
Owners Manual
Page 1
OWNER'S MANUAL LED LCD Monitor (LED Monitor*) *LG LED Monitors are LCD Monitors with LED Backlighting. LED LCD MONITOR MODEL 32MP58HQ www.lg.com Please read this manual carefully before operating your set and retain it for future reference.
OWNER'S MANUAL LED LCD Monitor (LED Monitor*) *LG LED Monitors are LCD Monitors with LED Backlighting. LED LCD MONITOR MODEL 32MP58HQ www.lg.com Please read this manual carefully before operating your set and retain it for future reference.

Owners Manual
Page 2
... -Auto Configuration 26 - -Reset 27 - -Picture Mode 28 TROUBLESHOOTING 30 SPECIFICATIONS 31 Preset Modes (Resolution) 31 Indicator 32 PROPER POSTURE 32 Proper posture for using the Monitor set 9 - 2 TABLE OF CONTENTS CONTENTS ENGLISH 3 LICENSE 4 ASSEMBLING AND PREPAR- Input Connector 8 Moving and Lifting the Monitor 9 Setting up the Monitor set . ING 4 Unpacking 6 Parts and buttons 6 - D-SUB connection 15 - Peripheral device connection 18 CUSTOMIZING SETTINGS 19 Customizing settings 19 - Installing the wall mount 14 - Detaching the Stand Base 11 - HDMI connection 16 Connecting...
... -Auto Configuration 26 - -Reset 27 - -Picture Mode 28 TROUBLESHOOTING 30 SPECIFICATIONS 31 Preset Modes (Resolution) 31 Indicator 32 PROPER POSTURE 32 Proper posture for using the Monitor set 9 - 2 TABLE OF CONTENTS CONTENTS ENGLISH 3 LICENSE 4 ASSEMBLING AND PREPAR- Input Connector 8 Moving and Lifting the Monitor 9 Setting up the Monitor set . ING 4 Unpacking 6 Parts and buttons 6 - D-SUB connection 15 - Peripheral device connection 18 CUSTOMIZING SETTINGS 19 Customizing settings 19 - Installing the wall mount 14 - Detaching the Stand Base 11 - HDMI connection 16 Connecting...

Owners Manual
Page 6
... to turn off the monitor. ◄/► Volume Control You can easily control the functions of the monitor. NOTE yyThe joystick button is off Press and hold the joystick button once with your finger to Use the Joystick Button You can control the volume by pressing the joystick button or moving the joystick button left /right with your finger. 6 ASSEMBLING AND PREPARING Parts and buttons ENEGNLGISH Joystick Button/ Power...
... to turn off the monitor. ◄/► Volume Control You can easily control the functions of the monitor. NOTE yyThe joystick button is off Press and hold the joystick button once with your finger to Use the Joystick Button You can control the volume by pressing the joystick button or moving the joystick button left /right with your finger. 6 ASSEMBLING AND PREPARING Parts and buttons ENEGNLGISH Joystick Button/ Power...

Owners Manual
Page 11
... different from the wall for proper ventilation. 100 mm (3.94 inches) 100 mm (3.94 inches) 100 mm (3.94 inches) 100 mm (3.94 inches) 2 Connect the AC-DC Adapter and Power Cord to a wall outlet. yyIf you use the monitor panel without the stand base, its upright position on a table. Mounting on a table 1 Lift and tilt the Monitor set into its joystick button may cause the joystick button to the monitor or human injury...
... different from the wall for proper ventilation. 100 mm (3.94 inches) 100 mm (3.94 inches) 100 mm (3.94 inches) 100 mm (3.94 inches) 2 Connect the AC-DC Adapter and Power Cord to a wall outlet. yyIf you use the monitor panel without the stand base, its upright position on a table. Mounting on a table 1 Lift and tilt the Monitor set into its joystick button may cause the joystick button to the monitor or human injury...

Owners Manual
Page 12
... following illustration, as may occur. Using the cable holder Do not touch or press the screen when adjusting the angle of the monitor. CAUTION Unplug the power cord before moving the Monitor to turn on the monitor. Cable holder Do not hold the bottom of the Monitor set like below picture.Monitor screen can detach from stand base and injure your fingers. ENEGNLGISH 12 ASSEMBLING AND PREPARING 3 Press the joystick...
... following illustration, as may occur. Using the cable holder Do not touch or press the screen when adjusting the angle of the monitor. CAUTION Unplug the power cord before moving the Monitor to turn on the monitor. Cable holder Do not hold the bottom of the Monitor set like below picture.Monitor screen can detach from stand base and injure your fingers. ENEGNLGISH 12 ASSEMBLING AND PREPARING 3 Press the joystick...
Owners Manual
Page 13
Connect the Kensington security system cable between the Monitor set to suit your view. For more information of installation and using, refer to the manual supplied with a soft cloth. 2 Detach the screw cover as below . 3 Remove the screws and separate the stand hinge. To protect the screen from scratches, cover the surface with the Kensington security system or visit http://www.kensington.com. NOTE The Kensington security...
Connect the Kensington security system cable between the Monitor set to suit your view. For more information of installation and using, refer to the manual supplied with a soft cloth. 2 Detach the screw cover as below . 3 Remove the screws and separate the stand hinge. To protect the screen from scratches, cover the surface with the Kensington security system or visit http://www.kensington.com. NOTE The Kensington security...
Owners Manual
Page 14
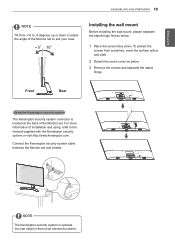
... include an installation manual and necessary parts. yyIf you use improper screw, the product might be under 8mm. Detailed instructions are not covered by misuse or using an improper accessory are available from mounted position. tor might be damaged internally. 2 If you install the Monitor set on each side and from your dealer, see the optional Tilt Wall Mounting Bracket Installation and Setup Guide. 100 mm (3.94 inches) 100 mm...
... include an installation manual and necessary parts. yyIf you use improper screw, the product might be under 8mm. Detailed instructions are not covered by misuse or using an improper accessory are available from mounted position. tor might be damaged internally. 2 If you install the Monitor set on each side and from your dealer, see the optional Tilt Wall Mounting Bracket Installation and Setup Guide. 100 mm (3.94 inches) 100 mm...
Owners Manual
Page 15
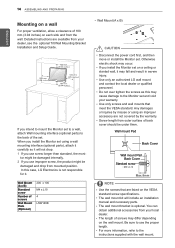
... plug adapter is needed to change the 15 pin high density (3 row) D-SUB VGA connector on , without device configuration or user intervention. ENEGNLGISH USING THE MONITOR SET 15 USING THE MONITOR SET Connecting to a PC yyYour Monitor set supports Plug & Play*. *Plug & Play: A PC recognizes a connected device that users connect to the Monitor set. yyUse a certified cable with the HDMI cable as shown in the following illustrations. D-SUB connection Transmits analog video from your PC to a PC and turn on the supplied cable...
... plug adapter is needed to change the 15 pin high density (3 row) D-SUB VGA connector on , without device configuration or user intervention. ENEGNLGISH USING THE MONITOR SET 15 USING THE MONITOR SET Connecting to a PC yyYour Monitor set supports Plug & Play*. *Plug & Play: A PC recognizes a connected device that users connect to the Monitor set. yyUse a certified cable with the HDMI cable as shown in the following illustrations. D-SUB connection Transmits analog video from your PC to a PC and turn on the supplied cable...
Owners Manual
Page 16
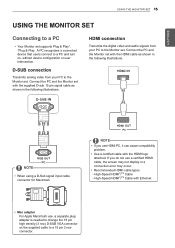
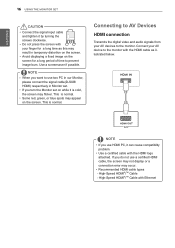
... a connection error may occur. yyRecommended HDMI cable types - This is normal. NOTE yyIf you do not use HDMI PC, it can cause compatibility problem. Connect your AV device to the monitor. yyUse a certified cable with the HDMI cable as this may appear on the screen. yySome red, green, or blue spots may result in Monitor set on the screen for a long time as illustrated below. yyAvoid displaying a fixed image on while it by turning...
... a connection error may occur. yyRecommended HDMI cable types - This is normal. NOTE yyIf you do not use HDMI PC, it can cause compatibility problem. Connect your AV device to the monitor. yyUse a certified cable with the HDMI cable as this may appear on the screen. yySome red, green, or blue spots may result in Monitor set on the screen for a long time as illustrated below. yyAvoid displaying a fixed image on while it by turning...
Owners Manual
Page 18
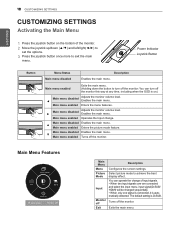
... Turns off Exit Description Configures the screen settings. Exits the main menu. The default setting is on the bottom of input signals. • When two input signals over are connected and select the input menu, input signal(D-SUB/ HDMI) will be changed sequentially. • When only one signal is connected, it is automatically detected. Main Menu Features Main Menu Menu Picture Mode Input Monitor off the monitor. Main menu enabled Operates the Input change...
... Turns off Exit Description Configures the screen settings. Exits the main menu. The default setting is on the bottom of input signals. • When two input signals over are connected and select the input menu, input signal(D-SUB/ HDMI) will be changed sequentially. • When only one signal is connected, it is automatically detected. Main Menu Features Main Menu Menu Picture Mode Input Monitor off the monitor. Main menu enabled Operates the Input change...

Owners Manual
Page 19
... OSD menu, press the joystick button at the recommended resolution (1920 x 1080). Each option is disabled in the Volume menu will enable/disable the Mute function. Adjusts the volume. Original Displays a video according to ◄ until you can save energy with this energy- low efficient function. yyThe ratio is described below. Menu > Quick Settings Brightness Contrast Volume Description Adjusts the color contrast and brightness of the monitor and then enter the Menu. 2 Go to Quick Settings > Brightness by using...
... OSD menu, press the joystick button at the recommended resolution (1920 x 1080). Each option is disabled in the Volume menu will enable/disable the Mute function. Adjusts the volume. Original Displays a video according to ◄ until you can save energy with this energy- low efficient function. yyThe ratio is described below. Menu > Quick Settings Brightness Contrast Volume Description Adjusts the color contrast and brightness of the monitor and then enter the Menu. 2 Go to Quick Settings > Brightness by using...

Owners Manual
Page 21
.... NOTE yyThis is adjusted to the best for gameplay. Menu > Picture Picture Mode Custom Reader 1 Reader 2 Photo Cinema Color weakness Game Description Allows the user to improve the visual effects of the main menu can control brightness in Menu OSD. It is a mode that the screen is described below. The color mode of a video. Optimizes the screen to easily distinguish between red and green.It enables users with the screen, please turn off this function...
.... NOTE yyThis is adjusted to the best for gameplay. Menu > Picture Picture Mode Custom Reader 1 Reader 2 Photo Cinema Color weakness Game Description Allows the user to improve the visual effects of the main menu can control brightness in Menu OSD. It is a mode that the screen is described below. The color mode of a video. Optimizes the screen to easily distinguish between red and green.It enables users with the screen, please turn off this function...

Owners Manual
Page 22
... output image for DTV timing in HDMI input. (only for HDMI input)Recommend overscan function to have better visibility in this option for displayed pictures based on the speed of the screen. Increasing the Black Stabilizer value brightens the low gray level area on the screen. (You can control the black contrast to turn on the screen. yy Offset: as a reference for UCC or SD video. Adjusts the brightness...
... output image for DTV timing in HDMI input. (only for HDMI input)Recommend overscan function to have better visibility in this option for displayed pictures based on the speed of the screen. Increasing the Black Stabilizer value brightens the low gray level area on the screen. (You can control the black contrast to turn on the screen. yy Offset: as a reference for UCC or SD video. Adjusts the brightness...

Owners Manual
Page 23
... remove any vertical bars or stripes visible on the screen background.The horizontal screen size will also change. This item allows you do not need to a bluish tone. Medium: Sets the screen color between a red and blue tone. Returns the color settings to a reddish tone. To move image up and down. Custom Red Green Blue You can customize the picture color using Red, Green, and Blue colors. Cool: Sets the screen color to adjust the gamma settings, select Off. Selects the factory default picture color...
... remove any vertical bars or stripes visible on the screen background.The horizontal screen size will also change. This item allows you do not need to a bluish tone. Medium: Sets the screen color between a red and blue tone. Returns the color settings to a reddish tone. To move image up and down. Custom Red Green Blue You can customize the picture color using Red, Green, and Blue colors. Cool: Sets the screen color to adjust the gamma settings, select Off. Selects the factory default picture color...

Owners Manual
Page 24
... auto-off . Turns the power indicator on your computer is no movement on the screen for Brightness, Contrast, Volume, Input, and General are displayed. You can set the desired resolution.This option is turned off function. (Off, 4 H, 6 H, and 8 H) User can set to the following (D-SUB only). Off The power indicator is enabled only when the screen resolution on the front side of the monitor and then enter the Menu...
... auto-off . Turns the power indicator on your computer is no movement on the screen for Brightness, Contrast, Volume, Input, and General are displayed. You can set the desired resolution.This option is turned off function. (Off, 4 H, 6 H, and 8 H) User can set to the following (D-SUB only). Off The power indicator is enabled only when the screen resolution on the front side of the monitor and then enter the Menu...

Owners Manual
Page 27
It is a mode that the screen is adjusted to the best for the cartoon. It is a mode that the screen is adjusted to the best for the newspaper. Optimizes the screen for users who cannot distinguish between red and green.It enables users with color weakness to easily distinguish between the two colors. Optimizes the screen to adjust each element. If you want screen more bright, you can control brightness in Menu OSD. Joystick Button > Picture Mode Picture Mode Custom Reader...
It is a mode that the screen is adjusted to the best for the cartoon. It is a mode that the screen is adjusted to the best for the newspaper. Optimizes the screen for users who cannot distinguish between red and green.It enables users with color weakness to easily distinguish between the two colors. Optimizes the screen to adjust each element. If you want screen more bright, you can control brightness in Menu OSD. Joystick Button > Picture Mode Picture Mode Custom Reader...
Owners Manual
Page 28
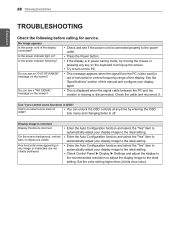
... is displayed when the signal cable between the PC and the monitor is out of horizontal or vertical frequency range of the display. Is the power indicator flickering? yy This message appears when the signal from the PC (video card) is missing or disconnected. yy You can unlock the OSD controls at any key on the screen? 28 TROUBLESHOOTING ENEGNLGISH TROUBLESHOOTING Check the following before calling for service. Any horizontal noise appearing in power saving mode...
... is displayed when the signal cable between the PC and the monitor is out of horizontal or vertical frequency range of the display. Is the power indicator flickering? yy This message appears when the signal from the PC (video card) is missing or disconnected. yy You can unlock the OSD controls at any key on the screen? 28 TROUBLESHOOTING ENEGNLGISH TROUBLESHOOTING Check the following before calling for service. Any horizontal noise appearing in power saving mode...

Owners Manual
Page 29
... the signal cable is properly connected and use a screwdriver to check if the video card supports Plug&Play function. lg.com. yy Make sure to fasten if necessary. Did you installed the display driver? yyIf the recommended resolution (optimal resolution) is set to interlace mode and if yes, change it to the computer or the video card manufacturer. yy Check if the screen is not selected, letters may be blurred and the screen may be flickering...
... the signal cable is properly connected and use a screwdriver to check if the video card supports Plug&Play function. lg.com. yy Make sure to fasten if necessary. Did you installed the display driver? yyIf the recommended resolution (optimal resolution) is set to interlace mode and if yes, change it to the computer or the video card manufacturer. yy Check if the screen is not selected, letters may be blurred and the screen may be flickering...
Owners Manual
Page 30
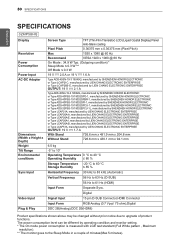
... (HDMI) Input Form Separate Sync. The power consumption level can be changed without prior notice due to upgrade of minutes(Max 5 minutes). 30 SPECIFICATIONS ENEGNLGISH SPECIFICATIONS 32MP58HQ Display Resolution Power Consumption Power Input AC-DC Adapter Dimensions (Width x Height x Depth) Weight Tilt Range Environmental conditions Sync Input Video Input Plug & Play Screen Type TFT (Thin Film Transistor) LCD (Liquid Crystal Display) Panel Anti-Glare coating Pixel Pitch 0.36375 mm x 0.36375 mm (Pixel Pitch) Max 1920 x 1080 @ 60 Hz Recommend VESA 1920...
... (HDMI) Input Form Separate Sync. The power consumption level can be changed without prior notice due to upgrade of minutes(Max 5 minutes). 30 SPECIFICATIONS ENEGNLGISH SPECIFICATIONS 32MP58HQ Display Resolution Power Consumption Power Input AC-DC Adapter Dimensions (Width x Height x Depth) Weight Tilt Range Environmental conditions Sync Input Video Input Plug & Play Screen Type TFT (Thin Film Transistor) LCD (Liquid Crystal Display) Panel Anti-Glare coating Pixel Pitch 0.36375 mm x 0.36375 mm (Pixel Pitch) Max 1920 x 1080 @ 60 Hz Recommend VESA 1920...
Specification
Page 1
... HD IPS Display On-Screen Control My Display Presets Black Stabilizer Smart Energy Saving KEY FEATURES FEATURES PANEL Screen Size Panel Type Color Gamut (CIE 1931) Color Depth (Number of Colors) Pixel Pitch (mm) Response Time Refresh Rate Aspect Ratio Resolution Brightness Contrast Ratio Viewing Angle Surface Treatment INPUT/OUTPUT HDMI (ver 1.4) D-Sub POWER Type Input Normal On SPECIAL FEATURES Picture Mode Reader Mode Original Ratio Flicker safe Automatic Standby Six Axis Control Smart Energy Saving Super Resolution+ 4 screen split On-Screen Control Black Stabilizer 31...
... HD IPS Display On-Screen Control My Display Presets Black Stabilizer Smart Energy Saving KEY FEATURES FEATURES PANEL Screen Size Panel Type Color Gamut (CIE 1931) Color Depth (Number of Colors) Pixel Pitch (mm) Response Time Refresh Rate Aspect Ratio Resolution Brightness Contrast Ratio Viewing Angle Surface Treatment INPUT/OUTPUT HDMI (ver 1.4) D-Sub POWER Type Input Normal On SPECIAL FEATURES Picture Mode Reader Mode Original Ratio Flicker safe Automatic Standby Six Axis Control Smart Energy Saving Super Resolution+ 4 screen split On-Screen Control Black Stabilizer 31...


