
User Manual
Page 3
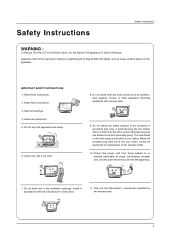
... Fire Or Electric Shock, Do Not Expose This Apparatus To Rain Or Moisture. Do not use the attachments / accessories specified by the manufacturer. 3 Protect the power cord from the apparatus. 7. Clean only with the manufacturer's instructions. 11. When the provided plug does not fit into your outlet, consult an electrician for...
... Fire Or Electric Shock, Do Not Expose This Apparatus To Rain Or Moisture. Do not use the attachments / accessories specified by the manufacturer. 3 Protect the power cord from the apparatus. 7. Clean only with the manufacturer's instructions. 11. When the provided plug does not fit into your outlet, consult an electrician for...
User Manual
Page 4
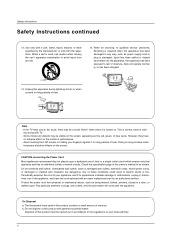
...they be visible on the monitor's performance. - On Disposal a. b. Overloaded wall outlets, loose or damaged wall outlets, extension cords, frayed power cords, or damaged or cracked wire insulation are dangerous. ing wrong with a cart, stand, tripod, bracket, or table specified by an ...authorized servicer. that is noth- Check the specification page of time. Protect the power cord from tip-over. 14. Safety Instructions Safety Instructions continued 12. CAUTION concerning the Power Cord Most appliances recommend they have the cord replaced with an exact replacement part...
...they be visible on the monitor's performance. - On Disposal a. b. Overloaded wall outlets, loose or damaged wall outlets, extension cords, frayed power cords, or damaged or cracked wire insulation are dangerous. ing wrong with a cart, stand, tripod, bracket, or table specified by an ...authorized servicer. that is noth- Check the specification page of time. Protect the power cord from tip-over. 14. Safety Instructions Safety Instructions continued 12. CAUTION concerning the Power Cord Most appliances recommend they have the cord replaced with an exact replacement part...
User Manual
Page 7
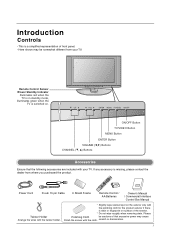
...be cautions of that the following accessories are included with the cloth. If any accessory is switched on. Remote Control Sensor /Power Standby Indicator Illuminates red when the TV is in standby mode, illuminates green when the TV is missing, please contact the dealer...SOUND PAUSE VIDEO PIP ZOOM PIPCHSIGNAL FF STOP SKIP PIPCH+ PIPINPUT SWAP RECORD ENTER EXIT MUTE VOL SAP CH RATIO CC FLASHBK SURF POWER TIMER 1.5V 1.5V Power Cord D-sub 15 pin Cable 6 Shield Foams Remote Control / AA Batteries Owner's Manual / Commercial Interface Control Box Manual Twister Holder...
...be cautions of that the following accessories are included with the cloth. If any accessory is switched on. Remote Control Sensor /Power Standby Indicator Illuminates red when the TV is in standby mode, illuminates green when the TV is missing, please contact the dealer...SOUND PAUSE VIDEO PIP ZOOM PIPCHSIGNAL FF STOP SKIP PIPCH+ PIPINPUT SWAP RECORD ENTER EXIT MUTE VOL SAP CH RATIO CC FLASHBK SURF POWER TIMER 1.5V 1.5V Power Cord D-sub 15 pin Cable 6 Shield Foams Remote Control / AA Batteries Owner's Manual / Commercial Interface Control Box Manual Twister Holder...
User Manual
Page 8
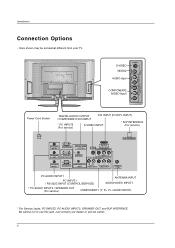
R (MONO) L VIDEO S-VIDEO VIDEO2 S-VIDEO AUDIO Input COMPONENT2 (VIDEO Input) VIDEO 2 AUDIO COMPONENT 2 VIDEO Power Cord Socket DIGITAL AUDIO OUTPUT DVI INPUT (PC/DTV INPUT) / COMPONENT1/DVI INPUT * PC INPUT2 (For service) S-VIDEO INPUT * RJP INTERFACE (For service) AC IN ...
R (MONO) L VIDEO S-VIDEO VIDEO2 S-VIDEO AUDIO Input COMPONENT2 (VIDEO Input) VIDEO 2 AUDIO COMPONENT 2 VIDEO Power Cord Socket DIGITAL AUDIO OUTPUT DVI INPUT (PC/DTV INPUT) / COMPONENT1/DVI INPUT * PC INPUT2 (For service) S-VIDEO INPUT * RJP INTERFACE (For service) AC IN ...

User Manual
Page 9
... RGB2-PC TIMER Lets you select the amount of time before your TV or any other operating modes, for multiple program channels such as 2-1, 2-2,etc. POWER Turns your TV turns itself off , depending on or off automatically. (Refer to p.37) NUMBER buttons - (DASH) Used to enter a program number ... mode: TV, VCR, DVD, CABLE, HDSTB or AUDIO. Select other programmed equipment on mode. Remote Control Key Functions Introduction LIGHT MODE POWER TV/VIDEO COMP/RGB/DVI TIMER FLASHBK MUTE VOL SURF CH INFO SAP RATIO CC ENTER MENU SOUND VIDEO EXIT PLAY PAUSE STOP RECORD REW...
... RGB2-PC TIMER Lets you select the amount of time before your TV or any other operating modes, for multiple program channels such as 2-1, 2-2,etc. POWER Turns your TV turns itself off , depending on or off automatically. (Refer to p.37) NUMBER buttons - (DASH) Used to enter a program number ... mode: TV, VCR, DVD, CABLE, HDSTB or AUDIO. Select other programmed equipment on mode. Remote Control Key Functions Introduction LIGHT MODE POWER TV/VIDEO COMP/RGB/DVI TIMER FLASHBK MUTE VOL SURF CH INFO SAP RATIO CC ENTER MENU SOUND VIDEO EXIT PLAY PAUSE STOP RECORD REW...

User Manual
Page 10
... p.33) VIDEO Adjusts the factory preset picture according to the room. (Refer to p.29) EXIT Clears all on top of the screen. Introduction LIGHT MODE POWER TV/VIDEO COMP/RGB/DVI TIMER FLASHBK MUTE VOL SURF CH INFO SAP RATIO CC ENTER MENU SOUND VIDEO EXIT PLAY PAUSE STOP RECORD REW...
... p.33) VIDEO Adjusts the factory preset picture according to the room. (Refer to p.29) EXIT Clears all on top of the screen. Introduction LIGHT MODE POWER TV/VIDEO COMP/RGB/DVI TIMER FLASHBK MUTE VOL SURF CH INFO SAP RATIO CC ENTER MENU SOUND VIDEO EXIT PLAY PAUSE STOP RECORD REW...
User Manual
Page 11
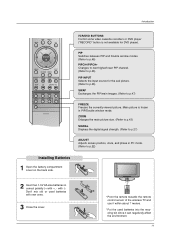
... compartment cover on the back side. 2 Insert two 1.5V AA size batteries in PIP/Double window mode. with new ones. 3 Close the cover. LIGHT MODE POWER TV/VIDEO COMP/RGB/DVI TIMER FLASHBK * Point the remote towards the remote control sensor of the wireless TV and use it within about 7 meters...
... compartment cover on the back side. 2 Insert two 1.5V AA size batteries in PIP/Double window mode. with new ones. 3 Close the cover. LIGHT MODE POWER TV/VIDEO COMP/RGB/DVI TIMER FLASHBK * Point the remote towards the remote control sensor of the wireless TV and use it within about 7 meters...
User Manual
Page 13
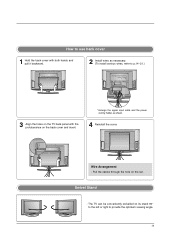
Pull the cables through the hole on the back cover and insert. * Arrange the signal input cable and the power cord by holder, as necessary. (To install various wires, refer to provide the optimum viewing angle. 13 Wire Arrangement - The TV can be conveniently swivelled on its stand 90° to the left or right to p.14~21.) 3 Align the holes on the TV back panel with both hands and pull it backward. 2 Install wires as shown. 4 Reinstall the cover. How to use back cover 1 Hold the back cover with the protuberance on the set. Swivel Stand -
Pull the cables through the hole on the back cover and insert. * Arrange the signal input cable and the power cord by holder, as necessary. (To install various wires, refer to provide the optimum viewing angle. 13 Wire Arrangement - The TV can be conveniently swivelled on its stand 90° to the left or right to p.14~21.) 3 Align the holes on the TV back panel with both hands and pull it backward. 2 Install wires as shown. 4 Reinstall the cover. How to use back cover 1 Hold the back cover with the protuberance on the set. Swivel Stand -
User Manual
Page 23
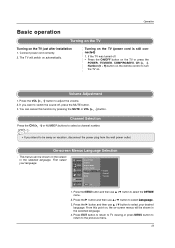
... TV just after installation 1. The menus can cancel this point on, the on-screen menus will switch on the screen in the selected language. 4. Connect power cord correctly. 2. Channel Selection Press the CH (+, -) or NUMBER buttons to select a channel number. • If you want to be away on . ... Press the G button and then use D / E button to the previous menu. 23 Operation Basic operation Turning on the TV Turning on the TV (power cord is still connected) 1. You can be shown in the selected language. Press EXIT button to return to TV viewing or press MENU button to...
... TV just after installation 1. The menus can cancel this point on, the on-screen menus will switch on the screen in the selected language. 4. Connect power cord correctly. 2. Channel Selection Press the CH (+, -) or NUMBER buttons to select a channel number. • If you want to be away on . ... Press the G button and then use D / E button to the previous menu. 23 Operation Basic operation Turning on the TV Turning on the TV (power cord is still connected) 1. You can be shown in the selected language. Press EXIT button to return to TV viewing or press MENU button to...

User Manual
Page 41
... 4 1. Press EXIT button to return to TV viewing or press MENU button to return to the previous menu. 41 Choose the language you turn the power off. 1. The other languages can also use D / E button to select available caption languages: English, Spanish, or French. 4. Use the CC button repeatedly to select the...
... 4 1. Press EXIT button to return to TV viewing or press MENU button to return to the previous menu. 41 Choose the language you turn the power off. 1. The other languages can also use D / E button to select available caption languages: English, Spanish, or French. 4. Use the CC button repeatedly to select the...

User Manual
Page 49
SETUP EZ Scan Ch.Edit 1. Label Main Input 3. The adjustment range of the PC computer. Power k 02. Aspect Ratio k 04. Brightness k 09. Color k 10. Balance k 19. Color Temperature k 20. PIP Input Source x a 0 ~ 1 b 0 ~ 9 c 1 ~ 1F d 0 ~ 1 e 0 ~ 1 f 0 ~ 64 g 0 ~ 64 h 0 ~ 64 i 0 ~ 64 j 0 ~ 64 k 0 ~ 64 l 0 ~ 1 m 0 ~ 1 n 0 ~ 3 q 0 ~ 3 r 0 ~ 64 s 0 ~ 64 t 0 ~ ...
SETUP EZ Scan Ch.Edit 1. Label Main Input 3. The adjustment range of the PC computer. Power k 02. Aspect Ratio k 04. Brightness k 09. Color k 10. Balance k 19. Color Temperature k 20. PIP Input Source x a 0 ~ 1 b 0 ~ 9 c 1 ~ 1F d 0 ~ 1 e 0 ~ 1 f 0 ~ 64 g 0 ~ 64 h 0 ~ 64 i 0 ~ 64 j 0 ~ 64 k 0 ~ 64 l 0 ~ 1 m 0 ~ 1 n 0 ~ 3 q 0 ~ 3 r 0 ~ 64 s 0 ~ 64 t 0 ~ ...
User Manual
Page 50
Transmission [k][a][ ][Set ID][ ][Data][Cr] Data 0 : Power Off 1 : Power On Acknowledgement [a][ ][Set ID][ ][OK][Data][x] * In a like manner, if other functions transmit 'FF' data based on remote control. You can also adjust mute ...[k][g][ ][Set ID][ ][Data][Cr] Data Min : 0 ~ Max : 64 • Refer to 'Real data mapping' as shown below. Acknowledgement [f][ ][Set ID][ ][OK][Data][x] 07. Power (Command2:a) G To control Power On/Off of the TV. Input Select (Command2:b) (Main Picture Input) G To select input source for the TV. Transmission [k][d][ ][Set ID][ ][Data][Cr] Data...
Transmission [k][a][ ][Set ID][ ][Data][Cr] Data 0 : Power Off 1 : Power On Acknowledgement [a][ ][Set ID][ ][OK][Data][x] * In a like manner, if other functions transmit 'FF' data based on remote control. You can also adjust mute ...[k][g][ ][Set ID][ ][Data][Cr] Data Min : 0 ~ Max : 64 • Refer to 'Real data mapping' as shown below. Acknowledgement [f][ ][Set ID][ ][OK][Data][x] 07. Power (Command2:a) G To control Power On/Off of the TV. Input Select (Command2:b) (Main Picture Input) G To select input source for the TV. Transmission [k][d][ ][Set ID][ ][Data][Cr] Data...

User Manual
Page 53
...0x71 0x61 0x63 0x65 0x7B 0x0A 0xCB 0xD6 0x5A 0xD0 0xBF 0xD4 0xD5 0xD7 0xC6 0x76 0x77 0xAF 0x70 0x96 Function TV/VIDEO MODE POWER POWER ON POWER OFF COMP/RGB/DVI RATIO TIMER Number Key 0~ 9 - (Dash) FLASHBK MUTE VOL + VOL CH + CH SURF INFO CC...COMPONENT 1 COMPONENT 2 RGB-PC RGB-DTV DVI-DTV Ratio 4:3 Ratio 16:9 Ratio Zoom MULTI PIP SIGNAL Note R/C Button R/C Button R/C Button (Power On/Off) Discrete IR Code (Only Power On) Discrete IR Code (Only Power Off) R/C Button R/C Button R/C Button R/C Button R/C Button R/C Button R/C Button R/C Button R/C Button R/C Button R/C Button R/C Button R/C ...
...0x71 0x61 0x63 0x65 0x7B 0x0A 0xCB 0xD6 0x5A 0xD0 0xBF 0xD4 0xD5 0xD7 0xC6 0x76 0x77 0xAF 0x70 0x96 Function TV/VIDEO MODE POWER POWER ON POWER OFF COMP/RGB/DVI RATIO TIMER Number Key 0~ 9 - (Dash) FLASHBK MUTE VOL + VOL CH + CH SURF INFO CC...COMPONENT 1 COMPONENT 2 RGB-PC RGB-DTV DVI-DTV Ratio 4:3 Ratio 16:9 Ratio Zoom MULTI PIP SIGNAL Note R/C Button R/C Button R/C Button (Power On/Off) Discrete IR Code (Only Power On) Discrete IR Code (Only Power Off) R/C Button R/C Button R/C Button R/C Button R/C Button R/C Button R/C Button R/C Button R/C Button R/C Button R/C Button R/C Button R/C ...

User Manual
Page 54
... on the component to find out whether your remote control. There are two ways to be found , the device will turn off . 5. A. Press the POWER button after each code change one at the component. Enter a code number using the number buttons on the remote. If not, repeat from step 2. Press... on the component such as a VCR and press the corresponding MODE button (VCR) on the remote control, while pointing at -a-time. Test the POWER and CH +/- Test the remote control functions to be programmed to operate the device. 2. Note that the remote control may not control all models of...
... on the component to find out whether your remote control. There are two ways to be found , the device will turn off . 5. A. Press the POWER button after each code change one at the component. Enter a code number using the number buttons on the remote. If not, repeat from step 2. Press... on the component such as a VCR and press the corresponding MODE button (VCR) on the remote control, while pointing at -a-time. Test the POWER and CH +/- Test the remote control functions to be programmed to operate the device. 2. Note that the remote control may not control all models of...

User Manual
Page 57
...8226; Try another channel. to +, - Please contact your antenna direction and/or location. • Test the wall power outlet, plug another product's power cord into wall power outlet? • Check your service center, if the picture has not appeared after switching on • This is normal.... • Try another station. • Station signal is weak, reorient antenna to restore the brightness of the antenna). 57 Power interrupted • No broadcast on some channels • Station or cable product experiencing problems, tune to another channel. Picture appears slowly ...
...8226; Try another channel. to +, - Please contact your antenna direction and/or location. • Test the wall power outlet, plug another product's power cord into wall power outlet? • Check your service center, if the picture has not appeared after switching on • This is normal.... • Try another station. • Station signal is weak, reorient antenna to restore the brightness of the antenna). 57 Power interrupted • No broadcast on some channels • Station or cable product experiencing problems, tune to another channel. Picture appears slowly ...
User Manual
Page 59
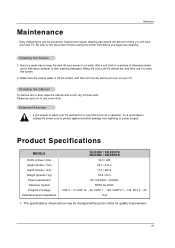
.... Product Specifications MODELS Width (inches / mm) Height (inches / mm) Depth (inches / mm) Weight (pounds / kg) Power requirement Television System Program Coverage External Antenna Impedance 32LX3DC / 32LX3DCS 32LX4DC / 32LX4DCS 36.3 / 922 24.1 / 613.4 11.3 / 287.5 55.8 / 25.3 AC 100-240V~ 50/60Hz NTSC-M, ATSC VHF 2 ~ 13, UHF 14 ~ 69, ...CATV 1 ~ 125, CADTV 1 ~ 135. Here's a great way to keep the dust off and unplug the power cord before you ...
.... Product Specifications MODELS Width (inches / mm) Height (inches / mm) Depth (inches / mm) Weight (pounds / kg) Power requirement Television System Program Coverage External Antenna Impedance 32LX3DC / 32LX3DCS 32LX4DC / 32LX4DCS 36.3 / 922 24.1 / 613.4 11.3 / 287.5 55.8 / 25.3 AC 100-240V~ 50/60Hz NTSC-M, ATSC VHF 2 ~ 13, UHF 14 ~ 69, ...CATV 1 ~ 125, CADTV 1 ~ 135. Here's a great way to keep the dust off and unplug the power cord before you ...


