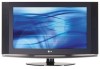

Owners Manual
Page 2
These limits are designed to persons. Consult the dealer or an experienced radio/TV technician for compliance user's authority to oper_e the equipment could void the CAUTION: Do not attempt to modify this product in a residential installation. ... for proper grounding and, in particular, specifies that the cable ground sha_ be determined by turning the equipment off and on a circuit different from LG Electronics Unauthorized modification could void the users authority to Pa_ 15 of the following measures: - NO USER SERVICEABLE PARTS INSIDE. REFER TO QUAUFIED SERVICE...
These limits are designed to persons. Consult the dealer or an experienced radio/TV technician for compliance user's authority to oper_e the equipment could void the CAUTION: Do not attempt to modify this product in a residential installation. ... for proper grounding and, in particular, specifies that the cable ground sha_ be determined by turning the equipment off and on a circuit different from LG Electronics Unauthorized modification could void the users authority to Pa_ 15 of the following measures: - NO USER SERVICEABLE PARTS INSIDE. REFER TO QUAUFIED SERVICE...

Owners Manual
Page 4
ff the TV feels cold to the touch, there may be _rried out in a door, or walked upon a dedicated circuit; Periodically examine the cord of mercu_. b. Ii nDDisipsopso_sal ...
ff the TV feels cold to the touch, there may be _rried out in a door, or walked upon a dedicated circuit; Periodically examine the cord of mercu_. b. Ii nDDisipsopso_sal ...

Owners Manual
Page 5
... Setup HDSTB Setup Setup PC Setup 22 Adjustments for screen Position, Clock, and Phase 22 fnitializing (Reset to original factory values) 23 Turning on the TV 23 Volu me Adj ustment 23 Channel Selection 23 On=screen Menus Language Selection 24 Screen Menus Selection and Adjustment 25 EZ Scan (Channel Search... Audio Language 32 EZ SoundRit_ 33 EZ Sound 33 Manuat Sound Control (EZ Sound-Off Option) 34 Stereo/SAP Broadcas_ Setup 34 Front Surround 35 TV Speakers On/Off Setup 5
... Setup HDSTB Setup Setup PC Setup 22 Adjustments for screen Position, Clock, and Phase 22 fnitializing (Reset to original factory values) 23 Turning on the TV 23 Volu me Adj ustment 23 Channel Selection 23 On=screen Menus Language Selection 24 Screen Menus Selection and Adjustment 25 EZ Scan (Channel Search... Audio Language 32 EZ SoundRit_ 33 EZ Sound 33 Manuat Sound Control (EZ Sound-Off Option) 34 Stereo/SAP Broadcas_ Setup 34 Front Surround 35 TV Speakers On/Off Setup 5
Owners Manual
Page 6
... 42 Demo (Review) 43 Split Zoom _45 Parentaf Lock Setup 46 Watching PIP!Double Window Selecting an input Signal Source for PIP/Double Window 46 TV Program Selection for PIP 47 Moving the PIP sub picture 47 Swapping PIP/Double Window 48 ~53 54 55 ~56 57~58 59 59 External...
... 42 Demo (Review) 43 Split Zoom _45 Parentaf Lock Setup 46 Watching PIP!Double Window Selecting an input Signal Source for PIP/Double Window 46 TV Program Selection for PIP 47 Moving the PIP sub picture 47 Swapping PIP/Double Window 48 ~53 54 55 ~56 57~58 59 59 External...
Owners Manual
Page 7
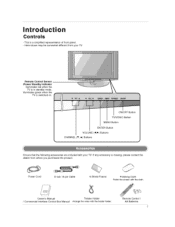
... Polish the screen with the cloth, Owner's Manual /Commerciai interface Control Box Manual Twister Holder Arrange the wires with your TV, Remote Control Sensor /Power Standby Indicator Illuminates red when the TV is in = This is a simplified representation of front panel. o Here shown may be somewhat different from where you purchased the... accessories are included with the twister holder. If any accessory is missing, please contact the dealer from your T'V. |in standby mode, illuminates green when the TV is switched on. Remote Control / AA Batteries 7
... Polish the screen with the cloth, Owner's Manual /Commerciai interface Control Box Manual Twister Holder Arrange the wires with your TV, Remote Control Sensor /Power Standby Indicator Illuminates red when the TV is in = This is a simplified representation of front panel. o Here shown may be somewhat different from where you purchased the... accessories are included with the twister holder. If any accessory is missing, please contact the dealer from your T'V. |in standby mode, illuminates green when the TV is switched on. Remote Control / AA Batteries 7
Owners Manual
Page 8
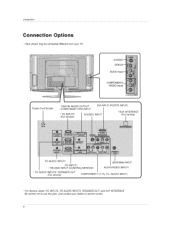
Introduction Here shown may be somewhat different from your dealer or service center, 8 Just contact your TV. AUDIO Ir COMPONENT2 ('VIDEO input) Power Cord Socket DIGITAL AUDIO OUTPUT / COMPONENT1iDVl INPUT * PC INPUT2 (For service) S-VIDEO DVI INPUT (PC/DTV INPUT) INPUT * RJP ...
Introduction Here shown may be somewhat different from your dealer or service center, 8 Just contact your TV. AUDIO Ir COMPONENT2 ('VIDEO input) Power Cord Socket DIGITAL AUDIO OUTPUT / COMPONENT1iDVl INPUT * PC INPUT2 (For service) S-VIDEO DVI INPUT (PC/DTV INPUT) INPUT * RJP ...
Owners Manual
Page 10
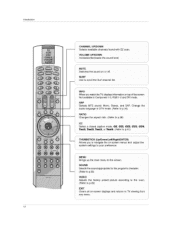
... increases!decreases the sound level MUTE Switches the sound on or off SURF Use to scroll the Surf channel list INFO When you watch the TV, displays information on top of the ._creen. RGB 1=2 and DW mc_. CC4.
... increases!decreases the sound level MUTE Switches the sound on or off SURF Use to scroll the Surf channel list INFO When you watch the TV, displays information on top of the ._creen. RGB 1=2 and DW mc_. CC4.
Owners Manual
Page 11
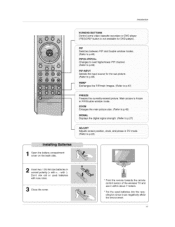
... (+ with +, -with -)_ Don't mix old or used batteries With new ones, close the cover, * Point the remote towards the remote control sensor of the wireless TV and use it within about 7 meters. * Put the used batteries into the recycling bin since it can negatively affect the environment. 11
... (+ with +, -with -)_ Don't mix old or used batteries With new ones, close the cover, * Point the remote towards the remote control sensor of the wireless TV and use it within about 7 meters. * Put the used batteries into the recycling bin since it can negatively affect the environment. 11

Owners Manual
Page 13
At[gn the holes on the TV back panel with the protuberance on its stand 90 ° to the left or right to provide the optimum viewing angle, 13 The TV can be conveniently swivelled on the back cover and inset, 4 Reinstall the cover. -
At[gn the holes on the TV back panel with the protuberance on its stand 90 ° to the left or right to provide the optimum viewing angle, 13 The TV can be conveniently swivelled on the back cover and inset, 4 Reinstall the cover. -

Owners Manual
Page 14
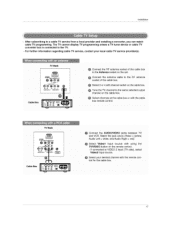
... you are complete. 14 insta_I a "2Way Signak Splitter' in the connections. _"L SIgn_ * ff the antenna is not installed propedy, contact your deah er for two TV's. Antenna or Cable Service without a Cable Box Conn_tions. For optimum picture qual_, _just antenna direction if needed, Multi-family Dwe}[ings/A_rtments (Connect to wat...
... you are complete. 14 insta_I a "2Way Signak Splitter' in the connections. _"L SIgn_ * ff the antenna is not installed propedy, contact your deah er for two TV's. Antenna or Cable Service without a Cable Box Conn_tions. For optimum picture qual_, _just antenna direction if needed, Multi-family Dwe}[ings/A_rtments (Connect to wat...
Owners Manual
Page 15
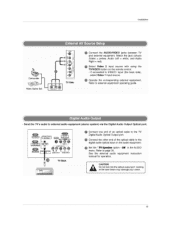
Installation @ Connect the AUDIO/VIDEO jacks between TV and external equipmenL Match the jack colours - Send the TV's audio to ex_rnal audio equipment (stereo system) via the Digi_l Audio Output Opti_l port. 15
Installation @ Connect the AUDIO/VIDEO jacks between TV and external equipmenL Match the jack colours - Send the TV's audio to ex_rnal audio equipment (stereo system) via the Digi_l Audio Output Opti_l port. 15
Owners Manual
Page 16
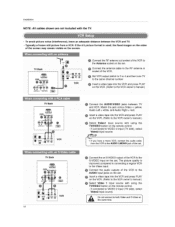
... i, @ _ @" [_ i ,_o i /I -"_ _ _ /_ _ a _ _,_,_,_; i _hlVeCiRi,t_,_ii_ the Antenna socket on the scr_n. iii: ¸¸/ TV 8_k ," Y/__ :/ I @ Yc R ÷ Cioi'_neie!_hi eR!F'_aien_n_¸ia_0uii_i0_cki;{of_; the fixed images on the sides of the VCR, _ Set VCR output switch... yellow, Audio Left = white, and Audio Right = red) 16 To avoid picture noise (interference), leave an adequate distance between the VCR and TV, Typically a frozen still picture from a VCR, if the 4:3 picture format is used; Installation NOTE: All cables shown are not included with the 7P#. ...
... i, @ _ @" [_ i ,_o i /I -"_ _ _ /_ _ a _ _,_,_,_; i _hlVeCiRi,t_,_ii_ the Antenna socket on the scr_n. iii: ¸¸/ TV 8_k ," Y/__ :/ I @ Yc R ÷ Cioi'_neie!_hi eR!F'_aien_n_¸ia_0uii_i0_cki;{of_; the fixed images on the sides of the VCR, _ Set VCR output switch... yellow, Audio Left = white, and Audio Right = red) 16 To avoid picture noise (interference), leave an adequate distance between the VCR and TV, Typically a frozen still picture from a VCR, if the 4:3 picture format is used; Installation NOTE: All cables shown are not included with the 7P#. ...
Owners Manual
Page 17
...Match the jack colors _Video = yellow. Cable Box bOXremote control @ Connect the AUDIO/VIDEO jacks between TV ana VCR. If connected to the TV. - For further information regarding cable TV service, contact your desired channel with using the TVNiDEO button on the remote control. - tnsta#ation After... subscribing to a cable TV service from a local provider and installing a converter, you can watch cable TV programming. Audio Left = white, end Audio Right = red) Semect Video1 input source with the remote ...
...Match the jack colors _Video = yellow. Cable Box bOXremote control @ Connect the AUDIO/VIDEO jacks between TV ana VCR. If connected to the TV. - For further information regarding cable TV service, contact your desired channel with using the TVNiDEO button on the remote control. - tnsta#ation After... subscribing to a cable TV service from a local provider and installing a converter, you can watch cable TV programming. Audio Left = white, end Audio Right = red) Semect Video1 input source with the remote ...

Owners Manual
Page 18
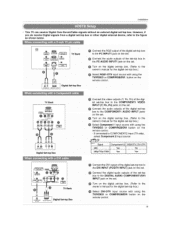
...DVD to the COMPONENT1 AUDIO jacks on the DVD pJayer, insert a DVD. Installation NOTE: All cables shown are not included with using the TV/MIDEO or COMP/RGB/DVI button on the remote control If connected to the DIGITAL AUDIO COMPONENTI/DVl INPUT jack on the seL O Turn ...on the set . VIDEO (Y, PB, PR) jacks Connect the audio outputs of the DVD to COMPONENT2 (TV side), select Component 2 nput source. Select Com_nent 1 input source with the TV TV Sack COM_ONSN_I o_q_u_a a_Au_m Y_ _ DVD Select @ or @, depending on your DVD connector. 18 @ Connect the video outputs ...
...DVD to the COMPONENT1 AUDIO jacks on the DVD pJayer, insert a DVD. Installation NOTE: All cables shown are not included with using the TV/MIDEO or COMP/RGB/DVI button on the remote control If connected to the DIGITAL AUDIO COMPONENTI/DVl INPUT jack on the seL O Turn ...on the set . VIDEO (Y, PB, PR) jacks Connect the audio outputs of the DVD to COMPONENT2 (TV side), select Component 2 nput source. Select Com_nent 1 input source with the TV TV Sack COM_ONSN_I o_q_u_a a_Au_m Y_ _ DVD Select @ or @, depending on your DVD connector. 18 @ Connect the video outputs ...
Owners Manual
Page 19
This TV can receive Digital Over-the-air/Cable signals without an external digital set ,top box to the COMPONENTt AUDIO INPUT jacks ontheset _ Turn on the ... set -top box. tnstallatJon - However, ff you do receive Digital signals from a dig_l set-top box or other digital external device, refer to COMPONENT2 input (Tv S!de)_ 20p/1080, _ ....
This TV can receive Digital Over-the-air/Cable signals without an external digital set ,top box to the COMPONENTt AUDIO INPUT jacks ontheset _ Turn on the ... set -top box. tnstallatJon - However, ff you do receive Digital signals from a dig_l set-top box or other digital external device, refer to COMPONENT2 input (Tv S!de)_ 20p/1080, _ ....
Owners Manual
Page 20
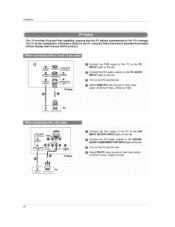
... main input ' _ @ ,,! @ Select DVI;PC !nputsource in main input option 0f SETUP menul (Refe[ to the TV's settings. Installation = This TV provides Plug and Play capability, meaning that the PC adjusts automatically to 20 The TV sends configuration information (EDID) to the PC using the Video Electronics Standard Association (VESA) Display Data Channel...
... main input ' _ @ ,,! @ Select DVI;PC !nputsource in main input option 0f SETUP menul (Refe[ to the TV's settings. Installation = This TV provides Plug and Play capability, meaning that the PC adjusts automatically to 20 The TV sends configuration information (EDID) to the PC using the Video Electronics Standard Association (VESA) Display Data Channel...

Owners Manual
Page 21
... mode to another resolution, change the PC graphic card or consult the manufacturer of the PC graphic card 5_ Avoid keeping a fixed image on the TV's screen for Horizontal and Vertical frequencies is clear. t 8 75.00 60.00 70.06 21 Installation 1 To get the best picture qualib:/, ... brightness and contrast on the PC does ou_ut anaJog and digital RGB simuEtaneously, set to Ptug and Piny automatically by the TV) 3. There may become permanently imprinted on your TV. If the graphic card on the menu unti_ the picture is separate Monitor Display Specifications (RGB1-PC / DVI-PC Mode...
... mode to another resolution, change the PC graphic card or consult the manufacturer of the PC graphic card 5_ Avoid keeping a fixed image on the TV's screen for Horizontal and Vertical frequencies is clear. t 8 75.00 60.00 70.06 21 Installation 1 To get the best picture qualib:/, ... brightness and contrast on the PC does ou_ut anaJog and digital RGB simuEtaneously, set to Ptug and Piny automatically by the TV) 3. There may become permanently imprinted on your TV. If the graphic card on the menu unti_ the picture is separate Monitor Display Specifications (RGB1-PC / DVI-PC Mode...
Owners Manual
Page 23
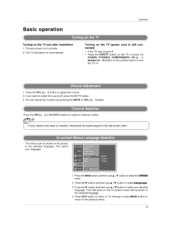
... the OH (+, -) or NUMBER buttons to adjust the volume. 2. Basic operation Turning on the screen in the selected language, 4, Press EXIT button to return to TV viewing or press MENU button to return to select your language 1. If you want to select the O_ON menu. 2. You can be shown in the... use & / T button to select Language 3 Press the !_ button and then use A / T button to switch the sound off • Press the ON/OFF button on the TV or press the POWER, TVP¢IDEO, COMP/RGB/DVI, CH (% -), Number (0 ~ 9) button on the remote control to turn the...
... the OH (+, -) or NUMBER buttons to adjust the volume. 2. Basic operation Turning on the screen in the selected language, 4, Press EXIT button to return to TV viewing or press MENU button to return to select your language 1. If you want to select the O_ON menu. 2. You can be shown in the... use & / T button to select Language 3 Press the !_ button and then use A / T button to switch the sound off • Press the ON/OFF button on the TV or press the POWER, TVP¢IDEO, COMP/RGB/DVI, CH (% -), Number (0 ~ 9) button on the remote control to turn the...
Owners Manual
Page 25
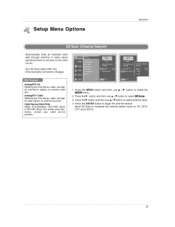
... antenna or cable inputs, and stores them in memory on the chan _ nel list: - Press the ENTER button to complete the channel search cycle for TV, CATV, DTV and CADTW 25 Allow EZ Scan to begin the channel search. Run EZ Scan again after any AntennaYCabfe connection changes, Analog/DTV Air...
... antenna or cable inputs, and stores them in memory on the chan _ nel list: - Press the ENTER button to complete the channel search cycle for TV, CATV, DTV and CADTW 25 Allow EZ Scan to begin the channel search. Run EZ Scan again after any AntennaYCabfe connection changes, Analog/DTV Air...
Owners Manual
Page 26
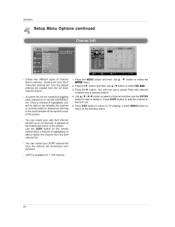
... ENTER button to add or delete it, Press SURF button to add the channel to the Surf LisL 5_ Press EXIT button to return to TV viewing or press MENU button to return to add or delete the channel from the Surf channel list_ - You can create your SURF channel list...
... ENTER button to add or delete it, Press SURF button to add the channel to the Surf LisL 5_ Press EXIT button to return to TV viewing or press MENU button to return to add or delete the channel from the Surf channel list_ - You can create your SURF channel list...


