
Owners Manual
Page 2
... SHOCK DO NOT REMOVE COVER (OR BACK). This equipment generates, uses and can be determined by turning the equipment off and on a circuit different from LG Electronics Corporation. Consult the dealer or an experienced radio/TV technician for this equipment does cause harmful ... within an equilateral triangle, is intended to alert the user to the presence of uninsulated "dangerous voltage" within an equilateral triangle is : LG Electronics U.S.A., Inc. 1000 Sylvan Avenue, Englewood Cliffs, NJ 07632 Phone: 1-201-816-2000 http://www.lgusa.com 2 Unauthorized modification could...
... SHOCK DO NOT REMOVE COVER (OR BACK). This equipment generates, uses and can be determined by turning the equipment off and on a circuit different from LG Electronics Corporation. Consult the dealer or an experienced radio/TV technician for this equipment does cause harmful ... within an equilateral triangle, is intended to alert the user to the presence of uninsulated "dangerous voltage" within an equilateral triangle is : LG Electronics U.S.A., Inc. 1000 Sylvan Avenue, Englewood Cliffs, NJ 07632 Phone: 1-201-816-2000 http://www.lgusa.com 2 Unauthorized modification could...
Owners Manual
Page 5
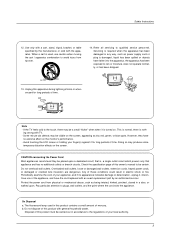
... used in a door, or walked upon a dedicated circuit; However, they be a small "flicker" when when it is , a single outlet circuit which powers only that is turned on the screen. This is normal, there is noth- Overloaded wall outlets, loose or damaged wall outlets, extension cords, frayed power cords, or damaged or...
... used in a door, or walked upon a dedicated circuit; However, they be a small "flicker" when when it is , a single outlet circuit which powers only that is turned on the screen. This is normal, there is noth- Overloaded wall outlets, loose or damaged wall outlets, extension cords, frayed power cords, or damaged or...
Owners Manual
Page 6
...37/42LP1D, 26/32LX2D only) Antenna or Cable Connection VCR Setup DVD Setup HDSTB Setup External AV Source Setup Digital Audio Output Monitor Out Setup (32LX1D/2D, 32/37/42LP1D only) CableCARDTM Setup PC Setup IEEE1394 G-LINKTM Setup TV Guide On ScreenTM System Setup TV Guide On ScreenTM System Feature ... 72 Options 73 73 74 74 75 Video Menu 75 Options 76 76 76 77 77 Audio Menu 78 Options 78 79 79 80 80 Turning on the TV Volume Adjustment Channel Selection On Screen Menus Language Selection On Screen Menus Selection and Adjustment EZ Scan (Channel Search) Manual Scan...
...37/42LP1D, 26/32LX2D only) Antenna or Cable Connection VCR Setup DVD Setup HDSTB Setup External AV Source Setup Digital Audio Output Monitor Out Setup (32LX1D/2D, 32/37/42LP1D only) CableCARDTM Setup PC Setup IEEE1394 G-LINKTM Setup TV Guide On ScreenTM System Setup TV Guide On ScreenTM System Feature ... 72 Options 73 73 74 74 75 Video Menu 75 Options 76 76 76 77 77 Audio Menu 78 Options 78 79 79 80 80 Turning on the TV Volume Adjustment Channel Selection On Screen Menus Language Selection On Screen Menus Selection and Adjustment EZ Scan (Channel Search) Manual Scan...

Owners Manual
Page 14
... screen. Introduction Remote Control Key Functions TV INPUT POWER TV AUDIO DVD MODE CABLE TV/VIDEO VCR STB DAY MENU DAY+ TV GUIDE ENTER POWER Turns your preference. TV/VIDEO (Refer to the last TV channel. MENU Brings up the TV Guide On Screen system to the screen.
... screen. Introduction Remote Control Key Functions TV INPUT POWER TV AUDIO DVD MODE CABLE TV/VIDEO VCR STB DAY MENU DAY+ TV GUIDE ENTER POWER Turns your preference. TV/VIDEO (Refer to the last TV channel. MENU Brings up the TV Guide On Screen system to the screen.

Owners Manual
Page 15
...) Changes the aspect ratio. RATIO (Refer to the last channel viewed. mode. PAGE UP/DOWN Moves from one full set of time before your TV turns itself off . TIMER (Refer to p.82) Lets you want to the next one. PIP CH+ PIP INPUT TIMER RATIO ADJUST SWAP SAP EZ PIC APM...
...) Changes the aspect ratio. RATIO (Refer to the last channel viewed. mode. PAGE UP/DOWN Moves from one full set of time before your TV turns itself off . TIMER (Refer to p.82) Lets you want to the next one. PIP CH+ PIP INPUT TIMER RATIO ADJUST SWAP SAP EZ PIC APM...
Owners Manual
Page 18
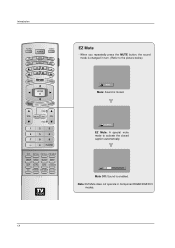
... you repeatedly press the MUTE button, the sound mode is changed in Component/RGB/HDMI/DVI modes. 18 Note: EZ Mute does not operate in turn. (Refer to activate the closed caption automatically. 24 Mute Off: Sound is muted. EZ Mute EZ Mute: A special mute mode to the picture below) Mute...
... you repeatedly press the MUTE button, the sound mode is changed in Component/RGB/HDMI/DVI modes. 18 Note: EZ Mute does not operate in turn. (Refer to activate the closed caption automatically. 24 Mute Off: Sound is muted. EZ Mute EZ Mute: A special mute mode to the picture below) Mute...
Owners Manual
Page 21
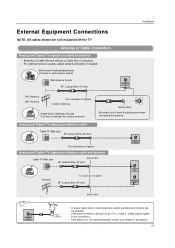
...Multi-family Dwellings/Apartments (Connect to wall antenna socket) Wall Antenna Socket RF Coaxial Wire (75 ohm) ANTENNA Installation VHF Antenna UHF Antenna Turn clockwise to bend the bronze wire when connecting the antenna. Outdoor Antenna Single-family Dwellings /Houses (Connect to wall jack for assistance. 21 ...Analog and Digital TV signals provided on cable and antenna Cable TV Wall Jack Bronze Wire RF Coaxial Wire (75 ohm) Antenna Turn clockwise to tighten. RF Coaxial Wire (75 ohm) CABLE ANTENNA Bronze Wire ANTENNA signal amplifier • In a poor signal area to ...
...Multi-family Dwellings/Apartments (Connect to wall antenna socket) Wall Antenna Socket RF Coaxial Wire (75 ohm) ANTENNA Installation VHF Antenna UHF Antenna Turn clockwise to bend the bronze wire when connecting the antenna. Outdoor Antenna Single-family Dwellings /Houses (Connect to wall jack for assistance. 21 ...Analog and Digital TV signals provided on cable and antenna Cable TV Wall Jack Bronze Wire RF Coaxial Wire (75 ohm) Antenna Turn clockwise to tighten. RF Coaxial Wire (75 ohm) CABLE ANTENNA Bronze Wire ANTENNA signal amplifier • In a poor signal area to ...
Owners Manual
Page 24
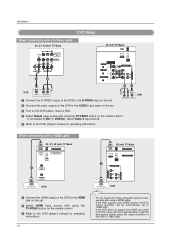
... to the S-VIDEO input on the set. (R) AUDIO (L) S-VIDEO DVD 2 Connect the audio outputs of the DVD to the AUDIO input jacks on the set. 3 Turn on the DVD player, insert a DVD. 4 Select Video1 input source with using a HDMI cable. • If the DVD supports Auto HDMI function, the DVD output...
... to the S-VIDEO input on the set. (R) AUDIO (L) S-VIDEO DVD 2 Connect the audio outputs of the DVD to the AUDIO input jacks on the set. 3 Turn on the DVD player, insert a DVD. 4 Select Video1 input source with using a HDMI cable. • If the DVD supports Auto HDMI function, the DVD output...

Owners Manual
Page 25
... DIGITAL AUDIO COMPONENT1 INPUT jack on the set . 2-2 Connect the optical audio output of the DVD to the COMPONENT1 AUDIO INPUT jacks on the set . 3 Turn on the DVD player, insert a DVD. 4 Select Component 1 input source with a component cable 32, 37, 42 inch TV Back DIGITAL AUDIO (OPTICAL) OUTPUT RS-232C...
... DIGITAL AUDIO COMPONENT1 INPUT jack on the set . 2-2 Connect the optical audio output of the DVD to the COMPONENT1 AUDIO INPUT jacks on the set . 3 Turn on the DVD player, insert a DVD. 4 Select Component 1 input source with a component cable 32, 37, 42 inch TV Back DIGITAL AUDIO (OPTICAL) OUTPUT RS-232C...

Owners Manual
Page 26
... (PC/DTV INPUT) jack on the set. 2 Connect the audio outputs of the set-top box to the PC AUDIO INPUT jack on the set. 3 Turn on the digital set-top box. (Refer to the figure as shown below. When connecting with using the TV/VIDEO button on the remote control...
... (PC/DTV INPUT) jack on the set. 2 Connect the audio outputs of the set-top box to the PC AUDIO INPUT jack on the set. 3 Turn on the digital set-top box. (Refer to the figure as shown below. When connecting with using the TV/VIDEO button on the remote control...
Owners Manual
Page 27
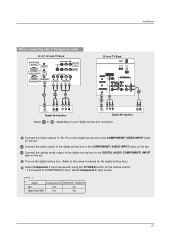
... jacks on the set. 2-2 Connect the optical audio output of the digital set-top box to the DIGITAL AUDIO COMPONENT1 INPUT jack on the set. 3 Turn on the digital set-top box. (Refer to COMPONENT2 input, select Component 2 input source. Signal Component1/2 RGB-DTV, HDMI/DVI 480i Yes No 480p/720p...
... jacks on the set. 2-2 Connect the optical audio output of the digital set-top box to the DIGITAL AUDIO COMPONENT1 INPUT jack on the set. 3 Turn on the digital set-top box. (Refer to COMPONENT2 input, select Component 2 input source. Signal Component1/2 RGB-DTV, HDMI/DVI 480i Yes No 480p/720p...

Owners Manual
Page 28
... set-top box to the HDMI jack on the set. 2 Select HDMI/DVI input source with using the TV/VIDEO button on the remote control. 3 Turn on the digital set-top box. (Refer to the owner's manual for the digital set-top box.) • TV can receive the video and audio...
... set-top box to the HDMI jack on the set. 2 Select HDMI/DVI input source with using the TV/VIDEO button on the remote control. 3 Turn on the digital set-top box. (Refer to the owner's manual for the digital set-top box.) • TV can receive the video and audio...
Owners Manual
Page 29
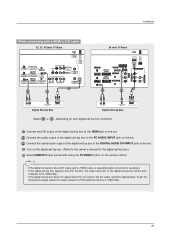
... jack on the set. 2-2 Connect the optical audio output of the digital set-top box to the DIGITAL AUDIO DVI INPUT jack on the set. 4 Turn on the remote control. • If the digital set-top box has a DVI output and no HDMI output, a separated audio connection is necessary. • If...
... jack on the set. 2-2 Connect the optical audio output of the digital set-top box to the DIGITAL AUDIO DVI INPUT jack on the set. 4 Turn on the remote control. • If the digital set-top box has a DVI output and no HDMI output, a separated audio connection is necessary. • If...

Owners Manual
Page 30
... jack colors (Video = yellow, Audio Left = white, and Audio Right = red). 2 Select Video2 input source with external audio equipments, such as amplifiers or speakers, please turn the TV speakers off. (Refer to operate the TV Guide On Screen system, see page 42~43.
... jack colors (Video = yellow, Audio Left = white, and Audio Right = red). 2 Select Video2 input source with external audio equipments, such as amplifiers or speakers, please turn the TV speakers off. (Refer to operate the TV Guide On Screen system, see page 42~43.

Owners Manual
Page 31
... CABLE HDMI IEEE 1394 CableCARD COMPONENT1 AUDIO INPUT L VIDEO INPUT R ANTENNA - Caution: When removing the CableCARDTM, do not drop it as amplifiers or speakers, please turn the TV speakers off. (Refer to the TV's MONITOR OUTPUT jacks. 2 See the Operating Manual of TV as shown. To view the premium stations Insert... this TV and the CableCARD is automatically displayed on the screen, contact with this unit (Motorola, Scientific Atlanta, SCM, etc.). 31 Installation Monitor Out Setup (32LX1D/2D, 32/37/42LP1D only) -
... CABLE HDMI IEEE 1394 CableCARD COMPONENT1 AUDIO INPUT L VIDEO INPUT R ANTENNA - Caution: When removing the CableCARDTM, do not drop it as amplifiers or speakers, please turn the TV speakers off. (Refer to the TV's MONITOR OUTPUT jacks. 2 See the Operating Manual of TV as shown. To view the premium stations Insert... this TV and the CableCARD is automatically displayed on the screen, contact with this unit (Motorola, Scientific Atlanta, SCM, etc.). 31 Installation Monitor Out Setup (32LX1D/2D, 32/37/42LP1D only) -

Owners Manual
Page 32
... remote control. 32 This TV provides Plug and Play capability, meaning that the PC adjusts automatically to the PC AUDIO INPUT jack on the set. 3 Turn on the PC and the set. 4 Select RGB-PC input source with using the TV/VIDEO button on the set. 2 Connect the PC audio output...
... remote control. 32 This TV provides Plug and Play capability, meaning that the PC adjusts automatically to the PC AUDIO INPUT jack on the set. 3 Turn on the PC and the set. 4 Select RGB-PC input source with using the TV/VIDEO button on the set. 2 Connect the PC audio output...

Owners Manual
Page 33
... resolution of the PC to the HDMI jack on the set. 2 Connect the PC audio output to the PC AUDIO INPUT jack on the set. 3 Turn on the PC and the set the output resolution appropriately. Installation When connecting with a HDMI to DVI cable 32, 37, 42 inch TV Back HDMI...
... resolution of the PC to the HDMI jack on the set. 2 Connect the PC audio output to the PC AUDIO INPUT jack on the set. 3 Turn on the PC and the set the output resolution appropriately. Installation When connecting with a HDMI to DVI cable 32, 37, 42 inch TV Back HDMI...

Owners Manual
Page 44
... it OFF when not in your area, you may be prompted to select which are ready to begin Setup. 44 If you have a VCR connected, turn it ON. 3. If you have more than one Cable system in use. (Do not unplug the power cord.) 4. if you select "Set up TV Guide... to connect the G-LINKTM cable for the TV Guide On Screen system to work with show listings and lineups in use the D / E button to download. Turn OFF your area-which Cable system's program data to highlight an option, and press ENTER button. • "Set up TV Guide On Screen now" on...
... it OFF when not in your area, you may be prompted to select which are ready to begin Setup. 44 If you have a VCR connected, turn it ON. 3. If you have more than one Cable system in use. (Do not unplug the power cord.) 4. if you select "Set up TV Guide... to connect the G-LINKTM cable for the TV Guide On Screen system to work with show listings and lineups in use the D / E button to download. Turn OFF your area-which Cable system's program data to highlight an option, and press ENTER button. • "Set up TV Guide On Screen now" on...

Owners Manual
Page 53
... the first Service displayed in order to Record • Lock and unlock the Video Window • Access Panel and Channel Ads - Use the D / E / F / G button to turn off your TV. - There may be replaced with program information during the next transmission, which should occur within Listings to: • View 8 days of show...
... the first Service displayed in order to Record • Lock and unlock the Video Window • Access Panel and Channel Ads - Use the D / E / F / G button to turn off your TV. - There may be replaced with program information during the next transmission, which should occur within Listings to: • View 8 days of show...
Owners Manual
Page 69
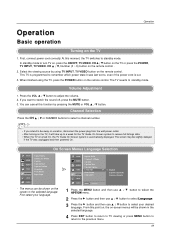
...is programmed to remember which power state it will be away on vacation, disconnect the power plug from the wall power outlet. • After turning on the TV, it was unplugged and then powered On. If you intend to select your language. SETUP Aspect Ratio VIDEO Cinema 3:2 Mode Caption ... source by pressing the MUTE or VOL D / E button. Channel Selection Press the CH D / E or NUMBER buttons to select a channel number. • If you want to turn TV on, press the ON/OFF, TV/VIDEO, CH D / E button on the TV or press the POWER, TV INPUT, TV/VIDEO, CH D / E, Number (0 ~ 9)...
...is programmed to remember which power state it will be away on vacation, disconnect the power plug from the wall power outlet. • After turning on the TV, it was unplugged and then powered On. If you intend to select your language. SETUP Aspect Ratio VIDEO Cinema 3:2 Mode Caption ... source by pressing the MUTE or VOL D / E button. Channel Selection Press the CH D / E or NUMBER buttons to select a channel number. • If you want to turn TV on, press the ON/OFF, TV/VIDEO, CH D / E button on the TV or press the POWER, TV INPUT, TV/VIDEO, CH D / E, Number (0 ~ 9)...


