
Owners Manual
Page 3
... has two blades with the apparatus. This information booklet or sheet, or be located before any heat sources such as follows. At the manufacturer's option, a picture or drawing that illustrates the intent of a specific safety instruction may be included by O Do not install near water. shall be given in a separate for...
... has two blades with the apparatus. This information booklet or sheet, or be located before any heat sources such as follows. At the manufacturer's option, a picture or drawing that illustrates the intent of a specific safety instruction may be included by O Do not install near water. shall be given in a separate for...

Owners Manual
Page 5
... or Cable Connection 17 Picture Size (Aspect Ratio) Control 44 Preset Picture Settings - Picture Mode - Picture Mode - Cinema 3:2 Pulldown Mode 50 Advanced - Power Picture Mode 54 HD Receiver Setup 18 DVD Setup 21 VCR Setup 23 Other A/V Source Setup 25 PC Setup 26 Audio Out Setup 31 Remote Control Functions 32 Turning On TV 34 Channel Selection...
... or Cable Connection 17 Picture Size (Aspect Ratio) Control 44 Preset Picture Settings - Picture Mode - Picture Mode - Cinema 3:2 Pulldown Mode 50 Advanced - Power Picture Mode 54 HD Receiver Setup 18 DVD Setup 21 VCR Setup 23 Other A/V Source Setup 25 PC Setup 26 Audio Out Setup 31 Remote Control Functions 32 Turning On TV 34 Channel Selection...

Owners Manual
Page 7
... the screen, appearing as tiny red, green, or blue spots. FOR LCD TV If the TV feels cold to the HDMI (high-definition multimedia interface), LG TV with one remote control. FEATURE OF THIS TV _TM E N G IN E LoGf a's fouwll ndisgpiteacl iailmdaiggeitapl roimceasgseor,gesniexradtioffre,recnot nsmisatining picture quality factors. However, they have no adverse effect on . On Disposal...
... the screen, appearing as tiny red, green, or blue spots. FOR LCD TV If the TV feels cold to the HDMI (high-definition multimedia interface), LG TV with one remote control. FEATURE OF THIS TV _TM E N G IN E LoGf a's fouwll ndisgpiteacl iailmdaiggeitapl roimceasgseor,gesniexradtioffre,recnot nsmisatining picture quality factors. However, they have no adverse effect on . On Disposal...

Owners Manual
Page 17
... attached to a wall so it cannot be somewhat different from the TV. © z Plasma TV Model LCD TV Model Insert the eye-bolts (or TV brackets and bolts) to tighten the product to the wall as shown in the picture. Secure the wall brackets with the bolts (not provided as parts of the ...the wall and the product. 16 Additionally, we recommend that children don't climb on the wall to the holes in the product. PREPARATION ATTACHING THE TV TO A WALL ,,,IThis feature is not available for all models. ,,,iHere shown may be pulled in a forward direction, _D potentially causing injury ...
... attached to a wall so it cannot be somewhat different from the TV. © z Plasma TV Model LCD TV Model Insert the eye-bolts (or TV brackets and bolts) to tighten the product to the wall as shown in the picture. Secure the wall brackets with the bolts (not provided as parts of the ...the wall and the product. 16 Additionally, we recommend that children don't climb on the wall to the holes in the product. PREPARATION ATTACHING THE TV TO A WALL ,,,IThis feature is not available for all models. ,,,iHere shown may be pulled in a forward direction, _D potentially causing injury ...
Owners Manual
Page 18
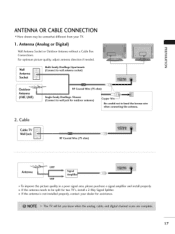
... CONNECTION ""_Here shown may be split for assistance. 17 i when connecting the antenna. 2. Cable Cable TV Wall Jack Antenna _ UHF VHF To improve the picture quality in a poor signal area, please purchase a signal amplifier and install properly. 01_If the antenna needs... to be somewhat different from your dealer for two TV's, install a 2-Way Signal Splitter. 01_If the antenna is not installed properly, contact your TV. 1. For optimum picture quality, adjust antenna direction if needed. © _ Multi-family Dwellings/Apartments z...
... CONNECTION ""_Here shown may be split for assistance. 17 i when connecting the antenna. 2. Cable Cable TV Wall Jack Antenna _ UHF VHF To improve the picture quality in a poor signal area, please purchase a signal amplifier and install properly. 01_If the antenna needs... to be somewhat different from your dealer for two TV's, install a 2-Way Signal Splitter. 01_If the antenna is not installed properly, contact your TV. 1. For optimum picture quality, adjust antenna direction if needed. © _ Multi-family Dwellings/Apartments z...

Owners Manual
Page 19
How to use picture for the digital set . ©V/q c 2. operation) Select Component 1 input source by using the INPUT button on r_3 X:) the set -top box or other digital external ... until you do receive digital signals from a digital set . "O r_3 z O onnect the audio output of the digital set-top box to the owner's manual for LCD TV model. When connecting Component cable r_3 x I. How to connect r_3 _o z O Connect the video outputs (Y, PB, PR) of EXTERNAL EQUIPMENT SETUP mainly use -O Turn on...
How to use picture for the digital set . ©V/q c 2. operation) Select Component 1 input source by using the INPUT button on r_3 X:) the set -top box or other digital external ... until you do receive digital signals from a digital set . "O r_3 z O onnect the audio output of the digital set-top box to the owner's manual for LCD TV model. When connecting Component cable r_3 x I. How to connect r_3 _o z O Connect the video outputs (Y, PB, PR) of EXTERNAL EQUIPMENT SETUP mainly use -O Turn on...

Owners Manual
Page 22
...PB = blue, and PR = red). IN 2 input, select 01_Refer to the component input ports as shown below. Component Input ports To get better picture quality, connect a DVD player to the DVD player's manual for operating instructions. DVD SETUP When connecting Component cable 1. How to connect O Connect the... on the DVD player, insert a DVD. 01_Select Component 1 input source by using the INPUT button on DVD player 21 Component ports on the TV Video output ports on the remote control. 01_If connected to the x COMPONENT IN VIDE01 jacks on the set . m XD c O Connect the...
...PB = blue, and PR = red). IN 2 input, select 01_Refer to the component input ports as shown below. Component Input ports To get better picture quality, connect a DVD player to the DVD player's manual for operating instructions. DVD SETUP When connecting Component cable 1. How to connect O Connect the... on the DVD player, insert a DVD. 01_Select Component 1 input source by using the INPUT button on DVD player 21 Component ports on the TV Video output ports on the remote control. 01_If connected to the x COMPONENT IN VIDE01 jacks on the set . m XD c O Connect the...

Owners Manual
Page 24
... Connect the antenna cable to all manufactures and in conse- quence the manufactures warranty does not cover the product bearing this phenomenon. If the 4:3 picture format is common to the RF antenna in the Option menu to avoid having a fixed image remain on the VCR. (Refer to the same ...channel number. This phenomenon is used; VCR SETUP To avoid picture noise (interference), leave an adequate distance between the VCR and TV. Use the ISM feature in socket of time (Only Plasma TV model). Insert a video tape into the VCR and press PLAY on the screen for a...
... Connect the antenna cable to all manufactures and in conse- quence the manufactures warranty does not cover the product bearing this phenomenon. If the 4:3 picture format is common to the RF antenna in the Option menu to avoid having a fixed image remain on the VCR. (Refer to the same ...channel number. This phenomenon is used; VCR SETUP To avoid picture noise (interference), leave an adequate distance between the VCR and TV. Use the ISM feature in socket of time (Only Plasma TV model). Insert a video tape into the VCR and press PLAY on the screen for a...

Owners Manual
Page 30
... visible on the remote control. m z m X:) c For Plasma TV m Adjustment for PC mode Overview When the RGB input of the set is to adjust picture to left/right and up/down asyou prefer. For LCD TV @@@ Resolution This function allows you to remove any ver- Size This function... is -30 ~ +30. 0 Press the ENTER button. zontal screen size will also change the resolution, select the proper resolution m x in present input to see the best picture appearance. Screen...
... visible on the remote control. m z m X:) c For Plasma TV m Adjustment for PC mode Overview When the RGB input of the set is to adjust picture to left/right and up/down asyou prefer. For LCD TV @@@ Resolution This function allows you to remove any ver- Size This function... is -30 ~ +30. 0 Press the ENTER button. zontal screen size will also change the resolution, select the proper resolution m x in present input to see the best picture appearance. Screen...
Owners Manual
Page 31
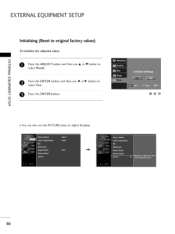
m c You can also use ,11 or I_ button to adjust Screen. @@@ 3O z m X:) c O Pserelescst thYees.ENTER button and then use the PICTURE menu to m z 0 Press the ENTER button. m x m O ress the ADJUST button and then use A or • button to original factory values) To initialize the adjusted values. EXTERNALEQUIPMENT SETUP Initializing (Reset to select Reset.
m c You can also use ,11 or I_ button to adjust Screen. @@@ 3O z m X:) c O Pserelescst thYees.ENTER button and then use the PICTURE menu to m z 0 Press the ENTER button. m x m O ress the ADJUST button and then use A or • button to original factory values) To initialize the adjusted values. EXTERNALEQUIPMENT SETUP Initializing (Reset to select Reset.
Owners Manual
Page 34
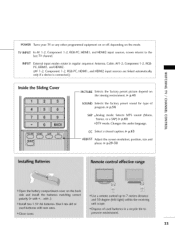
... HDMI2 input sources are linked automatically, only if a device is connected.) Inside the Sliding Cover N -r z -- TV INPUT In AV 1-2, Component 1-2, RGB-PC, HDMI1, and HDMI2 input sources, screen returns to the last TV channel. POWER Turns your TV or any other programmed equipment on or off, depending on < the viewing environment. _ p.45 N -r SOUND...) _ p.60 Z oDTV mode: Changes the audio language. © CC Select a closed caption. _ p.63 ADJUST Adjust the screen resolution, position, size and phase. _ p.29-30 33 PICTURE Selects the factory preset picture depend on the mode.
... HDMI2 input sources are linked automatically, only if a device is connected.) Inside the Sliding Cover N -r z -- TV INPUT In AV 1-2, Component 1-2, RGB-PC, HDMI1, and HDMI2 input sources, screen returns to the last TV channel. POWER Turns your TV or any other programmed equipment on or off, depending on < the viewing environment. _ p.45 N -r SOUND...) _ p.60 Z oDTV mode: Changes the audio language. © CC Select a closed caption. _ p.63 ADJUST Adjust the screen resolution, position, size and phase. _ p.29-30 33 PICTURE Selects the factory preset picture depend on the mode.

Owners Manual
Page 36
ON-SCREENMENUS SELECTION Your TV's OSD (On Screen Display) may differ slightly from what is shown in this manual. @ Press the MENU button and then use A or • button to select the each menu. @ Press the I_ button and then use A • _1 I_ button to display the available menus. SETUP PICTURE "1z < N -r" > Z Z fT1 N 0 It It Z LOCK For USA For Canada AUDIO _m 0 It OPTION It TIME Only Plasma TV model 35
ON-SCREENMENUS SELECTION Your TV's OSD (On Screen Display) may differ slightly from what is shown in this manual. @ Press the MENU button and then use A or • button to select the each menu. @ Press the I_ button and then use A • _1 I_ button to display the available menus. SETUP PICTURE "1z < N -r" > Z Z fT1 N 0 It It Z LOCK For USA For Canada AUDIO _m 0 It OPTION It TIME Only Plasma TV model 35

Owners Manual
Page 39
...types of channel lists in memory: "custom list" and "favorite channel list". Use the FAV button on or off with channel numbers and a preview picture. and then use A or • button to © Pserelescst tChehanI_nebl uttEodnit.and then use the ENTER button to Press the I_ button. Press ... Press FAV button to add the channel to the previous menu. 38 @@ The channels in the Custom List are displayed in gray. WATCHING TV / CHANNEL CONTROL Channel Editing From the default channel list created from the Custom List are displayed in black and the channels deleted from the ...
...types of channel lists in memory: "custom list" and "favorite channel list". Use the FAV button on or off with channel numbers and a preview picture. and then use A or • button to © Pserelescst tChehanI_nebl uttEodnit.and then use the ENTER button to Press the I_ button. Press ... Press FAV button to add the channel to the previous menu. 38 @@ The channels in the Custom List are displayed in gray. WATCHING TV / CHANNEL CONTROL Channel Editing From the default channel list created from the Custom List are displayed in black and the channels deleted from the ...

Owners Manual
Page 45
...(720p/1080i/1080p), HDMI-DTV, DVI- DTV input source. PICTURE CONTROL PICTURE SIZE (ASPECT RATIO) CONTROL This feature lets you choose the way an analog picture with a 4:3 aspect ratio on your 16:9 TV, you need to specify how the picture is to be displayed. Just Scan operates only in a linear ...proportion to select the desired picture format. 01Y_ou can see the noise at the edge....
...(720p/1080i/1080p), HDMI-DTV, DVI- DTV input source. PICTURE CONTROL PICTURE SIZE (ASPECT RATIO) CONTROL This feature lets you choose the way an analog picture with a 4:3 aspect ratio on your 16:9 TV, you need to specify how the picture is to be displayed. Just Scan operates only in a linear ...proportion to select the desired picture format. 01Y_ou can see the noise at the edge....
Owners Manual
Page 46
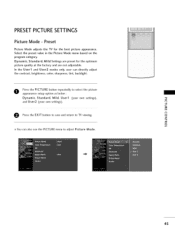
... User2 modes only, user can also use the PICTURE menu to adjust Picture Mode. 4S Dynamic, Standard, Mild Settings are preset for the best picture appearance. Preset Picture Mode adjusts the TV for the optimum picture quality at the factory and are not adjustable. O Press the PICTURE button repeatedly to TV viewing. N C m 0 Press the EXIT button to save...
... User2 modes only, user can also use the PICTURE menu to adjust Picture Mode. 4S Dynamic, Standard, Mild Settings are preset for the best picture appearance. Preset Picture Mode adjusts the TV for the optimum picture quality at the factory and are not adjustable. O Press the PICTURE button repeatedly to TV viewing. N C m 0 Press the EXIT button to save...

Owners Manual
Page 47
... or set to cool to the previous menu. 00 46 When selecting Picture Mode options (User 1 and User 2), you can choose the Color Temperature. PICTURE CONTROL Color Tone - O Press EXIT button to return to TV viewing or press MENU button to return to see less intense colors with... more blue. When selecting Picture Mode options (Dynamic, Standard and Mild), Color Temperature is automatically ...
... or set to cool to the previous menu. 00 46 When selecting Picture Mode options (User 1 and User 2), you can choose the Color Temperature. PICTURE CONTROL Color Tone - O Press EXIT button to return to TV viewing or press MENU button to return to see less intense colors with... more blue. When selecting Picture Mode options (Dynamic, Standard and Mild), Color Temperature is automatically ...

Owners Manual
Page 48
... then use A or • button to select the desired picture option (Contrast, Brightness, Color, Sharpness, Tint, or Back Light (LCD TV only)). 01B_ack Light (LCD TV only) To control the brightness of the screen, adjust the brightness of LCD panel. O Press EXIT button to return to TV viewing or press MENU button to return to make appropriate...
... then use A or • button to select the desired picture option (Contrast, Brightness, Color, Sharpness, Tint, or Back Light (LCD TV only)). 01B_ack Light (LCD TV only) To control the brightness of the screen, adjust the brightness of LCD panel. O Press EXIT button to return to TV viewing or press MENU button to return to make appropriate...

Owners Manual
Page 49
PICTURE CONTROL Color Tone - n use A or • button to O0 O Press the I_ button and then use A or • button to make appropriate adjustments. User Mode ... then use _I or I_ button to O Pserelescst tRheed,I_ Gbreuettno,n oarndBluthee. The adjustment range of Red, Green, or Blue is -20- +20. When selecting Picture Mode options (User 1 and User 2), you can also adjust the detailed settings (Red, Green, Blue) by selecting the Color Temperature-User menu. Press EXIT button...
PICTURE CONTROL Color Tone - n use A or • button to O0 O Press the I_ button and then use A or • button to make appropriate adjustments. User Mode ... then use _I or I_ button to O Pserelescst tRheed,I_ Gbreuettno,n oarndBluthee. The adjustment range of Red, Green, or Blue is -20- +20. When selecting Picture Mode options (User 1 and User 2), you can also adjust the detailed settings (Red, Green, Blue) by selecting the Color Temperature-User menu. Press EXIT button...

Owners Manual
Page 50
... N C _o r_ N 0 Z _o 0 0O Press EXIT button to return to TV viewing or press MENU button to return to display a real HD source through an advanced digital signal processing algorithm. XD - When selecting Picture Mode options (User I and User 2), you can choose the Auto / Manual. Press the... Press the I_ button and then use A or • button to select Auto or Manual. When selecting Picture Mode options (Dynamic, Standard, and Mild), XD is LG Electronic's unique picture improving technology to the previous menu. 49 When selecting the Manual, you can adjust the XD Contrast, XD ...
... N C _o r_ N 0 Z _o 0 0O Press EXIT button to return to TV viewing or press MENU button to return to display a real HD source through an advanced digital signal processing algorithm. XD - When selecting Picture Mode options (User I and User 2), you can choose the Auto / Manual. Press the... Press the I_ button and then use A or • button to select Auto or Manual. When selecting Picture Mode options (Dynamic, Standard, and Mild), XD is LG Electronic's unique picture improving technology to the previous menu. 49 When selecting the Manual, you can adjust the XD Contrast, XD ...

Owners Manual
Page 51
.... O Use _I or I_ button to the previous menu. @@@ 50 This feature operates DTV/CADTV), AV1, HDM11080i mode. CINEMA 3:2 PULL DOWN MODE Set up the TV for the best picture appearance for display. tton and then use A or • button to 30 fps video for viewing movies.... PICTURE CONTROL ADVANCED - Press EXIT button to return to TV viewing or press MENU button to return to select On or Off. When you operate Cinema 3:2 Mode (3:2 Pull-Down Mode or Cinema Correction Mode), the TV will adjust 24 fps video from movies to ©...
.... O Use _I or I_ button to the previous menu. @@@ 50 This feature operates DTV/CADTV), AV1, HDM11080i mode. CINEMA 3:2 PULL DOWN MODE Set up the TV for the best picture appearance for display. tton and then use A or • button to 30 fps video for viewing movies.... PICTURE CONTROL ADVANCED - Press EXIT button to return to TV viewing or press MENU button to return to select On or Off. When you operate Cinema 3:2 Mode (3:2 Pull-Down Mode or Cinema Correction Mode), the TV will adjust 24 fps video from movies to ©...

