
Owners Manual
Page 1
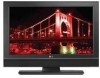
www.lgcommercial.com Retain it for future reference. Record model number and serial number of the set . See the label attached on the back cover and quote this manual carefully before operating your dealer when you require service. LCD TV PLASMA TV OWNER'S MANUAL LCD TV MODELS PLASMA TV MODEL 32LC5DC 32LC50C 42PX8DC 32LC5DCS 32LC50CS 42PG65C 32LC5DCB 32LC50CB 42PG60C 37LC5DC 32LX50C 37LC5DCB 32LX50CS 37LC5DC1 37LC50C 42LC5DC 37LC50CB 32LX5DC 42LB50C 32LX5DCS 42LC50C 42LB5DC Please read this information to your set .
www.lgcommercial.com Retain it for future reference. Record model number and serial number of the set . See the label attached on the back cover and quote this manual carefully before operating your dealer when you require service. LCD TV PLASMA TV OWNER'S MANUAL LCD TV MODELS PLASMA TV MODEL 32LC5DC 32LC50C 42PX8DC 32LC5DCS 32LC50CS 42PG65C 32LC5DCB 32LC50CB 42PG60C 37LC5DC 32LX50C 37LC5DCB 32LX50CS 37LC5DC1 37LC50C 42LC5DC 37LC50CB 32LX5DC 42LB50C 32LX5DCS 42LC50C 42LB5DC Please read this information to your set .

Owners Manual
Page 8
...EZ PIP CH SOUND - Polishing Cloth * Do not wipe roughly when removing stain. PREPARATION ACCESSORIES Ensure that excessive pressure for all models. This is normal, there is nothing wrong with your product. Do not dispose of this product contains a small amount of mercury...User must be cautions of that the following accessories are included with TV. Avoid touching the LCD screen or holding your local authority. may cause scratch or discoloration. 6 LCD TV PLASMA TV Owner's Manual http://www.lgusa.com www.lg.ca Copyright© 2007 LGE, All Rights Reserved. PIP CH...
...EZ PIP CH SOUND - Polishing Cloth * Do not wipe roughly when removing stain. PREPARATION ACCESSORIES Ensure that excessive pressure for all models. This is normal, there is nothing wrong with your product. Do not dispose of this product contains a small amount of mercury...User must be cautions of that the following accessories are included with TV. Avoid touching the LCD screen or holding your local authority. may cause scratch or discoloration. 6 LCD TV PLASMA TV Owner's Manual http://www.lgusa.com www.lg.ca Copyright© 2007 LGE, All Rights Reserved. PIP CH...

Owners Manual
Page 9
PREPARATION LCD TV model only Option Extras Protective Bracket and Bolt for Power Cord (This feature is not available for all models.) (Refer to P.13) D-sub 15 pin Cable Only 32/37/42LC5DC*, 32/37/42LC50C*, 42LB5DC, 42LB50C models Cable Management (Refer to p.13) Cable Holder (Refer to p.13) 1-...13) 4-Bolts for stand assembly (Refer to p.18) Only 32/37LC5DC*, 32/37LC50C* models x 2 M4xL22 Torx plus Star head screw (Refer to p.8) Plasma TV models only 75 ohm Round Cable D-sub 15 Pin Cable Only 42PG60C, 42PG65C models Protection cover (Refer to p.18) (This accessories can be ...
PREPARATION LCD TV model only Option Extras Protective Bracket and Bolt for Power Cord (This feature is not available for all models.) (Refer to P.13) D-sub 15 pin Cable Only 32/37/42LC5DC*, 32/37/42LC50C*, 42LB5DC, 42LB50C models Cable Management (Refer to p.13) Cable Holder (Refer to p.13) 1-...13) 4-Bolts for stand assembly (Refer to p.18) Only 32/37LC5DC*, 32/37LC50C* models x 2 M4xL22 Torx plus Star head screw (Refer to p.8) Plasma TV models only 75 ohm Round Cable D-sub 15 Pin Cable Only 42PG60C, 42PG65C models Protection cover (Refer to p.18) (This accessories can be ...

Owners Manual
Page 12
... VOL CH Remote Control Sensor Power/Standby Indicator Illuminates red when the TV is switched on . Illuminates green when the TV is in standby mode. PREPARATION 42PX8DC PREPARATION INPUT ENTER This TV's stand is switched on . POWER Button INPUT Button MENU Button ENTER... Button VOLUME Buttons CHANNEL Buttons 42PG60C, 42PG65C Stand (Only 42PG65C model) Remote Control Sensor POWER Button Power/Standby Indicator Illuminates ...
... VOL CH Remote Control Sensor Power/Standby Indicator Illuminates red when the TV is switched on . Illuminates green when the TV is in standby mode. PREPARATION 42PX8DC PREPARATION INPUT ENTER This TV's stand is switched on . POWER Button INPUT Button MENU Button ENTER... Button VOLUME Buttons CHANNEL Buttons 42PG60C, 42PG65C Stand (Only 42PG65C model) Remote Control Sensor POWER Button Power/Standby Indicator Illuminates ...

Owners Manual
Page 14
... VIDEO AUDIO COMPONENT IN 9 S-VIDEO 4 (MONO) AUDIO AV IN 1 8 VIDEO SPEAKER AUDIO OUT IN 8 (RGB, DVI) 7 (Only 42PG60C, 42PG65C Models) 6 10 7 2 RGB IN RGB(PC) AUDIO (RGB / DVI) RJP SPEAKER INTERFACE OUT 8 DIGITAL AUDIO OUT REMOTE CONTROL OPTICAL OUT 1 HDMI/DVI ...VIDEO L(MONO) R 9 8 1 HDMI/DVI IN, HDMI IN Connect a HDMI (DVI) connection to these jacks. This part mainly use picture for the LCD TV models. S-VIDEO Connect S-Video out from a PC. PREPARATION ■ Here shown may be somewhat different from various types of equipment. ANTENNA IN M.P.I. 12 13 ...
... VIDEO AUDIO COMPONENT IN 9 S-VIDEO 4 (MONO) AUDIO AV IN 1 8 VIDEO SPEAKER AUDIO OUT IN 8 (RGB, DVI) 7 (Only 42PG60C, 42PG65C Models) 6 10 7 2 RGB IN RGB(PC) AUDIO (RGB / DVI) RJP SPEAKER INTERFACE OUT 8 DIGITAL AUDIO OUT REMOTE CONTROL OPTICAL OUT 1 HDMI/DVI ...VIDEO L(MONO) R 9 8 1 HDMI/DVI IN, HDMI IN Connect a HDMI (DVI) connection to these jacks. This part mainly use picture for the LCD TV models. S-VIDEO Connect S-Video out from a PC. PREPARATION ■ Here shown may be somewhat different from various types of equipment. ANTENNA IN M.P.I. 12 13 ...

Owners Manual
Page 15
...BACK COVER FOR WIRE ARRANGEMENT ■ Here shown may be somewhat different from being removed by accident. If the product is not available for all models.) 1 Connect the cables as necessary. PROTECTIVE BRACKET 2 Install the CABLE HOLDER as shown. 2 Install the CABLE MANAGEMENT as shown. CABLE MANAGEMENT 13...CABLE MANAGEMENT G Hold the CABLE MANAGEMENT with the PROTECTIVE BRACKET and the screw as shown. It will help prevent the power cable from your TV. (This feature is dropped, you may be injured or the product may be broken. Secure the power cable with both hands and pull...
...BACK COVER FOR WIRE ARRANGEMENT ■ Here shown may be somewhat different from being removed by accident. If the product is not available for all models.) 1 Connect the cables as necessary. PROTECTIVE BRACKET 2 Install the CABLE HOLDER as shown. 2 Install the CABLE MANAGEMENT as shown. CABLE MANAGEMENT 13...CABLE MANAGEMENT G Hold the CABLE MANAGEMENT with the PROTECTIVE BRACKET and the screw as shown. It will help prevent the power cable from your TV. (This feature is dropped, you may be injured or the product may be broken. Secure the power cable with both hands and pull...

Owners Manual
Page 16
PROTECTIVE BRACKET BOLT CABLE HOLDER 14 PREPARATION PREPARATION BACK COVER FOR WIRE ARRANGEMENT ■ Here shown may be somewhat different from being removed by accident. 3 Install the CABLE HOLDER as shown. Secure the power cable with the PROTECTIVE BRACKET and the screw as necessary. To connect an additional equipment, see the EXTERNAL EQUIPMENT SETUP section. It will help prevent the power cable from your TV. (This feature is not available for all models.) 1 To separate the CABLE HOLDER, loosen the bolt installed the set. 2 Connect the cables as shown.
PROTECTIVE BRACKET BOLT CABLE HOLDER 14 PREPARATION PREPARATION BACK COVER FOR WIRE ARRANGEMENT ■ Here shown may be somewhat different from being removed by accident. 3 Install the CABLE HOLDER as shown. Secure the power cable with the PROTECTIVE BRACKET and the screw as necessary. To connect an additional equipment, see the EXTERNAL EQUIPMENT SETUP section. It will help prevent the power cable from your TV. (This feature is not available for all models.) 1 To separate the CABLE HOLDER, loosen the bolt installed the set. 2 Connect the cables as shown.

Owners Manual
Page 18
...backwards. SWIVEL STAND 20° (37LC5DC1, 42LC5DC, 42LC50C, 42PX8DC, 42LB5DC, 42LB50C, 42PG60C, 42PG65C models) 90° (32LX5DC/S, 32LX50C/S, 32LC5DC/S, 32LC50C/S, 37LC5DC, 37LC50C models) The TV can be pulled in a forward direction, potentially causing injury or damaging the product. Additionally, we ...recommend that you set up the TV close to the wall as parts of the bracket that...
...backwards. SWIVEL STAND 20° (37LC5DC1, 42LC5DC, 42LC50C, 42PX8DC, 42LB5DC, 42LB50C, 42PG60C, 42PG65C models) 90° (32LX5DC/S, 32LX50C/S, 32LC5DC/S, 32LC50C/S, 37LC5DC, 37LC50C models) The TV can be pulled in a forward direction, potentially causing injury or damaging the product. Additionally, we ...recommend that you set up the TV close to the wall as parts of the bracket that...

Owners Manual
Page 20
...STAND INSTALLATION ( 32/37LC5DC*, 32/37LC50C* ) 1 Carefully place the product screen side down on a cushioned surface that will protect product and screen from damage. ( 42PG60C. 42PG65C ) 1 Carefully place the TV screen side down on a cushioned surface to protect the screen from your TV. After removing...the stand. Press the PROTECTION COVER into the TV until you hear it click. 18 PROTECTION COVER ( Only 42PG60C. 42PG65C models) ■ Image shown may differ from damage. 2 Assemble the product stand with the product as shown. 2 Assemble the TV as shown. 3 Securely install the 4 bolts...
...STAND INSTALLATION ( 32/37LC5DC*, 32/37LC50C* ) 1 Carefully place the product screen side down on a cushioned surface that will protect product and screen from damage. ( 42PG60C. 42PG65C ) 1 Carefully place the TV screen side down on a cushioned surface to protect the screen from your TV. After removing...the stand. Press the PROTECTION COVER into the TV until you hear it click. 18 PROTECTION COVER ( Only 42PG60C. 42PG65C models) ■ Image shown may differ from damage. 2 Assemble the product stand with the product as shown. 2 Assemble the TV as shown. 3 Securely install the 4 bolts...
Owners Manual
Page 21
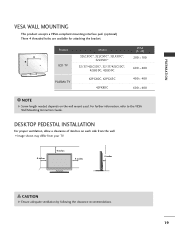
A B Product LCD TV PLASMA TV Model 32LC5DC*, 32LC50C*, 32LX5DC*, 32LX50C* 32/37/42LC5DC*, 32/37/42LC50C*, 42LB5DC, 42LB50C 42PG60C, 42PG65C 42PX8DC VESA (A * B) 200 * 100 600 * 400 400 * 400 600 * 400 NOTE G Screw length needed depends on each side from the wall. ■ Image shown may differ from your TV. 4 inches 4 inches 4 inches 4 inches CAUTION G Ensure adequate ventilation by...
A B Product LCD TV PLASMA TV Model 32LC5DC*, 32LC50C*, 32LX5DC*, 32LX50C* 32/37/42LC5DC*, 32/37/42LC50C*, 42LB5DC, 42LB50C 42PG60C, 42PG65C 42PX8DC VESA (A * B) 200 * 100 600 * 400 400 * 400 600 * 400 NOTE G Screw length needed depends on each side from the wall. ■ Image shown may differ from your TV. 4 inches 4 inches 4 inches 4 inches CAUTION G Ensure adequate ventilation by...

Owners Manual
Page 23
... 1. Y PB PR L R Connect the audio output of the digital set-top box to 2 the COMPONENT IN AUDIO jacks on the set. HD RECEIVER SETUP This TV can receive Digital Over-the-air/Cable signals without an external digital set-top box. Match the jack colors (Y = green, PB = blue, and PR = red... all equipment. ■ This part of external equipment setup mainly use ■ Turn on the digital set-top box. (Refer to the owner's manual for LCD TV models. RJP RFACE VIDEO AUDIO S-VIDEO ( ) COMPONENT IN Signal 480i 480p 720p 1080i 1080p Component Yes Yes Yes Yes Yes * 42LB5DC, 42LB50C...
... 1. Y PB PR L R Connect the audio output of the digital set-top box to 2 the COMPONENT IN AUDIO jacks on the set. HD RECEIVER SETUP This TV can receive Digital Over-the-air/Cable signals without an external digital set-top box. Match the jack colors (Y = green, PB = blue, and PR = red... all equipment. ■ This part of external equipment setup mainly use ■ Turn on the digital set-top box. (Refer to the owner's manual for LCD TV models. RJP RFACE VIDEO AUDIO S-VIDEO ( ) COMPONENT IN Signal 480i 480p 720p 1080i 1080p Component Yes Yes Yes Yes Yes * 42LB5DC, 42LB50C...
Owners Manual
Page 28
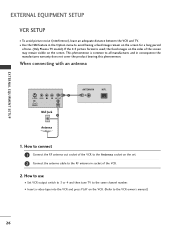
...socket of the VCR to the Antenna socket on the set. 2 Connect the antenna cable to the RF antenna in socket of time. (Only Plasma TV model). When connecting with an antenna 1 S-VIDEO VIDEO L R ANT OUT OUTPUT SWITCH ANT IN Wall Jack 2 Antenna ANTENNA IN M.P.I. 1. EXTERNAL EQUIPMENT ...SETUP EXTERNAL EQUIPMENT SETUP VCR SETUP ■ To avoid picture noise (interference), leave an adequate distance between the VCR and TV. ■ Use the ISM feature in the Option menu to avoid having a fixed image remain on the screen for a long period of the VCR...
...socket of the VCR to the Antenna socket on the set. 2 Connect the antenna cable to the RF antenna in socket of time. (Only Plasma TV model). When connecting with an antenna 1 S-VIDEO VIDEO L R ANT OUT OUTPUT SWITCH ANT IN Wall Jack 2 Antenna ANTENNA IN M.P.I. 1. EXTERNAL EQUIPMENT ...SETUP EXTERNAL EQUIPMENT SETUP VCR SETUP ■ To avoid picture noise (interference), leave an adequate distance between the VCR and TV. ■ Use the ISM feature in the Option menu to avoid having a fixed image remain on the screen for a long period of the VCR...

Owners Manual
Page 32
....96 45.00 59.94 60.00 1920x1080 33.72 33.75 30 59.94 60.00 * RGB-DOS mode only: 640x350 * Except 42PG60C/65C models G Check the image on the screen. G The synchronization input form for a long period of time. There may become permanently imprinted on your... TV. If the refresh rate of the PC graphic card. The fixed image may be changed, change the PC graphic card or consult the manufacturer of ...
....96 45.00 59.94 60.00 1920x1080 33.72 33.75 30 59.94 60.00 * RGB-DOS mode only: 640x350 * Except 42PG60C/65C models G Check the image on the screen. G The synchronization input form for a long period of time. There may become permanently imprinted on your... TV. If the refresh rate of the PC graphic card. The fixed image may be changed, change the PC graphic card or consult the manufacturer of ...

Owners Manual
Page 35
...with new ones. ■ Close cover. UP/DOWN WATCHING TV / CHANNEL CONTROL PIP SAP PIP CH- PIP CH+ PIP SWAP PIP INPUT Installing Batteries Remote control effective range 32/37/42LC5DC*, 42LB5DC, 32/37/42LC5DC*, 32LX5DC*, 32LX50C* 32/37/42LC50C*, 42LB5DC, 42LB50C 42PX8DC ■ Open the ...Down/Left /Right/ENTER) tings to 7 meters INPUT TV POWER MODE TV INPUT DVD MULTI VCR PIP PIP CH - INPUT ENTER ■ Use a INPUT TV POWER MODE TV INPUT DVD MULTI VCR PIP PIP CH - (Only 42PG60C, 42PG65C models) TV POWER DVD STB VCR RATIO CC INPUT ENTER RETURN MENU ...
...with new ones. ■ Close cover. UP/DOWN WATCHING TV / CHANNEL CONTROL PIP SAP PIP CH- PIP CH+ PIP SWAP PIP INPUT Installing Batteries Remote control effective range 32/37/42LC5DC*, 42LB5DC, 32/37/42LC5DC*, 32LX5DC*, 32LX50C* 32/37/42LC50C*, 42LB5DC, 42LB50C 42PX8DC ■ Open the ...Down/Left /Right/ENTER) tings to 7 meters INPUT TV POWER MODE TV INPUT DVD MULTI VCR PIP PIP CH - INPUT ENTER ■ Use a INPUT TV POWER MODE TV INPUT DVD MULTI VCR PIP PIP CH - (Only 42PG60C, 42PG65C models) TV POWER DVD STB VCR RATIO CC INPUT ENTER RETURN MENU ...

Owners Manual
Page 37
...Off OPTION SETUP VIDEO AUDIO TIME OPTION SCREEN LOCK Aspect Ratio Caption/Text Caption Options Language ISM Method Low Power Set ID Only Plasma TV model 35 SETUP SETUP VIDEO AUDIO TIME OPTION SCREEN LOCK EZ Scan Manual Scan Channel Edit DTV Signal Channel Label VIDEO SETUP VIDEO AUDIO ... CONTROL LOCK For USA SETUP VIDEO AUDIO TIME OPTION SCREEN LOCK Lock System Set Password Block Channel Movie Rating TV Rating-Children TV Rating-General Aux. ON-SCREEN MENUS SELECTION Your TV's OSD (On Screen Display) may differ slightly from what is shown in this manual. 1 Press the MENU button...
...Off OPTION SETUP VIDEO AUDIO TIME OPTION SCREEN LOCK Aspect Ratio Caption/Text Caption Options Language ISM Method Low Power Set ID Only Plasma TV model 35 SETUP SETUP VIDEO AUDIO TIME OPTION SCREEN LOCK EZ Scan Manual Scan Channel Edit DTV Signal Channel Label VIDEO SETUP VIDEO AUDIO ... CONTROL LOCK For USA SETUP VIDEO AUDIO TIME OPTION SCREEN LOCK Lock System Set Password Block Channel Movie Rating TV Rating-Children TV Rating-General Aux. ON-SCREEN MENUS SELECTION Your TV's OSD (On Screen Display) may differ slightly from what is shown in this manual. 1 Press the MENU button...

Owners Manual
Page 54
... use D or E button to select O n or O f f. ■ When you select On, the screen darkens. 4 Press EXIT button to return to TV viewing or press MENU button to return to the previous menu. 1 SETUP Aspect Ratio VIDEO Caption/Text AUDIO Caption Options TIME Language OPTION ISM Method ... VIDEO AUDIO TIME OPTION SCREEN LOCK EZ Picture Color Temperature XD Advanced Reset G 1 To set PICTURE CONTROL 23 LOW-POWER PICTURE MODE (Only Plasma TV model) Low power reduces the plasma display power consumption. 1 Press the MENU button and then use D or E button to select the OPTION menu. ...
... use D or E button to select O n or O f f. ■ When you select On, the screen darkens. 4 Press EXIT button to return to TV viewing or press MENU button to return to the previous menu. 1 SETUP Aspect Ratio VIDEO Caption/Text AUDIO Caption Options TIME Language OPTION ISM Method ... VIDEO AUDIO TIME OPTION SCREEN LOCK EZ Picture Color Temperature XD Advanced Reset G 1 To set PICTURE CONTROL 23 LOW-POWER PICTURE MODE (Only Plasma TV model) Low power reduces the plasma display power consumption. 1 Press the MENU button and then use D or E button to select the OPTION menu. ...


