
Owners Manual
Page 5
...** only) 9 Connection Options (Model Name: 32/37/42LC2D**) 10 Controls (Model Name: 42PC1D**/42PC3D**/50PC3D**) 11 Connection Options (Model Name: 42PC1D**/42PC3D**/50PC3D**) 12~16 Remote Control Key Functions 17 18-20 21 22-23 23 24-25 26-27 28 28 29-31 Various Installation Basic Connection Antenna or Cable...
...** only) 9 Connection Options (Model Name: 32/37/42LC2D**) 10 Controls (Model Name: 42PC1D**/42PC3D**/50PC3D**) 11 Connection Options (Model Name: 42PC1D**/42PC3D**/50PC3D**) 12~16 Remote Control Key Functions 17 18-20 21 22-23 23 24-25 26-27 28 28 29-31 Various Installation Basic Connection Antenna or Cable...

Owners Manual
Page 6
Contents 44 44 45 45 46 47 48 48 49 50 50 51 52_53 Auto Clock Setup Manual Clock Setup On/Off Timer Setup Sleep Timer Auto Off Aspect Ratio Control Cinema 3:2 Mode Setup Caption Caption/Text Caption Option Low Power (42PCl D**/42PC3D**/50PC3D** only) ISM (Image Sticking Minimization) Method (42PC1D**/42PC3D**/50PC3D** only) Parental Lock Setup 54~59 60~61 62 63~64 65~66 66 67~68 External Control Device Setup IR Codes Programming the Remote Programming Codes Troubleshooting Checklist Maintenance Product Specifications
Contents 44 44 45 45 46 47 48 48 49 50 50 51 52_53 Auto Clock Setup Manual Clock Setup On/Off Timer Setup Sleep Timer Auto Off Aspect Ratio Control Cinema 3:2 Mode Setup Caption Caption/Text Caption Option Low Power (42PCl D**/42PC3D**/50PC3D** only) ISM (Image Sticking Minimization) Method (42PC1D**/42PC3D**/50PC3D** only) Parental Lock Setup 54~59 60~61 62 63~64 65~66 66 67~68 External Control Device Setup IR Codes Programming the Remote Programming Codes Troubleshooting Checklist Maintenance Product Specifications

Owners Manual
Page 7
... side down on surface of that the following accessories are included with the cleansing cloths for the product. / / /' /' / / Power Cord 75_-_Round Cable Owner's Manual Remote Control / Batteries ,For 42PC1D**,42PC3B**,50PC3D F..o..r....3..2..1..3..7..1..4..2..L..C..2..D 2-Wall brackets 2-eye-bolts 2-TV brackets 2-Wall brackets Twister Holder Arrange the wires with the twister holder. 2-TV Bracket...
... side down on surface of that the following accessories are included with the cleansing cloths for the product. / / /' /' / / Power Cord 75_-_Round Cable Owner's Manual Remote Control / Batteries ,For 42PC1D**,42PC3B**,50PC3D F..o..r....3..2..1..3..7..1..4..2..L..C..2..D 2-Wall brackets 2-eye-bolts 2-TV brackets 2-Wall brackets Twister Holder Arrange the wires with the twister holder. 2-TV Bracket...
Owners Manual
Page 8
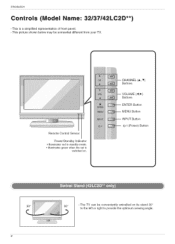
This is switched on its stand 30 ° to the left or right to provide the optimum viewing angle. illuminates red in standby mode. . illuminates green when the set is a simplified representation of front panel. - Remote Control Sensor Power/Standby Indicator . This picture shown below may be conveniently swivelled on . Introduction Con tro Is (Model Nam e'. - The TV can be somewhat different from your TV. CHANNEL (A, _') Buttons VOLUME (_1,1_) Buttons ENTER Button MENU Button INPUT Button d)/I (Power) Button -
This is switched on its stand 30 ° to the left or right to provide the optimum viewing angle. illuminates red in standby mode. . illuminates green when the set is a simplified representation of front panel. - Remote Control Sensor Power/Standby Indicator . This picture shown below may be conveniently swivelled on . Introduction Con tro Is (Model Nam e'. - The TV can be somewhat different from your TV. CHANNEL (A, _') Buttons VOLUME (_1,1_) Buttons ENTER Button MENU Button INPUT Button d)/I (Power) Button -

Owners Manual
Page 9
Introduction 37/42LC2D** -- AUDIO Input 1 VIDEO Input 32LC2D** AC IN AV AV IN1 COMPONENT IN 1/2 HDMI / DVI IN RS-232C INPUT (Control &Service) CABLE IN ANTENNA IN AUDIO (RGB/DVI) DIGITAL AUDIO OUT OPTICAL RGB (PC/DTV) REMOTE CONTROL Port J Connection Options (Model Name'. - S-VIDEO Input -- Here shown may be somewhat different from your TV.
Introduction 37/42LC2D** -- AUDIO Input 1 VIDEO Input 32LC2D** AC IN AV AV IN1 COMPONENT IN 1/2 HDMI / DVI IN RS-232C INPUT (Control &Service) CABLE IN ANTENNA IN AUDIO (RGB/DVI) DIGITAL AUDIO OUT OPTICAL RGB (PC/DTV) REMOTE CONTROL Port J Connection Options (Model Name'. - S-VIDEO Input -- Here shown may be somewhat different from your TV.

Owners Manual
Page 10
INPUT Button ENTER Button CHANNEL (A _') Buttons 42 PC3 D**/50PC3 D** Remote Control Sensor Power/Standby Indicator • illuminates red in standby mode. • illuminates green when the set is switched on . lO CHANNEL (A, T) Buttons VOLUME (_,1_) ...
INPUT Button ENTER Button CHANNEL (A _') Buttons 42 PC3 D**/50PC3 D** Remote Control Sensor Power/Standby Indicator • illuminates red in standby mode. • illuminates green when the set is switched on . lO CHANNEL (A, T) Buttons VOLUME (_,1_) ...

Owners Manual
Page 11
Here shown may be somewhat different from your TV. HDMI/DVI IN AV AV IN1 COMPONENT IN 1/2 RS-232C INPUT (Control &Service) S-VIDEO InputAUDIO Input VIDEO Input- AC IN CABLE IN DIGITAL AUDIO OUT OPTICAL ANTENNA IN AUDIO (RGB/DVI) RGB (PC/DTV) REMOTE CONTROL Port J 11 Introduction ConnectionOptions(ModelName:42PC1D**/42PC3D**/50PC3D**) -
Here shown may be somewhat different from your TV. HDMI/DVI IN AV AV IN1 COMPONENT IN 1/2 RS-232C INPUT (Control &Service) S-VIDEO InputAUDIO Input VIDEO Input- AC IN CABLE IN DIGITAL AUDIO OUT OPTICAL ANTENNA IN AUDIO (RGB/DVI) RGB (PC/DTV) REMOTE CONTROL Port J 11 Introduction ConnectionOptions(ModelName:42PC1D**/42PC3D**/50PC3D**) -

Owners Manual
Page 12
...screen. GUIDE (Refer to the screen. on-screen disp ays and returns to your preference. CC (Refer to p.47) Changes the aspect ratio. Introduction Remote Control Key Functions POWER Turns your TV or any menul Lets you watch the TV, information displays ontop of time before your TV turns itse.../Right/ENTER) Allows you to navigate the on-screen menus and adjust the system settings to TV viewing from any other than TV, for the remote m to the last TV channel. Not available in regular sequence: Antenna, Cable, AV1-2, Component 1-2, RGB-DTV (or RGB-PC), HDMI/DVI). (AV1, AV2,Component ...
...screen. GUIDE (Refer to the screen. on-screen disp ays and returns to your preference. CC (Refer to p.47) Changes the aspect ratio. Introduction Remote Control Key Functions POWER Turns your TV or any menul Lets you watch the TV, information displays ontop of time before your TV turns itse.../Right/ENTER) Allows you to navigate the on-screen menus and adjust the system settings to TV viewing from any other than TV, for the remote m to the last TV channel. Not available in regular sequence: Antenna, Cable, AV1-2, Component 1-2, RGB-DTV (or RGB-PC), HDMI/DVI). (AV1, AV2,Component ...

Owners Manual
Page 16
... broadcasted by broadcasting cc mpanies. - This function can be used batteries in correct polarity (+ with +, - Close the cover. 16 42/50PC3D** 42PC1D** 30_i 30_ * Use a remote control 7 meter distance and 30 degree (left/right) within the receiving unit scope. * Dispose of used only when the EPG information is only supported in...
... broadcasted by broadcasting cc mpanies. - This function can be used batteries in correct polarity (+ with +, - Close the cover. 16 42/50PC3D** 42PC1D** 30_i 30_ * Use a remote control 7 meter distance and 30 degree (left/right) within the receiving unit scope. * Dispose of used only when the EPG information is only supported in...

Owners Manual
Page 22
... presumed that RGB and HDMI/DVI sources are connected. 22 If connected to the AUDIO L/MONO jack of the screen may remain visible on the remote control. - Typically a frozen still picture from the VCR to AV IN2. Installation To avoid picture noise (interference), leave an adequate distance between TV and VCR...
... presumed that RGB and HDMI/DVI sources are connected. 22 If connected to the AUDIO L/MONO jack of the screen may remain visible on the remote control. - Typically a frozen still picture from the VCR to AV IN2. Installation To avoid picture noise (interference), leave an adequate distance between TV and VCR...

Owners Manual
Page 23
It is imProved; compared t0 norma! I O c0nnecttheSWIDEO0utput0ftheVCRt0thes_ VIDEO input on the remote control - Match the jack colors (Video = yellow, Audio Left = white, and Audio Right = red). Refer to both Video andS-Vide o at the same time In ...
It is imProved; compared t0 norma! I O c0nnecttheSWIDEO0utput0ftheVCRt0thes_ VIDEO input on the remote control - Match the jack colors (Video = yellow, Audio Left = white, and Audio Right = red). Refer to both Video andS-Vide o at the same time In ...

Owners Manual
Page 24
... to the DVD player's manual for operating instructions. • TV can receive the video and audio signal simultaneously by using the INPUT button on the remote control. ly. Refer to 1280x720p. , ] 24 if connected to the AUDIO input jacks on the seL Turn onthe DVD p!ayei, insert a DVDI Select AV1... input source With using the INPUT button on the remote control. - To get the best picture quality, adjust the output resolution of the DVD to set . Select HDIVlI/DVI input source with using a ...
... to the DVD player's manual for operating instructions. • TV can receive the video and audio signal simultaneously by using the INPUT button on the remote control. ly. Refer to 1280x720p. , ] 24 if connected to the AUDIO input jacks on the seL Turn onthe DVD p!ayei, insert a DVDI Select AV1... input source With using the INPUT button on the remote control. - To get the best picture quality, adjust the output resolution of the DVD to set . Select HDIVlI/DVI input source with using a ...

Owners Manual
Page 25
... 1 input source with using the INPUT button on DVD player Y Y PI: P_ B_ : R_ _ Or: _ _R _ 25 Componentportson the TV Y Video output ports Y on the remote control - Refer to the DVD player's manual for operating instructions. • Component Input ports To get better picture quality, connect a DVD player to COMPONENT 2, select...
... 1 input source with using the INPUT button on DVD player Y Y PI: P_ B_ : R_ _ Or: _ _R _ 25 Componentportson the TV Y Video output ports Y on the remote control - Refer to the DVD player's manual for operating instructions. • Component Input ports To get better picture quality, connect a DVD player to COMPONENT 2, select...

Owners Manual
Page 26
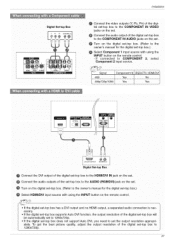
Connect the audio outputs of the digital set-top box to the AUDIO (RGB/DVI) jack on the remote control Digital Set-top Box 26 This TV can receive Digital Over-the-air/Cable signals without an external digital set -top box.) Select RGB-...
Connect the audio outputs of the digital set-top box to the AUDIO (RGB/DVI) jack on the remote control Digital Set-top Box 26 This TV can receive Digital Over-the-air/Cable signals without an external digital set -top box.) Select RGB-...
Owners Manual
Page 27
... digital set4op box. (Refer to the owner's manual for the digital set4op box.) O Select HDMI/DVl input source with using the INPUT button on the remote control. ° If the digital set4op box has a DVI output and no HDMI output, a separated audio connection is necessary. • If the digital set4op box...
... digital set4op box. (Refer to the owner's manual for the digital set4op box.) O Select HDMI/DVl input source with using the INPUT button on the remote control. ° If the digital set4op box has a DVI output and no HDMI output, a separated audio connection is necessary. • If the digital set4op box...

Owners Manual
Page 29
...'s settings. _VI-PC OUTPUT @@ al AUDIO ILl PC O Connect the DVI output of PC graphics cards output resolution to 1024x768, 60Hz. 29 Turn on the remote control. _-t. Select HDMI/DVI input source with using the INPUT button on the PC and the set . To get the | best picture quality, adjust the...
...'s settings. _VI-PC OUTPUT @@ al AUDIO ILl PC O Connect the DVI output of PC graphics cards output resolution to 1024x768, 60Hz. 29 Turn on the remote control. _-t. Select HDMI/DVI input source with using the INPUT button on the PC and the set . To get the | best picture quality, adjust the...

Owners Manual
Page 32
... buttons to standby mode. 1. This TV is out. 3. b> The menus can cancel this function by using the TV, press the POWER button on the remote control. 2. First select your language. 32 1 Press the MENU button and then use • / • button to select the OPTION menu. 2 ... INPUT, CH • / • button on the TV or press the POWER, TV INPUT, INPUT, CH • / •, Number (0 - 9) button on the remote control. Operation 0n Basic operation 1. In standby mode to switch the sound off, press the MUTE button. 3. Press the VOL • / • button to standby...
... buttons to standby mode. 1. This TV is out. 3. b> The menus can cancel this function by using the TV, press the POWER button on the remote control. 2. First select your language. 32 1 Press the MENU button and then use • / • button to select the OPTION menu. 2 ... INPUT, CH • / • button on the TV or press the POWER, TV INPUT, INPUT, CH • / •, Number (0 - 9) button on the remote control. Operation 0n Basic operation 1. In standby mode to switch the sound off, press the MUTE button. 3. Press the VOL • / • button to standby...

Owners Manual
Page 35
...; button to add or delete scanned channels. Press FAV button to add the channel to the previous menu. 35 Using the FAV button on the remote control when a channel is highlighted you can add or delete the channel by toggling each channel on the SETUP menu. - You will appear in front...
...; button to add or delete scanned channels. Press FAV button to add the channel to the previous menu. 35 Using the FAV button on the remote control when a channel is highlighted you can add or delete the channel by toggling each channel on the SETUP menu. - You will appear in front...

Owners Manual
Page 38
... /I_ button to TV viewing. 38 By pressing the ENTER button, you can also adjust EZ Picture in the EZ Picture menu based on the remote control are preset for the best picture appearance. When adjusting Video menu options (contrast, brightness, color, sharpness, tint, and color temperature) manually, EZ Picture automatically...
... /I_ button to TV viewing. 38 By pressing the ENTER button, you can also adjust EZ Picture in the EZ Picture menu based on the remote control are preset for the best picture appearance. When adjusting Video menu options (contrast, brightness, color, sharpness, tint, and color temperature) manually, EZ Picture automatically...

Owners Manual
Page 42
Select Mono if you press the SAP button, Mono, Stereo, or SAP appear in turn. • If other languages available on the remote control, this TV can only receive the signal when that accompanies the stereo program; b> $R$(0_ is only in Analog channel. TruSurround XT technology is incorporated ... signal, select them with a very wide and 42 even though Stereo or SAP has been selected. Use the SAP button to the mono sound in remote fringe areas during stereo/SAP broadcasting. Each time you want to listen to select your desired MTS mode in analog signal. "Dolby" and the double...
Select Mono if you press the SAP button, Mono, Stereo, or SAP appear in turn. • If other languages available on the remote control, this TV can only receive the signal when that accompanies the stereo program; b> $R$(0_ is only in Analog channel. TruSurround XT technology is incorporated ... signal, select them with a very wide and 42 even though Stereo or SAP has been selected. Use the SAP button to the mono sound in remote fringe areas during stereo/SAP broadcasting. Each time you want to listen to select your desired MTS mode in analog signal. "Dolby" and the double...


