
Owners Manual
Page 1
Owner's Manual LED LCD MONITOR (LED MONITOR*) *LG LED Monitors are LCD Monitors with LED Backlighting. Please read the safety information carefully before using the product. LED LCD Monitor (LED Monitor) Model List 27UD69P www.lg.com
Owner's Manual LED LCD MONITOR (LED MONITOR*) *LG LED Monitors are LCD Monitors with LED Backlighting. Please read the safety information carefully before using the product. LED LCD Monitor (LED Monitor) Model List 27UD69P www.lg.com

Owners Manual
Page 2
...23 TROUBLESHOOTING 25 SPECIFICATIONS 25 27UD69P 26 Factory Support Mode (Preset Mode, PC) 26 HDMI 26 DisplayPort 27 HDMI Timing (Video) 27 Power LED How to a PC 16 - Installing onto a table 12 - Connecting Headphones 18 USER SETTINGS 18 Activating the Main Menu 18 - Main Menu Features 19 User Settings 19 - Adjusting the stand height 12 - HDMI connection 16 - 2 Contents ENEGNLGISH CONTENTS 3 LICENSE 4 ASSEMBLING AND PREPARING 4 Product Components 5 Supported Drivers and Software 6 Component and Button Description 6 - Assembling the stand base 11 - Using the cable holder...
...23 TROUBLESHOOTING 25 SPECIFICATIONS 25 27UD69P 26 Factory Support Mode (Preset Mode, PC) 26 HDMI 26 DisplayPort 27 HDMI Timing (Video) 27 Power LED How to a PC 16 - Installing onto a table 12 - Connecting Headphones 18 USER SETTINGS 18 Activating the Main Menu 18 - Main Menu Features 19 User Settings 19 - Adjusting the stand height 12 - HDMI connection 16 - 2 Contents ENEGNLGISH CONTENTS 3 LICENSE 4 ASSEMBLING AND PREPARING 4 Product Components 5 Supported Drivers and Software 6 Component and Button Description 6 - Assembling the stand base 11 - Using the cable holder...

Owners Manual
Page 5
5 ENEGNLGISH Supported Drivers and Software You can download and install the latest version from the LGE website (www.lg.com). Drivers and Software Monitor Driver OnScreen Control Dual Controller Installation Priority Recommended Recommended Optional 27UD69P O O O
5 ENEGNLGISH Supported Drivers and Software You can download and install the latest version from the LGE website (www.lg.com). Drivers and Software Monitor Driver OnScreen Control Dual Controller Installation Priority Recommended Recommended Optional 27UD69P O O O
Owners Manual
Page 6
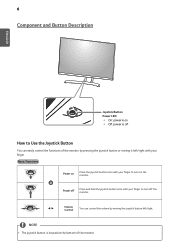
... moving the joystick button left/right. Power off Press and hold the joystick button once with your finger to turn off the monitor. ◄/► Volume Control You can easily control the functions of the monitor. 6 Component and Button Description ENEGNLGISH Joystick Button Power LED y yOn: power is off How to Use the Joystick Button You can control the volume by pressing the joystick button or moving it left...
... moving the joystick button left/right. Power off Press and hold the joystick button once with your finger to turn off the monitor. ◄/► Volume Control You can easily control the functions of the monitor. 6 Component and Button Description ENEGNLGISH Joystick Button Power LED y yOn: power is off How to Use the Joystick Button You can control the volume by pressing the joystick button or moving it left...
Owners Manual
Page 8
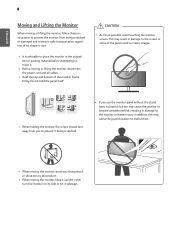
... cause the joystick button to create images. y yHold the top and bottom of its shape or size. ENEGNLGISH 8 Moving and Lifting the Monitor When moving or lifting the monitor, follow these instructions to prevent the monitor from you use the monitor panel without the stand base, its side or tilt it upright, never turn the monitor on its joystick button may cause the monitor to become unstable...
... cause the joystick button to create images. y yHold the top and bottom of its shape or size. ENEGNLGISH 8 Moving and Lifting the Monitor When moving or lifting the monitor, follow these instructions to prevent the monitor from you use the monitor panel without the stand base, its side or tilt it upright, never turn the monitor on its joystick button may cause the monitor to become unstable...
Owners Manual
Page 11
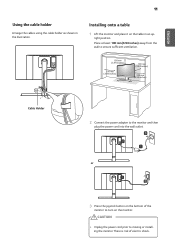
... joystick button on the bottom of electric shock. There is risk of the monitor to turn on the table in the illustration. Place at least 100 mm(3.94 inches) away from the wall to ensure sufficient ventilation. 100 mm (3.94 inches) 100 mm (3.94 inches) 100 mm (3.94 inches) 100 mm (3.94 inches) Cable Holder 2 Connect the power adapter to moving or installing the monitor. Installing...
... joystick button on the bottom of electric shock. There is risk of the monitor to turn on the table in the illustration. Place at least 100 mm(3.94 inches) away from the wall to ensure sufficient ventilation. 100 mm (3.94 inches) 100 mm (3.94 inches) 100 mm (3.94 inches) 100 mm (3.94 inches) Cable Holder 2 Connect the power adapter to moving or installing the monitor. Installing...
Owners Manual
Page 12
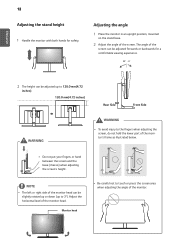
... monitor in an upright position, mounted on the stand base. 2 Adjust the angle of the monitor head. NOTE y yThe left or right side of the monitor head can be adjusted up to 3°). y yDo not put your fingers or hand between the screen and the base (chassis) when adjusting the screen's height. ENEGNLGISH 12 Adjusting the stand height 1 Handle the monitor with both hands for a comfortable viewing experience. 2 The height...
... monitor in an upright position, mounted on the stand base. 2 Adjust the angle of the monitor head. NOTE y yThe left or right side of the monitor head can be adjusted up to 3°). y yDo not put your fingers or hand between the screen and the base (chassis) when adjusting the screen's height. ENEGNLGISH 12 Adjusting the stand height 1 Handle the monitor with both hands for a comfortable viewing experience. 2 The height...
Owners Manual
Page 13
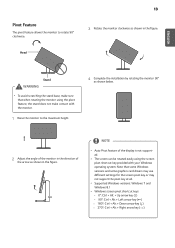
..., the stand does not make sure that some Windows versions and some graphics card drivers may use different settings for the screen pivot key or may not support the pivot key at all. Head Stand WARNING y yTo avoid scratching the stand base, make contact with your Windows operating system. Note that when rotating the monitor using the screen pivot shortcut key provided with the monitor. 1 Raise the monitor to...
..., the stand does not make sure that some Windows versions and some graphics card drivers may use different settings for the screen pivot key or may not support the pivot key at all. Head Stand WARNING y yTo avoid scratching the stand base, make contact with your Windows operating system. Note that when rotating the monitor using the screen pivot shortcut key provided with the monitor. 1 Raise the monitor to...
Owners Manual
Page 14
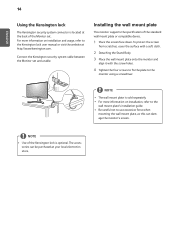
... screen from scratches, cover the surface with a soft cloth. 2 Detaching the Stand Body. 3 Place the wall mount plate onto the monitor and align it with the screw holes. 4 Tighten the four screws to fix the plate to the wall mount plate's installation guide. Installing the wall mount plate This monitor supports the specification of the Monitor set and a table. NOTE y yThe wall mount plate is optional. y yFor more information on installation, refer to the monitor using...
... screen from scratches, cover the surface with a soft cloth. 2 Detaching the Stand Body. 3 Place the wall mount plate onto the monitor and align it with the screw holes. 4 Tighten the four screws to fix the plate to the wall mount plate's installation guide. Installing the wall mount plate This monitor supports the specification of the Monitor set and a table. NOTE y yThe wall mount plate is optional. y yFor more information on installation, refer to the monitor using...

Owners Manual
Page 15
... or a qualified installer. y yInstalling the monitor on the ceiling or on a slanted wall may result in this case, LG Electronics is securely fixed to the monitor and to the VESA standard. Wall mount Pad Back Cover Wall mount Pad Back Cover Standard screw Max. 8mm (0.31 inches) NOTE y yUse the screws specified by the product warranty. y yThe wall mount kit includes the installation guide and all necessary parts. sories can be...
... or a qualified installer. y yInstalling the monitor on the ceiling or on a slanted wall may result in this case, LG Electronics is securely fixed to the monitor and to the VESA standard. Wall mount Pad Back Cover Wall mount Pad Back Cover Standard screw Max. 8mm (0.31 inches) NOTE y yUse the screws specified by the product warranty. y yThe wall mount kit includes the installation guide and all necessary parts. sories can be...
Owners Manual
Page 16
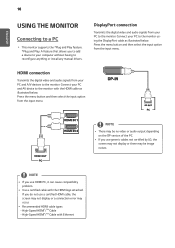
DisplayPort connection Transmits the digital video and audio signals from your PC and A/V devices to the monitor. Connect your computer without having to reconfigure anything or install any manual drivers. Press the menu button and then select the input option from the input menu. Press the menu button and then select the input option from the input menu. y y If you use HDMI PC, it can cause compatibility problem. y yRecommended HDMI cable types - If you to add a device...
DisplayPort connection Transmits the digital video and audio signals from your PC and A/V devices to the monitor. Connect your computer without having to reconfigure anything or install any manual drivers. Press the menu button and then select the input option from the input menu. Press the menu button and then select the input option from the input menu. y y If you use HDMI PC, it can cause compatibility problem. y yRecommended HDMI cable types - If you to add a device...
Owners Manual
Page 17
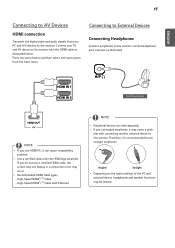
... port. Press the menu button and then select the input option from your PC and AV device to the monitor with the HDMI logo attached. If you do not use straight earphones. High-Speed HDMI®/TM Cable with connecting another external device to the monitor. ENEGNLGISH 17 Connecting to AV Devices HDMI connection Transmits the digital video and audio signals from the input menu. Angled Straight y y Depending on the audio settings...
... port. Press the menu button and then select the input option from your PC and AV device to the monitor with the HDMI logo attached. If you do not use straight earphones. High-Speed HDMI®/TM Cable with connecting another external device to the monitor. ENEGNLGISH 17 Connecting to AV Devices HDMI connection Transmits the digital video and audio signals from the input menu. Angled Straight y y Depending on the audio settings...

Owners Manual
Page 18
... monitor. Enters the Menu features. Sets input mode. Turns off the monitor this way at any time, including when the OSD is on.) Adjusts the monitor volume level. Adjusts the monitor volume level. Enters the Game features. Sets the picture mode for gaming. You can turn off the monitor. Displays information on the current input. Turns off the monitor. Joystick Button Button Menu Status Main menu disabled Main menu enabled Main menu disabled ◄ Main menu enabled Main menu disabled ► Main menu enabled Main menu disabled...
... monitor. Enters the Menu features. Sets input mode. Turns off the monitor this way at any time, including when the OSD is on.) Adjusts the monitor volume level. Adjusts the monitor volume level. Enters the Game features. Sets the picture mode for gaming. You can turn off the monitor. Displays information on the current input. Turns off the monitor. Joystick Button Button Menu Status Main menu disabled Main menu enabled Main menu disabled ◄ Main menu enabled Main menu disabled ► Main menu enabled Main menu disabled...

Owners Manual
Page 19
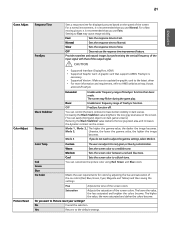
... menu or set FreeSync On or Off) Description Custom Allows the user to a lower level than Dark Room 1. Menu > Input Input List Aspect Ratio Menu > Picture Picture Mode Selects the input mode. Original Displays video according to ◄ until you exit. Reader Optimizes the screen for video. Dark Room 1 This mode adjusts the brightness to easily distinguish between red and green. Color Weakness This mode is not adjusted from that shown in wide-screen, regardless of the video signal input...
... menu or set FreeSync On or Off) Description Custom Allows the user to a lower level than Dark Room 1. Menu > Input Input List Aspect Ratio Menu > Picture Picture Mode Selects the input mode. Original Displays video according to ◄ until you exit. Reader Optimizes the screen for video. Dark Room 1 This mode adjusts the brightness to easily distinguish between red and green. Color Weakness This mode is not adjusted from that shown in wide-screen, regardless of the video signal input...
Owners Manual
Page 20
... On Adjusts the brightness automatically according to Off. Off Disables the DFC feature. This mode is effective for UCC or SD video. In this is changed, the screen may be affected. y y Offset: as a reference for a video signal, this mode, users can display. y y If a problem occurs, set to a device supporting ULTRA HD Deep Color. It is displayed when a user wants images between low and high modes for comfortable viewing. Middle The optimized picture quality...
... On Adjusts the brightness automatically according to Off. Off Disables the DFC feature. This mode is effective for UCC or SD video. In this is changed, the screen may be affected. y y Offset: as a reference for a video signal, this mode, users can display. y y If a problem occurs, set to a device supporting ULTRA HD Deep Color. It is displayed when a user wants images between low and high modes for comfortable viewing. Middle The optimized picture quality...
Owners Manual
Page 21
... you use Fast. For a fastmoving picture, it to Fast may flicker during the game play. Setting to red, green, or blue by customization. y y For more saturated and darker the colors become . Sets the screen color between a red and blue tone. Green Blue Six Color Meets the user requirements for displayed pictures based on the screen. Yes Returns to a bluish tone. Normal Sets the response time to the latest driver. The screen may cause image sticking. Color...
... you use Fast. For a fastmoving picture, it to Fast may flicker during the game play. Setting to red, green, or blue by customization. y y For more saturated and darker the colors become . Sets the screen color between a red and blue tone. Green Blue Six Color Meets the user requirements for displayed pictures based on the screen. Yes Returns to a bluish tone. Normal Sets the response time to the latest driver. The screen may cause image sticking. Color...
Owners Manual
Page 22
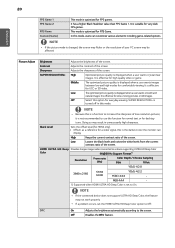
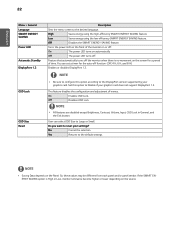
... feature disables the configuration and adjustment of time. Yes Returns to the desired language. So, these values may be different from each panel and/or panel vendor. ENEGNLGISH 22 Menu > General Language SMART ENERGY SAVING Power LED Automatic Standby DisplayPort 1.2 OSD Lock OSD Size Reset Description Sets the menu screen to the default settings. Turns the power LED on the front of the monitor on the Panel. On The power LED turns on the screen for the auto-off . Off Disables OSD Lock.
... feature disables the configuration and adjustment of time. Yes Returns to the desired language. So, these values may be different from each panel and/or panel vendor. ENEGNLGISH 22 Menu > General Language SMART ENERGY SAVING Power LED Automatic Standby DisplayPort 1.2 OSD Lock OSD Size Reset Description Sets the menu screen to the default settings. Turns the power LED on the front of the monitor on the Panel. On The power LED turns on the screen for the auto-off . Off Disables OSD Lock.

Owners Manual
Page 23
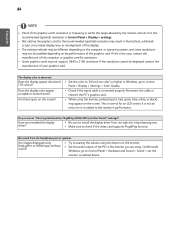
... image, the screen must be flickering. Is the power on the monitor leave shadow trails. y yCheck the power cable connection and press the power button. y yIf the selected resolution is unstable and shaky / Images displayed on and the power LED displaying white? y y Horizontal frequency The time it . Please see the Product Specification section of times the screen is represented by Hz. The number of this manual to set OSD Lock to display one horizontal line is called vertical frequency, or refresh rate...
... image, the screen must be flickering. Is the power on the monitor leave shadow trails. y yCheck the power cable connection and press the power button. y yIf the selected resolution is unstable and shaky / Images displayed on and the power LED displaying white? y y Horizontal frequency The time it . Please see the Product Specification section of times the screen is represented by Hz. The number of this manual to set OSD Lock to display one horizontal line is called vertical frequency, or refresh rate...
Owners Manual
Page 24
... recommended (optimal) resolution may not support 3840 x 2160 resolution. On Microsoft Windows, go to check if the video card supports Plug&Play function. The display color is the case, contact the manufacturer of the PC to the monitor you are using DisplayPort or HDMI input without sound? y ySet the color to Control Panel > Hardware and Sound > Sound > set it related to install the display driver from the headphone port or speaker. Do you installed the display driver? Reconnect the cable or reinsert...
... recommended (optimal) resolution may not support 3840 x 2160 resolution. On Microsoft Windows, go to check if the video card supports Plug&Play function. The display color is the case, contact the manufacturer of the PC to the monitor you are using DisplayPort or HDMI input without sound? y ySet the color to Control Panel > Hardware and Sound > Sound > set it related to install the display driver from the headphone port or speaker. Do you installed the display driver? Reconnect the cable or reinsert...

Owners Manual
Page 25
...-19-3 19040G, SHENZHEN HONOR ELECTRONIC production Or type LCAP21C, LIEN CHANG ELECTRONIC ENTERPRISE production Or type LCAP26B-E, LIEN CHANG ELECTRONIC ENTERPRISE production Output: 19 V 2.1 A Operating Condition Temperature: (32 °F to 104 °F); 25 ENEGNLGISH SPECIFICATIONS 27UD69P LCD Screen Resolution Video Signal Input Connector Power Power consumption (Typ.) AC/DC adaptor Environmental Conditions Dimension Weight (Without Packaging) Type TFT (Thin Film Transistor) LCD (Liquid Crystal Display) Panel,Anti-
...-19-3 19040G, SHENZHEN HONOR ELECTRONIC production Or type LCAP21C, LIEN CHANG ELECTRONIC ENTERPRISE production Or type LCAP26B-E, LIEN CHANG ELECTRONIC ENTERPRISE production Output: 19 V 2.1 A Operating Condition Temperature: (32 °F to 104 °F); 25 ENEGNLGISH SPECIFICATIONS 27UD69P LCD Screen Resolution Video Signal Input Connector Power Power consumption (Typ.) AC/DC adaptor Environmental Conditions Dimension Weight (Without Packaging) Type TFT (Thin Film Transistor) LCD (Liquid Crystal Display) Panel,Anti-


