
Owners Manual
Page 2
... - DVI-D connection 10 - HDMI connection 12 CUSTOMIZING SETTINGS 13 Customizing Settings 13 - Detaching the Stand Base 7 - Attaching the Stand Base 6 - Using the cable holder 9 - Mounting on a table 7 - 2 TABLE OF CONTENTS CONTENTS ENEGNLGISH 3 ASSEMBLING AND PREPAR- ING 3 Unpacking 4 Parts and buttons 5 Setting up the Monitor set . Setting 19 -Picture Mode 20 -SUPER ENERGY SAVING 21 -DUAL DISPLAY 21 -DUAL WEB 22 -MY KEY Setting 23 TROUBLESHOOTING 25 SPECIFICATIONS 25 22EA53V 26 23EA53V 27 24EA53V 28 27EA53V 29 Preset Modes (Resolution) 29 HDMI...
... - DVI-D connection 10 - HDMI connection 12 CUSTOMIZING SETTINGS 13 Customizing Settings 13 - Detaching the Stand Base 7 - Attaching the Stand Base 6 - Using the cable holder 9 - Mounting on a table 7 - 2 TABLE OF CONTENTS CONTENTS ENEGNLGISH 3 ASSEMBLING AND PREPAR- ING 3 Unpacking 4 Parts and buttons 5 Setting up the Monitor set . Setting 19 -Picture Mode 20 -SUPER ENERGY SAVING 21 -DUAL DISPLAY 21 -DUAL WEB 22 -MY KEY Setting 23 TROUBLESHOOTING 25 SPECIFICATIONS 25 22EA53V 26 23EA53V 27 24EA53V 28 27EA53V 29 Preset Modes (Resolution) 29 HDMI...
Owners Manual
Page 4
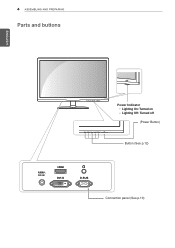
4 ASSEMBLING AND PREPARING Parts and buttons ENEGNLGISH Power Indicator yyLighting On: Turned on yyLighting Off: Turned off (Power Button) Button (See p.12) DC-IN HDMI DVI-D D-SUB Connection panel (See p.10)
4 ASSEMBLING AND PREPARING Parts and buttons ENEGNLGISH Power Indicator yyLighting On: Turned on yyLighting Off: Turned off (Power Button) Button (See p.12) DC-IN HDMI DVI-D D-SUB Connection panel (See p.10)
Owners Manual
Page 9
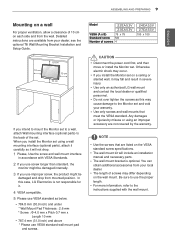
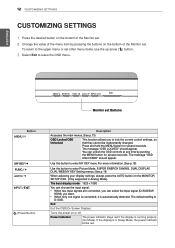
... instructions are available from mounted position. Model 22EA53V 23EA53V VESA (A x B) 75 x 75 Standard screw M4 Number of screws 4 24EA53V 27EA53V 100 x 100 CAUTION yyDisconnect the power cord first, and then move or install the Monitor set . yyUse only screws and wall mounts that are not covered by the warranty. yyFor more information, refer to use VESA standard wall mount pad and screws. When you intend to mount the Monitor set to a wall, attach Wall mounting interface (optional parts) to the Monitor set using...
... instructions are available from mounted position. Model 22EA53V 23EA53V VESA (A x B) 75 x 75 Standard screw M4 Number of screws 4 24EA53V 27EA53V 100 x 100 CAUTION yyDisconnect the power cord first, and then move or install the Monitor set . yyUse only screws and wall mounts that are not covered by the warranty. yyFor more information, refer to use VESA standard wall mount pad and screws. When you intend to mount the Monitor set to a wall, attach Wall mounting interface (optional parts) to the Monitor set using...
Owners Manual
Page 10
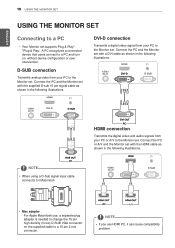
... the Monitor set . NOTE yyIf you use , a separate plug adapter is needed to change the 15 pin high density (3 row) D-SUB VGA connector on , without device configuration or user intervention. yyMac adapter For Apple Macintosh use HDMI PC, it can cause compatibility problem. NOTE yyWhen using a D-Sub signal input cable connector for Macintosh HDMI connection Transmits the digital video and audio signals from your PC to the Monitor set. D-SUB connection Transmits analog video from your PC to the Monitor set with the supplied...
... the Monitor set . NOTE yyIf you use , a separate plug adapter is needed to change the 15 pin high density (3 row) D-SUB VGA connector on , without device configuration or user intervention. yyMac adapter For Apple Macintosh use HDMI PC, it can cause compatibility problem. NOTE yyWhen using a D-Sub signal input cable connector for Macintosh HDMI connection Transmits the digital video and audio signals from your PC to the Monitor set. D-SUB connection Transmits analog video from your PC to the Monitor set with the supplied...
Owners Manual
Page 11
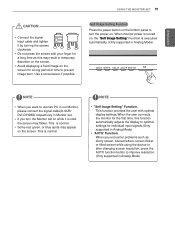
... monitor power is turned on, the "Self Image Setting" Function is executed automatically. (Only supported in Analog Mode) NOTE yyWhen you want to use two PC in our Monitor, please connect the signal cable(D-SUB/ DVI-D/HDMI) respectively in temporary distortion on the screen. yySome red, green, or blue spots may flicker. When you turn the power on. yyAvoid displaying a fixed image on the screen for individual input signals.(Only supported in Analog Mode) USING THE MONITOR SET 11 Self Image Setting Function Press the power button on...
... monitor power is turned on, the "Self Image Setting" Function is executed automatically. (Only supported in Analog Mode) NOTE yyWhen you want to use two PC in our Monitor, please connect the signal cable(D-SUB/ DVI-D/HDMI) respectively in temporary distortion on the screen. yySome red, green, or blue spots may flicker. When you turn the power on. yyAvoid displaying a fixed image on the screen for individual input signals.(Only supported in Analog Mode) USING THE MONITOR SET 11 Self Image Setting Function Press the power button on...
Owners Manual
Page 12
... the display is in Analog Mode) The best display mode 1920 x 1080 You can choose the input signal. • When two input signals are connected, you can unlock the OSD controls at any time by pressing the buttons on the bottom of the Monitor set other menu items, use the up arrow ( ) button. 3 Select Exit to leave the OSD menu. You can select the input signal (D-SUB/DVI/ HDMI) you to enter Picture Mode, SUPER ENERGY SAVING, DUAL DISPLAY, DUAL...
... the display is in Analog Mode) The best display mode 1920 x 1080 You can choose the input signal. • When two input signals are connected, you can unlock the OSD controls at any time by pressing the buttons on the bottom of the Monitor set other menu items, use the up arrow ( ) button. 3 Select Exit to leave the OSD menu. You can select the input signal (D-SUB/DVI/ HDMI) you to enter Picture Mode, SUPER ENERGY SAVING, DUAL DISPLAY, DUAL...
Owners Manual
Page 13
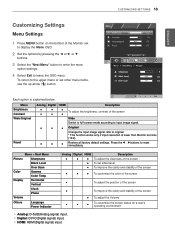
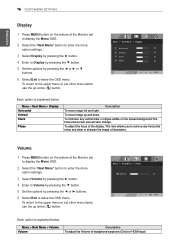
...; Restore all factory default settings. ENEGNLGISH Customizing Settings Menu Settings 1 Press MENU button on the bottom of the screen ● To adjust the Volume ● ● ● To customize the screen status for a user's operating environment yyAnalog: D-SUB(Analog signal) input. To return to leave the OSD menu. Menu Brightness Contrast Wide/Original Reset Analog Digital HDMI Description ● ● ● To adjust the brightness, contrast of the screen ● ● ● Wide Switch to full screen mode according to input image signal. ● ●...
...; Restore all factory default settings. ENEGNLGISH Customizing Settings Menu Settings 1 Press MENU button on the bottom of the screen ● To adjust the Volume ● ● ● To customize the screen status for a user's operating environment yyAnalog: D-SUB(Analog signal) input. To return to leave the OSD menu. Menu Brightness Contrast Wide/Original Reset Analog Digital HDMI Description ● ● ● To adjust the brightness, contrast of the screen ● ● ● Wide Switch to full screen mode according to input image signal. ● ●...
Owners Manual
Page 14
... image for DTV timing in HDMI input.(only for video signal, it is explained below. You can show. If you select 'High', the screen will be bright and if you select 'Low', the screen will be dark.(only for HDMI input) * Offset?As the criteria for HDMI input)Recommend overscan function to turn on the bottom of the Monitor set to display the Menu OSD. 2 Select the "Next Menu" button...
... image for DTV timing in HDMI input.(only for video signal, it is explained below. You can show. If you select 'High', the screen will be bright and if you select 'Low', the screen will be dark.(only for HDMI input) * Offset?As the criteria for HDMI input)Recommend overscan function to turn on the bottom of the Monitor set to display the Menu OSD. 2 Select the "Next Menu" button...
Owners Manual
Page 16
... Menu > Display Horizontal Vertical Clock Phase Description To move image up arrow ( ) button. This item allows you to remove any vertical bars or stripes visible on the bottom of headphone/earphone.(Only for HDMI input) On Off EXIT Volume 1 Press MENU button on the screen background.The horizontal screen size will also change. On Off To minimize any horizontal noise and clear or sharpen the image of the Monitor set other menu items, use...
... Menu > Display Horizontal Vertical Clock Phase Description To move image up arrow ( ) button. This item allows you to remove any vertical bars or stripes visible on the bottom of headphone/earphone.(Only for HDMI input) On Off EXIT Volume 1 Press MENU button on the screen background.The horizontal screen size will also change. On Off To minimize any horizontal noise and clear or sharpen the image of the Monitor set other menu items, use...
Owners Manual
Page 17
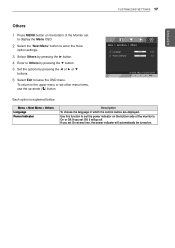
... will automatically be turned on the bottom side of the Monitor set to display the Menu OSD. 2 Select the "Next Menu" button to enter the more option settings. 3 Select Others by pressing the ► button. 4 Enter to Others by pressing the ▼ button. 5 Set the options by pressing the ◄ or ► or ▼ buttons. 6 Select Exit to leave the OSD menu. Each option is...
... will automatically be turned on the bottom side of the Monitor set to display the Menu OSD. 2 Select the "Next Menu" button to enter the more option settings. 3 Select Others by pressing the ► button. 4 Enter to Others by pressing the ▼ button. 5 Set the options by pressing the ◄ or ► or ▼ buttons. 6 Select Exit to leave the OSD menu. Each option is...
Owners Manual
Page 19
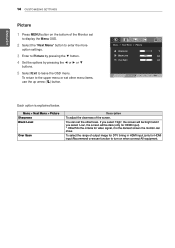
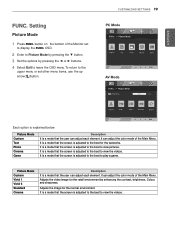
... is a mode that the user can adjust each element. Adjusts the video image for the textworks. It can adjust the color mode of the Monitor set other menu items, use the up arrow( )button. It is a mode that the screen is a mode that the screen is adjusted to the best to the upper menu or set to Picture Mode by pressing the ▼ button. 3 Set the options by enhancing the contrast, brightness, Colour, and sharpness. Setting Picture Mode 1 Press FUNC. button on...
... is a mode that the user can adjust each element. Adjusts the video image for the textworks. It can adjust the color mode of the Monitor set other menu items, use the up arrow( )button. It is a mode that the screen is a mode that the screen is adjusted to the best to the upper menu or set to Picture Mode by pressing the ▼ button. 3 Set the options by enhancing the contrast, brightness, Colour, and sharpness. Setting Picture Mode 1 Press FUNC. button on...
Owners Manual
Page 20
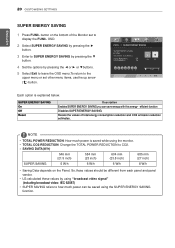
... inch) SUPER SAVING 5 W/h 6 W/h 6 W/h 8 W/h yySaving Data depends on the bottom of total energy consumption reduction and CO2 emission reduction estimates. Resets the values of the Monitor set other menu items, use the up arrow ( ) button. OSD. 2 Select SUPER ENERGY SAVING by pressing the ► button. 3 Enter to SUPER ENERGY SAVING by pressing the ▼ button. 4 Set the options by using "broadcast video signal" (including broadcast video: IEC 62087) yySUPER SAVING...
... inch) SUPER SAVING 5 W/h 6 W/h 6 W/h 8 W/h yySaving Data depends on the bottom of total energy consumption reduction and CO2 emission reduction estimates. Resets the values of the Monitor set other menu items, use the up arrow ( ) button. OSD. 2 Select SUPER ENERGY SAVING by pressing the ► button. 3 Enter to SUPER ENERGY SAVING by pressing the ▼ button. 4 Set the options by using "broadcast video signal" (including broadcast video: IEC 62087) yySUPER SAVING...
Owners Manual
Page 21
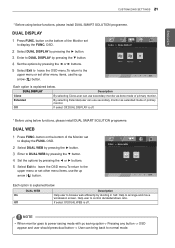
... 5O0 ff Description By selecting Clone,user can use secondary monitor as extended mode of the Monitor set other menu items, use the up arrow ( ) button. Help user to display the FUNC. ENEGNLGISH Color Temp Red 50 Green 50 Blue 50 CUSTOMIZING SETTINGS 21 EXIT * Before using below functions, please install DUAL SMART SOLUTION programme. EXIT * Before using below functions, please install DUAL SMART SOLUTION programme. OSD. 2 Select DUAL WEB by pressing...
... 5O0 ff Description By selecting Clone,user can use secondary monitor as extended mode of the Monitor set other menu items, use the up arrow ( ) button. Help user to display the FUNC. ENEGNLGISH Color Temp Red 50 Green 50 Blue 50 CUSTOMIZING SETTINGS 21 EXIT * Before using below functions, please install DUAL SMART SOLUTION programme. EXIT * Before using below functions, please install DUAL SMART SOLUTION programme. OSD. 2 Select DUAL WEB by pressing...
Owners Manual
Page 22
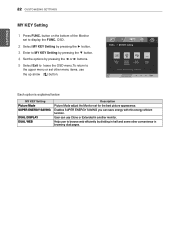
... KEY Setting Picture Mode SUPER ENERGY SAVING DUAL DISPLAY DUAL WEB Description Picture Mode adjust the Monitor set to the upper menu or set other convenience in another monitor. On Off 5 Select Exit to leave the OSD menu.To return to display the FUNC. EXIT Each option is explained below. User can save energy with this energy-effcient function. Help user to MY KEY Setting by pressing the ▼ button. 4 Set the options...
... KEY Setting Picture Mode SUPER ENERGY SAVING DUAL DISPLAY DUAL WEB Description Picture Mode adjust the Monitor set to the upper menu or set other convenience in another monitor. On Off 5 Select Exit to leave the OSD menu.To return to display the FUNC. EXIT Each option is explained below. User can save energy with this energy-effcient function. Help user to MY KEY Setting by pressing the ▼ button. 4 Set the options...

Owners Manual
Page 23
... setting. No image appears Is the power cord of the display. yy Adjust the brightness and the contrast. yy This message appears when the signal from the PC (video card) is out of horizontal or vertical frequency range of the display connected? yy Check and see "OSD LOCKED" when yy You can unlock the OSD controls at any image or characters are visible. yy Check Control Panel ► Display ► Settings and adjust the display to the recommended resolution or adjust the display image to turn...
... setting. No image appears Is the power cord of the display. yy Adjust the brightness and the contrast. yy This message appears when the signal from the PC (video card) is out of horizontal or vertical frequency range of the display connected? yy Check and see "OSD LOCKED" when yy You can unlock the OSD controls at any image or characters are visible. yy Check Control Panel ► Display ► Settings and adjust the display to the recommended resolution or adjust the display image to turn...
Owners Manual
Page 24
... the video card supports Plug&Play function. yy Be sure to fasten if necessary. yyIf the recommended resolution (optimal resolution) is flickering. yy Check if the signal cable is properly connected and use a screwdriver to install the display driver from our web site: http://www.lg.com. In this case, please ask to the recommend resolution. ENEGNLGISH 24 TROUBLESHOOTING CAUTION yyCheck Control Panel ► Display ► Settings and see an "Unrecognized monitor, Plug&Play (VESA DDC) monitor...
... the video card supports Plug&Play function. yy Be sure to fasten if necessary. yyIf the recommended resolution (optimal resolution) is flickering. yy Check if the signal cable is properly connected and use a screwdriver to install the display driver from our web site: http://www.lg.com. In this case, please ask to the recommend resolution. ENEGNLGISH 24 TROUBLESHOOTING CAUTION yyCheck Control Panel ► Display ► Settings and see an "Unrecognized monitor, Plug&Play (VESA DDC) monitor...
Owners Manual
Page 25
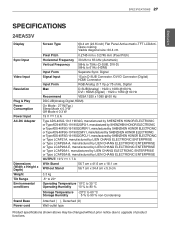
... be changed without prior notice due to 61Hz (HDMI) Input Form Separate Sync. SPECIFICATIONS SPECIFICATIONS 25 ENEGNLGISH 22EA53V Display Sync Input Video Input Resolution Plug & Play Power Consumption Power Input AC-DC Adapter Dimensions (Width x Height x Depth) Weight Tilt Range Environmental conditions Stand Base Power cord Screen Type 54.6 cm (21.5 inch) Flat Panel Active matrix-TFT LCDAntiGlare coating Visible diagonal size: 54.6 cm Pixel Pitch 0.08265 mm x 0.24795 mm (Pixel Pitch) Horizontal Frequency Vertical Frequency 30 kHz to 83 kHz (Automatic) 56Hz to 75Hz (D-SUB, DVI...
... be changed without prior notice due to 61Hz (HDMI) Input Form Separate Sync. SPECIFICATIONS SPECIFICATIONS 25 ENEGNLGISH 22EA53V Display Sync Input Video Input Resolution Plug & Play Power Consumption Power Input AC-DC Adapter Dimensions (Width x Height x Depth) Weight Tilt Range Environmental conditions Stand Base Power cord Screen Type 54.6 cm (21.5 inch) Flat Panel Active matrix-TFT LCDAntiGlare coating Visible diagonal size: 54.6 cm Pixel Pitch 0.08265 mm x 0.24795 mm (Pixel Pitch) Horizontal Frequency Vertical Frequency 30 kHz to 83 kHz (Automatic) 56Hz to 75Hz (D-SUB, DVI...
Owners Manual
Page 26
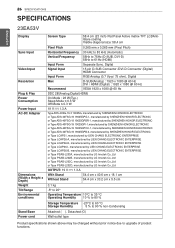
... be changed without prior notice due to 61Hz (HDMI) Input Form Separate Sync. 26 SPECIFICATIONS SPECIFICATIONS ENEGNLGISH 23EA53V Display Sync Input Video Input Resolution Plug & Play Power Consumption Power Input AC-DC Adapter Dimensions (Width x Height x Depth) Weight Tilt Range Environmental conditions Stand Base Power cord Screen Type 58.4 cm (23 inch) Flat Panel Active matrix-TFT LCDAntiGlare coating Visible diagonal size: 58.4 cm Pixel Pitch 0.265 mm x 0.265 mm (Pixel Pitch) Horizontal Frequency Vertical Frequency 30 kHz to 83 kHz (Automatic) 56Hz to 75Hz (D-SUB, DVI...
... be changed without prior notice due to 61Hz (HDMI) Input Form Separate Sync. 26 SPECIFICATIONS SPECIFICATIONS ENEGNLGISH 23EA53V Display Sync Input Video Input Resolution Plug & Play Power Consumption Power Input AC-DC Adapter Dimensions (Width x Height x Depth) Weight Tilt Range Environmental conditions Stand Base Power cord Screen Type 58.4 cm (23 inch) Flat Panel Active matrix-TFT LCDAntiGlare coating Visible diagonal size: 58.4 cm Pixel Pitch 0.265 mm x 0.265 mm (Pixel Pitch) Horizontal Frequency Vertical Frequency 30 kHz to 83 kHz (Automatic) 56Hz to 75Hz (D-SUB, DVI...
Owners Manual
Page 27
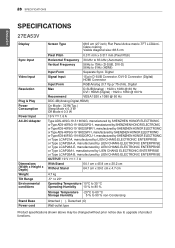
... SPECIFICATIONS 24EA53V Display Sync Input Video Input Resolution Plug & Play Power Consumption Power Input AC-DC Adapter Dimensions (Width x Height x Depth) Weight Tilt Range Environmental conditions Stand Base Power cord Screen Type 60.4 cm (23.8 inch) Flat Panel Active matrix-TFT LCDAntiGlare coating Visible diagonal size: 60.4 cm Pixel Pitch 0.2745 mm x 0.2745 mm (Pixel Pitch) Horizontal Frequency 30 kHz to 83 kHz (Automatic) Vertical Frequency 56Hz to 75Hz (D-SUB, DVI-D) 56Hz to upgrade of product functions. Digital Signal Input 15 pin D-SUB Connector /DVI-D Connector...
... SPECIFICATIONS 24EA53V Display Sync Input Video Input Resolution Plug & Play Power Consumption Power Input AC-DC Adapter Dimensions (Width x Height x Depth) Weight Tilt Range Environmental conditions Stand Base Power cord Screen Type 60.4 cm (23.8 inch) Flat Panel Active matrix-TFT LCDAntiGlare coating Visible diagonal size: 60.4 cm Pixel Pitch 0.2745 mm x 0.2745 mm (Pixel Pitch) Horizontal Frequency 30 kHz to 83 kHz (Automatic) Vertical Frequency 56Hz to 75Hz (D-SUB, DVI-D) 56Hz to upgrade of product functions. Digital Signal Input 15 pin D-SUB Connector /DVI-D Connector...
Owners Manual
Page 28
... SPECIFICATIONS 27EA53V Display Sync Input Video Input Resolution Plug & Play Power Consumption Power Input AC-DC Adapter Dimensions (Width x Height x Depth) Weight Tilt Range Environmental conditions Stand Base Power cord Screen Type 68.5 cm (27 inch) Flat Panel Active matrix-TFT LCDAntiGlare coating Visible diagonal size: 68.5 cm Pixel Pitch 0.311 mm x 0.311 mm (Pixel Pitch) Horizontal Frequency 30 kHz to 83 kHz (Automatic) Vertical Frequency 56Hz to 75Hz (D-SUB, DVI-D) 56Hz to upgrade of product functions. Digital Signal Input 15 pin D-SUB Connector /DVI-D Connector (Digital...
... SPECIFICATIONS 27EA53V Display Sync Input Video Input Resolution Plug & Play Power Consumption Power Input AC-DC Adapter Dimensions (Width x Height x Depth) Weight Tilt Range Environmental conditions Stand Base Power cord Screen Type 68.5 cm (27 inch) Flat Panel Active matrix-TFT LCDAntiGlare coating Visible diagonal size: 68.5 cm Pixel Pitch 0.311 mm x 0.311 mm (Pixel Pitch) Horizontal Frequency 30 kHz to 83 kHz (Automatic) Vertical Frequency 56Hz to 75Hz (D-SUB, DVI-D) 56Hz to upgrade of product functions. Digital Signal Input 15 pin D-SUB Connector /DVI-D Connector (Digital...


