Owners Manual - English
Page 1
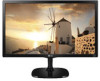
Please read this manual carefully before operating your set and retain it for future reference. Owner's Manual IPS LED MONITOR (LED MONITOR*) *LG LED Monitors are LCD Monitors with LED Backlighting. IPS LED MONITOR MODEL 22MP57A 23MP57A 24MP57D 27MP57HQ 22MP57D 23MP57D 24MP57HQ 27MP57VQ 22MP57HQ 23MP57H 24MP57VQ 27MP57HT 22MP57VQ 23MP57HQ 23MP57VQ www.lg.com
Please read this manual carefully before operating your set and retain it for future reference. Owner's Manual IPS LED MONITOR (LED MONITOR*) *LG LED Monitors are LCD Monitors with LED Backlighting. IPS LED MONITOR MODEL 22MP57A 23MP57A 24MP57D 27MP57HQ 22MP57D 23MP57D 24MP57HQ 27MP57VQ 22MP57HQ 23MP57H 24MP57VQ 27MP57HT 22MP57VQ 23MP57HQ 23MP57VQ www.lg.com
Owners Manual - English
Page 2
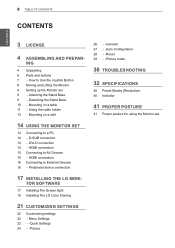
...CONTENTS ENGLISH 3 LICENSE 4 ASSEMBLING AND PREPAR- DVI-D connection 14 - ING 4 Unpacking 6 Parts and buttons 7 - TOR SOFTWARE 17 Installing The Screen Split 19 Installing The LG Color Cloning 21 CUSTOMIZING SETTINGS 22 Customizing settings 22 - HDMI connection 15 Connecting to Use the Joystick Button 8 Moving and Lifting the Monitor 9 Setting up the Monitor set . Attaching the Stand Base 9 - Menu Settings 22 - -Quick Settings 24 - -Picture 26 - -General 27 - -Auto Configuration 28 - -Reset 29 - -Picture mode 30 TROUBLESHOOTING 32 SPECIFICATIONS 40 Preset Modes (Resolution) 40...
...CONTENTS ENGLISH 3 LICENSE 4 ASSEMBLING AND PREPAR- DVI-D connection 14 - ING 4 Unpacking 6 Parts and buttons 7 - TOR SOFTWARE 17 Installing The Screen Split 19 Installing The LG Color Cloning 21 CUSTOMIZING SETTINGS 22 Customizing settings 22 - HDMI connection 15 Connecting to Use the Joystick Button 8 Moving and Lifting the Monitor 9 Setting up the Monitor set . Attaching the Stand Base 9 - Menu Settings 22 - -Quick Settings 24 - -Picture 26 - -General 27 - -Auto Configuration 28 - -Reset 29 - -Picture mode 30 TROUBLESHOOTING 32 SPECIFICATIONS 40 Preset Modes (Resolution) 40...
Owners Manual - English
Page 7
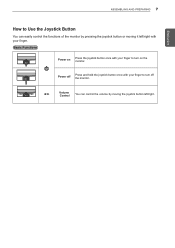
Power off Press and hold the joystick button once with your finger to turn on the monitor. ASSEMBLING AND PREPARING 7 ENEGNLGISH How to Use the Joystick Button You can control the volume by pressing the joystick button or moving the joystick button left /right with your finger to turn off the monitor. ◄/► Volume Control You can easily control the functions of the monitor by moving it left /right. Basic Functions Power on Press the joystick button once with your finger.
Power off Press and hold the joystick button once with your finger to turn on the monitor. ASSEMBLING AND PREPARING 7 ENEGNLGISH How to Use the Joystick Button You can control the volume by pressing the joystick button or moving the joystick button left /right with your finger to turn off the monitor. ◄/► Volume Control You can easily control the functions of the monitor by moving it left /right. Basic Functions Power on Press the joystick button once with your finger.
Owners Manual - English
Page 10
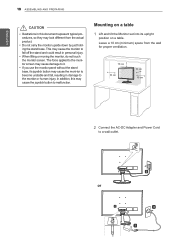
... unstable and fall off the stand and could result in this may look different from the wall for proper ventilation. 10 cm 10 cm 10 cm 10 cm 2 Connect the AC-DC Adapter and Power Cord to it. ENEGNLGISH 10 ASSEMBLING AND PREPARING CAUTION yyIllustrations in personal injury. yyIf you use the monitor panel without the stand base, its upright position on a table.
... unstable and fall off the stand and could result in this may look different from the wall for proper ventilation. 10 cm 10 cm 10 cm 10 cm 2 Connect the AC-DC Adapter and Power Cord to it. ENEGNLGISH 10 ASSEMBLING AND PREPARING CAUTION yyIllustrations in personal injury. yyIf you use the monitor panel without the stand base, its upright position on a table.
Owners Manual - English
Page 11
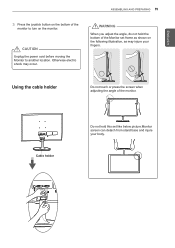
... ENGLISH ASSEMBLING AND PREPARING 11 3 Press the joystick button on the bottom of the monitor. Cable holder Do not hold the bottom of the Monitor set like below picture.Monitor screen can detach from stand base and injure your fingers. WARNING When you adjust the angle, do not hold this set frame as shown on the following illustration, as may occur. CAUTION Unplug the power cord...
... ENGLISH ASSEMBLING AND PREPARING 11 3 Press the joystick button on the bottom of the monitor. Cable holder Do not hold the bottom of the Monitor set like below picture.Monitor screen can detach from stand base and injure your fingers. WARNING When you adjust the angle, do not hold this set frame as shown on the following illustration, as may occur. CAUTION Unplug the power cord...
Owners Manual - English
Page 13
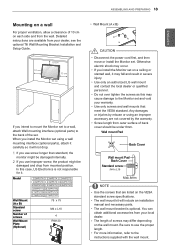
... install the Monitor set using an improper accessory are available from your warranty. Any damages or injuries by misuse or using a wall mounting interface (optional parts), attach it carefully so it may occur. Detailed instructions are not covered by the warranty. Be sure to the instructions supplied with the wall mount. yyUse only screws and wall mounts that are listed on the VESA standard screw specifications. ASSEMBLING AND PREPARING 13 ENEGNLGISH Mounting...
... install the Monitor set using an improper accessory are available from your warranty. Any damages or injuries by misuse or using a wall mounting interface (optional parts), attach it carefully so it may occur. Detailed instructions are not covered by the warranty. Be sure to the instructions supplied with the wall mount. yyUse only screws and wall mounts that are listed on the VESA standard screw specifications. ASSEMBLING AND PREPARING 13 ENEGNLGISH Mounting...

Owners Manual - English
Page 14
... can cause compatibility problem. Connect the PC and the Monitor set with the supplied D-sub 15 pin signal cable as shown in the following illustrations. NOTE yyWhen using a D-Sub signal input cable connector for Macintosh HDMI connection Transmits the digital video and audio signals from your PC to the Monitor set. ENGLISH 14 USING THE MONITOR SET USING THE MONITOR SET Connecting to a PC yyYour Monitor set supports Plug & Play*. *Plug & Play: A PC recognizes a connected device that users connect to a 15 pin 2 row connector. DVI-D connection Transmits a digital video signal from...
... can cause compatibility problem. Connect the PC and the Monitor set with the supplied D-sub 15 pin signal cable as shown in the following illustrations. NOTE yyWhen using a D-Sub signal input cable connector for Macintosh HDMI connection Transmits the digital video and audio signals from your PC to the Monitor set. ENGLISH 14 USING THE MONITOR SET USING THE MONITOR SET Connecting to a PC yyYour Monitor set supports Plug & Play*. *Plug & Play: A PC recognizes a connected device that users connect to a 15 pin 2 row connector. DVI-D connection Transmits a digital video signal from...

Owners Manual - English
Page 15
... prevent image burn. Use a screensaver if possible. yyIf you turn the Monitor set . yySome red, green, or blue spots may flicker. This is normal. Connecting to AV Devices HDMI connection Transmits the digital video and audio signals from your finger for a long period of time to use HDMI PC, it by turning the screws clockwise. ENEGNLGISH USING THE MONITOR SET 15 CAUTION yyConnect the signal input cable and tighten it can cause compatibility problem. yyAvoid displaying a fixed image on the screen. Connect your...
... prevent image burn. Use a screensaver if possible. yyIf you turn the Monitor set . yySome red, green, or blue spots may flicker. This is normal. Connecting to AV Devices HDMI connection Transmits the digital video and audio signals from your finger for a long period of time to use HDMI PC, it by turning the screws clockwise. ENEGNLGISH USING THE MONITOR SET 15 CAUTION yyConnect the signal input cable and tighten it can cause compatibility problem. yyAvoid displaying a fixed image on the screen. Connect your...

Owners Manual - English
Page 21
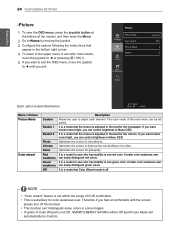
... 22MP57VQ 23MP57HQ Pi2ct4urMe MPo5d7eVQ 27MP57HQ 23MP57VQ 27MP57VQ 27MP57HT Picture Mode Main Menu Menu Picture Mode Input Auto Monitor off the monitor. Press the Auto button to automatically adjust your display image to the ideal setting. (Only supported in Analog Mode) Turns off Exit Description Configures the screen settings. Main menu enabled Enters the menu features. 22MP57HQ 23MP57H 24MP57HQ 27MP57HQ 22MP57VQ 23MP57HQ 24MP57VQ 27MP57VQ Main menu disabled 23MP57VQ 27MP57HT Adjusts the monitor volume level. 22MP57A 22MP57D 23MP57A 23MP57D 24MP57D Enables the...
... 22MP57VQ 23MP57HQ Pi2ct4urMe MPo5d7eVQ 27MP57HQ 23MP57VQ 27MP57VQ 27MP57HT Picture Mode Main Menu Menu Picture Mode Input Auto Monitor off the monitor. Press the Auto button to automatically adjust your display image to the ideal setting. (Only supported in Analog Mode) Turns off Exit Description Configures the screen settings. Main menu enabled Enters the menu features. 22MP57HQ 23MP57H 24MP57HQ 27MP57HQ 22MP57VQ 23MP57HQ 24MP57VQ 27MP57VQ Main menu disabled 23MP57VQ 27MP57HT Adjusts the monitor volume level. 22MP57A 22MP57D 23MP57A 23MP57D 24MP57D Enables the...

Owners Manual - English
Page 22
... OSD menu, move the joystick to the input video signal aspect ratio. Low Enables SMART ENERGY SAVING you can save energy with this energy- yyThe ratio is described below. ENEGNLGISH 22 CUSTOMIZING SETTINGS Customizing settings Menu Settings -Quick Settings 1 To view the OSD menu, press the joystick button at the recommended resolution (1920 x 1080). Menu > Quick Settings Brightness Contrast Volume 22MP57HQ 24MP57HQ 22MP57VQ 24MP57VQ 23MP57H 27MP57HQ 23MP57HQ 27MP57VQ 23MP57VQ 27MP57HT Description Adjusts the color contrast and brightness of the screen...
... OSD menu, move the joystick to the input video signal aspect ratio. Low Enables SMART ENERGY SAVING you can save energy with this energy- yyThe ratio is described below. ENEGNLGISH 22 CUSTOMIZING SETTINGS Customizing settings Menu Settings -Quick Settings 1 To view the OSD menu, press the joystick button at the recommended resolution (1920 x 1080). Menu > Quick Settings Brightness Contrast Volume 22MP57HQ 24MP57HQ 22MP57VQ 24MP57VQ 23MP57H 27MP57HQ 23MP57HQ 27MP57VQ 23MP57VQ 27MP57HT Description Adjusts the color contrast and brightness of the screen...
Owners Manual - English
Page 24
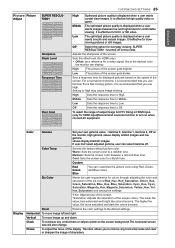
... the instructions that the screen is adjusted to the best for the cartoon. It is a mode that Color Wizard mode is off this function. It is a mode for color weakness user. It is a mode for gameplay. It is a mode that the screen is subsidiary for user who has inability to see green color. yyThis is adjusted to see red color. If you want screen more bright, you can control brightness in some images. Menu > Picture Picture Mode Color wizard...
... the instructions that the screen is adjusted to the best for the cartoon. It is a mode that Color Wizard mode is off this function. It is a mode for color weakness user. It is a mode for gameplay. It is a mode that the screen is subsidiary for user who has inability to see green color. yyThis is adjusted to see red color. If you want screen more bright, you can control brightness in some images. Menu > Picture Picture Mode Color wizard...
Owners Manual - English
Page 25
... a video signal, this mode. If user don't want adjusted gamma, user can select Gamma off in HDMI input. (only for DTV timing in this is recommended that you use Normal. Six Color Meets the user requirements for displayed pictures based on the screen background.The horizontal screen size will also change. Horizontal To move image up and down. This item allows you to the default settings. Low The optimized picture quality is displayed when a user wants images between a red...
... a video signal, this mode. If user don't want adjusted gamma, user can select Gamma off in HDMI input. (only for DTV timing in this is recommended that you use Normal. Six Color Meets the user requirements for displayed pictures based on the screen background.The horizontal screen size will also change. Horizontal To move image up and down. This item allows you to the default settings. Low The optimized picture quality is displayed when a user wants images between a red...
Owners Manual - English
Page 26
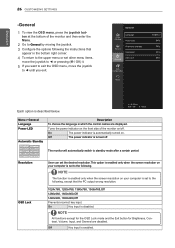
... OSD Lock mode and the Exit button for Brightness, Contrast, Volume, Input, and General are displayed. Resolution User can set the desired resolution.This option is enabled only when the screen resolution on your computer is set other menu items, move the joystick to ◄ or pressing ( / OK) it. 5 If you want to exit the OSD menu, move the joystick to the following the instructions that the PC output wrong resolution...
... OSD Lock mode and the Exit button for Brightness, Contrast, Volume, Input, and General are displayed. Resolution User can set the desired resolution.This option is enabled only when the screen resolution on your computer is set other menu items, move the joystick to ◄ or pressing ( / OK) it. 5 If you want to exit the OSD menu, move the joystick to the following the instructions that the PC output wrong resolution...

Owners Manual - English
Page 29
... ENERGY SAVING and Color Wizard will automatically be adjusted. It is a mode that the screen is described below. Joystick Button > Picture Mode Picture Mode Custom Reader 1 Reader 2 Photo Cinema Game Description Allows the user to ▲. 3 Configure the options following the instructions that appear in Menu OSD. Optimizes the screen for the cartoon. CUSTOMIZING SETTINGS 29 -Picture mode 1 Press the joystick button on the bottom of the monitor. 2 Go to Picture mode by...
... ENERGY SAVING and Color Wizard will automatically be adjusted. It is a mode that the screen is described below. Joystick Button > Picture Mode Picture Mode Custom Reader 1 Reader 2 Photo Cinema Game Description Allows the user to ▲. 3 Configure the options following the instructions that appear in Menu OSD. Optimizes the screen for the cartoon. CUSTOMIZING SETTINGS 29 -Picture mode 1 Press the joystick button on the bottom of the monitor. 2 Go to Picture mode by...

Owners Manual - English
Page 30
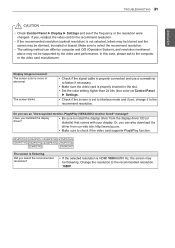
... manual and configure your display image to turn on the screen? Can 't you see a "NO SIGNAL" message on the PC. Set the color setting higher than 24 bits (true color). yy Press the Power button. No image appears Is the power cord of the display. yy If the display is in power saving mode, try moving the mouse or pressing any key on the screen? Display image is incorrect Display Position is out of horizontal or vertical frequency range...
... manual and configure your display image to turn on the screen? Can 't you see a "NO SIGNAL" message on the PC. Set the color setting higher than 24 bits (true color). yy Press the Power button. No image appears Is the power cord of the display. yy If the display is in power saving mode, try moving the mouse or pressing any key on the screen? Display image is incorrect Display Position is out of horizontal or vertical frequency range...
Owners Manual - English
Page 31
... install the display driver from our web site: http://www.lg.com. Display image is incorrect The screen color is not selected, letters may be blurred and the screen may be flickering. Do you select the recommended resolution? yy Make sure to check if the video card supports Plug&Play function. 22MP57HQ 23MP57H 24MP57HQ 27MP57HQ 22MP57VQ 23MP57HQ 24MP57VQ 27MP57VQ 23MP57VQ 27MP57HT The screen is set to interlace mode and if yes, change...
... install the display driver from our web site: http://www.lg.com. Display image is incorrect The screen color is not selected, letters may be blurred and the screen may be flickering. Do you select the recommended resolution? yy Make sure to check if the video card supports Plug&Play function. 22MP57HQ 23MP57H 24MP57HQ 27MP57HQ 22MP57VQ 23MP57HQ 24MP57VQ 27MP57VQ 23MP57VQ 27MP57HT The screen is set to interlace mode and if yes, change...
Owners Manual - English
Page 32
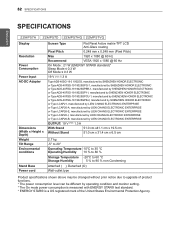
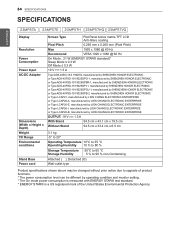
32 SPECIFICATIONS ENEGNLGISH SPECIFICATIONS 22MP57A 22MP57D 22MP57HQ 22MP57VQ Display Resolution Power Consumption Power Input AC-DC Adapter Dimensions (Width x Height x Depth) Weight Tilt Range Environmental conditions Stand Base Power cord Screen Type Flat Panel Active matrix-TFT LCD Anti-Glare coating Pixel Pitch Max 0.248 mm x 0.248 mm (Pixel Pitch) 1920 x 1080 @ 60 Hz Recommend VESA 1920 x 1080 @ 60 Hz On Mode : 21 W (ENERGY STAR® standard)* Sleep Mode ≤ 0.3 W Off Mode ≤ 0.3 W 19 V 1.3 A Type ADS-40SG-19...
32 SPECIFICATIONS ENEGNLGISH SPECIFICATIONS 22MP57A 22MP57D 22MP57HQ 22MP57VQ Display Resolution Power Consumption Power Input AC-DC Adapter Dimensions (Width x Height x Depth) Weight Tilt Range Environmental conditions Stand Base Power cord Screen Type Flat Panel Active matrix-TFT LCD Anti-Glare coating Pixel Pitch Max 0.248 mm x 0.248 mm (Pixel Pitch) 1920 x 1080 @ 60 Hz Recommend VESA 1920 x 1080 @ 60 Hz On Mode : 21 W (ENERGY STAR® standard)* Sleep Mode ≤ 0.3 W Off Mode ≤ 0.3 W 19 V 1.3 A Type ADS-40SG-19...
Owners Manual - English
Page 34
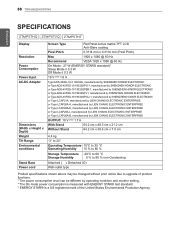
... 23MP57A 23MP57D 23MP57H 23MP57HQ 23MP57VQ Display Resolution Power Consumption Power Input AC-DC Adapter Dimensions (Width x Height x Depth) Weight Tilt Range Environmental conditions Stand Base Power cord Screen Type Flat Panel Active matrix-TFT LCD Anti-Glare coating Pixel Pitch Max 0.265 mm x 0.265 mm (Pixel Pitch) 1920 x 1080 @ 60 Hz Recommend VESA 1920 x 1080 @ 60 Hz On Mode : 21 W (ENERGY STAR® standard)* Sleep Mode ≤ 0.3 W Off Mode ≤ 0.3 W 19 V 1.3 A Type ADS-40SG-19...
... 23MP57A 23MP57D 23MP57H 23MP57HQ 23MP57VQ Display Resolution Power Consumption Power Input AC-DC Adapter Dimensions (Width x Height x Depth) Weight Tilt Range Environmental conditions Stand Base Power cord Screen Type Flat Panel Active matrix-TFT LCD Anti-Glare coating Pixel Pitch Max 0.265 mm x 0.265 mm (Pixel Pitch) 1920 x 1080 @ 60 Hz Recommend VESA 1920 x 1080 @ 60 Hz On Mode : 21 W (ENERGY STAR® standard)* Sleep Mode ≤ 0.3 W Off Mode ≤ 0.3 W 19 V 1.3 A Type ADS-40SG-19...

Owners Manual - English
Page 36
36 SPECIFICATIONS ENEGNLGISH SPECIFICATIONS 24MP57D 24MP57HQ 24MP57VQ Display Resolution Power Consumption Power Input AC-DC Adapter Dimensions (Width x Height x Depth) Weight Tilt Range Environmental conditions Stand Base Power cord Screen Type Flat Panel Active matrix-TFT LCD Anti-Glare coating Pixel Pitch 0.2745 mm x 0.2745 mm (Pixel Pitch) Max Recommend 1920 x 1080 @ 60 Hz VESA 1920 x 1080 @ 60 Hz On Mode : 22 W (ENERGY STAR® standard)* Sleep Mode ≤ 0.3 W Off Mode ≤ 0.3 W 19 V 1.3 A Type ADS-40SG-19-3 19025G, manufactured...
36 SPECIFICATIONS ENEGNLGISH SPECIFICATIONS 24MP57D 24MP57HQ 24MP57VQ Display Resolution Power Consumption Power Input AC-DC Adapter Dimensions (Width x Height x Depth) Weight Tilt Range Environmental conditions Stand Base Power cord Screen Type Flat Panel Active matrix-TFT LCD Anti-Glare coating Pixel Pitch 0.2745 mm x 0.2745 mm (Pixel Pitch) Max Recommend 1920 x 1080 @ 60 Hz VESA 1920 x 1080 @ 60 Hz On Mode : 22 W (ENERGY STAR® standard)* Sleep Mode ≤ 0.3 W Off Mode ≤ 0.3 W 19 V 1.3 A Type ADS-40SG-19-3 19025G, manufactured...
Owners Manual - English
Page 38
38 TROUBLESHOOTING ENEGNLGISH SPECIFICATIONS 27MP57HQ 27MP57VQ 27MP57HT Display Resolution Power Consumption Power Input AC-DC Adapter Dimensions (Width x Height x Depth) Weight Tilt Range Environmental conditions Stand Base Power cord Screen Type Flat Panel Active matrix-TFT LCD Anti-Glare coating Pixel Pitch 0.3114 mm x 0.3114 mm (Pixel Pitch) Max Recommend 1920 x 1080 @ 60 Hz VESA 1920 x 1080 @ 60 Hz On Mode : 27 W (ENERGY STAR® standard)* Sleep Mode ≤ 0.3 W Off Mode ≤ 0.3 W 19 V 1.6 A Type ADS-40SG-19-3 19032G...
38 TROUBLESHOOTING ENEGNLGISH SPECIFICATIONS 27MP57HQ 27MP57VQ 27MP57HT Display Resolution Power Consumption Power Input AC-DC Adapter Dimensions (Width x Height x Depth) Weight Tilt Range Environmental conditions Stand Base Power cord Screen Type Flat Panel Active matrix-TFT LCD Anti-Glare coating Pixel Pitch 0.3114 mm x 0.3114 mm (Pixel Pitch) Max Recommend 1920 x 1080 @ 60 Hz VESA 1920 x 1080 @ 60 Hz On Mode : 27 W (ENERGY STAR® standard)* Sleep Mode ≤ 0.3 W Off Mode ≤ 0.3 W 19 V 1.6 A Type ADS-40SG-19-3 19032G...


