
Owners Manual - English
Page 2
Attaching the Stand Base 10 - D-SUB connection 16 - Peripheral device connection 19 CUSTOMIZING SETTINGS 21 Customizing Settings 21 - Menu Settings 23 -Picture 24 -Color 25 -Display 25 -Audio 26 -Others 27 READER Setting 28 FUNC. Setting 28 -SMART ENERGY SAVING 29 -Picture Mode 30 -Color wizard ...
Attaching the Stand Base 10 - D-SUB connection 16 - Peripheral device connection 19 CUSTOMIZING SETTINGS 21 Customizing Settings 21 - Menu Settings 23 -Picture 24 -Color 25 -Display 25 -Audio 26 -Others 27 READER Setting 28 FUNC. Setting 28 -SMART ENERGY SAVING 29 -Picture Mode 30 -Color wizard ...
Owners Manual - English
Page 23
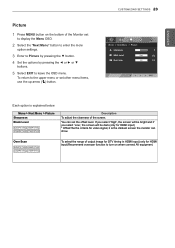
... or ► or ▼ buttons. 5 Select EXIT to the upper menu or set the offset level. You can show. Over Scan 22MP47HQ 24MP47HQ 23MP47HQ 27MP47HQ To select the range of output image for DTV timing in HDMI input.(only for video signal, it is explained below. ENEGNLGISH Picture 1 Press... MENU button on when connect AV equipment. To return to leave the OSD menu. CUSTOMIZING SETTINGS 23 Each option is the darkest screen the monitor can set other menu items, use the up arrow ( ) button. If you select 'High', the...
... or ► or ▼ buttons. 5 Select EXIT to the upper menu or set the offset level. You can show. Over Scan 22MP47HQ 24MP47HQ 23MP47HQ 27MP47HQ To select the range of output image for DTV timing in HDMI input.(only for video signal, it is explained below. ENEGNLGISH Picture 1 Press... MENU button on when connect AV equipment. To return to leave the OSD menu. CUSTOMIZING SETTINGS 23 Each option is the darkest screen the monitor can set other menu items, use the up arrow ( ) button. If you select 'High', the...


