Specification
Page 1
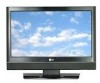
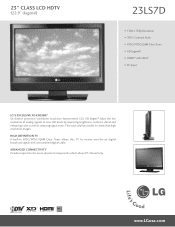
... in ATSC/NTSC/QAM Clear Tuner allows this TV to receive over-the-air digital broadcast signals and unscrambled digital cable. LG's XD Engine® takes the low resolution of analog signals to picture improvement. 23" CLASS LCD HDTV (22.9" diagonal) 23LS7D • 1366 x 768p Resolution • 700...:1 Contrast Ratio • ATSC/NTSC/QAM Clear Tuner • XD Engine® • HDMI™ with HDCP • PC Input LG's Exclusive XD Engine® Six distinct...
... in ATSC/NTSC/QAM Clear Tuner allows this TV to receive over-the-air digital broadcast signals and unscrambled digital cable. LG's XD Engine® takes the low resolution of analog signals to picture improvement. 23" CLASS LCD HDTV (22.9" diagonal) 23LS7D • 1366 x 768p Resolution • 700...:1 Contrast Ratio • ATSC/NTSC/QAM Clear Tuner • XD Engine® • HDMI™ with HDCP • PC Input LG's Exclusive XD Engine® Six distinct...
Specification
Page 2
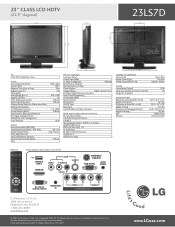
...Watts - Dimensions w/Packaging (W x H x D) 25.8" x 19.3" x 21.6" Weight In Package 21.6 lbs. LG Design and Life's Good are the property of LG Electronics, Inc. All other trademarks are trademarks of their respective owners. THD 10%) 3W + 3W Speaker System Details 1... Video In (Y,Pb,Pr) + L/R Audio 1 HDMI™/HDCP Input 1 RGB In (D-Sub 15pin) - 23" CLASS LCD HDTV (22.9" diagonal) 22.9" 3.3" 23LS7D 3.9" 3.9" 18.1" 16.3" 7.8" 14.4" TV ATSC/NTSC/QAM Clear Tuner • Video Native Display Resolution 1366 x 768p Contrast Ratio 700:1 Response Time ...
...Watts - Dimensions w/Packaging (W x H x D) 25.8" x 19.3" x 21.6" Weight In Package 21.6 lbs. LG Design and Life's Good are the property of LG Electronics, Inc. All other trademarks are trademarks of their respective owners. THD 10%) 3W + 3W Speaker System Details 1... Video In (Y,Pb,Pr) + L/R Audio 1 HDMI™/HDCP Input 1 RGB In (D-Sub 15pin) - 23" CLASS LCD HDTV (22.9" diagonal) 22.9" 3.3" 23LS7D 3.9" 3.9" 18.1" 16.3" 7.8" 14.4" TV ATSC/NTSC/QAM Clear Tuner • Video Native Display Resolution 1366 x 768p Contrast Ratio 700:1 Response Time ...

Owner's Manual (English)
Page 17
PREPARATION KENSINGTON SECURITY SYSTEM - The Kensington Security System is equipped with the Kensington Security System. ATTACHING THE TV TO A DESK (Only 23 inches) The TV must be pulled in a forward/backward direction, potentially causing injury or damaging the product. 2-Screws (M3x25) (not provided as parts of the Kensington Security System, ... as shown below. - NOTE - Tipping, shaking, or rocking the machine may cause injury/death. 15 Connect the Kensington Security System cable as notebook PCs and LCD projectors. The TV is an optional accessory.
PREPARATION KENSINGTON SECURITY SYSTEM - The Kensington Security System is equipped with the Kensington Security System. ATTACHING THE TV TO A DESK (Only 23 inches) The TV must be pulled in a forward/backward direction, potentially causing injury or damaging the product. 2-Screws (M3x25) (not provided as parts of the Kensington Security System, ... as shown below. - NOTE - Tipping, shaking, or rocking the machine may cause injury/death. 15 Connect the Kensington Security System cable as notebook PCs and LCD projectors. The TV is an optional accessory.
Owner's Manual (English)
Page 25
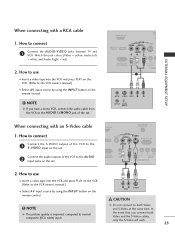
... Select A V input source by using the INPUT button on the set . How to both Video and the S-Video cables, only the S-Video will work. 23 How to use I Insert a video tape into the VCR and press PLAY on the remote control. ! Match the jack colors (Video = yellow, Audio Left ...Right = red) 2. NOTE G If you connect both Video and S-Video at the same time. G Do not connect to connect 1 Connect the AUDIO/VIDEO jacks between TV and VCR. I/DVI IN ANTENNA/ CABLE IN VIDEO AV IN S-VIDEO AUDIO RGB (PC) IN ( L(MONO) R -232C IN VICE ONLY) H/P 2 VIDEO AUDIO ...
... Select A V input source by using the INPUT button on the set . How to both Video and the S-Video cables, only the S-Video will work. 23 How to use I Insert a video tape into the VCR and press PLAY on the remote control. ! Match the jack colors (Video = yellow, Audio Left ...Right = red) 2. NOTE G If you connect both Video and S-Video at the same time. G Do not connect to connect 1 Connect the AUDIO/VIDEO jacks between TV and VCR. I/DVI IN ANTENNA/ CABLE IN VIDEO AV IN S-VIDEO AUDIO RGB (PC) IN ( L(MONO) R -232C IN VICE ONLY) H/P 2 VIDEO AUDIO ...
Owner's Manual (English)
Page 34
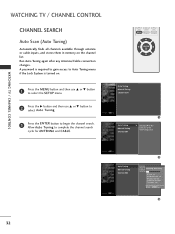
Auto Tuning screen. DTV Ch. 23 Found Channel(s) : 16 Press to complete the channel search cycle for ANTENNA and CABLE. Allow Auto Tuning to stop the current scan and start TV channel scan. Run Auto Tuning again after any Antenna/Cable connection changes. CC MENU BACK EXIT ENTER ... 3 A password is required to gain access to Auto Tuning menu if the Lock System is turned on the channel list. WATCHING TV / CHANNEL CONTROL WATCHING TV / CHANNEL CONTROL CHANNEL SEARCH Auto Scan (Auto Tuning) Automatically finds all channels available through antenna or cable inputs, and stores them ...
Auto Tuning screen. DTV Ch. 23 Found Channel(s) : 16 Press to complete the channel search cycle for ANTENNA and CABLE. Allow Auto Tuning to stop the current scan and start TV channel scan. Run Auto Tuning again after any Antenna/Cable connection changes. CC MENU BACK EXIT ENTER ... 3 A password is required to gain access to Auto Tuning menu if the Lock System is turned on the channel list. WATCHING TV / CHANNEL CONTROL WATCHING TV / CHANNEL CONTROL CHANNEL SEARCH Auto Scan (Auto Tuning) Automatically finds all channels available through antenna or cable inputs, and stores them ...

Owner's Manual (English)
Page 37
... be set up so that it was last set to even if you turn the TV off. Language Key Lock Caption Low Power : English : Off : Off : Off 1 Language Key Lock Caption Low Power G Off On 23 35 CC MENU BACK EXIT ENTER 1 Press the MENU button and then use D or E button to... select the OPTION menu. 2 Press the G button and then use D or E button to select Key Lock. 3 Press the G button and then use D or E button to select O n or O f f. 4 Press the EXIT button to return to TV...
... be set up so that it was last set to even if you turn the TV off. Language Key Lock Caption Low Power : English : Off : Off : Off 1 Language Key Lock Caption Low Power G Off On 23 35 CC MENU BACK EXIT ENTER 1 Press the MENU button and then use D or E button to... select the OPTION menu. 2 Press the G button and then use D or E button to select Key Lock. 3 Press the G button and then use D or E button to select O n or O f f. 4 Press the EXIT button to return to TV...
Owner's Manual (English)
Page 38
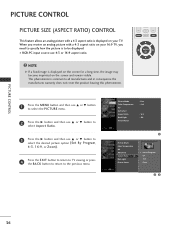
... Reset : User : Cool : 16:9 : 100 1 Picture Mode Color Temperature XD Advanced Aspect Ratio G Back Light Picture Reset Set By Program 4:3 16:9 Zoom 23 36 I RGB-PC input source use D or E button to select the desired picture option (Set By Program, 4 : 3, 16:9, or Zoom). 4 Press ...the EXIT button to return to TV viewing or press the B A C K button to return to all manufactures and in consequence the manufactures warranty does not cover the product bearing this phenomenon....
... Reset : User : Cool : 16:9 : 100 1 Picture Mode Color Temperature XD Advanced Aspect Ratio G Back Light Picture Reset Set By Program 4:3 16:9 Zoom 23 36 I RGB-PC input source use D or E button to select the desired picture option (Set By Program, 4 : 3, 16:9, or Zoom). 4 Press ...the EXIT button to return to TV viewing or press the B A C K button to return to all manufactures and in consequence the manufactures warranty does not cover the product bearing this phenomenon....
Owner's Manual (English)
Page 41
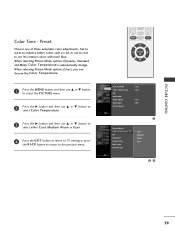
...Color Temperature. 3 Press the G button and then use D or E button to select either Cool, Medium, Warm or User. 4 Press the EXIT button to return to TV viewing or press the B A C K button to return to see less intense colors with more blue. Preset Choose one of three automatic color adjustments. VOL MUTE...Ratio Back Light Picture Reset : User : Cool : 16:9 : 100 1 Picture Mode Color Temperature G XD Advanced Aspect Ratio Back Light Picture Reset Cool Medium Warm User 23 39 When selecting Picture Mode options (Dynamic, Standard and Mild), Color Temperature is automatically change.
...Color Temperature. 3 Press the G button and then use D or E button to select either Cool, Medium, Warm or User. 4 Press the EXIT button to return to TV viewing or press the B A C K button to return to see less intense colors with more blue. Preset Choose one of three automatic color adjustments. VOL MUTE...Ratio Back Light Picture Reset : User : Cool : 16:9 : 100 1 Picture Mode Color Temperature G XD Advanced Aspect Ratio Back Light Picture Reset Cool Medium Warm User 23 39 When selecting Picture Mode options (Dynamic, Standard and Mild), Color Temperature is automatically change.
Owner's Manual (English)
Page 42
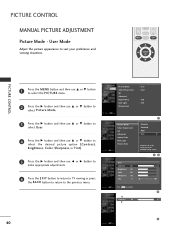
..., Color, Sharpness, or Tint). 5 Press the G button and then use F or G button to make appropriate adjustments. 6 Press the EXIT button to return to TV viewing or press the B A C K button to return to the previous menu. 40 Picture Mode Color Temperature XD Advanced Aspect Ratio Back Light Picture Reset : User... Aspect Ratio Back Light Picture Reset 1 Dynamic Standard Mild User G Selection ( G or ) leads you to the detailed setting screen. 23 User Contrast 85 Brightness 50 Color 50 Sharpness 50 Tint 0 R G G Press BACK to suit your preference and viewing situations. User ...
..., Color, Sharpness, or Tint). 5 Press the G button and then use F or G button to make appropriate adjustments. 6 Press the EXIT button to return to TV viewing or press the B A C K button to return to the previous menu. 40 Picture Mode Color Temperature XD Advanced Aspect Ratio Back Light Picture Reset : User... Aspect Ratio Back Light Picture Reset 1 Dynamic Standard Mild User G Selection ( G or ) leads you to the detailed setting screen. 23 User Contrast 85 Brightness 50 Color 50 Sharpness 50 Tint 0 R G G Press BACK to suit your preference and viewing situations. User ...
Owner's Manual (English)
Page 43
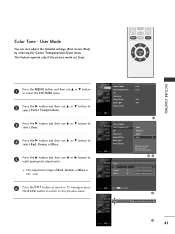
I The adjustment range of R e d, G r e e n, or B l u e is 20~ +20. 6 Press the EXIT button to return to TV viewing or press the B A C K button to return to make appropriate adjustments. This feature operate only if the picture mode set U s e r. Color Tone - VOL MUTE CC ... XD Advanced Aspect Ratio Back Light Picture Reset User Red 0 Green 0 Blue 0 1 Cool Medium Warm User G Selection ( G or ) leads you to the detailed setting screen. 23 G Press BACK to confirm. 4 E Red 0 F G E 5 41
I The adjustment range of R e d, G r e e n, or B l u e is 20~ +20. 6 Press the EXIT button to return to TV viewing or press the B A C K button to return to make appropriate adjustments. This feature operate only if the picture mode set U s e r. Color Tone - VOL MUTE CC ... XD Advanced Aspect Ratio Back Light Picture Reset User Red 0 Green 0 Blue 0 1 Cool Medium Warm User G Selection ( G or ) leads you to the detailed setting screen. 23 G Press BACK to confirm. 4 E Red 0 F G E 5 41
Owner's Manual (English)
Page 44
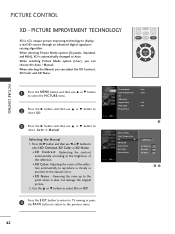
...G Advanced Aspect Ratio Back Light Picture Reset Manual XD Contrast On XD Color On XD Noise On 23 42 When selecting the Manual, you can adjust the XD Contrast, XD Color and XD Noise....the D or E button to select O n or O f f. 4 Press the EXIT button to return to TV viewing or press the B A C K button to return to the natural colors. PICTURE IMPROVEMENT TECHNOLOGY XD is ...automatically changed to Auto. When selecting Picture Mode options (Dynamic, Standard, and Mild), XD is LG's unique picture improving technology to the point where it does not damage the original picture. 2. ...
...G Advanced Aspect Ratio Back Light Picture Reset Manual XD Contrast On XD Color On XD Noise On 23 42 When selecting the Manual, you can adjust the XD Contrast, XD Color and XD Noise....the D or E button to select O n or O f f. 4 Press the EXIT button to return to TV viewing or press the B A C K button to return to the natural colors. PICTURE IMPROVEMENT TECHNOLOGY XD is ...automatically changed to Auto. When selecting Picture Mode options (Dynamic, Standard, and Mild), XD is LG's unique picture improving technology to the point where it does not damage the original picture. 2. ...
Owner's Manual (English)
Page 45
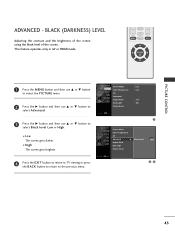
I High The screen gets brighter. 4 Press the EXIT button to return to TV viewing or press the B A C K button to return to select Black level Low or High. This feature operates only in AV or HDMI mode. BLACK (DARKNESS) ... Aspect Ratio Back Light Picture Reset : User : Cool : 16:9 : 100 1 Picture Mode Color Temperature XD Advanced G Aspect Ratio Back Light Picture Reset Black Level Low 23 43
I High The screen gets brighter. 4 Press the EXIT button to return to TV viewing or press the B A C K button to return to select Black level Low or High. This feature operates only in AV or HDMI mode. BLACK (DARKNESS) ... Aspect Ratio Back Light Picture Reset : User : Cool : 16:9 : 100 1 Picture Mode Color Temperature XD Advanced G Aspect Ratio Back Light Picture Reset Black Level Low 23 43
Owner's Manual (English)
Page 47
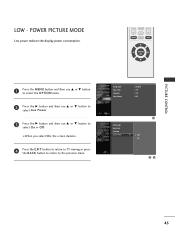
... use D or E button to the previous menu. Language Key Lock Caption Low Power : English : Off : Off : Off 1 Language Key Lock Caption Low Power G Off On 23 45 PICTURE CONTROL LOW - I When you select O n, the screen darkens. 4 Press the EXIT button to return to...
... use D or E button to the previous menu. Language Key Lock Caption Low Power : English : Off : Off : Off 1 Language Key Lock Caption Low Power G Off On 23 45 PICTURE CONTROL LOW - I When you select O n, the screen darkens. 4 Press the EXIT button to return to...

Owner's Manual (English)
Page 48
... Reset : User : Cool : 16:9 : 100 1 Picture Mode Color Temperature XD Advanced Aspect Ratio Back Light Picture Reset Selection ( G or ) G resets to the factory setting (defaults). 23 46
... Reset : User : Cool : 16:9 : 100 1 Picture Mode Color Temperature XD Advanced Aspect Ratio Back Light Picture Reset Selection ( G or ) G resets to the factory setting (defaults). 23 46
Owner's Manual (English)
Page 50
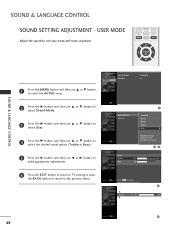
...option (Treble or Bass). 5 Press the G button and then use F or G button to make appropriate adjustments. 6 Press the EXIT button to return to TV viewing or press the B A C K button to return to the previous menu. 48 Sound Mode Balance : Standard : 0 Sound Mode Balance 1 Standard Music... Movie Sports User G Selection ( G or ) leads you to the detailed setting screen. 23 User Treble 50 G Bass 50 Press BACK to suit your taste and room situations. USER MODE Adjust the sound to confirm. 4 E Treble 85 F G E...
...option (Treble or Bass). 5 Press the G button and then use F or G button to make appropriate adjustments. 6 Press the EXIT button to return to TV viewing or press the B A C K button to return to the previous menu. 48 Sound Mode Balance : Standard : 0 Sound Mode Balance 1 Standard Music... Movie Sports User G Selection ( G or ) leads you to the detailed setting screen. 23 User Treble 50 G Bass 50 Press BACK to suit your taste and room situations. USER MODE Adjust the sound to confirm. 4 E Treble 85 F G E...
Owner's Manual (English)
Page 58
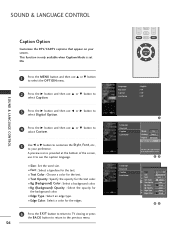
...Size : Set the word size. I Bg (Background) Opacity : Select the opacity for the edges. 6 Press the EXIT button to return to TV viewing or press the B A C K button to return to the previous menu. 56 VOL MUTE CC MENU BACK CH EXIT ENTER Language Key ... Lock Caption Low Power 1 Mode On Analog Text1 Digital Service3 Digital Option G Selection ( G or ) leads you to the Caption Option Screen. 23 ModSteyle On D E Custom AnaSliozge Text1 A Standard Font Font 1 Digital Service3 Text Color White DigiTteaxlt OOppaticoitny GSolid Bg Color Black Bg Opacity Solid SelectEiodng...
...Size : Set the word size. I Bg (Background) Opacity : Select the opacity for the edges. 6 Press the EXIT button to return to TV viewing or press the B A C K button to return to the previous menu. 56 VOL MUTE CC MENU BACK CH EXIT ENTER Language Key ... Lock Caption Low Power 1 Mode On Analog Text1 Digital Service3 Digital Option G Selection ( G or ) leads you to the Caption Option Screen. 23 ModSteyle On D E Custom AnaSliozge Text1 A Standard Font Font 1 Digital Service3 Text Color White DigiTteaxlt OOppaticoitny GSolid Bg Color Black Bg Opacity Solid SelectEiodng...
Owner's Manual (English)
Page 59
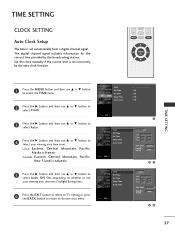
... SETTING Auto Clock Setup The time is set automatically from a digital channel signal. Date - - / - Time Time Zone Daylight Saving Eastern Auto 23 Auto Year - - - VOL MUTE CC MENU BACK CH EXIT ENTER Clock Off Time On Time Sleep Time Auto sleep Off : Off : Off... use D or E button to select Auto, O f f, O n, depending on whether or not your viewing area observes Daylight Saving time. 6 Press the EXIT button to return to TV viewing or press the B A C K button to return to select your viewing area time zone: U.S.A : E a s t e r n, C e n t r a l, M o u n t a i n, P a...
... SETTING Auto Clock Setup The time is set automatically from a digital channel signal. Date - - / - Time Time Zone Daylight Saving Eastern Auto 23 Auto Year - - - VOL MUTE CC MENU BACK CH EXIT ENTER Clock Off Time On Time Sleep Time Auto sleep Off : Off : Off... use D or E button to select Auto, O f f, O n, depending on whether or not your viewing area observes Daylight Saving time. 6 Press the EXIT button to return to TV viewing or press the B A C K button to return to select your viewing area time zone: U.S.A : E a s t e r n, C e n t r a l, M o u n t a i n, P a...

Owner's Manual (English)
Page 60
Press the G button and then use F or G button to the previous menu. Once selected, use D or E button to select Manual. Time 23 TIME SETTING 58 VOL MUTE CC MENU BACK CH EXIT ENTER 1 Press the MENU button and then use D or E button to select the TIME menu. 2 ... Clock. 3 Press the G button and then use the D or E button to set the year, date, and time options. 5 Press the EXIT button to return to TV viewing or press the B A C K button to return to 4 select either the year, date, or time option. Clock Off Time On Time Sleep Time Auto sleep...
Press the G button and then use F or G button to the previous menu. Once selected, use D or E button to select Manual. Time 23 TIME SETTING 58 VOL MUTE CC MENU BACK CH EXIT ENTER 1 Press the MENU button and then use D or E button to select the TIME menu. 2 ... Clock. 3 Press the G button and then use the D or E button to set the year, date, and time options. 5 Press the EXIT button to return to TV viewing or press the B A C K button to return to 4 select either the year, date, or time option. Clock Off Time On Time Sleep Time Auto sleep...

Owner's Manual (English)
Page 63
... : Oct 19, 2007, 03:44 AM : Off : Off : Off : Off 1 Clock Off Time On Time Sleep Time Auto sleep TV will be automatically turned off automatically after 10 minutes. G Off On 23 TIME SETTING 61 AUTO SHUT-OFF SETTING If set to the previous menu. VOL MUTE CC MENU BACK CH EXIT... use D or E button to select Auto sleep. 3 Press the G button and then use D or E button to select O n or O f f. 4 Press the EXIT button to return to TV viewing or press the B A C K button to return to on and there is no input signal, the...
... : Oct 19, 2007, 03:44 AM : Off : Off : Off : Off 1 Clock Off Time On Time Sleep Time Auto sleep TV will be automatically turned off automatically after 10 minutes. G Off On 23 TIME SETTING 61 AUTO SHUT-OFF SETTING If set to the previous menu. VOL MUTE CC MENU BACK CH EXIT... use D or E button to select Auto sleep. 3 Press the G button and then use D or E button to select O n or O f f. 4 Press the EXIT button to return to TV viewing or press the B A C K button to return to on and there is no input signal, the...
