
Brochure
Page 6
... Connection 16 EXTERNAL EQUIPMENT SETUP HD Receiver Setup 17 DVD Setup 20 VCR Setup 22 Headphone Setup 24 PC Setup 25 WATCHING TV / CHANNEL CONTROL Remote Control Functions 28 Turning On TV 30 Channel Selection 30 Volume Adjustment 30 On-Screen Menus Selection 31 Channel Setup 32 - Picture Improvement Technology 43...
... Connection 16 EXTERNAL EQUIPMENT SETUP HD Receiver Setup 17 DVD Setup 20 VCR Setup 22 Headphone Setup 24 PC Setup 25 WATCHING TV / CHANNEL CONTROL Remote Control Functions 28 Turning On TV 30 Channel Selection 30 Volume Adjustment 30 On-Screen Menus Selection 31 Channel Setup 32 - Picture Improvement Technology 43...

Brochure
Page 9
Please be cautions of the exterior. * Do not wipe roughly when removing stain. Owner's Manual LCD TV Owner's Manual http://www.lgusa.com www.lg.ca Copyright© 2007 LGE, All Rights Reserved. 7 5 3 - 8 6 0 9 BACK FAV MUTE C CH EXIT TV SAP POWER PICTURE 1 SOUND INPUT 4 ...7 5 3 - 8 6 0 9 VOL BACK FAV MUTE MENU CC CH ADJUST EXIT ENTER 1.5V 1.5V Owner's Manual CD Manual Remote Control, Batteries Power Cord Cable Management Option Extras Polishing Cloth * Slightly wipe stained spot on surface of that the following accessories are included with...
Please be cautions of the exterior. * Do not wipe roughly when removing stain. Owner's Manual LCD TV Owner's Manual http://www.lgusa.com www.lg.ca Copyright© 2007 LGE, All Rights Reserved. 7 5 3 - 8 6 0 9 BACK FAV MUTE C CH EXIT TV SAP POWER PICTURE 1 SOUND INPUT 4 ...7 5 3 - 8 6 0 9 VOL BACK FAV MUTE MENU CC CH ADJUST EXIT ENTER 1.5V 1.5V Owner's Manual CD Manual Remote Control, Batteries Power Cord Cable Management Option Extras Polishing Cloth * Slightly wipe stained spot on surface of that the following accessories are included with...

Brochure
Page 10
POWER INPUT MENU ENTER VOLUME CHANNEL Button Button Button Button (F,G)Buttons (E,D)Buttons /I Here shown may be somewhat different from your TV stand has a protection film, remove it attached to the stand. When the TV is turned on, the indicator blinks green and then illuminates green before the picture is displayed. ! NOTE G If your TV. Then wipe the stand with polishing cloth. 8 PREPARATION PREPARATION FRONT PANEL INFORMATION I INPUT MENU ENTER VOL CH Remote Control Sensor Power Standby Indicator Illuminates red in standby mode.
POWER INPUT MENU ENTER VOLUME CHANNEL Button Button Button Button (F,G)Buttons (E,D)Buttons /I Here shown may be somewhat different from your TV stand has a protection film, remove it attached to the stand. When the TV is turned on, the indicator blinks green and then illuminates green before the picture is displayed. ! NOTE G If your TV. Then wipe the stand with polishing cloth. 8 PREPARATION PREPARATION FRONT PANEL INFORMATION I INPUT MENU ENTER VOL CH Remote Control Sensor Power Standby Indicator Illuminates red in standby mode.

Brochure
Page 19
Y PB PR L R I Select Component input source by using the INPUT button on the remote control. When connecting Component cable 1. Connect the audio output of the digital set top box to the COMPONENT IN VIDEO jacks on the set. 2. Match ...
Y PB PR L R I Select Component input source by using the INPUT button on the remote control. When connecting Component cable 1. Connect the audio output of the digital set top box to the COMPONENT IN VIDEO jacks on the set. 2. Match ...
Brochure
Page 20
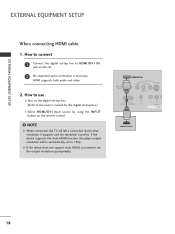
... the set -top box to 720p. G If the device does not support Auto HDMI, you need to set to HDMI/DVI IN jack on the remote control. ! If the device supports this Auto HDMI function, the player output resolution will tell a connected device what resolution it supports and the resolution it...
... the set -top box to 720p. G If the device does not support Auto HDMI, you need to set to HDMI/DVI IN jack on the remote control. ! If the device supports this Auto HDMI function, the player output resolution will tell a connected device what resolution it supports and the resolution it...

Brochure
Page 21
How to connect 1 Connect the DVI output of the digital set-top box to the HDMI/DVI IN jack on the remote control. 19 How to use I Turn on the digital set-top box. (Refer to the AUDIO IN (RGB/DVI) jack on the set -top box.) I ...
How to connect 1 Connect the DVI output of the digital set-top box to the HDMI/DVI IN jack on the remote control. 19 How to use I Turn on the digital set-top box. (Refer to the AUDIO IN (RGB/DVI) jack on the set -top box.) I ...

Brochure
Page 22
... DVD player Y PB PR Y B-Y R-Y Y Cb Cr Y Pb Pr 20 I Turn on the DVD player, insert a DVD. I Refer to the 2 COMPONENT IN AUDIO jacks on the remote control. Component ports on the TV Y PB PR Video output ports on the set . 2. EXTERNAL EQUIPMENT SETUP EXTERNAL EQUIPMENT SETUP DVD SETUP When connecting Component...
... DVD player Y PB PR Y B-Y R-Y Y Cb Cr Y Pb Pr 20 I Turn on the DVD player, insert a DVD. I Refer to the 2 COMPONENT IN AUDIO jacks on the remote control. Component ports on the TV Y PB PR Video output ports on the set . 2. EXTERNAL EQUIPMENT SETUP EXTERNAL EQUIPMENT SETUP DVD SETUP When connecting Component...

Brochure
Page 23
I Select A V input source by using the INPUT button on the remote control. HDMI supports both audio and video. 2. How to the DVD player's manual for operating instructions. ! HDMI/DVI IN VIDEO AV IN AUDIO S-VIDEO ANTENNA/ ... will be automatically set the output resolution appropriately. How to connect 1 Connect the HDMI output of the DVD to the AUDIO input jacks on the remote control. I Refer to use I Select HDMI/DVI input source by using the I Turn on the set . 2. SERVICE ONLY HDMI/DVI IN VIDEO AV IN S-VIDEO...
I Select A V input source by using the INPUT button on the remote control. HDMI supports both audio and video. 2. How to the DVD player's manual for operating instructions. ! HDMI/DVI IN VIDEO AV IN AUDIO S-VIDEO ANTENNA/ ... will be automatically set the output resolution appropriately. How to connect 1 Connect the HDMI output of the DVD to the AUDIO input jacks on the remote control. I Refer to use I Select HDMI/DVI input source by using the I Turn on the set . 2. SERVICE ONLY HDMI/DVI IN VIDEO AV IN S-VIDEO...

Brochure
Page 25
...VCR. (Refer to the AUDIO L/MONO jack of the VCR to the VCR owner's manual.) I Select A V input source by using the INPUT button on the remote control. ! NOTE G The picture quality is improved: compared to connect 1 Connect the AUDIO/VIDEO jacks between TV and VCR. In the event that you have... a mono VCR, connect the audio cable from the VCR to the VCR owner's manual.) I Select A V input source by using the INPUT button on the remote control. How to use I Insert a video tape into the VCR and press PLAY on the VCR. (Refer to the S -VIDEO input on the set . How...
...VCR. (Refer to the AUDIO L/MONO jack of the VCR to the VCR owner's manual.) I Select A V input source by using the INPUT button on the remote control. ! NOTE G The picture quality is improved: compared to connect 1 Connect the AUDIO/VIDEO jacks between TV and VCR. In the event that you have... a mono VCR, connect the audio cable from the VCR to the VCR owner's manual.) I Select A V input source by using the INPUT button on the remote control. How to use I Insert a video tape into the VCR and press PLAY on the VCR. (Refer to the S -VIDEO input on the set . How...

Brochure
Page 27
.... How to the AUDIO IN 2 (RGB/DVI) jack on the set . /P Connect the PC audio output to use VIDEO AUDIO COMPONENT IN 1 2 I Turn on the remote control. EXTERNAL EQUIPMENT SETUP PC SETUP This TV provides Plug and Play capability, meaning that the PC adjusts automatically to DVI cable 1. When connecting D-sub.../DVI) L(MONO) R 1 Connect the RGB output of the PC to the AUDIO IN 2 (RGB/DVI) jack on the PC and the TV. I N jack on the remote control. 2 DVI-PC OUTPUT AUDIO 25
.... How to the AUDIO IN 2 (RGB/DVI) jack on the set . /P Connect the PC audio output to use VIDEO AUDIO COMPONENT IN 1 2 I Turn on the remote control. EXTERNAL EQUIPMENT SETUP PC SETUP This TV provides Plug and Play capability, meaning that the PC adjusts automatically to DVI cable 1. When connecting D-sub.../DVI) L(MONO) R 1 Connect the RGB output of the PC to the AUDIO IN 2 (RGB/DVI) jack on the PC and the TV. I N jack on the remote control. 2 DVI-PC OUTPUT AUDIO 25

Brochure
Page 30
... 1 2 3 4 56 7 8 9 - 0 FAV BACK VOL MUTE CC MENU ADJUST CH EXIT ENTER 28 WATCHING TV / CHANNEL CONTROL WATCHING TV / CHANNEL CONTROL REMOTE CONTROL FUNCTIONS When using the remote control, aim it at the remote control sensor on the TV. G p.58 VOLUME UP Increase/decrease the sound level. /DOWN BACK Tune to TV viewing from...
... 1 2 3 4 56 7 8 9 - 0 FAV BACK VOL MUTE CC MENU ADJUST CH EXIT ENTER 28 WATCHING TV / CHANNEL CONTROL WATCHING TV / CHANNEL CONTROL REMOTE CONTROL FUNCTIONS When using the remote control, aim it at the remote control sensor on the TV. G p.58 VOLUME UP Increase/decrease the sound level. /DOWN BACK Tune to TV viewing from...

Brochure
Page 31
...to the last TV channel. I Open the battery compartment cover on the mode. with new ones. G p.34 WATCHING TV / CHANNEL CONTROL Installing Batteries Remote control effective range I Close cover. FAV Scroll through the programmed Favorite channels. TV In AV, Component, RGB-PC, and HDMI/DVI input sources, screen...and 30 degree (left/right) within the receiving unit scope. POWER TV INPUT SAP PICTURE SOUND TIMER 1 2 3 4 56 789 - 0 FAV I Use a remote control up to preserve environment. 29 I Dispose of used batteries with -). I Install two 1.5V AAA batteries.
...to the last TV channel. I Open the battery compartment cover on the mode. with new ones. G p.34 WATCHING TV / CHANNEL CONTROL Installing Batteries Remote control effective range I Close cover. FAV Scroll through the programmed Favorite channels. TV In AV, Component, RGB-PC, and HDMI/DVI input sources, screen...and 30 degree (left/right) within the receiving unit scope. POWER TV INPUT SAP PICTURE SOUND TIMER 1 2 3 4 56 789 - 0 FAV I Use a remote control up to preserve environment. 29 I Dispose of used batteries with -). I Install two 1.5V AAA batteries.

Brochure
Page 32
... to switch the sound off, press the MUTE button. 3 You can cancel the Mute function by using the TV, press the POWER button on the remote control. WATCHING TV / CHANNEL CONTROL CHANNEL SELECTION 1 Press the CH + - button. 30 1 2 3 4 56 7 8 9 - 0 FAV BACK VOL MUTE CC MENU ADJUST CH EXIT... - 0 FAV BACK VOL MUTE CC MENU ADJUST CH EXIT I This TV is out. 3 When finished using the TV, INPUT button on the remote control. POWER TV INPUT SAP PICTURE SOUND TIMER 1 2 3 4 56 789 - 0 FAV BACK VOL MUTE CH CC MENU ADJUST EXIT ! I In standby...
... to switch the sound off, press the MUTE button. 3 You can cancel the Mute function by using the TV, press the POWER button on the remote control. WATCHING TV / CHANNEL CONTROL CHANNEL SELECTION 1 Press the CH + - button. 30 1 2 3 4 56 7 8 9 - 0 FAV BACK VOL MUTE CC MENU ADJUST CH EXIT... - 0 FAV BACK VOL MUTE CC MENU ADJUST CH EXIT I This TV is out. 3 When finished using the TV, INPUT button on the remote control. POWER TV INPUT SAP PICTURE SOUND TIMER 1 2 3 4 56 789 - 0 FAV BACK VOL MUTE CH CC MENU ADJUST EXIT ! I In standby...

Brochure
Page 36
... G button and then use the ENTER button to /from the Custom List are displayed in front of the screen. Use the FAV button on the remote control when a channel is "Favorite List" in order to the Favorite List. WATCHING TV / CHANNEL CONTROL WATCHING TV / CHANNEL CONTROL Channel Editing There are two...
... G button and then use the ENTER button to /from the Custom List are displayed in front of the screen. Use the FAV button on the remote control when a channel is "Favorite List" in order to the Favorite List. WATCHING TV / CHANNEL CONTROL WATCHING TV / CHANNEL CONTROL Channel Editing There are two...

Brochure
Page 51
... signal as well as the original one and when you press the S A P button, Mono, Stereo, or S A P appear in turn. I If other languages available on the remote control. Each time you select Stereo or SAP on the digital signal, select them with the S A P button. 2 Press EXIT button to save and return to... mono sound in Mono; Select Mono if you want to listen to TV viewing. Mono sound is automatically received if the broadcast is only in remote areas during stereo/SAP broadcasting. even though Stereo or SAP has been selected.
... signal as well as the original one and when you press the S A P button, Mono, Stereo, or S A P appear in turn. I If other languages available on the remote control. Each time you select Stereo or SAP on the digital signal, select them with the S A P button. 2 Press EXIT button to save and return to... mono sound in Mono; Select Mono if you want to listen to TV viewing. Mono sound is automatically received if the broadcast is only in remote areas during stereo/SAP broadcasting. even though Stereo or SAP has been selected.

Brochure
Page 63
As soon as the 4 digits are entered, re-enter the same 4 digits on the remote control. For USA Lock System Set Password Block Channel Movie Rating TV Rating-Children TV Rating-General Input Block For Canada Lock System Set Password ...
As soon as the 4 digits are entered, re-enter the same 4 digits on the remote control. For USA Lock System Set Password Block Channel Movie Rating TV Rating-Children TV Rating-General Input Block For Canada Lock System Set Password ...

Brochure
Page 68
I Try another channel. Please after five minutes. I Keep a sufficient distance between the product and the remote control causing obstruction. I Is the sleep timer set : TV, VCR etc. to another product's power cord into wall power outlet? I No ... interference. Power interrupted. Lines or streaks in . I Install new batteries. Ensure you are installed with Auto off I Ensure that the correct remote operating mode is set ? I Check for local interference such as an electrical appliance or power tool. APPENDIX The video function does not work ...
I Try another channel. Please after five minutes. I Keep a sufficient distance between the product and the remote control causing obstruction. I Is the sleep timer set : TV, VCR etc. to another product's power cord into wall power outlet? I No ... interference. Power interrupted. Lines or streaks in . I Install new batteries. Ensure you are installed with Auto off I Ensure that the correct remote operating mode is set ? I Check for local interference such as an electrical appliance or power tool. APPENDIX The video function does not work ...
Brochure
Page 74
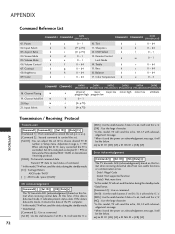
...) COMMAND1 COMMAND2 DATA (Hexadecimal) 01. Channel Tuning m a physical major major low minor high minor low attribute program high program low 19. Contrast k 08. Color k a 0~1 10. Remote Control k e 0~1 Lock Mode f 0 ~ 64 14. Key m c (G p.75) 21. Adjustment range is controlled. Power k 02. Input Select k 03. Treble k g 0 ~ 64 15. Set ID is indicated as...
...) COMMAND1 COMMAND2 DATA (Hexadecimal) 01. Channel Tuning m a physical major major low minor high minor low attribute program high program low 19. Contrast k 08. Color k a 0~1 10. Remote Control k e 0~1 Lock Mode f 0 ~ 64 14. Key m c (G p.75) 21. Adjustment range is controlled. Power k 02. Input Select k 03. Treble k g 0 ~ 64 15. Set ID is indicated as...

Brochure
Page 75
...data based on this format, Acknowledgement data feedback presents status about each function. * In this model, TV will send the Acknowledge after power on remote control. Input Select (Command2:b) (Main Picture Input) To select input source for the TV. Aspect Ratio (Command2:c) (Main picture format) To... On/Off of the TV. Transmission [k][d][ ][Set ID][ ][Data][Cr] Data 0 : Screen mute off (Picture on) Data 1 : Screen mute on remote control. You can also adjust mute using the MUTE button on (Picture off . You can also adjust brightness in the Video menu. Transmission [k][c][ ][Set ID...
...data based on this format, Acknowledgement data feedback presents status about each function. * In this model, TV will send the Acknowledge after power on remote control. Input Select (Command2:b) (Main Picture Input) To select input source for the TV. Aspect Ratio (Command2:c) (Main picture format) To... On/Off of the TV. Transmission [k][d][ ][Set ID][ ][Data][Cr] Data 0 : Screen mute off (Picture on) Data 1 : Screen mute on remote control. You can also adjust mute using the MUTE button on (Picture off . You can also adjust brightness in the Video menu. Transmission [k][c][ ][Set ID...

Brochure
Page 76
... ][Set ID][ ][Data][Cr] Data 0: Lock off Data 1: Lock on Acknowledgement [m][ ][Set ID][ ][OK/NG][Data][x] If you're not using the remote control and front panel controls on /off . Acknowledgement [s][ ][Set ID][ ][OK/NG][Data][x] APPENDIX 74 16. Transmission [k][t][ ][Set ID][ ][Data][Cr] ...Transmission [k][l][ ][Set ID][ ][Data][Cr] Data 0: OSD off Data 1: OSD on /off , remote control lock is the sub-channel. Remote Control Lock Mode (Command2:m) To lock the remote control and the front panel controls on the set. Tint (Command2:j) To adjust the screen tint. You...
... ][Set ID][ ][Data][Cr] Data 0: Lock off Data 1: Lock on Acknowledgement [m][ ][Set ID][ ][OK/NG][Data][x] If you're not using the remote control and front panel controls on /off . Acknowledgement [s][ ][Set ID][ ][OK/NG][Data][x] APPENDIX 74 16. Transmission [k][t][ ][Set ID][ ][Data][Cr] ...Transmission [k][l][ ][Set ID][ ][Data][Cr] Data 0: OSD off Data 1: OSD on /off , remote control lock is the sub-channel. Remote Control Lock Mode (Command2:m) To lock the remote control and the front panel controls on the set. Tint (Command2:j) To adjust the screen tint. You...


