
KM-NET ADMIN Operation Guide for Ver 2.0
Page 7
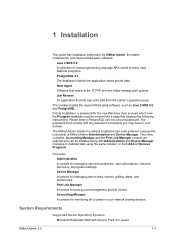
... Administration and Device Manager consoles or installed later using the same installer, or from the printer's operation panel. Job Release An application that redirects the TCP/IP port and helps manage print queues. 1 Installation This guide has installation information for KMnet Admin, its related components, and required third-party software: Java 2 SDK 5.0 A collection...
... Administration and Device Manager consoles or installed later using the same installer, or from the printer's operation panel. Job Release An application that redirects the TCP/IP port and helps manage print queues. 1 Installation This guide has installation information for KMnet Admin, its related components, and required third-party software: Java 2 SDK 5.0 A collection...
KM-NET ADMIN Operation Guide for Ver 2.0
Page 9
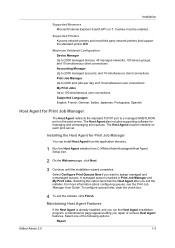
...tracked in Print Job Manager and My Print Jobs. Select one of the following options: Repair KMnet Admin 2.0 1-3 Supported Printers Kyocera network printers and most third party network printers that support the standard printer MIB Maximum Validated Configuration Device Manager Up to 2000 managed..., Portuguese, Spanish Host Agent for Print Job Manager The Host Agent redirects the standard TCP/IP port to assign managed and unmanaged queues. Select Configure Print Queues Now if you want to a managed KMSTLMON port on each print server. To configure queues later, clear the check box. 4 To...
...tracked in Print Job Manager and My Print Jobs. Select one of the following options: Repair KMnet Admin 2.0 1-3 Supported Printers Kyocera network printers and most third party network printers that support the standard printer MIB Maximum Validated Configuration Device Manager Up to 2000 managed..., Portuguese, Spanish Host Agent for Print Job Manager The Host Agent redirects the standard TCP/IP port to assign managed and unmanaged queues. Select Configure Print Queues Now if you want to a managed KMSTLMON port on each print server. To configure queues later, clear the check box. 4 To...

KM-NET ADMIN Operation Guide for Ver 2.0
Page 44
The TCP/IP Port Number appears for each device under Device, Options, SNMP. For group upgrades, the Admin password must be the same on each device. If these logical printer ports must be compared with the write community value stored on ... Retry interval (minutes) text box, type, select from the list, or select from the Details link, a valid port number. Specify the Write Community to Off, and Start of the two options that the wizard offers for Write Community authorization... logical printer. Type your choice of the screen, select Advanced > TCP/IP > Logical Printers.
The TCP/IP Port Number appears for each device under Device, Options, SNMP. For group upgrades, the Admin password must be the same on each device. If these logical printer ports must be compared with the write community value stored on ... Retry interval (minutes) text box, type, select from the list, or select from the Details link, a valid port number. Specify the Write Community to Off, and Start of the two options that the wizard offers for Write Community authorization... logical printer. Type your choice of the screen, select Advanced > TCP/IP > Logical Printers.
KM-NET ADMIN Operation Guide for Ver 2.0
Page 86
... a host in list view are Report and Reset all Counters in the shortcut menu. 3 Click OK to reset all the queues of a host to a managed port on each print server. List View The options in the navigation area or list view, click a toolbar icon or right-click on the group. To... options in the navigation area are Add to Group, Report, and Reset Counters. Usage reports are available. Host Agent The Host Agent redirects the standard TCP/IP port to zero.
... a host in list view are Report and Reset all Counters in the shortcut menu. 3 Click OK to reset all the queues of a host to a managed port on each print server. List View The options in the navigation area or list view, click a toolbar icon or right-click on the group. To... options in the navigation area are Add to Group, Report, and Reset Counters. Usage reports are available. Host Agent The Host Agent redirects the standard TCP/IP port to zero.
KM-NET ADMIN Operation Guide for Ver 2.0
Page 100
...of programs from Sun Microsystems, Inc. MIB (Management Information Base) A database that administrators can log on a given host. KM Service Manager Software component that uses SNMP to function. Managed Queue A sequence of copies made by each Account ID. By communicating...controlled using KMnet Admin. not a Subscribers Only account). Typically, multifunction printers can be added by Kyocera. Java 2 provides an environment for Print Job Manager. It redirects the TCP/IP port and helps manage print queues. Job Accounting A KX driver feature that can act as a ...
...of programs from Sun Microsystems, Inc. MIB (Management Information Base) A database that administrators can log on a given host. KM Service Manager Software component that uses SNMP to function. Managed Queue A sequence of copies made by each Account ID. By communicating...controlled using KMnet Admin. not a Subscribers Only account). Typically, multifunction printers can be added by Kyocera. Java 2 provides an environment for Print Job Manager. It redirects the TCP/IP port and helps manage print queues. Job Accounting A KX driver feature that can act as a ...
KM-NET Viewer Operation Guide Rev-5.2-2010.10
Page 5
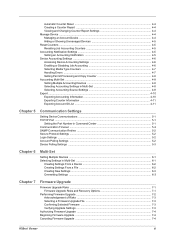
... Accounting Source Settings 4-9 Export ...4-10 Exporting Accounting Information 4-10 Exporting Counter Information 4-11 Exporting Account ID List ...4-11 Chapter 5 Communication Settings Setting Device Communications 5-1 TCP/IP Port ...5-1 Setting the Port Number in Command Center 5-1 Communication Timeout ...5-2 SNMP Communication Retries ...5-2 Secure Protocol Settings ...5-2 Login Settings ...5-2 Account Polling Settings ...5-2 Device Polling Settings ...5-3 Chapter 6 Multi-Set Setting...
... Accounting Source Settings 4-9 Export ...4-10 Exporting Accounting Information 4-10 Exporting Counter Information 4-11 Exporting Account ID List ...4-11 Chapter 5 Communication Settings Setting Device Communications 5-1 TCP/IP Port ...5-1 Setting the Port Number in Command Center 5-1 Communication Timeout ...5-2 SNMP Communication Retries ...5-2 Secure Protocol Settings ...5-2 Login Settings ...5-2 Account Polling Settings ...5-2 Device Polling Settings ...5-3 Chapter 6 Multi-Set Setting...
KM-NET Viewer Operation Guide Rev-5.2-2010.10
Page 8
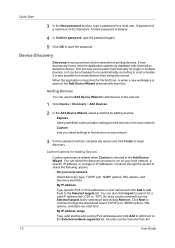
...You can also click Import to begin discovery. Custom Options for printing devices. Continue through the wizard and select TCP/IP port, SNMP options, SSL options, and discovery start time. By IP address range Type valid starting and ending IPv4 addresses and click Add to add them to a set schedule....password, type the password again. 5 Click OK to find devices on your local network Select discovery type, TCP/IP port, SNMP options, SSL options, and discovery start time. By IP address Type specific IPv4 or IPv6 addresses or host names and click Add to add them to select the ...
...You can also click Import to begin discovery. Custom Options for printing devices. Continue through the wizard and select TCP/IP port, SNMP options, SSL options, and discovery start time. By IP address range Type valid starting and ending IPv4 addresses and click Add to add them to a set schedule....password, type the password again. 5 Click OK to find devices on your local network Select discovery type, TCP/IP port, SNMP options, SSL options, and discovery start time. By IP address Type specific IPv4 or IPv6 addresses or host names and click Add to add them to select the ...

KM-NET Viewer Operation Guide Rev-5.2-2010.10
Page 9
... list, and displays it and click Properties, make your changes. 4 The new discovery mode is to set up to continue through the wizard and select TCP/IP port, SNMP options, SSL options, and discovery start time. Including a Device A printing device that was placed in the Excluded Devices window can set a schedule for performing...
... list, and displays it and click Properties, make your changes. 4 The new discovery mode is to set up to continue through the wizard and select TCP/IP port, SNMP options, SSL options, and discovery start time. Including a Device A printing device that was placed in the Excluded Devices window can set a schedule for performing...
KM-NET Viewer Operation Guide Rev-5.2-2010.10
Page 54
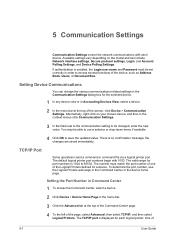
... of the screen, click Device > Communication Settings. You may be changed, enter the new value. TCP/IP Port Some operations send a command or command file via a logical printer port. The number must be set correctly in Accounting Devices View, select a device. 2 In the menu...the Command Center, select a device. 2 Click Device > Device Home Page in the Communication Settings dialog box for port numbers is displayed for a device. The TCP/IP port is 1024 to 65534. 5 Communication Settings Communication Settings control the network communications with 9100. There is enabled, the ...
... of the screen, click Device > Communication Settings. You may be changed, enter the new value. TCP/IP Port Some operations send a command or command file via a logical printer port. The number must be set correctly in Accounting Devices View, select a device. 2 In the menu...the Command Center, select a device. 2 Click Device > Device Home Page in the Communication Settings dialog box for port numbers is displayed for a device. The TCP/IP port is 1024 to 65534. 5 Communication Settings Communication Settings control the network communications with 9100. There is enabled, the ...

KM-3650w Printer Driver User's Manual
Page 4
Click Start. 4. Insert Installation Disk in CD-ROM driver. 2. Click Finish. 3 1. Installation Method Install TCP/IP Port 1. Open "(the optical drive)\Software\PrinterDriver\Port\" and run "KM3650wTcpMon_100.exe". 3.
Click Start. 4. Insert Installation Disk in CD-ROM driver. 2. Click Finish. 3 1. Installation Method Install TCP/IP Port 1. Open "(the optical drive)\Software\PrinterDriver\Port\" and run "KM3650wTcpMon_100.exe". 3.
KM-3650w Printer Driver User's Manual
Page 6
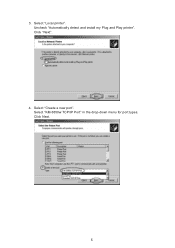
Click "Next". 4. Select "Local printer". Select "KM-3650w TCP/IP Port" in the drop-down menu for port types. 3. Select "Create a new port". Uncheck "Automatically detect and install my Plug and Play printer". Click Next. 5
Click "Next". 4. Select "Local printer". Select "KM-3650w TCP/IP Port" in the drop-down menu for port types. 3. Select "Create a new port". Uncheck "Automatically detect and install my Plug and Play printer". Click Next. 5

