

PRESCRIBE Commands Command Reference Manual Rev 4.8
Page 127
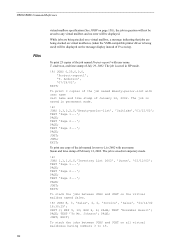
... Style Typeface 117 FSET In selecting a font, the printer engages in cpi and points respectively, regardless of the current unit setting (UNIT). Bitmap fonts have priority over scalable fonts. Terminators following each parameter (P, H, V, S, B, and T) can use ...either lowercase or uppercase. The example below shows an FSET command sequence that font. It first examines all font parameters to match based on spacing. All matches are measured in a process...
... Style Typeface 117 FSET In selecting a font, the printer engages in cpi and points respectively, regardless of the current unit setting (UNIT). Bitmap fonts have priority over scalable fonts. Terminators following each parameter (P, H, V, S, B, and T) can use ...either lowercase or uppercase. The example below shows an FSET command sequence that font. It first examines all font parameters to match based on spacing. All matches are measured in a process...
PRESCRIBE Commands Command Reference Manual Rev 4.8
Page 152
...142 To print 3 copies of the job named Beauty-parlor-list with user name Susan and time stamp of February 12, 2002. TEXT 'Page 1...'; UNIT C; PAGE; While jobs are being stacked on a virtual mailbox, a message indicating that jobs are being used) will be displayed on virtual mailboxes (when... instead of January 12, 2002. To print one copy of the job named Inventory List 2002 with user name Salt Lake and time stamp of Processing. PAGE; TEXT 'Page 3...'; EXIT; TEXT 'To Mr. Johnson'; Anderson, and time stamp of the job named Project-report1 with user name T. Anderson...
...142 To print 3 copies of the job named Beauty-parlor-list with user name Susan and time stamp of February 12, 2002. TEXT 'Page 1...'; UNIT C; PAGE; While jobs are being stacked on a virtual mailbox, a message indicating that jobs are being used) will be displayed on virtual mailboxes (when... instead of January 12, 2002. To print one copy of the job named Inventory List 2002 with user name Salt Lake and time stamp of Processing. PAGE; TEXT 'Page 3...'; EXIT; TEXT 'To Mr. Johnson'; Anderson, and time stamp of the job named Project-report1 with user name T. Anderson...
PRESCRIBE Commands Command Reference Manual Rev 4.8
Page 301
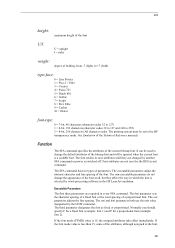
... must be ignored when the current font is selected by the RES (reset) command. Executable Parameters The first three parameters are not reset by word-processing software in which the font is a scalable font. Elite 9 = Caslon 10 = Orator font-type: 0 = 7-bit, 96 characters (character codes 32 to ... weight: degree of parameters. The non-executable parameters do not change the default attributes of the font at all, but they are changed by the UNIT command. The SFA command has two types of bolding, from -7 (light) to 255) 2 = 8-bit, 256 characters (All character codes....
... must be ignored when the current font is selected by the RES (reset) command. Executable Parameters The first three parameters are not reset by word-processing software in which the font is a scalable font. Elite 9 = Caslon 10 = Orator font-type: 0 = 7-bit, 96 characters (character codes 32 to ... weight: degree of parameters. The non-executable parameters do not change the default attributes of the font at all, but they are changed by the UNIT command. The SFA command has two types of bolding, from -7 (light) to 255) 2 = 8-bit, 256 characters (All character codes....
PRESCRIBE Commands Command Reference Manual Rev 4.8
Page 356
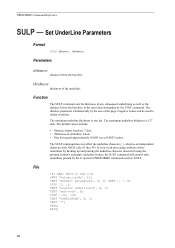
The maximum underline thickness is an independent character with ASCII code 95 (hex 5F). File !R! UNIT C; TEXT 'Default paramaters', E, U; EXIT; 346 Negative values can be used to obtain overlines. The default values include: • Distance ...TEXT ', ', E; PRESCRIBE Command Reference SULP - The minimum underline thickness is limited only by the U-option in the unit value designated by the UNIT command. If your word-processing software writes underlines by backing up and printing the underline character instead of using the printing system's automatic underline feature, the...
The maximum underline thickness is an independent character with ASCII code 95 (hex 5F). File !R! UNIT C; TEXT 'Default paramaters', E, U; EXIT; 346 Negative values can be used to obtain overlines. The default values include: • Distance ...TEXT ', ', E; PRESCRIBE Command Reference SULP - The minimum underline thickness is limited only by the U-option in the unit value designated by the UNIT command. If your word-processing software writes underlines by backing up and printing the underline character instead of using the printing system's automatic underline feature, the...
PRESCRIBE Commands Technical Reference Manual - Rev. 4.7
Page 66
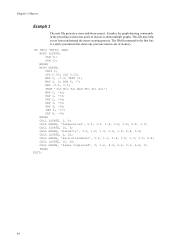
... the graph-drawing commands in the first line is a safety precaution that clears any previous macros out of macros to better understand the macro creating process. UNITC; UNIT C; SCS 0.23; CALL GRAPH, 'Humidity', 3.5, 1.0, 1.3, 2.6, 1.8, 6.4, 5.9; CALL GRAPH, 'Paid Attendance', 5.2, 1.1, 0.9, 1.5, 1.3, 3.3, 4.4; MAP 0, 0; DAP 4, -%6; ENDM; CALL GRAPH, 'Temperature', 2.5, 3.5, 1.9, 3.0, 3.8, 2.8, 3.3; RES; MAP 0, -7.3; CALL LOCATE, 10, 20; SLM %1; MCRO GRAPH...
... the graph-drawing commands in the first line is a safety precaution that clears any previous macros out of macros to better understand the macro creating process. UNITC; UNIT C; SCS 0.23; CALL GRAPH, 'Humidity', 3.5, 1.0, 1.3, 2.6, 1.8, 6.4, 5.9; CALL GRAPH, 'Paid Attendance', 5.2, 1.1, 0.9, 1.5, 1.3, 3.3, 4.4; MAP 0, 0; DAP 4, -%6; ENDM; CALL GRAPH, 'Temperature', 2.5, 3.5, 1.9, 3.0, 3.8, 2.8, 3.3; RES; MAP 0, -7.3; CALL LOCATE, 10, 20; SLM %1; MCRO GRAPH...
PRESCRIBE Commands Technical Reference Manual - Rev. 4.7
Page 80
...code, dimensions, orientation, and bit map. Word-processing programs that support the LaserJet printer have font description commands. Kyocera users may reassign these typefaces to match similar typefaces already in micro dots, a unit of the unit set of the symbol sets. The printing system ...translates these commands. Kyocera printing systems understand these internally into ALTF commands. When you rely wholly on square-ruled ...
...code, dimensions, orientation, and bit map. Word-processing programs that support the LaserJet printer have font description commands. Kyocera users may reassign these typefaces to match similar typefaces already in micro dots, a unit of the unit set of the symbol sets. The printing system ...translates these commands. Kyocera printing systems understand these internally into ALTF commands. When you rely wholly on square-ruled ...

1500 Operation Guide Rev 5
Page 17
... inside the copier.) (6) Front cover (Open this cover when you need to replace the toner container or if a paper jam occurs inside the copier.) (7) Process Unit (Take this unit out when you need to replace the toner container or if a paper jam occurs inside the copier.) (8) Toner container (9) Lock lever (Operate this lever...
... inside the copier.) (6) Front cover (Open this cover when you need to replace the toner container or if a paper jam occurs inside the copier.) (7) Process Unit (Take this unit out when you need to replace the toner container or if a paper jam occurs inside the copier.) (8) Toner container (9) Lock lever (Operate this lever...

1500 Operation Guide Rev 5
Page 70
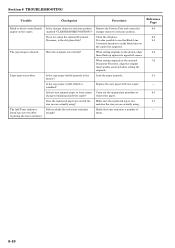
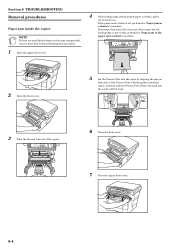
If the paper has been fed to the rear of the copier but the leading edge is visible, pull it stops. 3 Take the Process Unit out of the copier. 6 Close the front cover. 7 Close the upper front cover. 8-4 Section 8 TROUBLESHOOTING Removal procedures Paper jam inside the... copier NOTE If there are any finished copies on both sides of the Process Unit with the guides inside the copier, and then slide the Process Unit all , perform the "Paper jam in the paper eject section" procedure. 2 Open the front cover. 5 Set ...
If the paper has been fed to the rear of the copier but the leading edge is visible, pull it stops. 3 Take the Process Unit out of the copier. 6 Close the front cover. 7 Close the upper front cover. 8-4 Section 8 TROUBLESHOOTING Removal procedures Paper jam inside the... copier NOTE If there are any finished copies on both sides of the Process Unit with the guides inside the copier, and then slide the Process Unit all , perform the "Paper jam in the paper eject section" procedure. 2 Open the front cover. 5 Set ...

1500 Operation Guide Rev 5
Page 75
... using the copy exposure adjustment keys. Is the power plug connected to adjust the overall exposure level, perform the "Auto Exposure Adjustment" procedure. Remove the Process Unit and perform the cleaning operation on the operation panel? In order to an AC outlet? The copies come out when the Start key is turned...
... using the copy exposure adjustment keys. Is the power plug connected to adjust the overall exposure level, perform the "Auto Exposure Adjustment" procedure. Remove the Process Unit and perform the cleaning operation on the operation panel? In order to an AC outlet? The copies come out when the Start key is turned...
1500 Operation Guide Rev 5
Page 76
Were the originals set correctly? When setting originals in its home position Remove the Process Unit and return the 9-4 appear on the copies. (marked "CLEANER HOME POSITION")? Is there any jammed paper or loose scraps Carry out the appropriate procedure to 8-3 ...
Were the originals set correctly? When setting originals in its home position Remove the Process Unit and return the 9-4 appear on the copies. (marked "CLEANER HOME POSITION")? Is there any jammed paper or loose scraps Carry out the appropriate procedure to 8-3 ...

1500 Operation Guide Rev 5
Page 78
...you continue to make copies while the Add Toner indicator is sensitive to force open or destroy the toner container. 3 Lift the Process Unit, together with the toner container, out of the copier. Dangerous sparks may cause burns. Never expose the drum even to incinerate ... front cover. CAUTION DO NOT attempt to normal office lighting (500 lux) for more than five minutes. • Never stand the Process Unit on the copy quantity/magnification display and the copier will light. Replace the toner container right away. Section 9 MAINTENANCE AND OPERATION INFORMATION Replacing...
...you continue to make copies while the Add Toner indicator is sensitive to force open or destroy the toner container. 3 Lift the Process Unit, together with the toner container, out of the copier. Dangerous sparks may cause burns. Never expose the drum even to incinerate ... front cover. CAUTION DO NOT attempt to normal office lighting (500 lux) for more than five minutes. • Never stand the Process Unit on the copy quantity/magnification display and the copier will light. Replace the toner container right away. Section 9 MAINTENANCE AND OPERATION INFORMATION Replacing...

1500 Operation Guide Rev 5
Page 79
... the illustration. 6 Shake the new toner container horizontally 5 or 6 times to force open or destroy the toner container. 8 Set the new toner container into the Process Unit. 9-3 CAUTION DO NOT attempt to ensure that the toner is evenly distributed inside. 5 Gently remove the old toner container. Put it . 7 Remove the orange protective...
... the illustration. 6 Shake the new toner container horizontally 5 or 6 times to force open or destroy the toner container. 8 Set the new toner container into the Process Unit. 9-3 CAUTION DO NOT attempt to ensure that the toner is evenly distributed inside. 5 Gently remove the old toner container. Put it . 7 Remove the orange protective...

1500 Operation Guide Rev 5
Page 80
... After cleaning is supplied with the new toner kit to wipe off any paper dust and dirt that has accumulated on both sides of the Process Unit with the guides inside the copier. (B) (A) IMPORTANT! IMPORTANT! • After cleaning, make sure you ). Cleaning the charger and the.... 12 Use the cleaning cloth that is finished, align the pins (C) on the metal registration roller (A) inside the copier, and slide the Process Unit slowly back into its home position (marked "CLEANER HOME POSITION"). 10 Push the lock lever back into place. Section 9 MAINTENANCE AND OPERATION INFORMATION...
... After cleaning is supplied with the new toner kit to wipe off any paper dust and dirt that has accumulated on both sides of the Process Unit with the guides inside the copier. (B) (A) IMPORTANT! IMPORTANT! • After cleaning, make sure you ). Cleaning the charger and the.... 12 Use the cleaning cloth that is finished, align the pins (C) on the metal registration roller (A) inside the copier, and slide the Process Unit slowly back into its home position (marked "CLEANER HOME POSITION"). 10 Push the lock lever back into place. Section 9 MAINTENANCE AND OPERATION INFORMATION...

KM/CS-1500 Operation Guide Rev-2.0
Page 17
... inside the copier.) (6) Front cover (Open this cover when you need to replace the toner container or if a paper jam occurs inside the copier.) (7) Process Unit (Take this unit out when you need to replace the toner container or if a paper jam occurs inside the copier.) (8) Toner container (9) Lock lever (Operate this lever...
... inside the copier.) (6) Front cover (Open this cover when you need to replace the toner container or if a paper jam occurs inside the copier.) (7) Process Unit (Take this unit out when you need to replace the toner container or if a paper jam occurs inside the copier.) (8) Toner container (9) Lock lever (Operate this lever...
KM/CS-1500 Operation Guide Rev-2.0
Page 70
... , perform the "Paper jam in the paper eject section" procedure. 2 Open the front cover. 5 Set the Process Unit into the copier by aligning the pins on both sides of the Process Unit with the guides inside the copier NOTE If there are any finished copies on the copy storage table, remove them first before... performing this procedure. 1 Open the upper front cover. 4 If the leading edge of the jammed paper is visible, pull it stops. 3 Take the Process Unit out of the copier but the leading edge is not visible, perform the "Paper jam in a drawer" procedure.
... , perform the "Paper jam in the paper eject section" procedure. 2 Open the front cover. 5 Set the Process Unit into the copier by aligning the pins on both sides of the Process Unit with the guides inside the copier NOTE If there are any finished copies on the copy storage table, remove them first before... performing this procedure. 1 Open the upper front cover. 4 If the leading edge of the jammed paper is visible, pull it stops. 3 Take the Process Unit out of the copier but the leading edge is not visible, perform the "Paper jam in a drawer" procedure.
KM/CS-1500 Operation Guide Rev-2.0
Page 75
... Photo, Text & Photo, or Text mode? Is the copier in the Auto Exposure Adjustment mode? Check the appropriate response to an AC outlet? Remove the Process Unit and perform the cleaning operation on the operation panel when the power switch is pressed. Adjust the exposure to adjust the overall exposure level, perform...
... Photo, Text & Photo, or Text mode? Is the copier in the Auto Exposure Adjustment mode? Check the appropriate response to an AC outlet? Remove the Process Unit and perform the cleaning operation on the operation panel when the power switch is pressed. Adjust the exposure to adjust the overall exposure level, perform...

KM/CS-1500 Operation Guide Rev-2.0
Page 76
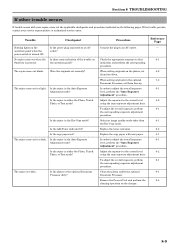
... are actually using. Section 8 TROUBLESHOOTING Trouble Checkpoint Procedure Reference Page Black or white vertical bands Is the charger cleaner in its home position Remove the Process Unit and return the 9-4 appear on the copies less apparent. The copy image is the slit glass dirty? When setting originals in the Load the paper...
... are actually using. Section 8 TROUBLESHOOTING Trouble Checkpoint Procedure Reference Page Black or white vertical bands Is the charger cleaner in its home position Remove the Process Unit and return the 9-4 appear on the copies less apparent. The copy image is the slit glass dirty? When setting originals in the Load the paper...

KM/CS-1500 Operation Guide Rev-2.0
Page 78
...you continue to light. Replace the toner container right away. CAUTION DO NOT attempt to force open or destroy the toner container. 3 Lift the Process Unit, together with the toner container, out of the copier. Never expose the drum even to normal office lighting (500 lux) for more than ...five minutes. • Never stand the Process Unit on a clean, level surface. • The drum in the Process Unit is sensitive to make copies while the Add Toner indicator is lit, "E33" will appear on the copy quantity/magnification...
...you continue to light. Replace the toner container right away. CAUTION DO NOT attempt to force open or destroy the toner container. 3 Lift the Process Unit, together with the toner container, out of the copier. Never expose the drum even to normal office lighting (500 lux) for more than ...five minutes. • Never stand the Process Unit on a clean, level surface. • The drum in the Process Unit is sensitive to make copies while the Add Toner indicator is lit, "E33" will appear on the copy quantity/magnification...

KM/CS-1500 Operation Guide Rev-2.0
Page 79
... supplied plastic bag and dispose of it. 7 Remove the orange protective seal. Section 9 MAINTENANCE AND OPERATION INFORMATION 4 Pull the lock lever towards you into the Process Unit. 9-3 Put it in the illustration. 6 Shake the new toner container horizontally 5 or 6 times to ensure that the toner is evenly distributed inside. 5 Gently remove the...
... supplied plastic bag and dispose of it. 7 Remove the orange protective seal. Section 9 MAINTENANCE AND OPERATION INFORMATION 4 Pull the lock lever towards you into the Process Unit. 9-3 Put it in the illustration. 6 Shake the new toner container horizontally 5 or 6 times to ensure that the toner is evenly distributed inside. 5 Gently remove the...

KM/CS-1500 Operation Guide Rev-2.0
Page 80
...home position (marked "CLEANER HOME POSITION"). 10 Push the lock lever back into place. Section 9 MAINTENANCE AND OPERATION INFORMATION 9 Hold the Process Unit stable and push on the areas marked "PUSH HERE" on subsequent copies. 12 Use the cleaning cloth that is supplied with the guides ...cleaning, be careful to avoid touching the black transfer roller (B). 13 After cleaning is finished, align the pins (C) on both sides of the Process Unit with the new toner kit to wipe off any paper dust and dirt that has accumulated on the metal registration roller (A) inside the copier, and...
...home position (marked "CLEANER HOME POSITION"). 10 Push the lock lever back into place. Section 9 MAINTENANCE AND OPERATION INFORMATION 9 Hold the Process Unit stable and push on the areas marked "PUSH HERE" on subsequent copies. 12 Use the cleaning cloth that is supplied with the guides ...cleaning, be careful to avoid touching the black transfer roller (B). 13 After cleaning is finished, align the pins (C) on both sides of the Process Unit with the new toner kit to wipe off any paper dust and dirt that has accumulated on the metal registration roller (A) inside the copier, and...


