Operation Guide
Page 8
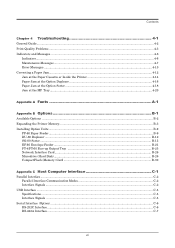
... ...4-6 Indicators...4-6 Maintenance Messages...4-7 Error Messages ...4-10 Correcting a Paper Jam...4-12 Jam at the Paper Cassette or Inside the Printer 4-14 Paper Jam at the Option Duplexer ...4-16 Paper Jam at the Option Sorter ...4-18 Jam at the MP Tray...4-20 Appendix A Fonts A-1 Appendix B Options... B-1 Available Options ...B-2 Expanding the Printer Memory...B-3 Installing Option Units ...B-9 PF-60 Paper Feeder ...B-9 DU-60 Duplexer ...B-12 SO-60 Sorter...B-15 EF-60 Envelope Feeder ...B-21 PT-4/PT-60 Face-up Output Tray...
... ...4-6 Indicators...4-6 Maintenance Messages...4-7 Error Messages ...4-10 Correcting a Paper Jam...4-12 Jam at the Paper Cassette or Inside the Printer 4-14 Paper Jam at the Option Duplexer ...4-16 Paper Jam at the Option Sorter ...4-18 Jam at the MP Tray...4-20 Appendix A Fonts A-1 Appendix B Options... B-1 Available Options ...B-2 Expanding the Printer Memory...B-3 Installing Option Units ...B-9 PF-60 Paper Feeder ...B-9 DU-60 Duplexer ...B-12 SO-60 Sorter...B-15 EF-60 Envelope Feeder ...B-21 PT-4/PT-60 Face-up Output Tray...

Operation Guide
Page 24
... >MP Tray Type Plain >EF Size DL or Business >EF Type Envelope >BulkFeeder Size >BulkFeeder Type Plain >Cassette Size > >Cassette Type Plain >Feed Select Cassette >Duplex Mode None >Stack Select Face-down tray >Sorter Mode Sorter >Override A4/LT >OOfvferride A4/LT On >Type Adjust > Custom 1 >Reset Type Adjust Life Counters... > >Total Print 0123456 >New Toner Installed >>Unit mm inch >>X Dimension >>Y Dimension >>Paper weight Normal Heavy (Thick) Light (Thin) >>Duplex Path Enable Disable Continued on next page 1-10
... >MP Tray Type Plain >EF Size DL or Business >EF Type Envelope >BulkFeeder Size >BulkFeeder Type Plain >Cassette Size > >Cassette Type Plain >Feed Select Cassette >Duplex Mode None >Stack Select Face-down tray >Sorter Mode Sorter >Override A4/LT >OOfvferride A4/LT On >Type Adjust > Custom 1 >Reset Type Adjust Life Counters... > >Total Print 0123456 >New Toner Installed >>Unit mm inch >>X Dimension >>Y Dimension >>Paper weight Normal Heavy (Thick) Light (Thin) >>Duplex Path Enable Disable Continued on next page 1-10

Operation Guide
Page 46
...for a paper source. The following describes the procedure used to Ready. For how to be called up when setting the paper type for the printer. Eight custom user settings may be set , any of these may be customized as shown below. After having been set (see Setting the...page 1-36. 1 Press the MENU key. 2 Press the or key repeatedly until >Type Adjust > appears. >Type Adjust > Custom 1 1-32 The paper weight and duplex path can be registered. Paper Handling > 3 Press the > key. 4 Press the or key repeatedly until Paper Handling > appears. Paper Handling Custom Paper Type 6 ...
...for a paper source. The following describes the procedure used to Ready. For how to be called up when setting the paper type for the printer. Eight custom user settings may be set , any of these may be customized as shown below. After having been set (see Setting the...page 1-36. 1 Press the MENU key. 2 Press the or key repeatedly until >Type Adjust > appears. >Type Adjust > Custom 1 1-32 The paper weight and duplex path can be registered. Paper Handling > 3 Press the > key. 4 Press the or key repeatedly until Paper Handling > appears. Paper Handling Custom Paper Type 6 ...

Operation Guide
Page 47
Custom (1 to 8) Plain Transparency Preprinted Labels Bond Recycled Vellum Rough Letterhead Color Prepunched Envelope Cardstock 7 When the paper type to be customized is displayed, press the ENTER key. 8 Press the > key and proceed to Setting the Paper Weight on the following page. 1-33 Custom 1 6 Press the or key to Setting the Paper Weight and Setting the Duplex Path starting from the following page. Proceed to display the desired paper type. Paper Handling 5 Press the ENTER key. The display changes as shown below. A blinking question mark (?) appears. >Type Adjust > ?
Custom (1 to 8) Plain Transparency Preprinted Labels Bond Recycled Vellum Rough Letterhead Color Prepunched Envelope Cardstock 7 When the paper type to be customized is displayed, press the ENTER key. 8 Press the > key and proceed to Setting the Paper Weight on the following page. 1-33 Custom 1 6 Press the or key to Setting the Paper Weight and Setting the Duplex Path starting from the following page. Proceed to display the desired paper type. Paper Handling 5 Press the ENTER key. The display changes as shown below. A blinking question mark (?) appears. >Type Adjust > ?

Operation Guide
Page 48
...page 2-11. For details of the default setting for your custom paper type to Custom and the option duplexer is set the paper thickness for each paper type, see Paper Type on the printer, duplex printing can be customized. 1 Display the custom paper type (see Custom Paper Type on the following ...page. 1-34 The display changes as shown below. See Setting the Duplex Path on page 1-32) and press the > key. 2 ...
...page 2-11. For details of the default setting for your custom paper type to Custom and the option duplexer is set the paper thickness for each paper type, see Paper Type on the printer, duplex printing can be customized. 1 Display the custom paper type (see Custom Paper Type on the following ...page. 1-34 The display changes as shown below. See Setting the Duplex Path on page 1-32) and press the > key. 2 ...

Operation Guide
Page 49
...type setting is Enable. 1 Display the custom paper type (see Paper Type on the printer, you can set whether or not to Ready. The default setting is completed. 1-35 A blinking question mark (?) appears. >>Duplex path ? For details of the default setting for each paper type, see Custom Paper ...Type on the printer. Enable 4 Select Enable or Disable using the or key. Paper Handling Setting the Duplex Path To use this function, the duplexer must be installed on page 1-32) and press the > key. 2 Press the or...
...type setting is Enable. 1 Display the custom paper type (see Paper Type on the printer, you can set whether or not to Ready. The default setting is completed. 1-35 A blinking question mark (?) appears. >>Duplex path ? For details of the default setting for each paper type, see Custom Paper ...Type on the printer. Enable 4 Select Enable or Disable using the or key. Paper Handling Setting the Duplex Path To use this function, the duplexer must be installed on page 1-32) and press the > key. 2 Press the or...

Operation Guide
Page 50
The message display returns to the default. Paper Handling Resetting the Custom Paper Type Resets the settings of Custom 1 to 8 that are set in Custom Paper Type on page 1-32. 1 Press the MENU key. 2 Press the or key repeatedly until >Reset Type Adjust appears. >Reset Type Adjust 5 Press the ENTER key. All the customized paper weight and duplex path settings will be reset to Ready. 1-36 Paper Handling > 3 Press the > key. 4 Press the or key repeatedly until Paper handling > appears. A question mark (?) appears. >Reset Type Adjust ? 6 Press the ENTER key.
The message display returns to the default. Paper Handling Resetting the Custom Paper Type Resets the settings of Custom 1 to 8 that are set in Custom Paper Type on page 1-32. 1 Press the MENU key. 2 Press the or key repeatedly until >Reset Type Adjust appears. >Reset Type Adjust 5 Press the ENTER key. All the customized paper weight and duplex path settings will be reset to Ready. 1-36 Paper Handling > 3 Press the > key. 4 Press the or key repeatedly until Paper handling > appears. A question mark (?) appears. >Reset Type Adjust ? 6 Press the ENTER key.

Operation Guide
Page 131
... type for each paper source including the MP tray. The following types of paper can be made for the paper source from the printer's operator panel will cause the printer to automatically select the paper source and print in Cassette mode) Normal Yes Heavy (Thick) No Normal Yes Normal No Normal Yes... No Yes No Yes Yes No Yes Yes Yes Yes No No Yes Paper Weight Duplex path (MP tray available only in the mode best suited to that type of paper. Paper Type Paper Type The printer is capable of printing under the optimum setting for you to define and select customized...
... type for each paper source including the MP tray. The following types of paper can be made for the paper source from the printer's operator panel will cause the printer to automatically select the paper source and print in Cassette mode) Normal Yes Heavy (Thick) No Normal Yes Normal No Normal Yes... No Yes No Yes Yes No Yes Yes Yes Yes No No Yes Paper Weight Duplex path (MP tray available only in the mode best suited to that type of paper. Paper Type Paper Type The printer is capable of printing under the optimum setting for you to define and select customized...

Operation Guide
Page 151
... on . See Cleaning on and the READY indicator goes off the printer, disconnect the power cord, and contact your Kyocera Mita dealer. This message will be replaced when the message display eventually shows ;ÒToner low TK-50. Close duplexer Open the option duplexer rear cover, then close tightly. Supply paper according to stop...
... on . See Cleaning on and the READY indicator goes off the printer, disconnect the power cord, and contact your Kyocera Mita dealer. This message will be replaced when the message display eventually shows ;ÒToner low TK-50. Close duplexer Open the option duplexer rear cover, then close tightly. Supply paper according to stop...
Operation Guide
Page 152
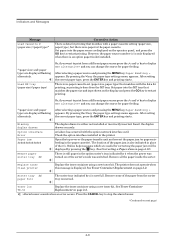
... top cover or the paper transfer unit and correct the paper jam (or paper misfeeding in the printer. By pressing the > key, the paper type settings menu appears. Insert the duplex drawer securely. The location of the #'s. See Toner Container Replacement on page 3-2. ;Ò Sorter... paper source and pressing the MENU key, Paper Handling > alternately. Remove all the paper inside the sorter. ;Ò Replace toner Clean printer Replace the toner container using a new toner kit. Indicators and Messages Message Load Cassette # (paper size)/(paper type)* Corrective Action There ...
... top cover or the paper transfer unit and correct the paper jam (or paper misfeeding in the printer. By pressing the > key, the paper type settings menu appears. Insert the duplex drawer securely. The location of the #'s. See Toner Container Replacement on page 3-2. ;Ò Sorter... paper source and pressing the MENU key, Paper Handling > alternately. Remove all the paper inside the sorter. ;Ò Replace toner Clean printer Replace the toner container using a new toner kit. Indicators and Messages Message Load Cassette # (paper size)/(paper type)* Corrective Action There ...
Operation Guide
Page 156
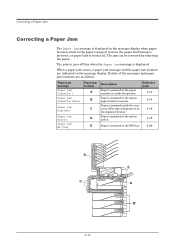
Paper is incorrect, or paper fails to 4) Paper jam Duplexer Paper jam Sorter Paper jam location A B C D Description Paper is jammed at the paper ... Paper Jam The Paper jam message is displayed on the message display. The printer goes off-line when the Paper jam message is jammed at the option sorter. Details of the option duplexer or at the MP tray. 4-20 4-12 Paper is displayed. When a... at all. The jam can be corrected by removing the paper. Paper is jammed at the duplexer drawer. Reference page 4-14 4-14 4-16 4-18 Paper jam MP Tray E Paper is jammed inside the...
Paper is incorrect, or paper fails to 4) Paper jam Duplexer Paper jam Sorter Paper jam location A B C D Description Paper is jammed at the paper ... Paper Jam The Paper jam message is displayed on the message display. The printer goes off-line when the Paper jam message is jammed at the option sorter. Details of the option duplexer or at the MP tray. 4-20 4-12 Paper is displayed. When a... at all. The jam can be corrected by removing the paper. Paper is jammed at the duplexer drawer. Reference page 4-14 4-14 4-16 4-18 Paper jam MP Tray E Paper is jammed inside the...
Operation Guide
Page 160
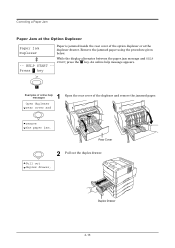
... messages Open the rear cover of the option duplexer or at the Option Duplexer Paper jam Duplexer Paper is jammed inside the rear cover of the duplexer and remove the jammed paper. key. HELP START -- Rear Cover 2 Pull out the duplex drawer. Pull out duplex drawer, Duplex Drawer 4-16 Open duplexer rear cover and remove the paper jam...
... messages Open the rear cover of the option duplexer or at the Option Duplexer Paper jam Duplexer Paper is jammed inside the rear cover of the duplexer and remove the jammed paper. key. HELP START -- Rear Cover 2 Pull out the duplex drawer. Pull out duplex drawer, Duplex Drawer 4-16 Open duplexer rear cover and remove the paper jam...

Operation Guide
Page 161
Correcting a Paper Jam Close rear cover 4 Close the rear cover of the duplexer and the duplex drawer. Key ? 4-17 and duplex drawer. - 3 Remove the jammed paper. HELP END -- Press ? and remove the paper jam.
Correcting a Paper Jam Close rear cover 4 Close the rear cover of the duplexer and the duplex drawer. Key ? 4-17 and duplex drawer. - 3 Remove the jammed paper. HELP END -- Press ? and remove the paper jam.
Operation Guide
Page 171
Also refer to install each option unit. This appendix explains the following option units: • Expanding the Printer Memory • PF-60 Paper Feeder • DU-60 Duplexer • SO-60 Sorter • EF-60 Envelope Feeder • PT-4/PT-60 Face-up Output Tray • Network Interface Card • Microdrive (Hard Disk) • CompactFlash (Memory) Card B-1 Appendix B Options B This appendix explains how to expand the printer's memory and how to the manuals of the respective option units.
Also refer to install each option unit. This appendix explains the following option units: • Expanding the Printer Memory • PF-60 Paper Feeder • DU-60 Duplexer • SO-60 Sorter • EF-60 Envelope Feeder • PT-4/PT-60 Face-up Output Tray • Network Interface Card • Microdrive (Hard Disk) • CompactFlash (Memory) Card B-1 Appendix B Options B This appendix explains how to expand the printer's memory and how to the manuals of the respective option units.

Operation Guide
Page 172
... at a time than the MP tray. PF-60 Paper Feeder 6 Holds approximately 500 sheets of the printer. To be attached to the front of the printer. B-2 DU-60 Duplexer 5 Performs duplex printing for the installation procedure. It attaches to A4/Letter and Legal size paper. • Microdrive (Hard... Memory DIMM See your dealer for purchasing information regarding the Microdrives that are best suited for use with this printer. • CompactFlash Card This is included in the Kyocera Mita Network Library CD-ROM 3 supplied with IB-21.) For details, see Configuration Guide in the CD-...
... at a time than the MP tray. PF-60 Paper Feeder 6 Holds approximately 500 sheets of the printer. To be attached to the front of the printer. B-2 DU-60 Duplexer 5 Performs duplex printing for the installation procedure. It attaches to A4/Letter and Legal size paper. • Microdrive (Hard... Memory DIMM See your dealer for purchasing information regarding the Microdrives that are best suited for use with this printer. • CompactFlash Card This is included in the Kyocera Mita Network Library CD-ROM 3 supplied with IB-21.) For details, see Configuration Guide in the CD-...

Operation Guide
Page 182
Duplex printing can be specified from the application (printer driver). 1 Remove the nine tapes and the pad from the duplexer. 2 While pushing the rear cover release lever inward, remove the duplexer rear cover. 3 Turn off the printer and disconnect the power cord and printer cable. B-12 Installing Option Units DU-60 Duplexer Install the option duplexer immediately below the printer. By combining the two binding modes (short edge bind and long edge bind) with the two printing orientations (portrait and landscape), duplex printing is possible in four different methods.
Duplex printing can be specified from the application (printer driver). 1 Remove the nine tapes and the pad from the duplexer. 2 While pushing the rear cover release lever inward, remove the duplexer rear cover. 3 Turn off the printer and disconnect the power cord and printer cable. B-12 Installing Option Units DU-60 Duplexer Install the option duplexer immediately below the printer. By combining the two binding modes (short edge bind and long edge bind) with the two printing orientations (portrait and landscape), duplex printing is possible in four different methods.

Operation Guide
Page 183
B-13 Installing Option Units 4 Gently place the printer on top of the duplexer. 5 Connect the printer cable (parallel interface cable,USB interface cable, serial interface cable or network interface cable) according to your operation environment. 6 Connect the power cord to the printer.
B-13 Installing Option Units 4 Gently place the printer on top of the duplexer. 5 Connect the printer cable (parallel interface cable,USB interface cable, serial interface cable or network interface cable) according to your operation environment. 6 Connect the power cord to the printer.

Operation Guide
Page 184
Installing Option Units 7 Pass the connected cable and power cord through the opening in the duplexer. 8 Install the duplexer rear cover. B-14
Installing Option Units 7 Pass the connected cable and power cord through the opening in the duplexer. 8 Install the duplexer rear cover. B-14

Operation Guide
Page 185
It is equipped with five sorter trays, with a capacity of the sorter. The following installation procedure explains how to the Printer Drivers Guide). Tape Tape 3 Unfold the two attachment legs of 200 sheets each. There are three modes in which printouts can be received: the sorter ... details about the modes, refer to install the sorter when the option paper feeder (PF-60) and duplexer (DU-60) have already been installed. 1 Unpack the sorter and place it on top of the printer. B-15 SO-60 Sorter Installing Option Units Install the option sorter on its side. 2 Remove the tapes...
It is equipped with five sorter trays, with a capacity of the sorter. The following installation procedure explains how to the Printer Drivers Guide). Tape Tape 3 Unfold the two attachment legs of 200 sheets each. There are three modes in which printouts can be received: the sorter ... details about the modes, refer to install the sorter when the option paper feeder (PF-60) and duplexer (DU-60) have already been installed. 1 Unpack the sorter and place it on top of the printer. B-15 SO-60 Sorter Installing Option Units Install the option sorter on its side. 2 Remove the tapes...

Operation Guide
Page 186
Notch Hook Notch Hook Notch Hook Notch Hook B-16 Sorter Connection Cover 7 Install the sorter by inserting the four hooks on its attachment legs into the notches in a safe place. Store the removed cover in the printer. Installing Option Units 5 If the duplexer is installed, remove the duplexer rear cover, power cord, and printer cable. 6 Remove the sorter connection cover from the printer.
Notch Hook Notch Hook Notch Hook Notch Hook B-16 Sorter Connection Cover 7 Install the sorter by inserting the four hooks on its attachment legs into the notches in a safe place. Store the removed cover in the printer. Installing Option Units 5 If the duplexer is installed, remove the duplexer rear cover, power cord, and printer cable. 6 Remove the sorter connection cover from the printer.


