Operation Guide
Page 38
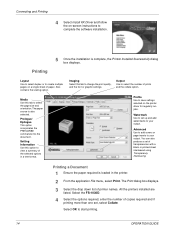
...graphic settings. Advanced Use to add covers or page inserts to your output. Connecting and Printing 4 Select Install KX Driver and follow the on the printer driver for regularly run jobs. Also contains the scaling option. Watermark Use to set up and add watermarks to your output.... The paper source is complete, the Printer Installed Successfully dialog box displays. Imaging Select this tab to view a summary of paper. Select the FS-1030D....
...graphic settings. Advanced Use to add covers or page inserts to your output. Connecting and Printing 4 Select Install KX Driver and follow the on the printer driver for regularly run jobs. Also contains the scaling option. Watermark Use to set up and add watermarks to your output.... The paper source is complete, the Printer Installed Successfully dialog box displays. Imaging Select this tab to view a summary of paper. Select the FS-1030D....
Operation Guide
Page 55
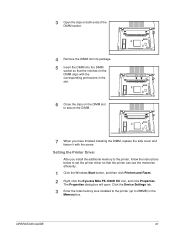
... corresponding protrusions in the slot. 6 Close the clips on the DIMM slot to 288MB) in the Memory box. OPERATION GUIDE 31 Setting the Printer Driver After you have finished installing the DIMM, replace the side cover and fasten it with the screw. The Properties dialog box will open. 3 ... both ends of the DIMM socket. 4 Remove the DIMM from its package. 5 Insert the DIMM into the DIMM socket so that the printer can use the memories efficiently. 1 Click the Windows Start button, and then click Printers and Faxes. 2 Right click the Kyocera Mita FS-1030D KX icon, and click Properties.
... corresponding protrusions in the slot. 6 Close the clips on the DIMM slot to 288MB) in the Memory box. OPERATION GUIDE 31 Setting the Printer Driver After you have finished installing the DIMM, replace the side cover and fasten it with the screw. The Properties dialog box will open. 3 ... both ends of the DIMM socket. 4 Remove the DIMM from its package. 5 Insert the DIMM into the DIMM socket so that the printer can use the memories efficiently. 1 Click the Windows Start button, and then click Printers and Faxes. 2 Right click the Kyocera Mita FS-1030D KX icon, and click Properties.


