
User guide
Page 5
See the Extended user guide www.kodak.com/go/z981support www.kodak.com/go/z981support 5 ENGLISH ᕦ Review pictures/videos Review 1 Press the Review button to enter/exit Review. 2 View previous/ next picture or video. OK Play a video.
See the Extended user guide www.kodak.com/go/z981support www.kodak.com/go/z981support 5 ENGLISH ᕦ Review pictures/videos Review 1 Press the Review button to enter/exit Review. 2 View previous/ next picture or video. OK Play a video.

User guide
Page 6
... it prompts you to run the KODAK Software Downloader on your computer. Make sure the computer is installed, follow the prompts to transfer pictures and videos to your computer. When you connect the camera to the computer, the KODAK Software Downloader automatically runs. ENGLISH &#...5479; Download software, transfer pictures When you connect the camera to the computer, it : ■ WINDOWS OS:...
... it prompts you to run the KODAK Software Downloader on your computer. Make sure the computer is installed, follow the prompts to transfer pictures and videos to your computer. When you connect the camera to the computer, the KODAK Software Downloader automatically runs. ENGLISH &#...5479; Download software, transfer pictures When you connect the camera to the computer, it : ■ WINDOWS OS:...

User guide
Page 10
Shutter speed is fast. S Shutter Priority M Manual Video Video with your camera Choose the mode that are in motion. NOTE: To adjust the LCD brightness for your subjects and surroundings. Sport Subjects that best suits your environment, see the Extended user guide (www.kodak.com/go/z981support). 10 www.kodak.com/go/easysharecenter SCN Scene Point...
Shutter speed is fast. S Shutter Priority M Manual Video Video with your camera Choose the mode that are in motion. NOTE: To adjust the LCD brightness for your subjects and surroundings. Sport Subjects that best suits your environment, see the Extended user guide (www.kodak.com/go/z981support). 10 www.kodak.com/go/easysharecenter SCN Scene Point...

User guide
Page 11
... the Shutter button completely down, then release it. See the Extended user guide www.kodak.com/go/z981support www.kodak.com/go/z981support 11 Take a video Do more with your camera 1 Turn the Mode dial to enter the chosen Scene mode. SCN modes: High ISO, Night Portrait, Landscape, Night Landscape, Flower, Sunset, Backlight, Candle...
... the Shutter button completely down, then release it. See the Extended user guide www.kodak.com/go/z981support www.kodak.com/go/z981support 11 Take a video Do more with your camera 1 Turn the Mode dial to enter the chosen Scene mode. SCN modes: High ISO, Night Portrait, Landscape, Night Landscape, Flower, Sunset, Backlight, Candle...

User guide
Page 13
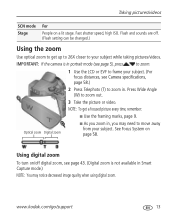
See the Extended user guide www.kodak.com/go/z981support www.kodak.com/go/z981support 13 Delete pictures/videos 1 Press the Review button. 2 Press for previous/next picture/video. 3 Press the Delete button. 4 Follow the screen prompts. Do more with your camera Use the optical zoom 1 Use the LCD or EVF to frame your subject. 2 To zoom in, press Telephoto (T). To zoom out, press Wide Angle (W). 3 Take the picture.
See the Extended user guide www.kodak.com/go/z981support www.kodak.com/go/z981support 13 Delete pictures/videos 1 Press the Review button. 2 Press for previous/next picture/video. 3 Press the Delete button. 4 Follow the screen prompts. Do more with your camera Use the optical zoom 1 Use the LCD or EVF to frame your subject. 2 To zoom in, press Telephoto (T). To zoom out, press Wide Angle (W). 3 Take the picture.
User guide
Page 15
To access the camera Help system, see page 7. www.kodak.com/go/z981support 15 Some modes offer limited settings. 1 Press the Menu button. 2 Press to choose a tab: ■ Capture/Video for other camera settings 3 Press to get the best results from your camera. Do more with your camera Use the menu button to change settings You can change settings to choose a setting, then press OK. 4 Choose an option, then press OK. and video-taking settings ■ Setup for the most common picture-
To access the camera Help system, see page 7. www.kodak.com/go/z981support 15 Some modes offer limited settings. 1 Press the Menu button. 2 Press to choose a tab: ■ Capture/Video for other camera settings 3 Press to get the best results from your camera. Do more with your camera Use the menu button to change settings You can change settings to choose a setting, then press OK. 4 Choose an option, then press OK. and video-taking settings ■ Setup for the most common picture-
User guide
Page 16
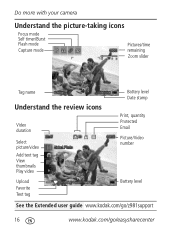
Do more with your camera Understand the picture-taking icons Focus mode Self timer/Burst Flash mode Capture mode Pictures/time remaining Zoom slider Tag name Understand the review icons Video duration Select picture/video Add text tag View thumbnails Play video Battery level Date stamp Print, quantity Protected Email Picture/Video number Upload Favorite Text tag Battery level See the Extended user guide www.kodak.com/go/z981support 16 www.kodak.com/go/easysharecenter
Do more with your camera Understand the picture-taking icons Focus mode Self timer/Burst Flash mode Capture mode Pictures/time remaining Zoom slider Tag name Understand the review icons Video duration Select picture/video Add text tag View thumbnails Play video Battery level Date stamp Print, quantity Protected Email Picture/Video number Upload Favorite Text tag Battery level See the Extended user guide www.kodak.com/go/z981support 16 www.kodak.com/go/easysharecenter

User guide
Page 23
To return to other pictures. See the Extended user guide at www.kodak.com/go /z981support 23 www.kodak.com/go /z981support. To access the camera Help system, see page 7. to choose Keyword 3 Press to choose an existing keyword or New Keyword to add a new one, then press OK. 4 Press to ... pictures Tag with keywords 1 Press the Review button, then to choose Done, then press OK. Tip: You can pre-choose a tag so that new pictures/videos are assigned that tag. When finished, press to find a picture. 2 Press the Menu button.
To return to other pictures. See the Extended user guide at www.kodak.com/go /z981support 23 www.kodak.com/go /z981support. To access the camera Help system, see page 7. to choose Keyword 3 Press to choose an existing keyword or New Keyword to add a new one, then press OK. 4 Press to ... pictures Tag with keywords 1 Press the Review button, then to choose Done, then press OK. Tip: You can pre-choose a tag so that new pictures/videos are assigned that tag. When finished, press to find a picture. 2 Press the Menu button.
Extended user guide
Page 5
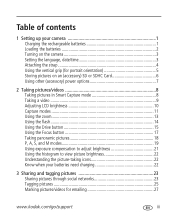
...Loading the batteries 2 Turning on the camera 3 Setting the language, date/time 3 Attaching the strap 4 Using the vertical grip (for portrait orientation 5 Storing pictures on an (accessory) SD or SDHC Card 6 Using other (accessory) power options 7 2 Taking pictures/videos 8 Taking pictures in Smart Capture mode 8 Taking a video 9 Adjusting LCD brightness 10 Capture ... Know when your batteries need charging 22 3 Sharing and tagging pictures 23 Sharing pictures through social networks 23 Tagging pictures 25 Marking pictures/videos for emailing 27 www.kodak.com/go/support iii
...Loading the batteries 2 Turning on the camera 3 Setting the language, date/time 3 Attaching the strap 4 Using the vertical grip (for portrait orientation 5 Storing pictures on an (accessory) SD or SDHC Card 6 Using other (accessory) power options 7 2 Taking pictures/videos 8 Taking pictures in Smart Capture mode 8 Taking a video 9 Adjusting LCD brightness 10 Capture ... Know when your batteries need charging 22 3 Sharing and tagging pictures 23 Sharing pictures through social networks 23 Tagging pictures 25 Marking pictures/videos for emailing 27 www.kodak.com/go/support iii
Extended user guide
Page 6
... slide show 33 Using the menu button in review 35 Selecting multiple pictures/videos 35 Cropping pictures 36 Copying pictures/videos 36 Using KODAK PERFECT TOUCH Technology 37 Using the RAW Develop feature 38 Editing videos 39 5 Doing more with your camera 40 Using the menu button to change settings 40 6 Transferring, printing pictures 47...
... slide show 33 Using the menu button in review 35 Selecting multiple pictures/videos 35 Cropping pictures 36 Copying pictures/videos 36 Using KODAK PERFECT TOUCH Technology 37 Using the RAW Develop feature 38 Editing videos 39 5 Doing more with your camera 40 Using the menu button to change settings 40 6 Transferring, printing pictures 47...

Extended user guide
Page 12
Inserting or removing a card when the camera is 32 GB.) CAUTION: A card can purchase an SD or SDHC Card to store more pictures and videos. (Maximum supported card size is on an (accessory) SD or SDHC Card Your camera has internal memory. forcing it may damage the pictures, the card, or the camera. 1 Turn off the camera. 2 3 Purchase accessories www.kodak.com/go/z981accessories 6 www.kodak.com/go/support You can only be inserted one way; Setting up your camera Storing pictures on may cause damage.
Inserting or removing a card when the camera is 32 GB.) CAUTION: A card can purchase an SD or SDHC Card to store more pictures and videos. (Maximum supported card size is on an (accessory) SD or SDHC Card Your camera has internal memory. forcing it may damage the pictures, the card, or the camera. 1 Turn off the camera. 2 3 Purchase accessories www.kodak.com/go/z981accessories 6 www.kodak.com/go/support You can only be inserted one way; Setting up your camera Storing pictures on may cause damage.

Extended user guide
Page 14
NOTE: For more information on Smart Capture and other modes, see page 11. EVF/LCD To save battery power, press the EVF/LCD button and use the electronic viewfinder. Framing marks do not appear in Smart Capture mode 1 Turn the Mode dial to Smart Capture . 2 Press the Shutter button halfway to lock the focus. When the framing marks turn green, press the Shutter button completely down. 2 Taking pictures/videos Taking pictures in some SCN (scene) and Video modes. 8 www.kodak.com/go/support
NOTE: For more information on Smart Capture and other modes, see page 11. EVF/LCD To save battery power, press the EVF/LCD button and use the electronic viewfinder. Framing marks do not appear in Smart Capture mode 1 Turn the Mode dial to Smart Capture . 2 Press the Shutter button halfway to lock the focus. When the framing marks turn green, press the Shutter button completely down. 2 Taking pictures/videos Taking pictures in some SCN (scene) and Video modes. 8 www.kodak.com/go/support

Extended user guide
Page 15
.../videos Using the framing marks Framing marks Framing marks indicate the camera focus area. 1 Press the Shutter button halfway. If the camera is not focusing on the desired subject, release the Shutter button and recompose the scene. 2 Press the Shutter button completely down and release. (To stop recording, press and release again.) www.kodak...
.../videos Using the framing marks Framing marks Framing marks indicate the camera focus area. 1 Press the Shutter button halfway. If the camera is not focusing on the desired subject, release the Shutter button and recompose the scene. 2 Press the Shutter button completely down and release. (To stop recording, press and release again.) www.kodak...
Extended user guide
Page 16
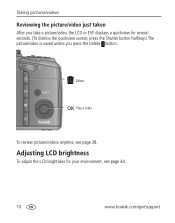
Taking pictures/videos Reviewing the picture/video just taken After you take a picture/video, the LCD or EVF displays a quickview for your environment, see page 28. Adjusting LCD brightness To adjust the LCD brightness for several seconds. (To dismiss the quickview sooner, press the Shutter button halfway.) The picture/video is saved unless you press the Delete button. Delete OK Play a video To review pictures/videos anytime, see page 44. 10 www.kodak.com/go/support
Taking pictures/videos Reviewing the picture/video just taken After you take a picture/video, the LCD or EVF displays a quickview for your environment, see page 28. Adjusting LCD brightness To adjust the LCD brightness for several seconds. (To dismiss the quickview sooner, press the Shutter button halfway.) The picture/video is saved unless you press the Delete button. Delete OK Play a video To review pictures/videos anytime, see page 44. 10 www.kodak.com/go/support

Extended user guide
Page 17
Taking pictures/videos Capture modes Choose the mode that are detected. ■ The scene is analyzed for other content and for lighting. ■ KODAK PERFECT TOUCH Technology is fast. Shutter speed is applied, for your subjects and surroundings. Sport Subjects that best suits your needs-just press the Menu ... Point-and-shoot simplicity when taking pictures under special conditions. (See page 12.) P Program More creative control. (See page 19.) A Aperture Priority S Shutter Priority M Manual Video Video with sound. (See page 9.) www.kodak.com/go/support 11
Taking pictures/videos Capture modes Choose the mode that are detected. ■ The scene is analyzed for other content and for lighting. ■ KODAK PERFECT TOUCH Technology is fast. Shutter speed is applied, for your subjects and surroundings. Sport Subjects that best suits your needs-just press the Menu ... Point-and-shoot simplicity when taking pictures under special conditions. (See page 12.) P Program More creative control. (See page 19.) A Aperture Priority S Shutter Priority M Manual Video Video with sound. (See page 9.) www.kodak.com/go/support 11
Extended user guide
Page 18
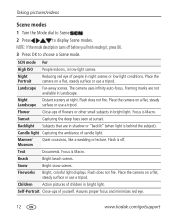
...High ISO People indoors, in bright light. Place the camera on a flat, steady surface or use a tripod. Snow Bright snow scenes. Focus is Macro. Assures proper focus and minimizes red eye. 12 www.kodak.com/go/support Taking pictures/videos Scene modes 1 Turn the Mode dial to Scene .... 2 Press to choose a Scene mode. Flower Close-ups of children in night scenes or low-light conditions. The camera uses infinity auto-focus. Flash is ...
...High ISO People indoors, in bright light. Place the camera on a flat, steady surface or use a tripod. Snow Bright snow scenes. Focus is Macro. Assures proper focus and minimizes red eye. 12 www.kodak.com/go/support Taking pictures/videos Scene modes 1 Turn the Mode dial to Scene .... 2 Press to choose a Scene mode. Flower Close-ups of children in night scenes or low-light conditions. The camera uses infinity auto-focus. Flash is ...
Extended user guide
Page 19
... If the camera is not available in portrait mode (see Camera specifications, page 58.) 2 Press Telephoto (T) to get a focused picture every time, remember: ■ Use the framing marks, page 9. Fast shutter speed, high ISO. www.kodak.com/go/support 13 Taking pictures/videos SCN mode Stage... For People on page 58. See Focus System on a lit stage. Press Wide Angle (W) to frame your subject while taking pictures/videos. Using digital zoom To turn on/off . (Flash...
... If the camera is not available in portrait mode (see Camera specifications, page 58.) 2 Press Telephoto (T) to get a focused picture every time, remember: ■ Use the framing marks, page 9. Fast shutter speed, high ISO. www.kodak.com/go/support 13 Taking pictures/videos SCN mode Stage... For People on page 58. See Focus System on a lit stage. Press Wide Angle (W) to frame your subject while taking pictures/videos. Using digital zoom To turn on/off . (Flash...
Extended user guide
Page 20
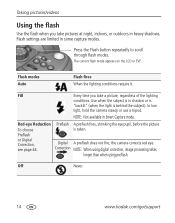
...when the light is behind the subject). Preflash A preflash fires, shrinking the eye pupil, before the picture is in Smart Capture mode. Digital A preflash does not fire; Flash modes Auto Flash fires When the lighting conditions require it. Use when the subject is taken. Red-... in heavy shadows. the camera corrects red eye. In low light, hold the camera steady or use a tripod. Correction NOTE: When using digital correction, image processing takes longer than when using preflash. Off Never. 14 www.kodak.com/go/support Taking pictures/videos Using the flash Use the...
...when the light is behind the subject). Preflash A preflash fires, shrinking the eye pupil, before the picture is in Smart Capture mode. Digital A preflash does not fire; Flash modes Auto Flash fires When the lighting conditions require it. Use when the subject is taken. Red-... in heavy shadows. the camera corrects red eye. In low light, hold the camera steady or use a tripod. Correction NOTE: When using digital correction, image processing takes longer than when using preflash. Off Never. 14 www.kodak.com/go/support Taking pictures/videos Using the flash Use the...

Extended user guide
Page 21
... the scene). 2 seconds- 2 A picture is taken after a 10-second delay (so you want to be included in a picture, or to take a 2- www.kodak.com/go/support 15 Place the camera on a tripod or flat surface. 1 In any picture-taking mode, press the Drive button until the desired self-timer icon is displayed... picture later. The current flash mode appears on the LCD. 10 seconds-10 A picture is taken after the delay. Using the Drive button Taking pictures/videos Press the Drive button repeatedly to scroll through self-timer and burst modes.
... the scene). 2 seconds- 2 A picture is taken after a 10-second delay (so you want to be included in a picture, or to take a 2- www.kodak.com/go/support 15 Place the camera on a tripod or flat surface. 1 In any picture-taking mode, press the Drive button until the desired self-timer icon is displayed... picture later. The current flash mode appears on the LCD. 10 seconds-10 A picture is taken after the delay. Using the Drive button Taking pictures/videos Press the Drive button repeatedly to scroll through self-timer and burst modes.

Extended user guide
Page 22
...space. speed 8/s second, up to scroll through self-timer and burst modes. To delete selectively, do so in the burst series. The camera stops taking pictures in Portrait, Night Portrait, Night Landscape, Backlight, Fireworks, and Panorama modes, and when taking pictures when you can delete ...all pictures in Review (see page 29). Burst is unavailable in the RAW format. 16 www.kodak.com/go/support Taking pictures/videos Taking burst pictures Press the Drive button repeatedly to 3 pictures (at full resolution at Standard compression) while the Shutter ...
...space. speed 8/s second, up to scroll through self-timer and burst modes. To delete selectively, do so in the burst series. The camera stops taking pictures in Portrait, Night Portrait, Night Landscape, Backlight, Fireworks, and Panorama modes, and when taking pictures when you can delete ...all pictures in Review (see page 29). Burst is unavailable in the RAW format. 16 www.kodak.com/go/support Taking pictures/videos Taking burst pictures Press the Drive button repeatedly to 3 pictures (at full resolution at Standard compression) while the Shutter ...


