

User Manual
Page 1
...the on while the charger is plugged in. (See the charger documentation for instructions and charging times.) For longer life, charge KODAK Ni-MH Pre-Charged Rechargeable Batteries AA prior to use, and occasionally discharge them to this user guide. ᕢ Charging ...and loading the batteries Lights are on -screen instructions. See the Extended user guide www.kodak.com/go/z980support www.kodak.com/go/z980support 1 After installing the software, return to depletion. ENGLISH ᕡ Installing the software Before connecting any cables, install...
...the on while the charger is plugged in. (See the charger documentation for instructions and charging times.) For longer life, charge KODAK Ni-MH Pre-Charged Rechargeable Batteries AA prior to use, and occasionally discharge them to this user guide. ᕢ Charging ...and loading the batteries Lights are on -screen instructions. See the Extended user guide www.kodak.com/go/z980support www.kodak.com/go/z980support 1 After installing the software, return to depletion. ENGLISH ᕡ Installing the software Before connecting any cables, install...

User Manual
Page 2
NOTE: The AC adapter does not charge the batteries. 2 www.kodak.com/go/easysharecenter ENGLISH Using an (accessory) SD or SDHC Card Your camera has internal memory. Using charging accessories You can use an accessory KODAK 5-Volt AC Adapter to store more pictures and videos. (Maximum supported card size... is on may cause damage. Inserting or removing a card when the camera is 32 GB.) CAUTION: A card can purchase an SD or ...
NOTE: The AC adapter does not charge the batteries. 2 www.kodak.com/go/easysharecenter ENGLISH Using an (accessory) SD or SDHC Card Your camera has internal memory. Using charging accessories You can use an accessory KODAK 5-Volt AC Adapter to store more pictures and videos. (Maximum supported card size... is on may cause damage. Inserting or removing a card when the camera is 32 GB.) CAUTION: A card can purchase an SD or ...

User Manual
Page 3
Date/Time: At the prompt, press OK. See the Extended user guide www.kodak.com/go/z980support www.kodak.com/go/z980support 3 for previous/next field. ENGLISH ᕣ Turning on the camera ᕤ Setting the language and date/time Language: to change . to change current field. OK to accept. OK to accept.
Date/Time: At the prompt, press OK. See the Extended user guide www.kodak.com/go/z980support www.kodak.com/go/z980support 3 for previous/next field. ENGLISH ᕣ Turning on the camera ᕤ Setting the language and date/time Language: to change . to change current field. OK to accept. OK to accept.

User Manual
Page 4
Framing marks See the Extended user guide www.kodak.com/go/z980support Learn more about Smart Capture and other modes see page 13 4 www.kodak.com/go/easysharecenter When the framing marks turn green, press the Shutter button completely down. EVF/LCD button To save battery power, press the EVF/LCD button and use the electronic viewfinder. ENGLISH ᕥ Taking a picture 1 Turn the Mode dial to Smart Capture . 2 Press the Shutter button halfway to lock the focus.
Framing marks See the Extended user guide www.kodak.com/go/z980support Learn more about Smart Capture and other modes see page 13 4 www.kodak.com/go/easysharecenter When the framing marks turn green, press the Shutter button completely down. EVF/LCD button To save battery power, press the EVF/LCD button and use the electronic viewfinder. ENGLISH ᕥ Taking a picture 1 Turn the Mode dial to Smart Capture . 2 Press the Shutter button halfway to lock the focus.

User Manual
Page 5
See the Extended user guide www.kodak.com/go/z980support www.kodak.com/go/z980support 5 ENGLISH ᕦ Reviewing pictures/videos Review Press the Review button to enter/exit Review. OK Play a video. View previous/next picture/video.
See the Extended user guide www.kodak.com/go/z980support www.kodak.com/go/z980support 5 ENGLISH ᕦ Reviewing pictures/videos Review Press the Review button to enter/exit Review. OK Play a video. View previous/next picture/video.

User Manual
Page 6
See the Extended user guide Purchase accessories www.kodak.com/go/z980support www.kodak.com/go/z980accessories 6 www.kodak.com/go/easysharecenter ENGLISH ᕧ Transferring pictures/videos 1 Turn off the camera. 2 Connect the KODAK USB Cable, Model U-8. 3 Turn on your computer and prompts you through the transfer process. KODAK EASYSHARE Software opens on the camera.
See the Extended user guide Purchase accessories www.kodak.com/go/z980support www.kodak.com/go/z980accessories 6 www.kodak.com/go/easysharecenter ENGLISH ᕧ Transferring pictures/videos 1 Turn off the camera. 2 Connect the KODAK USB Cable, Model U-8. 3 Turn on your computer and prompts you through the transfer process. KODAK EASYSHARE Software opens on the camera.

User Manual
Page 7
Scroll through a Help topic See the Extended user guide www.kodak.com/go/z980support www.kodak.com/go/z980support 7 It describes every setting for every menu choice. Because the more you know your camera Your camera offers a built-in Help system. ENGLISH ᕨ Getting help from your camera, the more confident you become. 1 Press the Menu button, then highlight a menu choice. 2 Press the Info button. If you learn nothing else about your camera, learn how to use on-camera Help.
Scroll through a Help topic See the Extended user guide www.kodak.com/go/z980support www.kodak.com/go/z980support 7 It describes every setting for every menu choice. Because the more you know your camera Your camera offers a built-in Help system. ENGLISH ᕨ Getting help from your camera, the more confident you become. 1 Press the Menu button, then highlight a menu choice. 2 Press the Info button. If you learn nothing else about your camera, learn how to use on-camera Help.
User Manual
Page 8
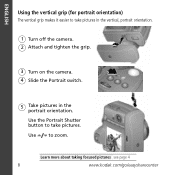
Use to take pictures in the vertical, portrait orientation. 1 Turn off the camera. 2 Attach and tighten the grip. 3 Turn on the camera. 4 Slide the Portrait switch. 5 Take pictures in the portrait orientation. Use the Portrait Shutter button to zoom. Learn more about taking focused pictures see page 4 8 www.kodak.com/go/easysharecenter ENGLISH Using the vertical grip (for portrait orientation) The vertical grip makes it easier to take pictures.
Use to take pictures in the vertical, portrait orientation. 1 Turn off the camera. 2 Attach and tighten the grip. 3 Turn on the camera. 4 Slide the Portrait switch. 5 Take pictures in the portrait orientation. Use the Portrait Shutter button to zoom. Learn more about taking focused pictures see page 4 8 www.kodak.com/go/easysharecenter ENGLISH Using the vertical grip (for portrait orientation) The vertical grip makes it easier to take pictures.

User Manual
Page 9
ENGLISH Attaching the strap 1 2 www.kodak.com/go/z980support 9
ENGLISH Attaching the strap 1 2 www.kodak.com/go/z980support 9

User Manual
Page 10
Congratulations! You have: • set up your camera • taken pictures • transferred pictures to your camera! ENGLISH ᕩ Keep learning about your computer Keep learning! Visit www.kodak.com/go/z980support: • the extended user guide • interactive troubleshooting and repairs • interactive tutorials • FAQs • downloads • accessories • printing information • product registration 10 www.kodak.com/go/easysharecenter Finish reading this book, so you can take and share your best pictures!
Congratulations! You have: • set up your camera • taken pictures • transferred pictures to your camera! ENGLISH ᕩ Keep learning about your computer Keep learning! Visit www.kodak.com/go/z980support: • the extended user guide • interactive troubleshooting and repairs • interactive tutorials • FAQs • downloads • accessories • printing information • product registration 10 www.kodak.com/go/easysharecenter Finish reading this book, so you can take and share your best pictures!

User Manual
Page 11
battery compartment www.kodak.com/go/z980support 11 ENGLISH Back, bottom view 1 2 3 17 4 16 5 15 6 14 7 13 8 12 11 10 9 18 1 Hot shoe (for optional 7 5V DC-In/USB/AV out external flash) 13 Jog dial 2 Power button 8 Portrait Shutter button 14 Mode dial 3 On/Off for Portrait mode 9 Share button 15 LCD 4 Shutter button 10 , OK 16 EVF (Electronic viewfinder) 5 Flash/Focus/Drive buttons 11 Delete/Menu/Info/Review 17 EVF/LCD button buttons 6 Strap post (1 of 2) 12 Wide Angle/Telephoto button 18 SD/SDHC Card slot;
battery compartment www.kodak.com/go/z980support 11 ENGLISH Back, bottom view 1 2 3 17 4 16 5 15 6 14 7 13 8 12 11 10 9 18 1 Hot shoe (for optional 7 5V DC-In/USB/AV out external flash) 13 Jog dial 2 Power button 8 Portrait Shutter button 14 Mode dial 3 On/Off for Portrait mode 9 Share button 15 LCD 4 Shutter button 10 , OK 16 EVF (Electronic viewfinder) 5 Flash/Focus/Drive buttons 11 Delete/Menu/Info/Review 17 EVF/LCD button buttons 6 Strap post (1 of 2) 12 Wide Angle/Telephoto button 18 SD/SDHC Card slot;
User Manual
Page 13
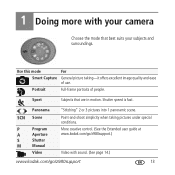
... "Stitching" 2 or 3 pictures into 1 panoramic scene. More creative control. (See the Extended user guide at www.kodak.com/go /z980support 13 1 Doing more with sound. (See page 14.) www.kodak.com/go /z980support.) Video with your camera Choose the mode that are in motion. Portrait Full-frame portraits of use. Point-and-shoot...
... "Stitching" 2 or 3 pictures into 1 panoramic scene. More creative control. (See the Extended user guide at www.kodak.com/go /z980support 13 1 Doing more with sound. (See page 14.) www.kodak.com/go /z980support.) Video with your camera Choose the mode that are in motion. Portrait Full-frame portraits of use. Point-and-shoot...

User Manual
Page 14
To review and work with your camera Taking a video 1 Turn the Mode dial to Video . 2 Press the Shutter button completely down, then release it , press OK. 3 Press OK to display Scene modes. NOTE: If the mode description turns off before you finish reading it . Doing more with videos, see page 19. Using Scene (SCN) modes Choose a Scene mode-for great pictures in practically any situation. 1 Turn the Mode dial to Scene . 2 Press to choose a Scene mode. 14 www.kodak.com/go/easysharecenter To stop recording, press and release the Shutter button again.
To review and work with your camera Taking a video 1 Turn the Mode dial to Video . 2 Press the Shutter button completely down, then release it , press OK. 3 Press OK to display Scene modes. NOTE: If the mode description turns off before you finish reading it . Doing more with videos, see page 19. Using Scene (SCN) modes Choose a Scene mode-for great pictures in practically any situation. 1 Turn the Mode dial to Scene . 2 Press to choose a Scene mode. 14 www.kodak.com/go/easysharecenter To stop recording, press and release the Shutter button again.

User Manual
Page 15
... marks, page 4. ■ As you zoom in . (10 x 15 cm) print. The slider on /off digital zoom, see the Setup menu (page 18). Digital zoom is not available in . Optical zoom Digital zoom Using digital zoom To turn on the LCD or EVF turns red when the picture quality reaches the limit... for an acceptable 4 x 6-in , move away from your subject. 2 Press Telephoto (T) to zoom out. 3 Take the picture or video. www.kodak.com/go/z980support 15 Doing more with your camera Using...
... marks, page 4. ■ As you zoom in . (10 x 15 cm) print. The slider on /off digital zoom, see the Setup menu (page 18). Digital zoom is not available in . Optical zoom Digital zoom Using digital zoom To turn on the LCD or EVF turns red when the picture quality reaches the limit... for an acceptable 4 x 6-in , move away from your subject. 2 Press Telephoto (T) to zoom out. 3 Take the picture or video. www.kodak.com/go/z980support 15 Doing more with your camera Using...

User Manual
Page 16
..., see the Extended user guide at www.kodak.com/go/z980support. 16 www.kodak.com/go/easysharecenter Digital Correction A preflash fires, shrinking the eye pupil, before the picture is shown on the LCD or EVF. NOTE: To attach an external flash, see the Setup menu. the camera corrects red eye. Off Never. Doing more...
..., see the Extended user guide at www.kodak.com/go/z980support. 16 www.kodak.com/go/easysharecenter Digital Correction A preflash fires, shrinking the eye pupil, before the picture is shown on the LCD or EVF. NOTE: To attach an external flash, see the Setup menu. the camera corrects red eye. Off Never. Doing more...

User Manual
Page 17
...and burst modes. Super Macro Subjects that are 1-30 cm (0.4-11.8 in .) from the lens. www.kodak.com/go /z980support. Using the Drive button Doing more with your camera Press the Drive button repeatedly to scroll through Auto Focus, Landscape, Macro, and Super Macro modes. For ...information about the self-timer and burst modes, see the Extended user guide www.kodak.com/go /z980support 17 Distant scenery, or ...
...and burst modes. Super Macro Subjects that are 1-30 cm (0.4-11.8 in .) from the lens. www.kodak.com/go /z980support. Using the Drive button Doing more with your camera Press the Drive button repeatedly to scroll through Auto Focus, Landscape, Macro, and Super Macro modes. For ...information about the self-timer and burst modes, see the Extended user guide www.kodak.com/go /z980support 17 Distant scenery, or ...

User Manual
Page 18
...a setting, then press OK. 4 Highlight an option, then press OK. To get the best results from your camera. Understanding the picture-taking settings ■ Setup for the most from your camera, see page 7. 1 Press the Menu button. 2 Press to highlight a tab: ■ Capture/Video for ...other camera settings 3 Press to get the most common picture- IMPORTANT: Your camera offers a built-in Help system. and video-taking icons Focus mode Self timer/Burst Flash mode Capture mode ...
...a setting, then press OK. 4 Highlight an option, then press OK. To get the best results from your camera. Understanding the picture-taking settings ■ Setup for the most from your camera, see page 7. 1 Press the Menu button. 2 Press to highlight a tab: ■ Capture/Video for ...other camera settings 3 Press to get the most common picture- IMPORTANT: Your camera offers a built-in Help system. and video-taking icons Focus mode Self timer/Burst Flash mode Capture mode ...

User Manual
Page 19
Viewing pictures as thumbnails 1 Press the Review button. 2 Press the Wide Angle (W) button to change from single-picture view to multi-up thumbnails. 3 Press Telephoto (T) to return to single-picture view. ■ Press the Review button to find a picture/video. 3 Press the Delete button. 4 Follow the screen prompts. 2 Working with pictures/videos Deleting pictures/videos 1 Press the Review button. 2 Press to exit Review. NOTE: If you have multiple pictures to delete, you can select then delete them. www.kodak.com/go/z980support 19
Viewing pictures as thumbnails 1 Press the Review button. 2 Press the Wide Angle (W) button to change from single-picture view to multi-up thumbnails. 3 Press Telephoto (T) to return to single-picture view. ■ Press the Review button to find a picture/video. 3 Press the Delete button. 4 Follow the screen prompts. 2 Working with pictures/videos Deleting pictures/videos 1 Press the Review button. 2 Press to exit Review. NOTE: If you have multiple pictures to delete, you can select then delete them. www.kodak.com/go/z980support 19
User Manual
Page 20
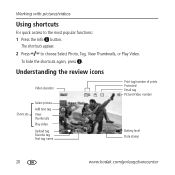
The shortcuts appear. 2 Press to the most popular functions: 1 Press the Info button. To hide the shortcuts again, press . Working with pictures/videos Using shortcuts For quick access to choose Select Photo, Tag, View Thumbnails, or Play Video. Understanding the review icons Video duration Print tag/number of prints Protected Email tag Picture/Video number Shortcuts Select picture Add text tag View thumbnails Play video Upload tag Favorite tag Text tag name Battery level Date stamp 20 www.kodak.com/go/easysharecenter
The shortcuts appear. 2 Press to the most popular functions: 1 Press the Info button. To hide the shortcuts again, press . Working with pictures/videos Using shortcuts For quick access to choose Select Photo, Tag, View Thumbnails, or Play Video. Understanding the review icons Video duration Print tag/number of prints Protected Email tag Picture/Video number Shortcuts Select picture Add text tag View thumbnails Play video Upload tag Favorite tag Text tag name Battery level Date stamp 20 www.kodak.com/go/easysharecenter

User Manual
Page 21
A thousand ways to tell a story... www.kodak.com/go/z980support 21 How do you tell yours? Prints • 4 x 6 pictures • Enlargements, posters • Collages • Photo books Photo gifts • Cards • Calendars • Mugs • Ties • Shirts Digitally • EASYSHARE Digital Picture Frame • HDTV devices • Email ...and much more! and each begins with a picture. 3 Share your stories!
A thousand ways to tell a story... www.kodak.com/go/z980support 21 How do you tell yours? Prints • 4 x 6 pictures • Enlargements, posters • Collages • Photo books Photo gifts • Cards • Calendars • Mugs • Ties • Shirts Digitally • EASYSHARE Digital Picture Frame • HDTV devices • Email ...and much more! and each begins with a picture. 3 Share your stories!
