
User Manual
Page 5
... of contents 1 1 Setting up your camera 1 Attaching the strap 1 Loading the battery 1 Turning on the camera 2 Setting the language, date/time 2 Using an optional SD/SDHC or MMC card 3 2 Taking pictures/videos 4 Taking a picture 4 Capture modes 6 Using optical zoom 8 Using the flash 9 Using the self...Cropping pictures 18 Using Kodak Perfect Touch technology 18 Editing videos 19 Running a slide show 21 Viewing pictures/videos in different ways 24 Selecting multiple pictures/videos 25 Copying pictures/videos 25 Understanding the review icons 26 www.kodak.com/go/support iii
... of contents 1 1 Setting up your camera 1 Attaching the strap 1 Loading the battery 1 Turning on the camera 2 Setting the language, date/time 2 Using an optional SD/SDHC or MMC card 3 2 Taking pictures/videos 4 Taking a picture 4 Capture modes 6 Using optical zoom 8 Using the flash 9 Using the self...Cropping pictures 18 Using Kodak Perfect Touch technology 18 Editing videos 19 Running a slide show 21 Viewing pictures/videos in different ways 24 Selecting multiple pictures/videos 25 Copying pictures/videos 25 Understanding the review icons 26 www.kodak.com/go/support iii
User Manual
Page 8
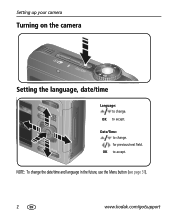
NOTE: To change . OK to accept. Date/Time: to change. for previous/next field. OK to accept. Setting up your camera Turning on the camera Setting the language, date/time Language: to change the date/time and language in the future, use the Menu button (see page 31). 2 www.kodak.com/go/support
NOTE: To change . OK to accept. Date/Time: to change. for previous/next field. OK to accept. Setting up your camera Turning on the camera Setting the language, date/time Language: to change the date/time and language in the future, use the Menu button (see page 31). 2 www.kodak.com/go/support

User Manual
Page 10
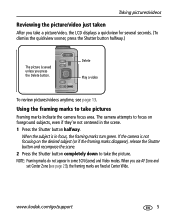
2 Taking pictures/videos Taking a picture 1 2 3 Press the Shutter button halfway to turn on framing marks, see page 38). To stop recording, press and release the Shutter button again. 4 www.kodak.com/go/support Taking a video 1 2 3 Press the Shutter button completely down . NOTE: Press to focus and set exposure. For more information on /off status icons (see page 12) and histogram (see page 5. Ready Framing light marks When the Ready light turns green, press the Shutter button completely down and release.
2 Taking pictures/videos Taking a picture 1 2 3 Press the Shutter button halfway to turn on framing marks, see page 38). To stop recording, press and release the Shutter button again. 4 www.kodak.com/go/support Taking a video 1 2 3 Press the Shutter button completely down . NOTE: Press to focus and set exposure. For more information on /off status icons (see page 12) and histogram (see page 5. Ready Framing light marks When the Ready light turns green, press the Shutter button completely down and release.
User Manual
Page 11
When the subject is saved unless you press the Delete button. www.kodak.com/go/support 5 When you use AF Zone and set Center Zone (see page 13. Delete Play a video To review pictures/videos anytime, see page ... displays a quickview for several seconds. (To dismiss the quickview sooner, press the Shutter button halfway.) The picture is in focus, the framing marks turn green. If the camera is not focusing on the desired subject (or if the framing marks disappear), release the Shutter button and recompose the scene. 2 Press the Shutter...
When the subject is saved unless you press the Delete button. www.kodak.com/go/support 5 When you use AF Zone and set Center Zone (see page 13. Delete Play a video To review pictures/videos anytime, see page ... displays a quickview for several seconds. (To dismiss the quickview sooner, press the Shutter button halfway.) The picture is in focus, the framing marks turn green. If the camera is not focusing on the desired subject (or if the framing marks disappear), release the Shutter button and recompose the scene. 2 Press the Shutter...

User Manual
Page 12
.... (See page 33). ISO High ISO People in low-light scenes indoors using a higher ISO. NOTE: If the mode description turns off before you finish reading it, press OK. 6 www.kodak.com/go/support Stabilization SCN Scene Point-and-shoot simplicity when taking . When the Shutter button is pressed halfway, Smart Scene..., the scene is analyzed, and the best settings are applied. Taking pictures/videos Capture modes Choose the mode that best suits your subjects and surroundings. Digital Image Minimizing the effects of camera shake and subject movement.
.... (See page 33). ISO High ISO People in low-light scenes indoors using a higher ISO. NOTE: If the mode description turns off before you finish reading it, press OK. 6 www.kodak.com/go/support Stabilization SCN Scene Point-and-shoot simplicity when taking . When the Shutter button is pressed halfway, Smart Scene..., the scene is analyzed, and the best settings are applied. Taking pictures/videos Capture modes Choose the mode that best suits your subjects and surroundings. Digital Image Minimizing the effects of camera shake and subject movement.

User Manual
Page 14
...zoom in . (10 x 15 cm) print. 8 www.kodak.com/go/support NOTE: You may notice decreased image quality when using digital zoom. Using optical zoom Use optical zoom to get up to 5X closer to zoom...zoom range Digital zoom range W TD Using the digital zoom Use digital zoom to get up to the maximum optical zoom. The slider on the zoom indicator turns red when the picture quality reaches the limit for an acceptable 4 x 6-in . For focus distances, see Camera specifications, page 57. 2 Press Telephoto (T) to frame your subject while taking pictures. Press Telephoto (T) to 5X...
...zoom in . (10 x 15 cm) print. 8 www.kodak.com/go/support NOTE: You may notice decreased image quality when using digital zoom. Using optical zoom Use optical zoom to get up to 5X closer to zoom...zoom range Digital zoom range W TD Using the digital zoom Use digital zoom to get up to the maximum optical zoom. The slider on the zoom indicator turns red when the picture quality reaches the limit for an acceptable 4 x 6-in . For focus distances, see Camera specifications, page 57. 2 Press Telephoto (T) to frame your subject while taking pictures. Press Telephoto (T) to 5X...
User Manual
Page 15
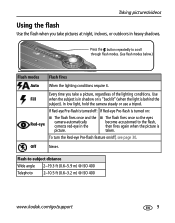
... shadows. In low light, hold the camera steady or use a tripod. Every time you take a picture, regardless of the lighting conditions. If Red-eye Pre-flash is turned off , see page 30. taken. Off... Never. Flash-to the flash, then fires again when the picture is turned on /off : If Red-eye Pre-flash...See flash modes below.) Flash modes Flash fires Auto When the lighting conditions require it. To turn the Red-eye Pre-flash feature on : ■ The flash fires once and the ■...
... shadows. In low light, hold the camera steady or use a tripod. Every time you take a picture, regardless of the lighting conditions. If Red-eye Pre-flash is turned off , see page 30. taken. Off... Never. Flash-to the flash, then fires again when the picture is turned on /off : If Red-eye Pre-flash...See flash modes below.) Flash modes Flash fires Auto When the lighting conditions require it. To turn the Red-eye Pre-flash feature on : ■ The flash fires once and the ■...

User Manual
Page 16
... 10-second options are available in a picture, or to ensure a steady Shutter button press. 1 Place camera on a tripod) • Again for a 10-second delay (so you want to be included in video mode. 10 www.kodak.com/go/support NOTE: The video stops when no storage space remains. Use the same procedure... to use the self-timer in Video mode, but: ■ Turn the Mode dial to get into the scene) • Again for a 2-second...
... 10-second options are available in a picture, or to ensure a steady Shutter button press. 1 Place camera on a tripod) • Again for a 10-second delay (so you want to be included in video mode. 10 www.kodak.com/go/support NOTE: The video stops when no storage space remains. Use the same procedure... to use the self-timer in Video mode, but: ■ Turn the Mode dial to get into the scene) • Again for a 2-second...

User Manual
Page 17
Exposure Compensation, White Balance, Exposure Metering, AF Zone, AF Control, Color Mode, and Sharpness are taking panoramic pictures. www.kodak.com/go/support 11 The flash is set to Off.) You can press the Delete button to re-take 3 pictures, the pictures are not ... picture. 4 Compose the second picture. NOTE: For best results, use the self-timer (2- After you want to 4.8 MP for each picture. See page 10. 1 Turn the Mode dial to SCN. 2 Press to highlight Panorama Left-Right or Panorama Right-Left (depending on the direction you take a picture.) 5 If you are...
Exposure Compensation, White Balance, Exposure Metering, AF Zone, AF Control, Color Mode, and Sharpness are taking panoramic pictures. www.kodak.com/go/support 11 The flash is set to Off.) You can press the Delete button to re-take 3 pictures, the pictures are not ... picture. 4 Compose the second picture. NOTE: For best results, use the self-timer (2- After you want to 4.8 MP for each picture. See page 10. 1 Turn the Mode dial to SCN. 2 Press to highlight Panorama Left-Right or Panorama Right-Left (depending on the direction you take a picture.) 5 If you are...
User Manual
Page 20
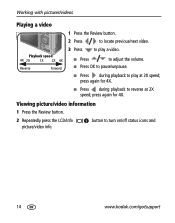
... to reverse at 2X speed; press again for 4X. Working with pictures/videos Playing a video 1 Press the Review button. 2 Press to turn on/off status icons and 14 www.kodak.com/go/support Viewing picture/video information 1 Press the Review button. 2 Repeatedly press the LCD/Info picture/video info. Playback speed 4X...
... to reverse at 2X speed; press again for 4X. Working with pictures/videos Playing a video 1 Press the Review button. 2 Press to turn on/off status icons and 14 www.kodak.com/go/support Viewing picture/video information 1 Press the Review button. 2 Repeatedly press the LCD/Info picture/video info. Playback speed 4X...

User Manual
Page 28
... the OK 2 Select a display interval. Working with pictures/videos Changing the slide show loop When you change it . 22 www.kodak.com/go/support The slide show repeats until you turn on Loop, the slide show is exhausted. You can set the display interval from 3-60 seconds. 1 On the Slide Show menu...
... the OK 2 Select a display interval. Working with pictures/videos Changing the slide show loop When you change it . 22 www.kodak.com/go/support The slide show repeats until you turn on Loop, the slide show is exhausted. You can set the display interval from 3-60 seconds. 1 On the Slide Show menu...
User Manual
Page 33
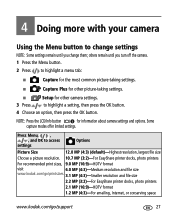
...modes offer limited settings. others remain until you turn off the camera. 1 Press the Menu button. 2 Press to highlight a menu tab: ■ Capture for the most common picture-taking settings. ■ Setup for information about camera settings and options. Press Menu, , ,... and OK to access settings Options Picture Size 12.0 MP (4:3) (default)-Highest resolution, largest file size Choose a picture resolution. 10.7 MP (3:2)-For EasyShare printer docks, photo printers For recommended ...
...modes offer limited settings. others remain until you turn off the camera. 1 Press the Menu button. 2 Press to highlight a menu tab: ■ Capture for the most common picture-taking settings. ■ Setup for information about camera settings and options. Press Menu, , ,... and OK to access settings Options Picture Size 12.0 MP (4:3) (default)-Highest resolution, largest file size Choose a picture resolution. 10.7 MP (3:2)-For EasyShare printer docks, photo printers For recommended ...
User Manual
Page 34
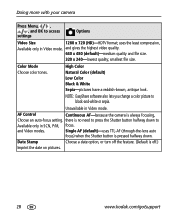
Color Mode Choose color tones. NOTE: EasyShare software also lets you change a color picture to access settings Options Video Size 1280 x 720 (HD)-HDTV format; Date Stamp Choose a date option, or turn off the feature. (Default is no need to Available only in SCN, P/M, focus. High Color Natural ...antique look. and Video modes. smallest file size. there is off.) Imprint the date on pictures. 28 www.kodak.com/go/support Unavailable in Video mode. Doing more with your camera Press Menu, , , and OK to black-and-white or sepia. and gives the highest video quality. ...
Color Mode Choose color tones. NOTE: EasyShare software also lets you change a color picture to access settings Options Video Size 1280 x 720 (HD)-HDTV format; Date Stamp Choose a date option, or turn off the feature. (Default is no need to Available only in SCN, P/M, focus. High Color Natural ...antique look. and Video modes. smallest file size. there is off.) Imprint the date on pictures. 28 www.kodak.com/go/support Unavailable in Video mode. Doing more with your camera Press Menu, , , and OK to black-and-white or sepia. and gives the highest video quality. ...

User Manual
Page 38
...are protected. This is helpful if, for PAL-used in North America and Japan. Language See page 2. Reset Camera Reset picture-taking settings to compose a picture The framing grid divides the LCD into thirds-vertically and horizontally. formats the card. To... turn on the card; About View camera information. Doing more with your camera Press Menu, , , and OK to access settings Options Auto Power Off Choose inactivity time until camera turns off the framing grid, see page 31. 32 www.kodak.com/go/support favorites; ...
...are protected. This is helpful if, for PAL-used in North America and Japan. Language See page 2. Reset Camera Reset picture-taking settings to compose a picture The framing grid divides the LCD into thirds-vertically and horizontally. formats the card. To... turn on the card; About View camera information. Doing more with your camera Press Menu, , , and OK to access settings Options Auto Power Off Choose inactivity time until camera turns off the framing grid, see page 31. 32 www.kodak.com/go/support favorites; ...

User Manual
Page 39
....) mode, and ISO speed Manual NOTE: Settings you retain the default setting of auto shooting with your camera P and M modes Use Program and Manual modes when you change modes or turn off the camera. www.kodak.com/go/support 33 to change in that mode. For example, if you change the Color Mode to... Sepia while in P or M mode, you change modes Mode For Press to control Ease of Color for P and M modes-even when you want more control over your camera and...
....) mode, and ISO speed Manual NOTE: Settings you retain the default setting of auto shooting with your camera P and M modes Use Program and Manual modes when you change modes or turn off the camera. www.kodak.com/go/support 33 to change in that mode. For example, if you change the Color Mode to... Sepia while in P or M mode, you change modes Mode For Press to control Ease of Color for P and M modes-even when you want more control over your camera and...

User Manual
Page 40
... Red-out of range ISO speed Exposure compensation Shutter speed Aperture Mode 1 Turn the Mode dial to change the value. The arrows disappear when you cannot...for controlling backlit or non-standard scenes. if it's too dark, increase the setting. 34 www.kodak.com/go/support NOTE: Some settings may produce unwanted "noise" in 1.2, 2.1, 2.2, and 3.1 ... higher ISO may be unavailable (see page 33. ISO speed-adjust the camera's sensitivity to control all other settings. Doing more with your camera Changing P or M mode settings P/M modes control ISO, Focus, exposure compensation...
... Red-out of range ISO speed Exposure compensation Shutter speed Aperture Mode 1 Turn the Mode dial to change the value. The arrows disappear when you cannot...for controlling backlit or non-standard scenes. if it's too dark, increase the setting. 34 www.kodak.com/go/support NOTE: Some settings may produce unwanted "noise" in 1.2, 2.1, 2.2, and 3.1 ... higher ISO may be unavailable (see page 33. ISO speed-adjust the camera's sensitivity to control all other settings. Doing more with your camera Changing P or M mode settings P/M modes control ISO, Focus, exposure compensation...
User Manual
Page 44
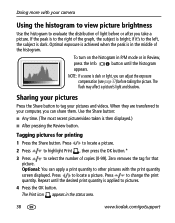
... the print quantity. Doing more with the print quantity screen displayed. To turn on the histogram in P/M mode or in the status area. 38 www.kodak.com/go/support Repeat until the histogram appears. Press to other pictures with your camera Using the histogram to view picture brightness Use the histogram to evaluate...
... the print quantity. Doing more with the print quantity screen displayed. To turn on the histogram in P/M mode or in the status area. 38 www.kodak.com/go/support Repeat until the histogram appears. Press to other pictures with your camera Using the histogram to view picture brightness Use the histogram to evaluate...
User Manual
Page 46
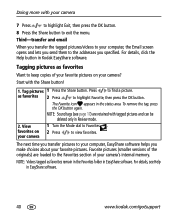
... folder in the status area. NOTE: Videos tagged as favorites 2 Press to your camera? The Favorite icon appears in EasyShare software. View 1 Turn the Mode dial to find a picture. For details, click the Help button in EasyShare software. 40 www.kodak.com/go/support Press to Favorites . The next time you transfer pictures to highlight...
... folder in the status area. NOTE: Videos tagged as favorites 2 Press to your camera? The Favorite icon appears in EasyShare software. View 1 Turn the Mode dial to find a picture. For details, click the Help button in EasyShare software. 40 www.kodak.com/go/support Press to Favorites . The next time you transfer pictures to highlight...
User Manual
Page 47
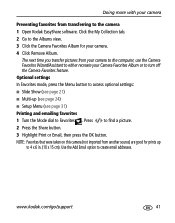
...turn off the Camera Favorites feature. Press to 4 x 6 in. (10 x 15 cm). www.kodak.com/go/support 41 NOTE: Favorites that were taken on this camera (not imported from another source) are good for your Camera Favorites Album or to create email addresses. Click the My Collection tab. 2 Go to the camera 1 Open Kodak EasyShare... software. Doing more with your camera Preventing favorites from transferring to the Albums view. 3 Click the Camera Favorites Album for prints up (see page 24) ■ Setup ...
...turn off the Camera Favorites feature. Press to 4 x 6 in. (10 x 15 cm). www.kodak.com/go/support 41 NOTE: Favorites that were taken on this camera (not imported from another source) are good for your Camera Favorites Album or to create email addresses. Click the My Collection tab. 2 Go to the camera 1 Open Kodak EasyShare... software. Doing more with your camera Preventing favorites from transferring to the Albums view. 3 Click the Camera Favorites Album for prints up (see page 24) ■ Setup ...
User Manual
Page 50
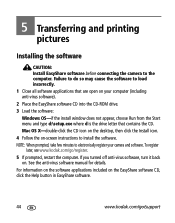
...turned off anti-virus software, turn it back on your camera and software. 5 Transferring and printing pictures Installing the software CAUTION: Install EasyShare software before connecting the camera to install the software. Failure to do so may cause the software to electronically register your computer (including anti-virus software). 2 Place the EasyShare...CD icon on the desktop, then click the Install icon. 4 Follow the on the EasyShare software CD, click the Help button in EasyShare software. 44 www.kodak.com/go /register. 5 If prompted, restart the computer. NOTE: When prompted, ...
...turned off anti-virus software, turn it back on your camera and software. 5 Transferring and printing pictures Installing the software CAUTION: Install EasyShare software before connecting the camera to install the software. Failure to do so may cause the software to electronically register your computer (including anti-virus software). 2 Place the EasyShare...CD icon on the desktop, then click the Install icon. 4 Follow the on the EasyShare software CD, click the Help button in EasyShare software. 44 www.kodak.com/go /register. 5 If prompted, restart the computer. NOTE: When prompted, ...


