User Manual
Page 1
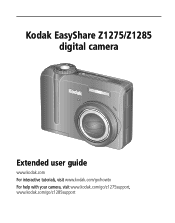
Kodak EasyShare Z1275/Z1285 digital camera Extended user guide www.kodak.com For interactive tutorials, visit www.kodak.com/go/howto For help with your camera, visit www.kodak.com/go/z1275support, www.kodak.com/go/z1285support
Kodak EasyShare Z1275/Z1285 digital camera Extended user guide www.kodak.com For interactive tutorials, visit www.kodak.com/go/howto For help with your camera, visit www.kodak.com/go/z1275support, www.kodak.com/go/z1285support

User Manual
Page 5
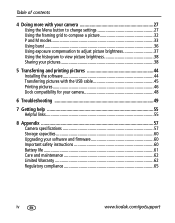
... of contents 1 1 Setting up your camera 1 Attaching the strap 1 Loading the battery 1 Turning on the camera 2 Setting the language, date/time 2 Using an optional SD/SDHC or MMC card 3 2 Taking pictures/videos 4 Taking a picture 4 Capture modes 6 Using optical zoom 8 Using the flash 9 Using the self...17 Cropping pictures 18 Using Kodak Perfect Touch technology 18 Editing videos 19 Running a slide show 21 Viewing pictures/videos in different ways 24 Selecting multiple pictures/videos 25 Copying pictures/videos 25 Understanding the review icons 26 www.kodak.com/go/support iii
... of contents 1 1 Setting up your camera 1 Attaching the strap 1 Loading the battery 1 Turning on the camera 2 Setting the language, date/time 2 Using an optional SD/SDHC or MMC card 3 2 Taking pictures/videos 4 Taking a picture 4 Capture modes 6 Using optical zoom 8 Using the flash 9 Using the self...17 Cropping pictures 18 Using Kodak Perfect Touch technology 18 Editing videos 19 Running a slide show 21 Viewing pictures/videos in different ways 24 Selecting multiple pictures/videos 25 Copying pictures/videos 25 Understanding the review icons 26 www.kodak.com/go/support iii
User Manual
Page 6
Table of contents 4 Doing more with your camera 27 Using the Menu button to change settings 27 Using the framing grid to compose a picture 32 P and M modes 33 Using burst 36 Using exposure ... pictures 44 Installing the software 44 Transferring pictures with the USB cable 45 Printing pictures 46 Dock compatibility for your camera 48 6 Troubleshooting 49 7 Getting help 55 Helpful links 55 8 Appendix 57 Camera specifications 57 Storage capacities 60 Upgrading your software and firmware 60 Important safety instructions 60 Battery life 61 Care...
Table of contents 4 Doing more with your camera 27 Using the Menu button to change settings 27 Using the framing grid to compose a picture 32 P and M modes 33 Using burst 36 Using exposure ... pictures 44 Installing the software 44 Transferring pictures with the USB cable 45 Printing pictures 46 Dock compatibility for your camera 48 6 Troubleshooting 49 7 Getting help 55 Helpful links 55 8 Appendix 57 Camera specifications 57 Storage capacities 60 Upgrading your software and firmware 60 Important safety instructions 60 Battery life 61 Care...
User Manual
Page 7
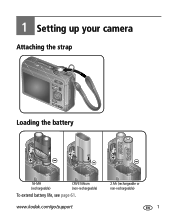
1 Setting up your camera Attaching the strap Loading the battery Ni-MH (rechargeable) CRV3 lithium (non-rechargeable) To extend battery life, see page 61. 2 AA (rechargeable or non-rechargeable) www.kodak.com/go/support 1
1 Setting up your camera Attaching the strap Loading the battery Ni-MH (rechargeable) CRV3 lithium (non-rechargeable) To extend battery life, see page 61. 2 AA (rechargeable or non-rechargeable) www.kodak.com/go/support 1
User Manual
Page 8
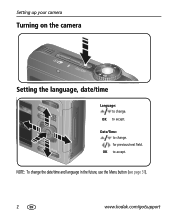
OK to accept. for previous/next field. NOTE: To change the date/time and language in the future, use the Menu button (see page 31). 2 www.kodak.com/go/support OK to accept. Date/Time: to change. Setting up your camera Turning on the camera Setting the language, date/time Language: to change.
OK to accept. for previous/next field. NOTE: To change the date/time and language in the future, use the Menu button (see page 31). 2 www.kodak.com/go/support OK to accept. Date/Time: to change. Setting up your camera Turning on the camera Setting the language, date/time Language: to change.
User Manual
Page 9
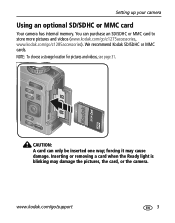
We recommend Kodak SD/SDHC or MMC cards. NOTE: To choose a storage location for pictures and videos, see page 31. Setting up your camera Using an optional SD/SDHC or MMC card Your camera has internal memory. CAUTION: A card can purchase an SD/SDHC or MMC card to store more pictures and videos (www.kodak.com/go/z1275accessories, www.kodak.com/go /support 3 Inserting or removing a card when the Ready light is blinking may cause damage. You can only be inserted one way; www.kodak.com/go /z1285accessories). forcing it may damage the pictures, the card, or the camera.
We recommend Kodak SD/SDHC or MMC cards. NOTE: To choose a storage location for pictures and videos, see page 31. Setting up your camera Using an optional SD/SDHC or MMC card Your camera has internal memory. CAUTION: A card can purchase an SD/SDHC or MMC card to store more pictures and videos (www.kodak.com/go/z1275accessories, www.kodak.com/go /support 3 Inserting or removing a card when the Ready light is blinking may cause damage. You can only be inserted one way; www.kodak.com/go /z1285accessories). forcing it may damage the pictures, the card, or the camera.
User Manual
Page 11
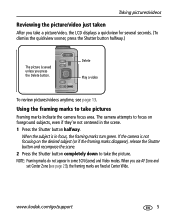
... release the Shutter button and recompose the scene. 2 Press the Shutter button completely down to take pictures Framing marks indicate the camera focus area. If the camera is saved unless you press the Delete button. Taking pictures/videos Reviewing the picture/video just taken After you take a picture...button halfway.) The picture is not focusing on foreground subjects, even if they're not centered in focus, the framing marks turn green. www.kodak.com/go/support 5 Delete Play a video To review pictures/videos anytime, see page 29), the framing marks are fixed at Center Wide....
... release the Shutter button and recompose the scene. 2 Press the Shutter button completely down to take pictures Framing marks indicate the camera focus area. If the camera is saved unless you press the Delete button. Taking pictures/videos Reviewing the picture/video just taken After you take a picture...button halfway.) The picture is not focusing on foreground subjects, even if they're not centered in focus, the framing marks turn green. www.kodak.com/go/support 5 Delete Play a video To review pictures/videos anytime, see page 29), the framing marks are fixed at Center Wide....

User Manual
Page 12
...-light scenes indoors using a higher ISO. NOTE: If the mode description turns off before you finish reading it, press OK. 6 www.kodak.com/go/support Digital Image Minimizing the effects of camera shake and subject movement. When the Shutter button is pressed halfway, Smart Scene faces are detected, the scene is analyzed, and...
...-light scenes indoors using a higher ISO. NOTE: If the mode description turns off before you finish reading it, press OK. 6 www.kodak.com/go/support Digital Image Minimizing the effects of camera shake and subject movement. When the Shutter button is pressed halfway, Smart Scene faces are detected, the scene is analyzed, and...
User Manual
Page 13
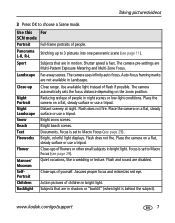
... sets the focus distance depending on a flat, steady surface or use a tripod. Distant scenery at night. Place the camera on the zoom position. Place the camera on a flat, steady surface or use a tripod. Flash and sound are not available in night scenes or low-light ...to choose a Scene mode. Close-ups of people. L-R, R-L Sport Subjects that are in motion. Place the camera on a flat, steady surface or use a tripod. Flash does not fire. www.kodak.com/go/support 7 Auto-focus framing marks are disabled. Flash does not fire. Taking pictures/videos 3 Press...
... sets the focus distance depending on a flat, steady surface or use a tripod. Distant scenery at night. Place the camera on the zoom position. Place the camera on a flat, steady surface or use a tripod. Flash and sound are not available in night scenes or low-light ...to choose a Scene mode. Close-ups of people. L-R, R-L Sport Subjects that are in motion. Place the camera on a flat, steady surface or use a tripod. Flash does not fire. www.kodak.com/go/support 7 Auto-focus framing marks are disabled. Flash does not fire. Taking pictures/videos 3 Press...

User Manual
Page 14
... image quality when using digital zoom. Taking pictures/videos Use this For SCN mode Panning Shot Fast-moving subjects. For focus distances, see Camera specifications, page 57. 2 Press Telephoto (T) to zoom out. The zoom indicator shows zoom status. 3 Take the picture or video. Using optical zoom Use optical zoom to get up to 5X beyond optical zoom while taking pictures...
... image quality when using digital zoom. Taking pictures/videos Use this For SCN mode Panning Shot Fast-moving subjects. For focus distances, see Camera specifications, page 57. 2 Press Telephoto (T) to zoom out. The zoom indicator shows zoom status. 3 Take the picture or video. Using optical zoom Use optical zoom to get up to 5X beyond optical zoom while taking pictures...
User Manual
Page 15
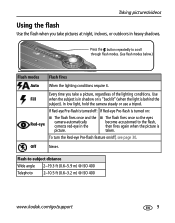
...-eye Pre-flash is turned on: ■ The flash fires once and the ■ The flash fires once so the eyes Red-eye camera automatically corrects red-eye in the become accustomed to the flash, then fires again when the picture is picture. Every time you take a picture...the button repeatedly to -subject distance Wide angle 2-19.3 ft (0.6-5.9 m) @ ISO 400 Telephoto 2-10.5 ft (0.6-3.2 m) @ ISO 400 www.kodak.com/go/support 9 In low light, hold the camera steady or use a tripod. taken. Taking pictures/videos Using the flash Use the flash when you take pictures at night, indoors...
...-eye Pre-flash is turned on: ■ The flash fires once and the ■ The flash fires once so the eyes Red-eye camera automatically corrects red-eye in the become accustomed to the flash, then fires again when the picture is picture. Every time you take a picture...the button repeatedly to -subject distance Wide angle 2-19.3 ft (0.6-5.9 m) @ ISO 400 Telephoto 2-10.5 ft (0.6-3.2 m) @ ISO 400 www.kodak.com/go/support 9 In low light, hold the camera steady or use a tripod. taken. Taking pictures/videos Using the flash Use the flash when you take pictures at night, indoors...

User Manual
Page 16
.../videos Using the self-timer Use the self-timer when you want to be included in a picture, or to ensure a steady Shutter button press. 1 Place camera on a tripod) • Again for a 10-second delay (so you have time to Video . ■ Press the Shutter button completely down . and 10...-second options are available in video mode. 10 www.kodak.com/go/support The picture is taken, press the Self-timer/Burst button , or press the Shutter button completely down . NOTE: The video stops when...
.../videos Using the self-timer Use the self-timer when you want to be included in a picture, or to ensure a steady Shutter button press. 1 Place camera on a tripod) • Again for a 10-second delay (so you have time to Video . ■ Press the Shutter button completely down . and 10...-second options are available in video mode. 10 www.kodak.com/go/support The picture is taken, press the Self-timer/Burst button , or press the Shutter button completely down . NOTE: The video stops when...
User Manual
Page 18
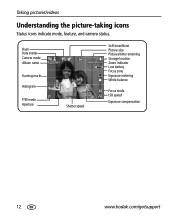
Flash Date stamp Camera mode Album name Framing marks Histogram P/M mode Aperture Shutter speed Self-timer/Burst Picture size Pictures/time remaining Storage location Zoom indicator Low battery Focus zone Exposure metering White balance Focus mode ISO speed Exposure compensation 12 www.kodak.com/go/support Taking pictures/videos Understanding the picture-taking icons Status icons indicate mode, feature, and camera status.
Flash Date stamp Camera mode Album name Framing marks Histogram P/M mode Aperture Shutter speed Self-timer/Burst Picture size Pictures/time remaining Storage location Zoom indicator Low battery Focus zone Exposure metering White balance Focus mode ISO speed Exposure compensation 12 www.kodak.com/go/support Taking pictures/videos Understanding the picture-taking icons Status icons indicate mode, feature, and camera status.
User Manual
Page 22
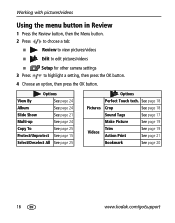
..., then the Menu button. 2 Press to choose a tab: ■ Review to view pictures/videos ■ Edit to edit pictures/videos ■ 3 Press Setup for other camera settings to highlight a setting, then press the OK button. 4 Choose an option, then press the OK button. See page 18 Pictures Crop See page 18... Tags See page 17 Make Picture See page 19 Trim Videos Action Print See page 19 See page 21 Bookmark See page 20 16 www.kodak.com/go/support
..., then the Menu button. 2 Press to choose a tab: ■ Review to view pictures/videos ■ Edit to edit pictures/videos ■ 3 Press Setup for other camera settings to highlight a setting, then press the OK button. 4 Choose an option, then press the OK button. See page 18 Pictures Crop See page 18... Tags See page 17 Make Picture See page 19 Trim Videos Action Print See page 19 See page 21 Bookmark See page 20 16 www.kodak.com/go/support
User Manual
Page 27
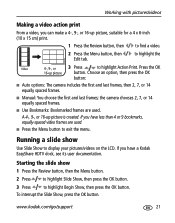
... OK button. Starting the slide show Use Slide Show to find a video. 2 Press the Menu button, then Edit tab. www.kodak.com/go/support 21 the camera chooses 2, 7, or 14 equally spaced frames. ■ Use Bookmarks: Bookmarked frames are used . to highlight the Video 4-, 9-, ...or 3 Press to exit the menu. Press the OK 16-up picture button. If you have a Kodak EasyShare HDTV dock, see its user documentation. ...
... OK button. Starting the slide show Use Slide Show to find a video. 2 Press the Menu button, then Edit tab. www.kodak.com/go/support 21 the camera chooses 2, 7, or 14 equally spaced frames. ■ Use Bookmarks: Bookmarked frames are used . to highlight the Video 4-, 9-, ...or 3 Press to exit the menu. Press the OK 16-up picture button. If you have a Kodak EasyShare HDTV dock, see its user documentation. ...
User Manual
Page 29
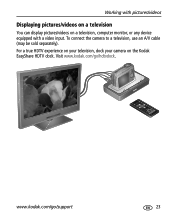
To connect the camera to a television, use an A/V cable (may be sold separately). Visit www.kodak.com/go /support 23 For a true HDTV experience on your television, dock your camera on a television, computer monitor, or any device equipped with pictures/videos Displaying pictures/videos on a television You can display pictures/videos on the Kodak EasyShare HDTV dock. www.kodak.com/go /hdtvdock. Working with a video input.
To connect the camera to a television, use an A/V cable (may be sold separately). Visit www.kodak.com/go /support 23 For a true HDTV experience on your television, dock your camera on a television, computer monitor, or any device equipped with pictures/videos Displaying pictures/videos on a television You can display pictures/videos on the Kodak EasyShare HDTV dock. www.kodak.com/go /hdtvdock. Working with a video input.
User Manual
Page 31
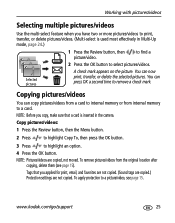
To remove pictures/videos from internal memory to remove a check mark. www.kodak.com/go/support 25 Copying pictures/videos You can press OK a second time to a card. Tags that a card is used most effectively in the camera. To apply protection to highlight an option. 4 Press the OK button. Working with pictures/videos...
To remove pictures/videos from internal memory to remove a check mark. www.kodak.com/go/support 25 Copying pictures/videos You can press OK a second time to a card. Tags that a card is used most effectively in the camera. To apply protection to highlight an option. 4 Press the OK button. Working with pictures/videos...
User Manual
Page 33
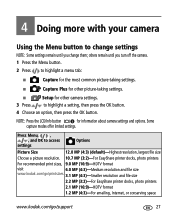
... to change them; 4 Doing more with your camera Using the Menu button to access settings Options Picture Size 12.0 MP (4:3) (default)-Highest resolution, largest file size Choose a picture resolution. 10.7 MP (3:2)-For EasyShare printer docks, photo printers For recommended print sizes,... 9.0 MP (16:9)-HDTV format visit 6.0 MP (4:3)-Medium resolution and file size www.kodak.com/go/printsizes 3.1 MP (4:3)-Smaller resolution and file size 2.2 MP (3:2)-For EasyShare printer docks, photo printers ...
... to change them; 4 Doing more with your camera Using the Menu button to access settings Options Picture Size 12.0 MP (4:3) (default)-Highest resolution, largest file size Choose a picture resolution. 10.7 MP (3:2)-For EasyShare printer docks, photo printers For recommended print sizes,... 9.0 MP (16:9)-HDTV format visit 6.0 MP (4:3)-Medium resolution and file size www.kodak.com/go/printsizes 3.1 MP (4:3)-Smaller resolution and file size 2.2 MP (3:2)-For EasyShare printer docks, photo printers ...
User Manual
Page 34
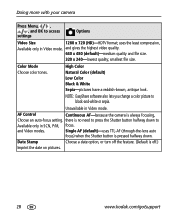
...button is always focusing, Choose an auto-focus setting. Color Mode Choose color tones. NOTE: EasyShare software also lets you change a color picture to access settings Options Video Size 1280 x 720 (HD)-HDTV format; High Color Natural Color (default) Low Color Black & White Sepia-pictures have ...240-lowest quality; AF Control Continuous AF-because the camera is pressed halfway down to press the Shutter button halfway down . Date Stamp Choose a date option, or turn off .) Imprint the date on pictures. 28 www.kodak.com/go/support there is off the feature. (Default...
...button is always focusing, Choose an auto-focus setting. Color Mode Choose color tones. NOTE: EasyShare software also lets you change a color picture to access settings Options Video Size 1280 x 720 (HD)-HDTV format; High Color Natural Color (default) Low Color Black & White Sepia-pictures have ...240-lowest quality; AF Control Continuous AF-because the camera is pressed halfway down to press the Shutter button halfway down . Date Stamp Choose a date option, or turn off .) Imprint the date on pictures. 28 www.kodak.com/go/support there is off the feature. (Default...
User Manual
Page 35
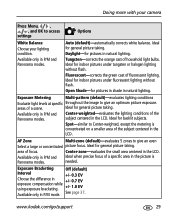
... EV Choose the difference in +/- 0.7 EV exposure compensation while using exposure bracketing. +/- 1.0 EV Available only in natural lighting. www.kodak.com/go/support 29 Ideal for indoor pictures under tungsten or halogen lighting without flash. Fluorescent-corrects the green cast of focus. Ideal for...light levels at specific throughout the image to give an optimum picture exposure. areas of household light bulbs. Doing more with your camera Press Menu, , , and OK to Center-weighted, except the metering is needed. Open Shade-for indoor pictures under fluorescent...
... EV Choose the difference in +/- 0.7 EV exposure compensation while using exposure bracketing. +/- 1.0 EV Available only in natural lighting. www.kodak.com/go/support 29 Ideal for indoor pictures under tungsten or halogen lighting without flash. Fluorescent-corrects the green cast of focus. Ideal for...light levels at specific throughout the image to give an optimum picture exposure. areas of household light bulbs. Doing more with your camera Press Menu, , , and OK to Center-weighted, except the metering is needed. Open Shade-for indoor pictures under fluorescent...


