
User Manual
Page 3
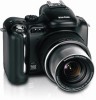
Front View 7 8 6 9 10 5 4 3 2 1 1 Lens 2 Grip 3 Self-timer/Video light 4 LED indicator 5 Shutter button 6 Mode /Power switch 7 Exposure metering button 8 Program button 9 Drive button 10 Mode dial www.kodak.com/go/support Product features 11 12 13 14 15 16 17 18 19 11 Hot shoe 12 Flash 13 Flash button 14 Focus button 15 Strap post 16 Speaker 17 Microphone 18 USB, A/V Out 19 DC-In (5V) i
Front View 7 8 6 9 10 5 4 3 2 1 1 Lens 2 Grip 3 Self-timer/Video light 4 LED indicator 5 Shutter button 6 Mode /Power switch 7 Exposure metering button 8 Program button 9 Drive button 10 Mode dial www.kodak.com/go/support Product features 11 12 13 14 15 16 17 18 19 11 Hot shoe 12 Flash 13 Flash button 14 Focus button 15 Strap post 16 Speaker 17 Microphone 18 USB, A/V Out 19 DC-In (5V) i

User Manual
Page 5
... the lens cap and strap 1 Charging the battery 2 Loading the battery 2 Turning on the camera 3 Setting the language and date/time, first time 3 Setting the language and date/time, other times 4 Storing pictures on an SD or MMC card 4 2 ...a picture 5 Using optical zoom 10 Using the flip-up flash 11 Using an external flash unit 11 Reviewing pictures and videos 12 Protecting pictures and videos from deletion 16 3 Transferring and printing pictures 18 Installing the software 18 Transferring pictures 19 Printing from a Kodak EasyShare printer dock or your computer 20 Printing from an...
... the lens cap and strap 1 Charging the battery 2 Loading the battery 2 Turning on the camera 3 Setting the language and date/time, first time 3 Setting the language and date/time, other times 4 Storing pictures on an SD or MMC card 4 2 ...a picture 5 Using optical zoom 10 Using the flip-up flash 11 Using an external flash unit 11 Reviewing pictures and videos 12 Protecting pictures and videos from deletion 16 3 Transferring and printing pictures 18 Installing the software 18 Transferring pictures 19 Printing from a Kodak EasyShare printer dock or your computer 20 Printing from an...

User Manual
Page 6
... contents 4 Doing more with your camera 23 Picture-taking modes 23 Taking panoramic pictures 28 Using the focus button 29 Using the drive mode for self-timer, burst, exposure bracketing 30 Using the AE/AF button 33 Using the program button 34 Changing the flash settings 36 PASM and C1, C2... picture 57 Copying pictures and videos 58 Running a slide show 59 Pre-tagging for album names 60 Sharing your pictures 63 5 Troubleshooting 69 Camera problems 69 Computer/connectivity problems 71 Picture quality problems 72 Direct printing (PictBridge) problems 74 6 Getting help 75 iv www...
... contents 4 Doing more with your camera 23 Picture-taking modes 23 Taking panoramic pictures 28 Using the focus button 29 Using the drive mode for self-timer, burst, exposure bracketing 30 Using the AE/AF button 33 Using the program button 34 Changing the flash settings 36 PASM and C1, C2... picture 57 Copying pictures and videos 58 Running a slide show 59 Pre-tagging for album names 60 Sharing your pictures 63 5 Troubleshooting 69 Camera problems 69 Computer/connectivity problems 71 Picture quality problems 72 Direct printing (PictBridge) problems 74 6 Getting help 75 iv www...
User Manual
Page 16
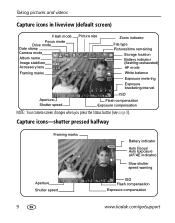
... Storage location Battery indicator (flashing=exhausted) AF mode White balance Exposure metering Exposure bracketing interval Aperture Shutter speed ISO Flash compensation Exposure compensation NOTE: Your camera screen changes when you press... the Status button (see page 8). Capture icons-shutter pressed halfway Framing marks Battery indicator Auto Focus/ Auto Exposure (AF/AE indicator) Slow shutter speed warning Aperture Shutter speed ISO Flash compensation Exposure compensation 9 www.kodak...
... Storage location Battery indicator (flashing=exhausted) AF mode White balance Exposure metering Exposure bracketing interval Aperture Shutter speed ISO Flash compensation Exposure compensation NOTE: Your camera screen changes when you press... the Status button (see page 8). Capture icons-shutter pressed halfway Framing marks Battery indicator Auto Focus/ Auto Exposure (AF/AE indicator) Slow shutter speed warning Aperture Shutter speed ISO Flash compensation Exposure compensation 9 www.kodak...

User Manual
Page 18
...camera's built-in heavy shadows. Flash-to the camera. The external flash unit is needed, the flash automatically opens. Flash When you are within the flash range. Press the cover to your external flash unit user's guide for fully automatic extended flash capabilities). The flash synchronizes at night, indoors, or outdoors in flash... Flash distance 2.9 ft-17.4 ft (0.9 m-5.3 m) 6.6 ft-15.4 ft (2.0 m-4.7 m) Using an external flash unit Use an external flash unit when you want additional or specialized lighting (we recommend a Kodak external flash unit for details. 11 www.kodak....
...camera's built-in heavy shadows. Flash-to the camera. The external flash unit is needed, the flash automatically opens. Flash When you are within the flash range. Press the cover to your external flash unit user's guide for fully automatic extended flash capabilities). The flash synchronizes at night, indoors, or outdoors in flash... Flash distance 2.9 ft-17.4 ft (0.9 m-5.3 m) 6.6 ft-15.4 ft (2.0 m-4.7 m) Using an external flash unit Use an external flash unit when you want additional or specialized lighting (we recommend a Kodak external flash unit for details. 11 www.kodak....
User Manual
Page 31
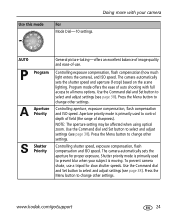
... Set button to select and adjust settings (see page 38). Controlling aperture, exposure compensation, flash compensation and ISO speed. www.kodak.com/go/support 24 The camera automatically sets the shutter speed and aperture (f-stop) based on the scene lighting. Use the... button to change other settings. The camera automatically sets the aperture for slow shutter speeds. Controlling shutter speed, exposure compensation, flash compensation and ISO speed. Controlling exposure compensation, flash compensation (how much light enters the camera), and ISO speed. NOTE: The aperture...
... Set button to select and adjust settings (see page 38). Controlling aperture, exposure compensation, flash compensation and ISO speed. www.kodak.com/go/support 24 The camera automatically sets the shutter speed and aperture (f-stop) based on the scene lighting. Use the... button to change other settings. The camera automatically sets the aperture for slow shutter speeds. Controlling shutter speed, exposure compensation, flash compensation and ISO speed. Controlling exposure compensation, flash compensation (how much light enters the camera), and ISO speed. NOTE: The aperture...

User Manual
Page 32
...exposure. Use the Command dial and Set button to select and adjust settings (see page 38). To prevent camera shake, use a tripod for slow shutter speeds. Capturing video with your camera Use this mode For Manual Custom Enjoying the highest level of the C modes using Copy to select and... Saving settings in another mode to any of creative control. Doing more with sound (see page 5). 25 www.kodak.com/go/support You can set the aperture, shutter speed, flash compensation, and ISO speed. Use the Command dial and Set button to Custom (see page 52). Custom Transferring settings...
...exposure. Use the Command dial and Set button to select and adjust settings (see page 38). To prevent camera shake, use a tripod for slow shutter speeds. Capturing video with your camera Use this mode For Manual Custom Enjoying the highest level of the C modes using Copy to select and... Saving settings in another mode to any of creative control. Doing more with sound (see page 5). 25 www.kodak.com/go/support You can set the aperture, shutter speed, flash compensation, and ISO speed. Use the Command dial and Set button to Custom (see page 52). Custom Transferring settings...
User Manual
Page 33
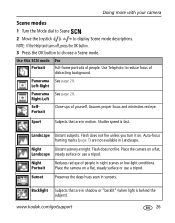
... Press the OK button to display Scene mode descriptions. Use Telephoto to reduce focus of people. Flash does not fire. Left-Right Panorama See page 28. Landscape Distant subjects. Place the camera on a flat, Landscape steady surface or use a tripod. Sport Subjects that are not available ...in sunsets. Flash does not fire unless you turn it on. www.kodak.com/go/support 26 Use this SCN mode Portrait For...
... Press the OK button to display Scene mode descriptions. Use Telephoto to reduce focus of people. Flash does not fire. Left-Right Panorama See page 28. Landscape Distant subjects. Place the camera on a flat, Landscape steady surface or use a tripod. Sport Subjects that are not available ...in sunsets. Flash does not fire unless you turn it on. www.kodak.com/go/support 26 Use this SCN mode Portrait For...
User Manual
Page 34
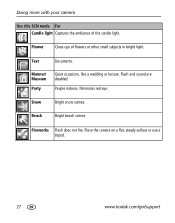
Flower Close-ups of the candle light. Manner/ Museum Party Quiet occasions, like a wedding or lecture. Minimizes red eye. Place the camera on a flat, steady surface or use a tripod. 27 www.kodak.com/go/support People indoors. Fireworks Flash does not fire. Flash and sound are disabled. Text Documents. Beach Bright beach scenes. Snow Bright snow scenes. Doing more with your camera Use this SCN mode For Candle light Captures the ambiance of flowers or other small subjects in bright light.
Flower Close-ups of the candle light. Manner/ Museum Party Quiet occasions, like a wedding or lecture. Minimizes red eye. Place the camera on a flat, steady surface or use a tripod. 27 www.kodak.com/go/support People indoors. Fireworks Flash does not fire. Flash and sound are disabled. Text Documents. Beach Bright beach scenes. Snow Bright snow scenes. Doing more with your camera Use this SCN mode For Candle light Captures the ambiance of flowers or other small subjects in bright light.

User Manual
Page 35
...want to pan), then press the OK button. 3 Take the first picture. NOTE: For printing options, visit the Kodak EasyShare Gallery at www.kodakgallery.com. www.kodak.com/go/support 28 The flash is set to 3.1 MP for each panorama picture you took.) 5 If you are taking only 2 pictures, press...the first picture. Exposure and white balance are saved only when panorama capture is cancelled before stitching occurs. (Picture size is set with your camera Taking panoramic pictures Use panorama to "stitch" up to delete each picture. Get 1 panoramic picture. After a quickview, the EVF/LCD ...
...want to pan), then press the OK button. 3 Take the first picture. NOTE: For printing options, visit the Kodak EasyShare Gallery at www.kodakgallery.com. www.kodak.com/go/support 28 The flash is set to 3.1 MP for each panorama picture you took.) 5 If you are taking only 2 pictures, press...the first picture. Exposure and white balance are saved only when panorama capture is cancelled before stitching occurs. (Picture size is set with your camera Taking panoramic pictures Use panorama to "stitch" up to delete each picture. Get 1 panoramic picture. After a quickview, the EVF/LCD ...

User Manual
Page 36
...again to exit.) 2 to set the focus adjustment. A graphic shows the approximate degree of available adjustment. 29 www.kodak.com/go/support Doing more with your camera Using the focus button Set the focus for close-up distances are unavailable. Manual Focus is at close range. Another ... Focus setting for the default mode, is forced off. Flash is displayed in pictures at center position. NOTE: For rapid setting changes, see page 40. A magnified image appears on the zoom position. The camera automatically sets the focus distance depending on the screen when ...
...again to exit.) 2 to set the focus adjustment. A graphic shows the approximate degree of available adjustment. 29 www.kodak.com/go/support Doing more with your camera Using the focus button Set the focus for close-up distances are unavailable. Manual Focus is at close range. Another ... Focus setting for the default mode, is forced off. Flash is displayed in pictures at center position. NOTE: For rapid setting changes, see page 40. A magnified image appears on the zoom position. The camera automatically sets the focus distance depending on the screen when ...

User Manual
Page 37
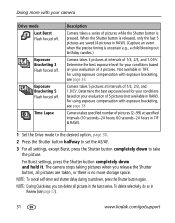
...to exit.) 2 to put yourself into the picture. First Burst Flash forced off. Capture an expected event e.g., a person swinging a golf club. Place camera on a tripod. Raw and TIFF are unavailable in the EVF/LCD screen. www.kodak.com/go/support 30 The active icon is pressed. NOTE: ...For rapid setting changes, see page 32. Camera takes a series of pictures while the Shutter button...
...to exit.) 2 to put yourself into the picture. First Burst Flash forced off. Capture an expected event e.g., a person swinging a golf club. Place camera on a tripod. Raw and TIFF are unavailable in the EVF/LCD screen. www.kodak.com/go/support 30 The active icon is pressed. NOTE: ...For rapid setting changes, see page 32. Camera takes a series of pictures while the Shutter button...
User Manual
Page 38
...5 pictures are taken, or there is pressed. For using exposure compensation with exposure bracketing, see page 17). 31 www.kodak.com/go/support The camera stops taking pictures when you can delete all pictures are saved (4 pictures in RAW). (Capture an event when the precise...1 Set the Drive mode to the desired option, page 30. 2 Press the Shutter button halfway to take the picture. Exposure Bracketing 5 Flash forced off . Camera takes 5 pictures at intervals of 1/3, 2/3, and 1.0 EV. Determine the best exposure level for your conditions based on your evaluation of pictures...
...5 pictures are taken, or there is pressed. For using exposure compensation with exposure bracketing, see page 17). 31 www.kodak.com/go/support The camera stops taking pictures when you can delete all pictures are saved (4 pictures in RAW). (Capture an event when the precise...1 Set the Drive mode to the desired option, page 30. 2 Press the Shutter button halfway to take the picture. Exposure Bracketing 5 Flash forced off . Camera takes 5 pictures at intervals of 1/3, 2/3, and 1.0 EV. Determine the best exposure level for your conditions based on your evaluation of pictures...

User Manual
Page 42
...-hand access to these review functions without navigating the menu. Doing more with your camera Program capture settings Pressing the Program button in Review, after program setup, allows for direct access to the flash and focus menus. Shortcut menu selections View Album Protect Edit Red-eye reduction Slide ...show Copy Video date display Multi-up (can also be set at main menu) 35 www.kodak.com/go/support
...-hand access to these review functions without navigating the menu. Doing more with your camera Program capture settings Pressing the Program button in Review, after program setup, allows for direct access to the flash and focus menus. Shortcut menu selections View Album Protect Edit Red-eye reduction Slide ...show Copy Video date display Multi-up (can also be set at main menu) 35 www.kodak.com/go/support

User Manual
Page 43
... useful when slower shutter speeds are preset for each picture-taking mode. The active icon is charging. For other slow-flash settings, see page 40. Doing more with your camera Changing the flash settings 1 Press . (Press again to exit.) 2 to Auto or Red-eye in shadow or is "backlit" (when the ...light is taken. (If the lighting conditions require flash but do not require Red-eye reduction, the flash may not be available in the EVF/LCD screen. Some of these modes, it . www.kodak.com/go/support 36
... useful when slower shutter speeds are preset for each picture-taking mode. The active icon is charging. For other slow-flash settings, see page 40. Doing more with your camera Changing the flash settings 1 Press . (Press again to exit.) 2 to Auto or Red-eye in shadow or is "backlit" (when the ...light is taken. (If the lighting conditions require flash but do not require Red-eye reduction, the flash may not be available in the EVF/LCD screen. Some of these modes, it . www.kodak.com/go/support 36

User Manual
Page 44
... the setting; You can use ISO 800 only when you are maintained for example f/8, refer to a smaller lens opening. NOTE: The settings, including Flash, are in a picture. Shutter Speed-controls how long the shutter stays open. Higher settings are in the C modes, the color change is applied to...see page 48) to reset PASM to Sepia while in those modes. good for controlling backlit or non-standard scenes. Use Reset Camera (see page 43). 37 www.kodak.com/go/support For example, if you change the Color Mode to their default settings. Aperture-also known as f-stop or ...
... the setting; You can use ISO 800 only when you are maintained for example f/8, refer to a smaller lens opening. NOTE: The settings, including Flash, are in a picture. Shutter Speed-controls how long the shutter stays open. Higher settings are in the C modes, the color change is applied to...see page 48) to reset PASM to Sepia while in those modes. good for controlling backlit or non-standard scenes. Use Reset Camera (see page 43). 37 www.kodak.com/go/support For example, if you change the Color Mode to their default settings. Aperture-also known as f-stop or ...
User Manual
Page 45
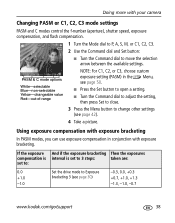
...: taken are: set to: 0.0 Set the drive mode to change other settings (see page 30) +0.7, +1.0, +1.3 -1.0 -1.3, -1.0, -0.7 www.kodak.com/go/support 38 I Press the Set button to move the selection arrow between the available settings. I Turn the Command dial to adjust the ... 0.0, +0.3 +1.0 bracketing 3 (see page 42). 4 Take a picture. Doing more with your camera Changing PASM or C1, C2, C3 mode settings PASM and C modes control the f-number (aperture), shutter speed, exposure compensation, and flash compensation. 1 Turn the Mode dial to P, A, S, M, or C1, C2, C3. 2 ...
...: taken are: set to: 0.0 Set the drive mode to change other settings (see page 30) +0.7, +1.0, +1.3 -1.0 -1.3, -1.0, -0.7 www.kodak.com/go/support 38 I Press the Set button to move the selection arrow between the available settings. I Turn the Command dial to adjust the ... 0.0, +0.3 +1.0 bracketing 3 (see page 42). 4 Take a picture. Doing more with your camera Changing PASM or C1, C2, C3 mode settings PASM and C modes control the f-number (aperture), shutter speed, exposure compensation, and flash compensation. 1 Turn the Mode dial to P, A, S, M, or C1, C2, C3. 2 ...

User Manual
Page 47
..., earth, and sky. Function buttons that provide rapid setting changes: • Flash button (page 36) • Drive button (page 30) • Focus button (page 29) • Exposure metering button (page 39) www.kodak.com/go/support 40 Using the command dial for rapid setting changes Use the ...Command dial in combination with your camera Using the framing grid to close the menu. This is helpful if, for rapid function...
..., earth, and sky. Function buttons that provide rapid setting changes: • Flash button (page 36) • Drive button (page 30) • Focus button (page 29) • Exposure metering button (page 39) www.kodak.com/go/support 40 Using the command dial for rapid setting changes Use the ...Command dial in combination with your camera Using the framing grid to close the menu. This is helpful if, for rapid function...
User Manual
Page 55
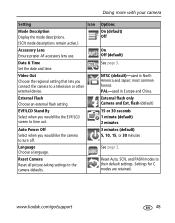
Auto Power Off Select when you would like the camera to the camera defaults. Reset Camera Reset all picture-taking settings to turn off. Options On (default) Off On Off (default) See page 3. flash (default) 15 or 30 seconds 1 minute (default) 2 minutes 3 minutes (default) 5, ... your camera Setting Icon Mode Description Display the mode descriptions. (SCN mode descriptions remain active.) Accessory Lens Ensure proper AF accessory lens use. External Flash Choose an external flash setting. External flash only Camera and Ext. Settings for C modes are retained. www.kodak.com/go...
Auto Power Off Select when you would like the camera to the camera defaults. Reset Camera Reset all picture-taking settings to turn off. Options On (default) Off On Off (default) See page 3. flash (default) 15 or 30 seconds 1 minute (default) 2 minutes 3 minutes (default) 5, ... your camera Setting Icon Mode Description Display the mode descriptions. (SCN mode descriptions remain active.) Accessory Lens Ensure proper AF accessory lens use. External Flash Choose an external flash setting. External flash only Camera and Ext. Settings for C modes are retained. www.kodak.com/go...

User Manual
Page 57
...function in natural lighting. Compensation-provides for indoor pictures under fluorescent lighting without flash. Doing more precise setting. pictures in the shade in Video mode. Click WB - Unavailable in natural lighting. www.kodak.com/go/support 50 This setting is placed next to the underlying white... picture-taking. captures a representative white surface for a more with your lighting condition. Setting Icon White Balance Choose your camera PASM and C1, C2, C3 menu options Capture + These settings are not available in C1, C2, and C3 until you change it...
...function in natural lighting. Compensation-provides for indoor pictures under fluorescent lighting without flash. Doing more precise setting. pictures in the shade in Video mode. Click WB - Unavailable in natural lighting. www.kodak.com/go/support 50 This setting is placed next to the underlying white... picture-taking. captures a representative white surface for a more with your lighting condition. Setting Icon White Balance Choose your camera PASM and C1, C2, C3 menu options Capture + These settings are not available in C1, C2, and C3 until you change it...


