
User Manual
Page 1
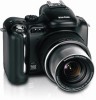
Kodak EasyShare P712 zoom digital camera User's guide www.kodak.com For interactive tutorials, www.kodak.com/go/howto For help with your camera, www.kodak.com/go/p712support
Kodak EasyShare P712 zoom digital camera User's guide www.kodak.com For interactive tutorials, www.kodak.com/go/howto For help with your camera, www.kodak.com/go/p712support

User Manual
Page 5
... the lens cap and strap 1 Charging the battery 2 Loading the battery 2 Turning on the camera 3 Setting the language and date/time, first time 3 Setting the language and date/time, other times 4 Storing pictures on an SD or MMC card 4 2 ...pictures and videos 12 Protecting pictures and videos from deletion 16 3 Transferring and printing pictures 18 Installing the software 18 Transferring pictures 19 Printing from a Kodak EasyShare printer dock or your computer 20 Printing from an optional SD or MMC card 20 Ordering prints online 20 Direct printing with a PictBridge enabled printer...
... the lens cap and strap 1 Charging the battery 2 Loading the battery 2 Turning on the camera 3 Setting the language and date/time, first time 3 Setting the language and date/time, other times 4 Storing pictures on an SD or MMC card 4 2 ...pictures and videos 12 Protecting pictures and videos from deletion 16 3 Transferring and printing pictures 18 Installing the software 18 Transferring pictures 19 Printing from a Kodak EasyShare printer dock or your computer 20 Printing from an optional SD or MMC card 20 Ordering prints online 20 Direct printing with a PictBridge enabled printer...

User Manual
Page 6
Table of contents 4 Doing more with your camera 23 Picture-taking modes 23 Taking panoramic pictures 28 Using the focus button 29 Using the drive mode for self-timer, burst, exposure bracketing 30 ... print or picture 57 Copying pictures and videos 58 Running a slide show 59 Pre-tagging for album names 60 Sharing your pictures 63 5 Troubleshooting 69 Camera problems 69 Computer/connectivity problems 71 Picture quality problems 72 Direct printing (PictBridge) problems 74 6 Getting help 75 iv www...
Table of contents 4 Doing more with your camera 23 Picture-taking modes 23 Taking panoramic pictures 28 Using the focus button 29 Using the drive mode for self-timer, burst, exposure bracketing 30 ... print or picture 57 Copying pictures and videos 58 Running a slide show 59 Pre-tagging for album names 60 Sharing your pictures 63 5 Troubleshooting 69 Camera problems 69 Computer/connectivity problems 71 Picture quality problems 72 Direct printing (PictBridge) problems 74 6 Getting help 75 iv www...

User Manual
Page 7
Table of contents Helpful links 75 Telephone customer support 76 7 Appendix 77 Camera specifications 77 Storage capacities 81 Power-saving features 84 Accessories 85 Important safety instructions 86 Battery information 88 Upgrading your software and firmware 89 Additional care and maintenance 89 Warranty...90 Regulatory compliance 92 www.kodak.com/go/support v
Table of contents Helpful links 75 Telephone customer support 76 7 Appendix 77 Camera specifications 77 Storage capacities 81 Power-saving features 84 Accessories 85 Important safety instructions 86 Battery information 88 Upgrading your software and firmware 89 Additional care and maintenance 89 Warranty...90 Regulatory compliance 92 www.kodak.com/go/support v

User Manual
Page 8
1 Setting up your camera Attaching the lens cap and strap 1 www.kodak.com/go/support
1 Setting up your camera Attaching the lens cap and strap 1 www.kodak.com/go/support

User Manual
Page 9
... the battery Charge the Li-Ion rechargeable battery before first use a Kodak Li-Ion rechargeable digital camera battery (KLIC-5001). Red-charging Green-complete Approximately 3 hours for full charge You can also charge the battery using a Kodak EasyShare printer dock or camera dock. Loading the battery CAUTION: We recommend that you use . Purchase these and other...
... the battery Charge the Li-Ion rechargeable battery before first use a Kodak Li-Ion rechargeable digital camera battery (KLIC-5001). Red-charging Green-complete Approximately 3 hours for full charge You can also charge the battery using a Kodak EasyShare printer dock or camera dock. Loading the battery CAUTION: We recommend that you use . Purchase these and other...

User Manual
Page 10
Setting up your Favorites, see page 66. to choose a Language, then press OK. Setting the language and date/time, first time Language: Move to change. for previous/next field. 2 Press OK to accept. 3 www.kodak.com/go/support Date & Time: 1 Press OK. I Favorites: View your camera Turning on the camera I Capture: Take pictures and videos.
Setting up your Favorites, see page 66. to choose a Language, then press OK. Setting the language and date/time, first time Language: Move to change. for previous/next field. 2 Press OK to accept. 3 www.kodak.com/go/support Date & Time: 1 Press OK. I Favorites: View your camera Turning on the camera I Capture: Take pictures and videos.

User Manual
Page 11
... store more pictures and videos. See page 81 for storage capacities. www.kodak.com/go /p712accessories. For best results, purchase a Kodak card. Storing pictures on an SD or MMC card Your camera has 32 MB of Kodak products or www.kodak.com/go /support 4 Purchase SD or MMC cards at a dealer of... internal memory. Setting up your camera Setting the language and date/time, other times 1 Press Menu. (Press again to exit.) 2 Move...
... store more pictures and videos. See page 81 for storage capacities. www.kodak.com/go /p712accessories. For best results, purchase a Kodak card. Storing pictures on an SD or MMC card Your camera has 32 MB of Kodak products or www.kodak.com/go /support 4 Purchase SD or MMC cards at a dealer of... internal memory. Setting up your camera Setting the language and date/time, other times 1 Press Menu. (Press again to exit.) 2 Move...

User Manual
Page 14
...: Framing marks do not appear in the scene. 1 Press the Shutter button halfway. For the best pictures, the camera attempts to take the picture. Framing marks 2 If the camera is not focusing on the desired subject (or if the framing marks disappear), release the Shutter button and recompose the ...scene. 3 Press the Shutter button completely down to focus on foreground subjects, even if the subjects are fixed at Center Wide. 7 www.kodak.com/go/support ...
...: Framing marks do not appear in the scene. 1 Press the Shutter button halfway. For the best pictures, the camera attempts to take the picture. Framing marks 2 If the camera is not focusing on the desired subject (or if the framing marks disappear), release the Shutter button and recompose the ...scene. 3 Press the Shutter button completely down to focus on foreground subjects, even if the subjects are fixed at Center Wide. 7 www.kodak.com/go/support ...

User Manual
Page 15
.../Shadow clipping I No icons I Status icons I No icons PASM and C modes I Status icons I Status icons, histogram, and camera settings I Highlight/Shadow clipping I No icons I Status icons I No icons Review I Status icons I Picture information I Histogram, highlight/shadow clipping, and... camera settings I No icons I Status icons I No icons I Video information www.kodak.com/go/support 8 Taking pictures and videos Using the Status button In any Capture or Review mode, press ...
.../Shadow clipping I No icons I Status icons I No icons PASM and C modes I Status icons I Status icons, histogram, and camera settings I Highlight/Shadow clipping I No icons I Status icons I No icons Review I Status icons I Picture information I Histogram, highlight/shadow clipping, and... camera settings I No icons I Status icons I No icons I Video information www.kodak.com/go/support 8 Taking pictures and videos Using the Status button In any Capture or Review mode, press ...
User Manual
Page 16
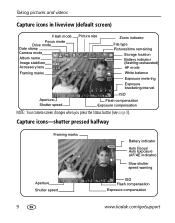
Taking pictures and videos Capture icons in liveview (default screen) Flash mode Focus mode Drive mode Date stamp Camera mode Album name Image stabilizer Accessory lens Framing marks Picture size Zoom indicator File type Pictures/time remaining Storage ... indicator (flashing=exhausted) AF mode White balance Exposure metering Exposure bracketing interval Aperture Shutter speed ISO Flash compensation Exposure compensation NOTE: Your camera screen changes when you press the Status button (see page 8). Capture icons-shutter pressed halfway Framing marks Battery indicator Auto Focus/ Auto...
Taking pictures and videos Capture icons in liveview (default screen) Flash mode Focus mode Drive mode Date stamp Camera mode Album name Image stabilizer Accessory lens Framing marks Picture size Zoom indicator File type Pictures/time remaining Storage ... indicator (flashing=exhausted) AF mode White balance Exposure metering Exposure bracketing interval Aperture Shutter speed ISO Flash compensation Exposure compensation NOTE: Your camera screen changes when you press the Status button (see page 8). Capture icons-shutter pressed halfway Framing marks Battery indicator Auto Focus/ Auto...

User Manual
Page 18
Make sure you are within the flash range. Press the cover to the camera. You can use the camera's built-in heavy shadows. To change the flash settings, see page 36. Refer to your external flash unit user's guide for fully automatic extended flash ...-15.4 ft (2.0 m-4.7 m) Using an external flash unit Use an external flash unit when you want additional or specialized lighting (we recommend a Kodak external flash unit for details. 11 www.kodak.com/go/support Flash-to the Hot shoe. 3 Turn on the external flash unit. Flash When you press the Shutter button halfway...
Make sure you are within the flash range. Press the cover to the camera. You can use the camera's built-in heavy shadows. To change the flash settings, see page 36. Refer to your external flash unit user's guide for fully automatic extended flash ...-15.4 ft (2.0 m-4.7 m) Using an external flash unit Use an external flash unit when you want additional or specialized lighting (we recommend a Kodak external flash unit for details. 11 www.kodak.com/go/support Flash-to the Hot shoe. 3 Turn on the external flash unit. Flash When you press the Shutter button halfway...

User Manual
Page 19
... with a black bar at a 3:2 aspect ratio with your pictures and videos. To save battery power, use the optional Kodak EasyShare camera or printer dock, or Kodak 5-volt AC adapter. (See www.kodak.com/go/p712accessories.) www.kodak.com/go/support 12 During pause: Rewind/fast forward by frame. Pictures 1 Press Review. (Press again to view single...
... with a black bar at a 3:2 aspect ratio with your pictures and videos. To save battery power, use the optional Kodak EasyShare camera or printer dock, or Kodak 5-volt AC adapter. (See www.kodak.com/go/p712accessories.) www.kodak.com/go/support 12 During pause: Rewind/fast forward by frame. Pictures 1 Press Review. (Press again to view single...

User Manual
Page 20
To deselect the entire set , press Set again. To deselect a picture, press Set again and the blue box disappears. 13 www.kodak.com/go/support Single-up 1 Press Review. (Press again to exit.) 2 Press . 3 and to scroll through your picture. 5 Scroll to the next picture. Multi-... select a picture. NOTE: Each time you press Set to highlight a picture. To remove a picture from the set , press review or turn off the camera. Taking pictures and videos Multi-selection of pictures during review Use the Set button to create a set of 20 selected pictures 2 Press Set. 3 to select...
To deselect the entire set , press Set again. To deselect a picture, press Set again and the blue box disappears. 13 www.kodak.com/go/support Single-up 1 Press Review. (Press again to exit.) 2 Press . 3 and to scroll through your picture. 5 Scroll to the next picture. Multi-... select a picture. NOTE: Each time you press Set to highlight a picture. To remove a picture from the set , press review or turn off the camera. Taking pictures and videos Multi-selection of pictures during review Use the Set button to create a set of 20 selected pictures 2 Press Set. 3 to select...

User Manual
Page 22
Taking pictures and videos Identifying the review icons Picture Favorite tag Email tag Selected/ Total number Review mode Album name Print tag/number of prints Protect Picture number Image storage location Battery indicator Scroll arrows Date stamp NOTE: Your camera screen changes when you press the Status button (see page 8). Video Favorite tag Email tag Selected/ Total number Review mode Album name Video length Protect Video number Image storage location Battery indicator Play/Pause Multi-up 15 Video date display www.kodak.com/go/support
Taking pictures and videos Identifying the review icons Picture Favorite tag Email tag Selected/ Total number Review mode Album name Print tag/number of prints Protect Picture number Image storage location Battery indicator Scroll arrows Date stamp NOTE: Your camera screen changes when you press the Status button (see page 8). Video Favorite tag Email tag Selected/ Total number Review mode Album name Video length Protect Video number Image storage location Battery indicator Play/Pause Multi-up 15 Video date display www.kodak.com/go/support

User Manual
Page 25
...choose the applications you wish to load incorrectly. 1 Close all software applications that are open on your computer. 2 Place the Kodak EasyShare software CD into the CD-ROM drive. 3 Load the software: Windows OS-if the install window does not appear, choose...virus software manual for information that contains the CD. 3 Transferring and printing pictures Installing the software CAUTION: Install Kodak EasyShare software before connecting the camera or optional dock to automatically install the most commonly used applications. Registering lets you turned off anti-virus software...
...choose the applications you wish to load incorrectly. 1 Close all software applications that are open on your computer. 2 Place the Kodak EasyShare software CD into the CD-ROM drive. 3 Load the software: Windows OS-if the install window does not appear, choose...virus software manual for information that contains the CD. 3 Transferring and printing pictures Installing the software CAUTION: Install Kodak EasyShare software before connecting the camera or optional dock to automatically install the most commonly used applications. Registering lets you turned off anti-virus software...

User Manual
Page 26
...the USB cable into the labeled USB port on the camera. 4 Turn on your computer. (For details, see the dock user's guide. NOTE: Visit www.kodak.com/go /p712accessories. Purchase these and other end of Kodak products or www.kodak.com/go /howto for details. 3 Plug the ... You can transfer pictures to your computer. To purchase accessories, see page 22.) 19 www.kodak.com/go /p712accessories. Kodak EasyShare software opens on the camera. For dock compatibility, see www.kodak.com/go /support See your computer user's guide for an online tutorial on your computer using...
...the USB cable into the labeled USB port on the camera. 4 Turn on your computer. (For details, see the dock user's guide. NOTE: Visit www.kodak.com/go /p712accessories. Purchase these and other end of Kodak products or www.kodak.com/go /howto for details. 3 Plug the ... You can transfer pictures to your computer. To purchase accessories, see page 22.) 19 www.kodak.com/go /p712accessories. Kodak EasyShare software opens on the camera. For dock compatibility, see www.kodak.com/go /support See your computer user's guide for an online tutorial on your computer using...
User Manual
Page 27
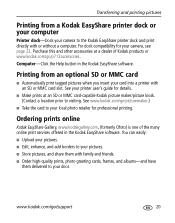
... dock or your computer Printer dock-Dock your camera to the Kodak EasyShare printer dock and print directly with or without a computer. Ordering prints online Kodak EasyShare Gallery, www.kodakgallery.com, (formerly Ofoto) is one of Kodak products or www.kodak.com/go/p712accessories. Transferring and printing pictures Printing from an optional SD or MMC card I Automatically...
... dock or your computer Printer dock-Dock your camera to the Kodak EasyShare printer dock and print directly with or without a computer. Ordering prints online Kodak EasyShare Gallery, www.kodakgallery.com, (formerly Ofoto) is one of Kodak products or www.kodak.com/go/p712accessories. Transferring and printing pictures Printing from an optional SD or MMC card I Automatically...

User Manual
Page 28
.../go/support Transferring and printing pictures Direct printing with I PictBridge enabled printer optional Kodak 5-volt AC adapter I Camera with fully charged batteries, or with a PictBridge enabled printer Your camera features PictBridge technology, which lets you have a Kodak 5-volt AC adapter (optional accessory), plug it . 3 Move the Joystick OK button. to or . 2 Turn on the...
.../go/support Transferring and printing pictures Direct printing with I PictBridge enabled printer optional Kodak 5-volt AC adapter I Camera with fully charged batteries, or with a PictBridge enabled printer Your camera features PictBridge technology, which lets you have a Kodak 5-volt AC adapter (optional accessory), plug it . 3 Move the Joystick OK button. to or . 2 Turn on the...

User Manual
Page 29
If the printer is displayed. Purchase camera docks, printer docks, and other accessories at a dealer of Kodak products or www.kodak.com/go /support 22 Tagged Pictures If your printer is capable, print pictures that you turned the Mode switch ...to Favorites, the current favorite picture is capable, choose a print size. NOTE: If you tagged for your camera To see page 63) and choose a print size. Dock compatibility for printing (see which EasyShare camera...
If the printer is displayed. Purchase camera docks, printer docks, and other accessories at a dealer of Kodak products or www.kodak.com/go /support 22 Tagged Pictures If your printer is capable, print pictures that you turned the Mode switch ...to Favorites, the current favorite picture is capable, choose a print size. NOTE: If you tagged for your camera To see page 63) and choose a print size. Dock compatibility for printing (see which EasyShare camera...


