
User Manual
Page 4
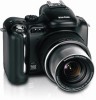
Product features Back View 5 4 3 2 6 1 7 8 9 10 11 12 13 14 17 18 15 16 1 Delete button 10 Set button 2 Tripod socket 11 AE/AF lock button 3 Dock connector 12 Status button 4 LCD screen 13 Review button 5 EVF/LCD toggle button 14 Joystick ( ); OK button (press in) 6 Diopter dial 15 Slot for optional SD or MMC card 7 EVF (Electronic Viewfinder) 16 Share button 8 Zoom lever 17 Menu button 9 Command dial 18 Battery compartment ii www.kodak.com/go/support
Product features Back View 5 4 3 2 6 1 7 8 9 10 11 12 13 14 17 18 15 16 1 Delete button 10 Set button 2 Tripod socket 11 AE/AF lock button 3 Dock connector 12 Status button 4 LCD screen 13 Review button 5 EVF/LCD toggle button 14 Joystick ( ); OK button (press in) 6 Diopter dial 15 Slot for optional SD or MMC card 7 EVF (Electronic Viewfinder) 16 Share button 8 Zoom lever 17 Menu button 9 Command dial 18 Battery compartment ii www.kodak.com/go/support

User Manual
Page 5
Table of contents 1 1 Setting up your camera 1 Attaching the lens cap and strap 1 Charging the battery 2 Loading the battery 2 Turning on the camera 3 Setting the language and date/time, first time 3 Setting the language and date/time, other times 4 Storing pictures on an SD ...12 Protecting pictures and videos from deletion 16 3 Transferring and printing pictures 18 Installing the software 18 Transferring pictures 19 Printing from a Kodak EasyShare printer dock or your computer 20 Printing from an optional SD or MMC card 20 Ordering prints online 20 Direct printing with a ...
Table of contents 1 1 Setting up your camera 1 Attaching the lens cap and strap 1 Charging the battery 2 Loading the battery 2 Turning on the camera 3 Setting the language and date/time, first time 3 Setting the language and date/time, other times 4 Storing pictures on an SD ...12 Protecting pictures and videos from deletion 16 3 Transferring and printing pictures 18 Installing the software 18 Transferring pictures 19 Printing from a Kodak EasyShare printer dock or your computer 20 Printing from an optional SD or MMC card 20 Ordering prints online 20 Direct printing with a ...

User Manual
Page 7
Table of contents Helpful links 75 Telephone customer support 76 7 Appendix 77 Camera specifications 77 Storage capacities 81 Power-saving features 84 Accessories 85 Important safety instructions 86 Battery information 88 Upgrading your software and firmware 89 Additional care and maintenance 89 Warranty...90 Regulatory compliance 92 www.kodak.com/go/support v
Table of contents Helpful links 75 Telephone customer support 76 7 Appendix 77 Camera specifications 77 Storage capacities 81 Power-saving features 84 Accessories 85 Important safety instructions 86 Battery information 88 Upgrading your software and firmware 89 Additional care and maintenance 89 Warranty...90 Regulatory compliance 92 www.kodak.com/go/support v

User Manual
Page 9
....kodak.com/go /support 2 Loading the battery CAUTION: We recommend that you use . www.kodak.com/go /p712accessories. Red-charging Green-complete Approximately 3 hours for full charge You can also charge the battery using a Kodak EasyShare printer dock or camera dock. Setting up your camera Charging the battery Charge the Li-Ion rechargeable battery before first use a Kodak Li-Ion rechargeable digital camera battery...
....kodak.com/go /support 2 Loading the battery CAUTION: We recommend that you use . www.kodak.com/go /p712accessories. Red-charging Green-complete Approximately 3 hours for full charge You can also charge the battery using a Kodak EasyShare printer dock or camera dock. Setting up your camera Charging the battery Charge the Li-Ion rechargeable battery before first use a Kodak Li-Ion rechargeable digital camera battery...
User Manual
Page 16
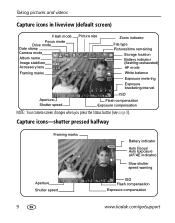
... Flash compensation Exposure compensation 9 www.kodak.com/go/support Taking pictures and videos Capture icons in liveview (default screen) Flash mode Focus mode Drive mode Date stamp Camera mode Album name Image stabilizer Accessory lens Framing marks Picture size Zoom indicator File type Pictures/time remaining Storage location Battery indicator (flashing=exhausted) AF...
... Flash compensation Exposure compensation 9 www.kodak.com/go/support Taking pictures and videos Capture icons in liveview (default screen) Flash mode Focus mode Drive mode Date stamp Camera mode Album name Image stabilizer Accessory lens Framing marks Picture size Zoom indicator File type Pictures/time remaining Storage location Battery indicator (flashing=exhausted) AF...

User Manual
Page 19
... rewind/fast forward. Videos 1 Press OK to play . Rate: Hold 3 seconds to increase/ decrease the rate. To save battery power, use the optional Kodak EasyShare camera or printer dock, or Kodak 5-volt AC adapter. (See www.kodak.com/go/p712accessories.) www.kodak.com/go/support 12 Adjust volume. End video play /pause. 2 During playback: Rewind/fast forward.
... rewind/fast forward. Videos 1 Press OK to play . Rate: Hold 3 seconds to increase/ decrease the rate. To save battery power, use the optional Kodak EasyShare camera or printer dock, or Kodak 5-volt AC adapter. (See www.kodak.com/go/p712accessories.) www.kodak.com/go/support 12 Adjust volume. End video play /pause. 2 During playback: Rewind/fast forward.

User Manual
Page 22
Video Favorite tag Email tag Selected/ Total number Review mode Album name Video length Protect Video number Image storage location Battery indicator Play/Pause Multi-up 15 Video date display www.kodak.com/go/support Taking pictures and videos Identifying the review icons Picture Favorite tag Email tag Selected/ Total number Review mode Album name Print tag/number of prints Protect Picture number Image storage location Battery indicator Scroll arrows Date stamp NOTE: Your camera screen changes when you press the Status button (see page 8).
Video Favorite tag Email tag Selected/ Total number Review mode Album name Video length Protect Video number Image storage location Battery indicator Play/Pause Multi-up 15 Video date display www.kodak.com/go/support Taking pictures and videos Identifying the review icons Picture Favorite tag Email tag Selected/ Total number Review mode Album name Print tag/number of prints Protect Picture number Image storage location Battery indicator Scroll arrows Date stamp NOTE: Your camera screen changes when you press the Status button (see page 8).

User Manual
Page 28
You need: I Camera with fully charged batteries, or with a PictBridge enabled printer Your camera features PictBridge technology, which lets you have a Kodak 5-volt AC adapter (optional accessory), plug it . 3 Move the Joystick OK button. The PictBridge logo is displayed, followed by... with I PictBridge enabled printer optional Kodak 5-volt AC adapter I USB cable (U-8) Connecting the camera to the printer 1 Turn off , press any button to redisplay it into the camera and into an electrical outlet. 3 Using a USB cable for your camera, connect the camera to the printer. (See your ...
You need: I Camera with fully charged batteries, or with a PictBridge enabled printer Your camera features PictBridge technology, which lets you have a Kodak 5-volt AC adapter (optional accessory), plug it . 3 Move the Joystick OK button. The PictBridge logo is displayed, followed by... with I PictBridge enabled printer optional Kodak 5-volt AC adapter I USB cable (U-8) Connecting the camera to the printer 1 Turn off , press any button to redisplay it into the camera and into an electrical outlet. 3 Using a USB cable for your camera, connect the camera to the printer. (See your ...

User Manual
Page 66
Doing more with your camera Running a slide show Use the Slide Show to display your option, then press the OK button. To scroll.... Changing the slide show on a television or on the LCD screen. The interval setting remains until you change it. 59 www.kodak.com/go /p712accessories.) Starting the slide show 1 Press the Review button, then press the Menu button. 2 Move to highlight Slide... interval. To run a slide show display interval The default interval setting displays each picture for 5 seconds. To save battery power, use an optional Kodak 5-volt AC adapter. (Visit www...
Doing more with your camera Running a slide show Use the Slide Show to display your option, then press the OK button. To scroll.... Changing the slide show on a television or on the LCD screen. The interval setting remains until you change it. 59 www.kodak.com/go /p712accessories.) Starting the slide show 1 Press the Review button, then press the Menu button. 2 Move to highlight Slide... interval. To run a slide show display interval The default interval setting displays each picture for 5 seconds. To save battery power, use an optional Kodak 5-volt AC adapter. (Visit www...

User Manual
Page 67
... to 32 album names to the album name list the next time you take are tagged with those album names. The Loop feature remains until battery power is correct (see page 48). The slide show stops if you connect or disconnect the cable while the slide show is continuously repeated. 1...press the OK button. Then, all the pictures or videos you change it. First-on your computer Use Kodak EasyShare software that the Video Out setting (NTSC or PAL) is exhausted. Doing more with your camera Running a continuous slide show loop When you turn on Loop, the slide show is running. 1 Connect ...
... to 32 album names to the album name list the next time you take are tagged with those album names. The Loop feature remains until battery power is correct (see page 48). The slide show stops if you connect or disconnect the cable while the slide show is continuously repeated. 1...press the OK button. Then, all the pictures or videos you change it. First-on your computer Use Kodak EasyShare software that the Video Out setting (NTSC or PAL) is exhausted. Doing more with your camera Running a continuous slide show loop When you turn on Loop, the slide show is running. 1 Connect ...

User Manual
Page 76
...camera is taken, based on a Kodak EasyShare camera dock (sold separately), then try again. In Review, a blue or black screen is displayed instead of a picture I Connect the camera to the computer. I Transfer the picture to a Kodak 5-volt AC adapter (sold separately), then try internal memory and/or another picture. retract I Insert a charged battery. I Place the camera... on picture size and content.) 69 www.kodak.com/go /p712support and select Interactive Troubleshooting and Repairs....
...camera is taken, based on a Kodak EasyShare camera dock (sold separately), then try again. In Review, a blue or black screen is displayed instead of a picture I Connect the camera to the computer. I Transfer the picture to a Kodak 5-volt AC adapter (sold separately), then try internal memory and/or another picture. retract I Insert a charged battery. I Place the camera... on picture size and content.) 69 www.kodak.com/go /p712support and select Interactive Troubleshooting and Repairs....

User Manual
Page 77
...more of the following Picture orientation is not I Wait for any blinking lights to stop; You cannot take a picture I Insert a charged battery (page 2). I Turn the camera off, then on again. I Check the flash setting and change image storage location, or insert a new card. I Set the Orientation ...page 46). I Change image storage location to the computer (page 19), delete pictures from the camera (page 17) or card, change as needed (page 36). Format card in Setup (page 48). www.kodak.com/go/support 70 I Note error number, if given; I If all the way (page...
...more of the following Picture orientation is not I Wait for any blinking lights to stop; You cannot take a picture I Insert a charged battery (page 2). I Turn the camera off, then on again. I Check the flash setting and change image storage location, or insert a new card. I Set the Orientation ...page 46). I Change image storage location to the computer (page 19), delete pictures from the camera (page 17) or card, change as needed (page 36). Format card in Setup (page 48). www.kodak.com/go/support 70 I Note error number, if given; I If all the way (page...

User Manual
Page 78
...kodak.com/go/support Try one or more of the following Computer does not I Turn on an external I Adjust the camera Video Out setting (NTSC or PAL, page 48). communicate with I Insert a charged battery (page 2). Make sure the camera is seated on camera and computer port (page 19). (If using an EasyShare... dock, check all cable connections. Pictures do not I Make sure the EasyShare software is securely connected on the dock...
...kodak.com/go/support Try one or more of the following Computer does not I Turn on an external I Adjust the camera Video Out setting (NTSC or PAL, page 48). communicate with I Insert a charged battery (page 2). Make sure the camera is seated on camera and computer port (page 19). (If using an EasyShare... dock, check all cable connections. Pictures do not I Make sure the EasyShare software is securely connected on the dock...

User Manual
Page 87
Appendix Kodak EasyShare P712 zoom digital camera Power Kodak Li-Ion rechargeable digital camera battery KLIC-5001 (or equivalent); 5V AC adapter, optional Communication with computer/TV USB 2.0 (PIMA 15740 protocol), via USB, 8-pin cable (Model U-8), EasyShare camera dock or printer dock, AV cable, 8-pin (Model AV-8) Other features PictBridge support Yes Self-timer 2 and 10 seconds, 2-...Operating temperature 32-104° F (0-40° C) degrees Size 4.3 x 3.3 x 2.8 in. (108.0 x 84.2 x 72.0 mm) @ power off Weight 14.2 oz (403 g) without battery or card www.kodak.com/go/support 80
Appendix Kodak EasyShare P712 zoom digital camera Power Kodak Li-Ion rechargeable digital camera battery KLIC-5001 (or equivalent); 5V AC adapter, optional Communication with computer/TV USB 2.0 (PIMA 15740 protocol), via USB, 8-pin cable (Model U-8), EasyShare camera dock or printer dock, AV cable, 8-pin (Model AV-8) Other features PictBridge support Yes Self-timer 2 and 10 seconds, 2-...Operating temperature 32-104° F (0-40° C) degrees Size 4.3 x 3.3 x 2.8 in. (108.0 x 84.2 x 72.0 mm) @ power off Weight 14.2 oz (403 g) without battery or card www.kodak.com/go/support 80

User Manual
Page 92
..., but rugged, for the entire listing (batteries & chargers, memory cards, tripods, camera bags, travel kits, cartridge & photo paper kit, camera docks, printer docks, lenses, etc.) 85 www.kodak.com/go /p712acc essories Kodak 1.4 tele converter Extends maximum focal length up digital camera battery - Batteries sold separately. Check our Web site for Kodak EasyShare digital camera case series digital cameras. Reduces light by 2 f-stops (log density...
..., but rugged, for the entire listing (batteries & chargers, memory cards, tripods, camera bags, travel kits, cartridge & photo paper kit, camera docks, printer docks, lenses, etc.) 85 www.kodak.com/go /p712acc essories Kodak 1.4 tele converter Extends maximum focal length up digital camera battery - Batteries sold separately. Check our Web site for Kodak EasyShare digital camera case series digital cameras. Reduces light by 2 f-stops (log density...

User Manual
Page 93
Contact your computer manufacturer if you have questions. Kodak AC adapters and battery chargers are no user-serviceable parts inside. If the LCD breaks, do not touch the glass or liquid. I If using Kodak products. CAUTION: Do not disassemble this product to liquid, moisture, or extreme temperatures....safety instructions Using this product I Read and follow basic safety procedures. I The use of an accessory attachment that is not recommended by Kodak, such as an AC adapter, may result in an airplane, observe all instructions of the airline. The use of controls, adjustments, ...
Contact your computer manufacturer if you have questions. Kodak AC adapters and battery chargers are no user-serviceable parts inside. If the LCD breaks, do not touch the glass or liquid. I If using Kodak products. CAUTION: Do not disassemble this product to liquid, moisture, or extreme temperatures....safety instructions Using this product I Read and follow basic safety procedures. I The use of an accessory attachment that is not recommended by Kodak, such as an AC adapter, may result in an airplane, observe all instructions of the airline. The use of controls, adjustments, ...

User Manual
Page 94
.... I Do not disassemble, install backward, or expose batteries to avoid risk of time. For more information on batteries, see www.kodak.com/go/batterytypes. 87 www.kodak.com/go/support I In the unlikely event that battery fluid leaks inside the product, contact your local Kodak Customer Service representative. batteries may short circuit, discharge energy, become hot, or...
.... I Do not disassemble, install backward, or expose batteries to avoid risk of time. For more information on batteries, see www.kodak.com/go/batterytypes. 87 www.kodak.com/go/support I In the unlikely event that battery fluid leaks inside the product, contact your local Kodak Customer Service representative. batteries may short circuit, discharge energy, become hot, or...

User Manual
Page 95
... them warm. Appendix Battery information Kodak battery replacement types/battery life Actual battery life may be usable. Not all manufacturers' 3.7V Li-Ion rechargeable batteries are compatible with a clean, dry cloth before loading batteries in Auto mode, using 64 MB SD/MMC card) 0 400 We recommend using your camera. When using only a Kodak Li-Ion rechargeable digital camera battery KLIC-5001. www...
... them warm. Appendix Battery information Kodak battery replacement types/battery life Actual battery life may be usable. Not all manufacturers' 3.7V Li-Ion rechargeable batteries are compatible with a clean, dry cloth before loading batteries in Auto mode, using 64 MB SD/MMC card) 0 400 We recommend using your camera. When using only a Kodak Li-Ion rechargeable digital camera battery KLIC-5001. www...
User Manual
Page 96
... camera lenses. I For digital camera disposal or recycling information, contact your camera, transfers pictures to remove dust and dirt. In the US, visit the Electronics Industry Alliance Web site at www.eiae.org or the Kodak Web site at least 24 hours before using the camera again. Kodak EasyShare printer dock-powers your camera, makes 4 x 6 in your camera. I If the camera...
... camera lenses. I For digital camera disposal or recycling information, contact your camera, transfers pictures to remove dust and dirt. In the US, visit the Electronics Industry Alliance Web site at www.eiae.org or the Kodak Web site at least 24 hours before using the camera again. Kodak EasyShare printer dock-powers your camera, makes 4 x 6 in your camera. I If the camera...

User Manual
Page 97
... making repairs, these parts may be remanufactured, or may contain remanufactured materials. Appendix Warranty Limited warranty Kodak warrants Kodak digital cameras and accessories (excluding batteries) to be free from malfunctions and defects in both materials and workmanship for one year from the ...date of the original dated Kodak digital camera or accessory sales receipt. (Always keep the original for warranty repair. Such repair...
... making repairs, these parts may be remanufactured, or may contain remanufactured materials. Appendix Warranty Limited warranty Kodak warrants Kodak digital cameras and accessories (excluding batteries) to be free from malfunctions and defects in both materials and workmanship for one year from the ...date of the original dated Kodak digital camera or accessory sales receipt. (Always keep the original for warranty repair. Such repair...


