
User Manual
Page 1
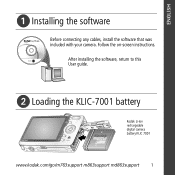
ENGLISH ᕡ Installing the software Before connecting any cables, install the software that was included with your camera. After installing the software, return to this User guide. ᕢ Loading the KLIC-7001 battery Kodak Li-Ion rechargeable digital camera battery KLIC 7001 www.kodak.com/go/m763support m863support md863support 1 Follow the on-screen instructions.
ENGLISH ᕡ Installing the software Before connecting any cables, install the software that was included with your camera. After installing the software, return to this User guide. ᕢ Loading the KLIC-7001 battery Kodak Li-Ion rechargeable digital camera battery KLIC 7001 www.kodak.com/go/m763support m863support md863support 1 Follow the on-screen instructions.
User Manual
Page 2
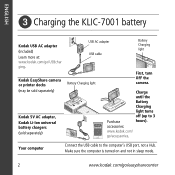
... and not in sleep mode. 2 www.kodak.com/go /accessories. accessories: www.kodak.com/ go /easysharecenter ENGLISH ᕣ Charging the KLIC-7001 battery Kodak USB AC adapter (included) Learn more at: www.kodak.com/go/USBchar ging. Kodak EasyShare camera or printer docks (may be sold separately) Kodak 5V AC adapter, Kodak Li-Ion universal battery chargers (sold separately...
... and not in sleep mode. 2 www.kodak.com/go /accessories. accessories: www.kodak.com/ go /easysharecenter ENGLISH ᕣ Charging the KLIC-7001 battery Kodak USB AC adapter (included) Learn more at: www.kodak.com/go/USBchar ging. Kodak EasyShare camera or printer docks (may be sold separately) Kodak 5V AC adapter, Kodak Li-Ion universal battery chargers (sold separately...
User Manual
Page 3
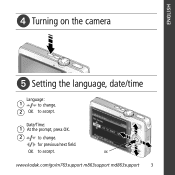
ENGLISH ᕤ Turning on the camera ᕥ Setting the language, date/time Language: 1 to change . OK to accept. Date/Time: 1 At the prompt, press OK. 2 to change . 2 OK to accept. for previous/next field. OK www.kodak.com/go/m763support m863support md863support 3
ENGLISH ᕤ Turning on the camera ᕥ Setting the language, date/time Language: 1 to change . OK to accept. Date/Time: 1 At the prompt, press OK. 2 to change . 2 OK to accept. for previous/next field. OK www.kodak.com/go/m763support m863support md863support 3
User Manual
Page 5
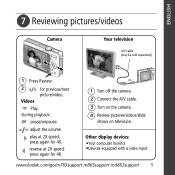
.... play at 2X speed; reverse at 2X speed; Videos Play. press again for 4X. 1 Turn off the camera. 2 Connect the A/V cable. 3 Turn on the camera. 4 Review pictures/videos/slide shows on television. press again for 4X. adjust the volume. Other display devices:... •Your computer monitor •Devices equipped with a video input www.kodak.com/go/m763support m863support md863support 5 ENGLISH ᕧ Reviewing pictures/videos Camera Your television A/V cable (may be sold separately) 1 Press Review. 2 for previous/next picture/video....
.... play at 2X speed; reverse at 2X speed; Videos Play. press again for 4X. 1 Turn off the camera. 2 Connect the A/V cable. 3 Turn on the camera. 4 Review pictures/videos/slide shows on television. press again for 4X. adjust the volume. Other display devices:... •Your computer monitor •Devices equipped with a video input www.kodak.com/go/m763support m863support md863support 5 ENGLISH ᕧ Reviewing pictures/videos Camera Your television A/V cable (may be sold separately) 1 Press Review. 2 for previous/next picture/video....
User Manual
Page 6
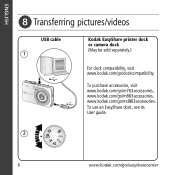
ENGLISH ᕨ Transferring pictures/videos USB cable 1 Kodak EasyShare printer dock or camera dock (May be sold separately.) For dock compatibility, visit www.kodak.com/go /md863accessories. To purchase accessories, visit www.kodak.com/go/m763accessories, www.kodak.com/go/m863accessories, www.kodak.com/go /dockcompatibility. To use an EasyShare dock, see its User guide. 2 6 www.kodak.com/go/easysharecenter
ENGLISH ᕨ Transferring pictures/videos USB cable 1 Kodak EasyShare printer dock or camera dock (May be sold separately.) For dock compatibility, visit www.kodak.com/go /md863accessories. To purchase accessories, visit www.kodak.com/go/m763accessories, www.kodak.com/go/m863accessories, www.kodak.com/go /dockcompatibility. To use an EasyShare dock, see its User guide. 2 6 www.kodak.com/go/easysharecenter

User Manual
Page 7
...learning about your best pictures! Finish reading this book, so you can take and share your camera! Visit www.kodak.com/go/m763support, m863support, or md863support and www.kodak.com/go/easysharecenter for: • the Extended user guide • interactive troubleshooting and repairs ...8226; FAQs • downloads • accessories • printing information • product registration www.kodak.com/go/m763support m863support md863support 7 Congratulations! You have: • set up your camera • taken pictures • transferred pictures to your computer Keep learning!
...learning about your best pictures! Finish reading this book, so you can take and share your camera! Visit www.kodak.com/go/m763support, m863support, or md863support and www.kodak.com/go/easysharecenter for: • the Extended user guide • interactive troubleshooting and repairs ...8226; FAQs • downloads • accessories • printing information • product registration www.kodak.com/go/m763support m863support md863support 7 Congratulations! You have: • set up your camera • taken pictures • transferred pictures to your computer Keep learning!
User Manual
Page 10
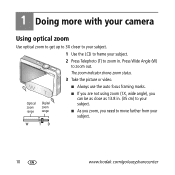
1 Doing more with your camera Using optical zoom Use optical zoom to get up to 3X closer to your subject. 1 Use the LCD to frame your subject. 2 Press Telephoto (T) to move further from your subject. I If you are not using zoom (1X, wide angle), you need to zoom in . (35 cm) to zoom out. I As you zoom, you can be as close as 13.8 in . Optical zoom range Digital zoom range I Always use the auto focus framing marks. Press Wide Angle (W) to your subject. W TD 10 www.kodak.com/go/easysharecenter The zoom indicator shows zoom status. 3 Take the picture or video.
1 Doing more with your camera Using optical zoom Use optical zoom to get up to 3X closer to your subject. 1 Use the LCD to frame your subject. 2 Press Telephoto (T) to move further from your subject. I If you are not using zoom (1X, wide angle), you need to zoom in . (35 cm) to zoom out. I As you zoom, you can be as close as 13.8 in . Optical zoom range Digital zoom range I Always use the auto focus framing marks. Press Wide Angle (W) to your subject. W TD 10 www.kodak.com/go/easysharecenter The zoom indicator shows zoom status. 3 Take the picture or video.
User Manual
Page 11
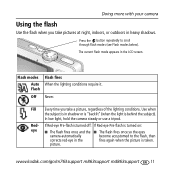
Flash modes Auto Flash Flash fires When the lighting conditions require it. Red- www.kodak.com/go/m763support m863support md863support 11 Doing more with your camera Using the flash Use the flash when you take pictures at night, indoors, or outdoors in heavy shadows. The current flash mode appears ... off: If Red-eye Pre-flash is turned on: eye I The flash fires once and the I The flash fires once so the eyes camera automatically become accustomed to scroll through flash modes (see Flash modes below). Use when the subject is in the LCD screen. picture. Fill Every ...
Flash modes Auto Flash Flash fires When the lighting conditions require it. Red- www.kodak.com/go/m763support m863support md863support 11 Doing more with your camera Using the flash Use the flash when you take pictures at night, indoors, or outdoors in heavy shadows. The current flash mode appears ... off: If Red-eye Pre-flash is turned on: eye I The flash fires once and the I The flash fires once so the eyes camera automatically become accustomed to scroll through flash modes (see Flash modes below). Use when the subject is in the LCD screen. picture. Fill Every ...

User Manual
Page 12
Digital Image Minimizing the effects of flash if possible. Capturing video with your camera Using different picture-taking modes Choose the mode that best suits your subjects and surroundings. Stabilization Close-up Close range. Use available light instead of camera shake and subject movement. SCN Scene High ISO ISO Video Point-and-shoot simplicity... conditions. (See page 13.) People in low-light scenes indoors using a higher ISO. Doing more with sound. (See page 4.) Favorites Reviewing favorite pictures. 12 www.kodak.com/go/easysharecenter
Digital Image Minimizing the effects of flash if possible. Capturing video with your camera Using different picture-taking modes Choose the mode that best suits your subjects and surroundings. Stabilization Close-up Close range. Use available light instead of camera shake and subject movement. SCN Scene High ISO ISO Video Point-and-shoot simplicity... conditions. (See page 13.) People in low-light scenes indoors using a higher ISO. Doing more with sound. (See page 4.) Favorites Reviewing favorite pictures. 12 www.kodak.com/go/easysharecenter
User Manual
Page 13
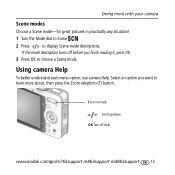
Using camera Help To better understand each menu option, use camera Help. T Turn on Help Scroll up/down OK Turn off before you want to learn more with your camera Scene modes Choose a Scene mode-for great pictures in practically any situation! 1 Turn the Mode dial to Scene . 2 Press to choose a Scene mode. If the mode description turns off Help www.kodak.com/go/m763support m863support md863support 13 Select an option you finish reading it, press OK. 3 Press OK to display Scene mode descriptions. Doing more about, then press the Zoom telephoto (T) button.
Using camera Help To better understand each menu option, use camera Help. T Turn on Help Scroll up/down OK Turn off before you want to learn more with your camera Scene modes Choose a Scene mode-for great pictures in practically any situation! 1 Turn the Mode dial to Scene . 2 Press to choose a Scene mode. If the mode description turns off Help www.kodak.com/go/m763support m863support md863support 13 Select an option you finish reading it, press OK. 3 Press OK to display Scene mode descriptions. Doing more about, then press the Zoom telephoto (T) button.
User Manual
Page 14
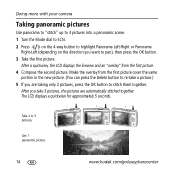
Get 1 panoramic picture. 14 www.kodak.com/go/easysharecenter After a quickview, the LCD displays the liveview and an "overlay" from the first picture cover the same portion in the new picture. (... the Delete button to re-take 3 pictures, the pictures are taking only 2 pictures, press the OK button to stitch them together. Doing more with your camera Taking panoramic pictures Use panorama to "stitch" up to 3 pictures into a panoramic scene. 1 Turn the Mode dial to SCN. 2 Press on the 4-way button to...
Get 1 panoramic picture. 14 www.kodak.com/go/easysharecenter After a quickview, the LCD displays the liveview and an "overlay" from the first picture cover the same portion in the new picture. (... the Delete button to re-take 3 pictures, the pictures are taking only 2 pictures, press the OK button to stitch them together. Doing more with your camera Taking panoramic pictures Use panorama to "stitch" up to 3 pictures into a panoramic scene. 1 Turn the Mode dial to SCN. 2 Press on the 4-way button to...
User Manual
Page 15
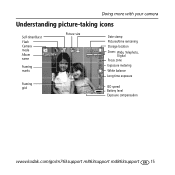
Doing more with your camera Understanding picture-taking icons Self-timer/Burst Flash Camera mode Album name Framing marks Framing grid Picture size Date stamp Pictures/time remaining Storage location Zoom: Wide, Telephoto, Digital Focus zone Exposure metering White balance Long time exposure ISO speed Battery level Exposure compensation www.kodak.com/go/m763support m863support md863support 15
Doing more with your camera Understanding picture-taking icons Self-timer/Burst Flash Camera mode Album name Framing marks Framing grid Picture size Date stamp Pictures/time remaining Storage location Zoom: Wide, Telephoto, Digital Focus zone Exposure metering White balance Long time exposure ISO speed Battery level Exposure compensation www.kodak.com/go/m763support m863support md863support 15
User Manual
Page 20
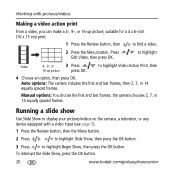
..., then 2, 7, or 14 equally spaced frames. To interrupt the Slide Show, press the OK button. 20 www.kodak.com/go/easysharecenter Press Edit Video, then press OK. the camera chooses 2, 7, or 14 equally spaced frames. to highlight Video 4-, 9-, or 3 Press to highlight Video Action Print... the Review button, then to find a video. 2 Press the Menu button. Running a slide show Use Slide Show to display your pictures/videos on the camera, a television, or any device equipped with pictures/videos Making a video action print From a video, you can make a 4-, 9-, or 16-up picture ...
..., then 2, 7, or 14 equally spaced frames. To interrupt the Slide Show, press the OK button. 20 www.kodak.com/go/easysharecenter Press Edit Video, then press OK. the camera chooses 2, 7, or 14 equally spaced frames. to highlight Video 4-, 9-, or 3 Press to highlight Video Action Print... the Review button, then to find a video. 2 Press the Menu button. Running a slide show Use Slide Show to display your pictures/videos on the camera, a television, or any device equipped with pictures/videos Making a video action print From a video, you can make a 4-, 9-, or 16-up picture ...

User Manual
Page 23
... /off. Caution: Formatting a card deletes all pictures and videos, including protected files. rechargeable digital camera battery KLIC-7001. Camera does not I Reformat the card. I Charge rechargeable battery (see page 1). I Insert a card into the slot, then push to seat. www.kodak.com/go /md863support and select Interactive Troubleshooting & Repairs. turn on the LCD; recognize SD...
... /off. Caution: Formatting a card deletes all pictures and videos, including protected files. rechargeable digital camera battery KLIC-7001. Camera does not I Reformat the card. I Charge rechargeable battery (see page 1). I Insert a card into the slot, then push to seat. www.kodak.com/go /md863support and select Interactive Troubleshooting & Repairs. turn on the LCD; recognize SD...
User Manual
Page 25
...such as any necessary adjustments and/or replacement parts. I If the camera has been subjected to any request for warranty repair. Kodak will include all labor as well as suntan lotion, to contact painted surfaces. For digital camera disposal or recycling information, contact your expense, to be free from...local authorities. Proof of the date of the purchase price paid for more information. If Kodak is only available from the date of the software included on the Kodak EasyShare software CD and the camera firmware (the software that runs on the lens or LCD to air-dry for...
...such as any necessary adjustments and/or replacement parts. I If the camera has been subjected to any request for warranty repair. Kodak will include all labor as well as suntan lotion, to contact painted surfaces. For digital camera disposal or recycling information, contact your expense, to be free from...local authorities. Proof of the date of the purchase price paid for more information. If Kodak is only available from the date of the software included on the Kodak EasyShare software CD and the camera firmware (the software that runs on the lens or LCD to air-dry for...
User Manual
Page 27
www.kodak.com/go/m763support m863support md863support 27 If this device must be used in accordance with the instructions, may cause harmful interference to provide reasonable protection ... 15 of the following two conditions: (1) this device may cause undesired operation. FCC compliance and advisory Appendix Kodak EasyShare M763/M863/MD863 digital camera This equipment has been tested and found to comply with the limits for a Class B digital device, pursuant to operate the equipment. This equipment generates, uses, and can be used with Industry Canada...
www.kodak.com/go/m763support m863support md863support 27 If this device must be used in accordance with the instructions, may cause harmful interference to provide reasonable protection ... 15 of the following two conditions: (1) this device may cause undesired operation. FCC compliance and advisory Appendix Kodak EasyShare M763/M863/MD863 digital camera This equipment has been tested and found to comply with the limits for a Class B digital device, pursuant to operate the equipment. This equipment generates, uses, and can be used with Industry Canada...

User Manual
Page 1
Kodak EasyShare M763/M863/MD863 digital camera Extended User Guide www.kodak.com For interactive tutorials: www.kodak.com/go/howto For help with your camera: www.kodak.com/go/m763support, www.kodak.com/go/m863support, www.kodak.com/go/md863support
Kodak EasyShare M763/M863/MD863 digital camera Extended User Guide www.kodak.com For interactive tutorials: www.kodak.com/go/howto For help with your camera: www.kodak.com/go/m763support, www.kodak.com/go/m863support, www.kodak.com/go/md863support

User Manual
Page 5
... pictures/videos 5 Taking a picture 5 Taking a video 6 Using optical zoom 7 Using the flash 8 Using different picture-taking modes 9 Using camera Help 11 Taking panoramic pictures 12 Understanding the picture-taking icons 13 3 Working with pictures/videos 14 Reviewing pictures/videos 14 Using sound tags 16... Deleting pictures/videos 17 Using the menu button in Review 18 Using Kodak Perfect Touch technology 19 Cropping pictures 19 Editing videos 20 Running a slide show 21 Viewing pictures/videos in different ways ...
... pictures/videos 5 Taking a picture 5 Taking a video 6 Using optical zoom 7 Using the flash 8 Using different picture-taking modes 9 Using camera Help 11 Taking panoramic pictures 12 Understanding the picture-taking icons 13 3 Working with pictures/videos 14 Reviewing pictures/videos 14 Using sound tags 16... Deleting pictures/videos 17 Using the menu button in Review 18 Using Kodak Perfect Touch technology 19 Cropping pictures 19 Editing videos 20 Running a slide show 21 Viewing pictures/videos in different ways ...

User Manual
Page 6
... Using the menu button to change settings 29 Customizing your camera 33 Using the self-timer 36 Using burst 37 Using exposure compensation to adjust picture brightness 37 Using the framing grid to compose a picture ... software 45 Transferring pictures with the USB cable 46 Printing pictures 47 Dock compatibility for your camera 49 6 Troubleshooting 50 Camera problems 50 Camera/computer communications 52 LCD screen messages 53 7 Getting help 56 8 Appendix 58 Camera specifications 58 Care and maintenance 61 Upgrading your software and firmware 61 Storage capacities 61 Important...
... Using the menu button to change settings 29 Customizing your camera 33 Using the self-timer 36 Using burst 37 Using exposure compensation to adjust picture brightness 37 Using the framing grid to compose a picture ... software 45 Transferring pictures with the USB cable 46 Printing pictures 47 Dock compatibility for your camera 49 6 Troubleshooting 50 Camera problems 50 Camera/computer communications 52 LCD screen messages 53 7 Getting help 56 8 Appendix 58 Camera specifications 58 Care and maintenance 61 Upgrading your software and firmware 61 Storage capacities 61 Important...

User Manual
Page 8
Charge until the Battery Charging light turns off (up your camera Charging the battery USB AC adapter Kodak USB AC adapter (included) USB cable Battery Charging light Kodak EasyShare camera or printer docks (may be sold separately) First, turn OFF the camera. Make sure the computer is turned on and not in sleep mode. Your computer Connect...
Charge until the Battery Charging light turns off (up your camera Charging the battery USB AC adapter Kodak USB AC adapter (included) USB cable Battery Charging light Kodak EasyShare camera or printer docks (may be sold separately) First, turn OFF the camera. Make sure the computer is turned on and not in sleep mode. Your computer Connect...


