
User Manual
Page 1
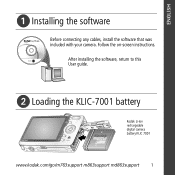
Follow the on-screen instructions. ENGLISH ᕡ Installing the software Before connecting any cables, install the software that was included with your camera. After installing the software, return to this User guide. ᕢ Loading the KLIC-7001 battery Kodak Li-Ion rechargeable digital camera battery KLIC 7001 www.kodak.com/go/m763support m863support md863support 1
Follow the on-screen instructions. ENGLISH ᕡ Installing the software Before connecting any cables, install the software that was included with your camera. After installing the software, return to this User guide. ᕢ Loading the KLIC-7001 battery Kodak Li-Ion rechargeable digital camera battery KLIC 7001 www.kodak.com/go/m763support m863support md863support 1
User Manual
Page 2
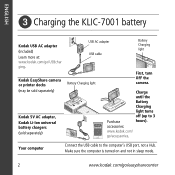
... sleep mode. 2 www.kodak.com/go /accessories. Kodak EasyShare camera or printer docks (may be sold separately) Kodak 5V AC adapter, Kodak Li-Ion universal battery chargers (sold separately) USB AC adapter USB cable Battery Charging light Battery Charging light First, turn OFF the camera. accessories: www.kodak.com/ go /easysharecenter ENGLISH ᕣ Charging the KLIC-7001 battery Kodak USB AC adapter (included...
... sleep mode. 2 www.kodak.com/go /accessories. Kodak EasyShare camera or printer docks (may be sold separately) Kodak 5V AC adapter, Kodak Li-Ion universal battery chargers (sold separately) USB AC adapter USB cable Battery Charging light Battery Charging light First, turn OFF the camera. accessories: www.kodak.com/ go /easysharecenter ENGLISH ᕣ Charging the KLIC-7001 battery Kodak USB AC adapter (included...
User Manual
Page 4
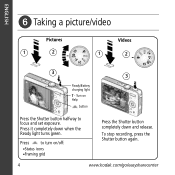
Press it completely down and release. Press to focus and set exposure. Turn on Help button Press the Shutter button halfway to turn on/off: •Status icons •Framing grid Press the Shutter button completely down when the Ready light turns green. To stop recording, press the Shutter button again. 4 www.kodak.com/go/easysharecenter ENGLISH ᕦ Taking a picture/video Pictures 1 2 Videos 1 2 3 3 Ready/Battery charging light T -
Press it completely down and release. Press to focus and set exposure. Turn on Help button Press the Shutter button halfway to turn on/off: •Status icons •Framing grid Press the Shutter button completely down when the Ready light turns green. To stop recording, press the Shutter button again. 4 www.kodak.com/go/easysharecenter ENGLISH ᕦ Taking a picture/video Pictures 1 2 Videos 1 2 3 3 Ready/Battery charging light T -
User Manual
Page 9
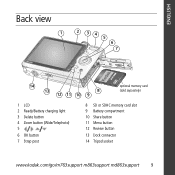
ENGLISH Back view 1 2 34 5 6 7 14 13 8 12 11 10 9 optional memory card (sold separately) 1 LCD 2 Ready/Battery charging light 3 Delete button 4 Zoom button (Wide/Telephoto) 5 6 OK button 7 Strap post 8 SD or SDHC memory card slot 9 Battery compartment 10 Share button 11 Menu button 12 Review button 13 Dock connector 14 Tripod socket www.kodak.com/go/m763support m863support md863support 9
ENGLISH Back view 1 2 34 5 6 7 14 13 8 12 11 10 9 optional memory card (sold separately) 1 LCD 2 Ready/Battery charging light 3 Delete button 4 Zoom button (Wide/Telephoto) 5 6 OK button 7 Strap post 8 SD or SDHC memory card slot 9 Battery compartment 10 Share button 11 Menu button 12 Review button 13 Dock connector 14 Tripod socket www.kodak.com/go/m763support m863support md863support 9
User Manual
Page 15
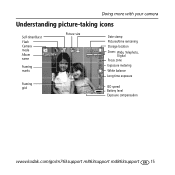
Doing more with your camera Understanding picture-taking icons Self-timer/Burst Flash Camera mode Album name Framing marks Framing grid Picture size Date stamp Pictures/time remaining Storage location Zoom: Wide, Telephoto, Digital Focus zone Exposure metering White balance Long time exposure ISO speed Battery level Exposure compensation www.kodak.com/go/m763support m863support md863support 15
Doing more with your camera Understanding picture-taking icons Self-timer/Burst Flash Camera mode Album name Framing marks Framing grid Picture size Date stamp Pictures/time remaining Storage location Zoom: Wide, Telephoto, Digital Focus zone Exposure metering White balance Long time exposure ISO speed Battery level Exposure compensation www.kodak.com/go/m763support m863support md863support 15

User Manual
Page 23
... the LCD; I Charge rechargeable battery (see page 1). rechargeable digital camera battery KLIC-7001. I Insert a card into the slot, then push to seat. I Install new battery. excessive use of the following activities that quickly deplete battery power: with Kodak Li-Ion reviewing pictures/videos on /off. recognize SD card. charge using USB charging. 3 Solving camera problems For support, visit...
... the LCD; I Charge rechargeable battery (see page 1). rechargeable digital camera battery KLIC-7001. I Insert a card into the slot, then push to seat. I Install new battery. excessive use of the following activities that quickly deplete battery power: with Kodak Li-Ion reviewing pictures/videos on /off. recognize SD card. charge using USB charging. 3 Solving camera problems For support, visit...
User Manual
Page 24
... manufacturer if you have questions. Contact Kodak customer support. I Do not charge non-rechargeable batteries. Kodak AC adapters and battery chargers are no user-serviceable parts inside the product, contact Kodak customer support. I Do not disassemble, install backward, or expose batteries to touch metal objects, including coins. I Use only batteries approved for an extended period of explosion...
... manufacturer if you have questions. Contact Kodak customer support. I Do not charge non-rechargeable batteries. Kodak AC adapters and battery chargers are no user-serviceable parts inside the product, contact Kodak customer support. I Do not disassemble, install backward, or expose batteries to touch metal objects, including coins. I Use only batteries approved for an extended period of explosion...
User Manual
Page 25
... to inclement weather or you suspect water has gotten inside the camera, turn off the camera and remove the batteries and card. Contact a dealer of Kodak products for camera lenses. If replacement parts are used in both materials and workmanship...Kodak EasyShare software CD and the camera firmware (the software that runs on the lens or LCD to remove dust and dirt. See www.kodak.com/go/m763downloads, www.kodak.com/go/m863downloads, or www.kodak.com/go /m763support m863support md863support 25 Wipe gently with any conditions and/or limitations stated herein. For digital camera...
... to inclement weather or you suspect water has gotten inside the camera, turn off the camera and remove the batteries and card. Contact a dealer of Kodak products for camera lenses. If replacement parts are used in both materials and workmanship...Kodak EasyShare software CD and the camera firmware (the software that runs on the lens or LCD to remove dust and dirt. See www.kodak.com/go/m763downloads, www.kodak.com/go/m863downloads, or www.kodak.com/go /m763support m863support md863support 25 Wipe gently with any conditions and/or limitations stated herein. For digital camera...

User Manual
Page 4
Product features Back view 1 2 34 5 6 7 14 13 12 11 10 9 8 optional memory card (sold separately) 1 LCD 2 Ready/Battery charging light 3 Delete button 4 Zoom button (Wide/Telephoto) 5 6 OK button 7 Strap post 8 SD or SDHC memory card slot 9 Battery compartment 10 Share button 11 Menu button 12 Review button 13 Dock connector 14 Tripod socket ii www.kodak.com/go/support
Product features Back view 1 2 34 5 6 7 14 13 12 11 10 9 8 optional memory card (sold separately) 1 LCD 2 Ready/Battery charging light 3 Delete button 4 Zoom button (Wide/Telephoto) 5 6 OK button 7 Strap post 8 SD or SDHC memory card slot 9 Battery compartment 10 Share button 11 Menu button 12 Review button 13 Dock connector 14 Tripod socket ii www.kodak.com/go/support

User Manual
Page 5
...camera 1 Attaching the strap 1 Loading the battery 1 Charging the battery 2 Turning on the camera 3 Setting the language, date/time 3 Storing pictures on an SD/SDHC card 4 2 Taking pictures/videos 5 Taking a picture 5 Taking a video 6 Using optical zoom 7 Using the flash 8 Using different picture-taking modes 9 Using camera... Help 11 Taking panoramic pictures 12 Understanding the picture-taking icons 13 3 Working with pictures/videos 14 Reviewing pictures/videos 14 Using sound tags 16 Deleting pictures/videos 17 Using the menu button in Review 18 Using Kodak ...
...camera 1 Attaching the strap 1 Loading the battery 1 Charging the battery 2 Turning on the camera 3 Setting the language, date/time 3 Storing pictures on an SD/SDHC card 4 2 Taking pictures/videos 5 Taking a picture 5 Taking a video 6 Using optical zoom 7 Using the flash 8 Using different picture-taking modes 9 Using camera... Help 11 Taking panoramic pictures 12 Understanding the picture-taking icons 13 3 Working with pictures/videos 14 Reviewing pictures/videos 14 Using sound tags 16 Deleting pictures/videos 17 Using the menu button in Review 18 Using Kodak ...

User Manual
Page 6
... Using the menu button to change settings 29 Customizing your camera 33 Using the self-timer 36 Using burst 37 Using exposure compensation to adjust picture brightness 37 Using the framing grid to compose a ... your camera 49 6 Troubleshooting 50 Camera problems 50 Camera/computer communications 52 LCD screen messages 53 7 Getting help 56 8 Appendix 58 Camera specifications 58 Care and maintenance 61 Upgrading your software and firmware 61 Storage capacities 61 Important safety instructions 62 Battery life 63 Limited Warranty 63 Regulatory compliance 65 iv www.kodak.com/...
... Using the menu button to change settings 29 Customizing your camera 33 Using the self-timer 36 Using burst 37 Using exposure compensation to adjust picture brightness 37 Using the framing grid to compose a ... your camera 49 6 Troubleshooting 50 Camera problems 50 Camera/computer communications 52 LCD screen messages 53 7 Getting help 56 8 Appendix 58 Camera specifications 58 Care and maintenance 61 Upgrading your software and firmware 61 Storage capacities 61 Important safety instructions 62 Battery life 63 Limited Warranty 63 Regulatory compliance 65 iv www.kodak.com/...

User Manual
Page 8
....kodak.com/go/USBcharging www.kodak.com/go/accessories 2 www.kodak.com/go/support Battery Charging light Kodak 5V AC adapter, Kodak Li-Ion universal battery chargers (sold separately) For dock compatibility, see page 49. Charge until the Battery Charging light turns off (up your camera Charging the battery USB AC adapter Kodak USB AC adapter (included) USB cable Battery Charging light Kodak EasyShare camera...
....kodak.com/go/USBcharging www.kodak.com/go/accessories 2 www.kodak.com/go/support Battery Charging light Kodak 5V AC adapter, Kodak Li-Ion universal battery chargers (sold separately) For dock compatibility, see page 49. Charge until the Battery Charging light turns off (up your camera Charging the battery USB AC adapter Kodak USB AC adapter (included) USB cable Battery Charging light Kodak EasyShare camera...

User Manual
Page 19
Taking pictures/videos Understanding the picture-taking icons Self-timer/Burst Flash Camera mode Album name Framing marks Framing grid Picture size Date stamp Pictures/time remaining Storage location Zoom: Wide, Telephoto, Digital Focus zone Exposure metering White balance Long time exposure ISO speed Battery level Exposure compensation In capture mode-shutter pressed halfway Camera mode Auto Exposure/ Auto Focus warning Battery level Exposure compensation www.kodak.com/go/support 13
Taking pictures/videos Understanding the picture-taking icons Self-timer/Burst Flash Camera mode Album name Framing marks Framing grid Picture size Date stamp Pictures/time remaining Storage location Zoom: Wide, Telephoto, Digital Focus zone Exposure metering White balance Long time exposure ISO speed Battery level Exposure compensation In capture mode-shutter pressed halfway Camera mode Auto Exposure/ Auto Focus warning Battery level Exposure compensation www.kodak.com/go/support 13

User Manual
Page 20
... pictures/videos on a television, see page 25.) 1 Press the Review button. 2 Press to multi-up thumbnail pictures. (See page 24.) 14 www.kodak.com/go /md863accessories.) NOTE: Pictures taken at 3:2 and 16:9 picture sizes have a black bar at the top of the 4 Press OK to return ...Press picture. A video's duration is displayed at the top and bottom. to view other parts of the LCD. OK Review To save battery power, use an optional Kodak EasyShare dock or Kodak 5-volt AC adapter. (Visit: www.kodak.com/go/m763accessories, www.kodak.com/go/m863accessories, www.kodak.com/go /support
... pictures/videos on a television, see page 25.) 1 Press the Review button. 2 Press to multi-up thumbnail pictures. (See page 24.) 14 www.kodak.com/go /md863accessories.) NOTE: Pictures taken at 3:2 and 16:9 picture sizes have a black bar at the top of the 4 Press OK to return ...Press picture. A video's duration is displayed at the top and bottom. to view other parts of the LCD. OK Review To save battery power, use an optional Kodak EasyShare dock or Kodak 5-volt AC adapter. (Visit: www.kodak.com/go/m763accessories, www.kodak.com/go/m863accessories, www.kodak.com/go /support

User Manual
Page 28
Working with pictures/videos Changing the slide show repeats until you press the OK button or until you change it . 22 www.kodak.com/go/support You can set the display interval from 3-60 seconds. 1 On the Slide Show menu, press button. Running a ... remains until you change it . The slide show display interval The default interval setting displays each picture for 5 seconds. The interval setting remains until battery power is continuously repeated. 1 On the Slide Show menu, press button. To scroll through the seconds quickly, press and hold . 3 Press the...
Working with pictures/videos Changing the slide show repeats until you press the OK button or until you change it . 22 www.kodak.com/go/support You can set the display interval from 3-60 seconds. 1 On the Slide Show menu, press button. Running a ... remains until you change it . The slide show display interval The default interval setting displays each picture for 5 seconds. The interval setting remains until battery power is continuously repeated. 1 On the Slide Show menu, press button. To scroll through the seconds quickly, press and hold . 3 Press the...

User Manual
Page 33
Working with pictures/videos Understanding the review icons Pictures Favorite Email tag Kodak Perfect Touch Blur warning Review mode Album name Protect Print tag/number of prints Picture number Image storage location Videos Play time Volume control indicator (sound tags) Battery level Review mode Video length Video number Image storage location Play time Video control indicator Battery level www.kodak.com/go/support 27
Working with pictures/videos Understanding the review icons Pictures Favorite Email tag Kodak Perfect Touch Blur warning Review mode Album name Protect Print tag/number of prints Picture number Image storage location Videos Play time Volume control indicator (sound tags) Battery level Review mode Video length Video number Image storage location Play time Video control indicator Battery level www.kodak.com/go/support 27

User Manual
Page 53
... directly to the printer. (See your camera to the Kodak EasyShare printer dock and print directly-with or without a computer. Transferring and printing pictures Printing pictures Printing with a Kodak EasyShare printer dock Dock your printer user guide or visit www.kodak.com/go/m763accessories, www.kodak.com/go/m863accessories, www.kodak.com/go/md863accessories.) www.kodak.com/go /md863accessories.
... directly to the printer. (See your camera to the Kodak EasyShare printer dock and print directly-with or without a computer. Transferring and printing pictures Printing pictures Printing with a Kodak EasyShare printer dock Dock your printer user guide or visit www.kodak.com/go/m763accessories, www.kodak.com/go/m863accessories, www.kodak.com/go/md863accessories.) www.kodak.com/go /md863accessories.

User Manual
Page 56
... 1). number does not decrease after taking pictures. Continue taking a picture. excessive use of the following activities that quickly deplete battery power: with Kodak Li-Ion reviewing pictures/videos on . rechargeable digital camera battery KLIC-7001. 50 www.kodak.com/go /usbcharging. Camera does not turn on the LCD; 6 Troubleshooting For step-by-step product support, visit www...
... 1). number does not decrease after taking pictures. Continue taking a picture. excessive use of the following activities that quickly deplete battery power: with Kodak Li-Ion reviewing pictures/videos on . rechargeable digital camera battery KLIC-7001. 50 www.kodak.com/go /usbcharging. Camera does not turn on the LCD; 6 Troubleshooting For step-by-step product support, visit www...
User Manual
Page 57
... Compensation (see page 35). I Move so that the distance between the camera and the subject. In Review mode, I Turn on the flash (see page 34). screen is not behind the subject. Keep rechargeable batteries charged. I Check the image storage location setting (see page 8). I Transfer... the picture to the computer (see page 46), then format the card in Close-up mode. www.kodak.com/go/support 51 Troubleshooting If... Do not remove card while the camera is not in the camera...
... Compensation (see page 35). I Move so that the distance between the camera and the subject. In Review mode, I Turn on the flash (see page 34). screen is not behind the subject. Keep rechargeable batteries charged. I Check the image storage location setting (see page 8). I Transfer... the picture to the computer (see page 46), then format the card in Close-up mode. www.kodak.com/go/support 51 Troubleshooting If... Do not remove card while the camera is not in the camera...

User Manual
Page 58
..., including protected files. Close all software applications, reconnect camera. 52 www.kodak.com/go/support I Turn the camera off before inserting or removing a card. Camera freezes up I Transfer pictures to the computer (see page... 46), or delete pictures (see page 4). when a card is inserted or I Disconnect the USB cable. I Make sure the camera is fully charged (see page 35). I Make sure the battery...
..., including protected files. Close all software applications, reconnect camera. 52 www.kodak.com/go/support I Turn the camera off before inserting or removing a card. Camera freezes up I Transfer pictures to the computer (see page... 46), or delete pictures (see page 4). when a card is inserted or I Disconnect the USB cable. I Make sure the camera is fully charged (see page 35). I Make sure the battery...


