User Guide
Page 11
... support options, contact your reseller of Kodak Document Imaging products or visit us provide you with the best possible service and support that helps maintain your scanner A-61500 May 2010 It is not performing at www.kodak.com/go /DIwarrantyregistration. Microsoft Windows 7 (32-bit) - For i700 Series Scanners only: Microsoft Windows 7 (64-bit) Registering your continuous scanning...
... support options, contact your reseller of Kodak Document Imaging products or visit us provide you with the best possible service and support that helps maintain your scanner A-61500 May 2010 It is not performing at www.kodak.com/go /DIwarrantyregistration. Microsoft Windows 7 (32-bit) - For i700 Series Scanners only: Microsoft Windows 7 (64-bit) Registering your continuous scanning...
User Guide
Page 28
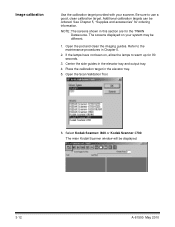
Place the calibration target in the elevator tray and output tray. 4. The main Kodak Scanner window will be different. 1. NOTE: The screens shown in Chapter 5. 2. The screens displayed on , allow the lamps to warm up for the TWAIN Datasource. Center ... Use the calibration target provided with your system may be displayed. 3-12 A-61500 May 2010 Open the pod and clean the imaging guides. Select Kodak Scanner: i600 or Kodak Scanner: i700. Be sure to the maintenance procedures in this section are for 90 seconds. 3. Additional calibration targets can be ordered.
Place the calibration target in the elevator tray and output tray. 4. The main Kodak Scanner window will be different. 1. NOTE: The screens shown in Chapter 5. 2. The screens displayed on , allow the lamps to warm up for the TWAIN Datasource. Center ... Use the calibration target provided with your system may be displayed. 3-12 A-61500 May 2010 Open the pod and clean the imaging guides. Select Kodak Scanner: i600 or Kodak Scanner: i700. Be sure to the maintenance procedures in this section are for 90 seconds. 3. Additional calibration targets can be ordered.
User Guide
Page 29
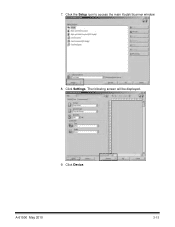
Click Settings. 7. The following screen will be displayed. 9. A-61500 May 2010 3-13 Click the Setup icon to access the main Kodak Scanner window. 8. Click Device.
Click Settings. 7. The following screen will be displayed. 9. A-61500 May 2010 3-13 Click the Setup icon to access the main Kodak Scanner window. 8. Click Device.

User Guide
Page 59
Select Kodak Scanner: i600 or Kodak Scanner: i700. Select Start>Programs>Kodak>Document Imaging>Scan Validation Tool. 2. The main Kodak Scanner window will be displayed.. 5. Open the Scan Validation Tool. 4. Accessing the Operator Log The Operator Log is accessed through the Scan Validation Tool. 1. From the Driver Types box, select TWAIN. 3. Click the Setup icon to access the main Kodak Scanner window.. A-61500 May 2010 6-3
Select Kodak Scanner: i600 or Kodak Scanner: i700. Select Start>Programs>Kodak>Document Imaging>Scan Validation Tool. 2. The main Kodak Scanner window will be displayed.. 5. Open the Scan Validation Tool. 4. Accessing the Operator Log The Operator Log is accessed through the Scan Validation Tool. 1. From the Driver Types box, select TWAIN. 3. Click the Setup icon to access the main Kodak Scanner window.. A-61500 May 2010 6-3
User Guide
Page 63
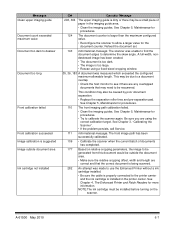
...; Clean the imaging guides. This condition may also be due to a document overlap. • Check the host monitor to see if there are using a fixed-sized cropping window. 35, 36, 183 A document was made to use the Enhanced Printer without a ink cartridge installed. &#...procedures. • Try to calibrate the scanner again. A-61500 May 2010 6-7 The scanner was unable to find the document edges to be a small piece of documents has completed. 177 Based on the scanner. See Chapter 5, Maintenance for procedures. 124 The document counter is larger than the maximum configured ...
...; Clean the imaging guides. This condition may also be due to a document overlap. • Check the host monitor to see if there are using a fixed-sized cropping window. 35, 36, 183 A document was made to use the Enhanced Printer without a ink cartridge installed. &#...procedures. • Try to calibrate the scanner again. A-61500 May 2010 6-7 The scanner was unable to find the document edges to be a small piece of documents has completed. 177 Based on the scanner. See Chapter 5, Maintenance for procedures. 124 The document counter is larger than the maximum configured ...
User Guide
Page 70
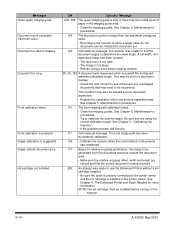
... fixed-sized cropping window. 35, 36, 183 A document was measured which exceeded the configured maximum allowable length. A full-width, nondeskewed image has been created. • The document is too dark. • The image is larger than the maximum configured value. • Reconfigure the scanner to allow a ...installed ID# Operator Message 293, 304 The upper imaging guide is dirty or there may be a small piece of documents has completed. 177 Based on the scanner. 6-14 A-61500 May 2010 See Chapter 4, The Enhanced Printer and Patch Readers for procedures. 110 The front imaging...
... fixed-sized cropping window. 35, 36, 183 A document was measured which exceeded the configured maximum allowable length. A full-width, nondeskewed image has been created. • The document is too dark. • The image is larger than the maximum configured value. • Reconfigure the scanner to allow a ...installed ID# Operator Message 293, 304 The upper imaging guide is dirty or there may be a small piece of documents has completed. 177 Based on the scanner. 6-14 A-61500 May 2010 See Chapter 4, The Enhanced Printer and Patch Readers for procedures. 110 The front imaging...
Installation Guide
Page 1
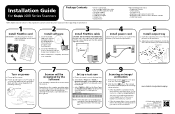
... requirement. 5 Install output tray a. Wait until the scanner beeps before initiating scanning. Place a document to the Image Processing Guide on power a. Insert the Kodak i600 Series Scanner Installation CD in the image viewer window. • If the document is displayed. b. Power up and login to your ...PC using , you intend to use with your scanner. • If the document did not scan correctly, refer...
... requirement. 5 Install output tray a. Wait until the scanner beeps before initiating scanning. Place a document to the Image Processing Guide on power a. Insert the Kodak i600 Series Scanner Installation CD in the image viewer window. • If the document is displayed. b. Power up and login to your ...PC using , you intend to use with your scanner. • If the document did not scan correctly, refer...


