User Manual
Page 4
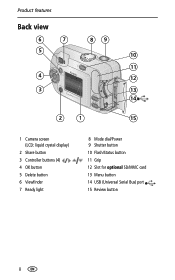
Product features Back view 6 7 5 89 10 11 4 12 3 13 14 2 1 15 1 Camera screen (LCD: liquid crystal display) 2 Share button 3 Controller buttons (4) 4 OK button 5 Delete button 6 Viewfinder 7 Ready light 8 Mode dial/Power 9 Shutter button 10 Flash/Status button 11 Grip 12 Slot for optional SD/MMC card 13 Menu button 14 USB (Universal Serial Bus) port 15 Review button ii
Product features Back view 6 7 5 89 10 11 4 12 3 13 14 2 1 15 1 Camera screen (LCD: liquid crystal display) 2 Share button 3 Controller buttons (4) 4 OK button 5 Delete button 6 Viewfinder 7 Ready light 8 Mode dial/Power 9 Shutter button 10 Flash/Status button 11 Grip 12 Slot for optional SD/MMC card 13 Menu button 14 USB (Universal Serial Bus) port 15 Review button ii
User Manual
Page 6
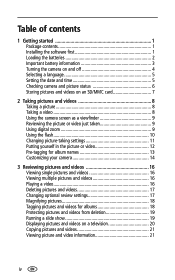
... an SD/MMC card 7 2 Taking pictures and videos 8 Taking a picture 8 Taking a video 8 Using the camera screen as a viewfinder 9 Reviewing the picture or video just taken 9 Using digital zoom 9 Using the flash 10 Changing picture-taking settings 11 Putting yourself in the picture or video 12 Pre-tagging... for album names 13 Customizing your camera 14 3 Reviewing pictures and videos 16 Viewing single pictures and videos ...
... an SD/MMC card 7 2 Taking pictures and videos 8 Taking a picture 8 Taking a video 8 Using the camera screen as a viewfinder 9 Reviewing the picture or video just taken 9 Using digital zoom 9 Using the flash 10 Changing picture-taking settings 11 Putting yourself in the picture or video 12 Pre-tagging... for album names 13 Customizing your camera 14 3 Reviewing pictures and videos 16 Viewing single pictures and videos ...
User Manual
Page 10
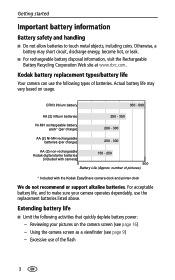
... 300 AA (2) Ni-MH rechargeable batteries (per charge) 200 - 300 AA (2) non-rechargeable Kodak digital starter batteries 150 - 250 (included with the Kodak EasyShare camera dock and printer dock We do not recommend or support alkaline batteries. number of pictures) * Included ...camera screen (see page 9) - Kodak battery replacement types/battery life Your camera can use the following activities that quickly deplete battery power: - For acceptable battery life, and to touch metal objects, including coins. Excessive use the replacement batteries listed above. Reviewing your camera...
... 300 AA (2) Ni-MH rechargeable batteries (per charge) 200 - 300 AA (2) non-rechargeable Kodak digital starter batteries 150 - 250 (included with the Kodak EasyShare camera dock and printer dock We do not recommend or support alkaline batteries. number of pictures) * Included ...camera screen (see page 9) - Kodak battery replacement types/battery life Your camera can use the following activities that quickly deplete battery power: - For acceptable battery life, and to touch metal objects, including coins. Excessive use the replacement batteries listed above. Reviewing your camera...
User Manual
Page 13
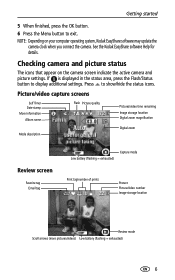
... Mode description Digital zoom Review screen Favorite tag Email tag Low battery (flashing = exhausted) Capture mode Print tag/number of prints Protect Picture/video number Image storage location Review mode Scroll arrows (more pictures/videos) Low battery (flashing = exhausted) 6 Checking camera and picture status The icons that appear on your computer operating system, Kodak EasyShare software...
... Mode description Digital zoom Review screen Favorite tag Email tag Low battery (flashing = exhausted) Capture mode Print tag/number of prints Protect Picture/video number Image storage location Review mode Scroll arrows (more pictures/videos) Low battery (flashing = exhausted) 6 Checking camera and picture status The icons that appear on your computer operating system, Kodak EasyShare software...

User Manual
Page 15
... the picture is being saved; To stop recording, press the Shutter button again. See page 9.) 3 Press the Shutter button to begin recording. you are in Review, Share, or Setup. NOTE: ■ You can still take pictures. If the ready light is red, wait until it for night scenes or low-light... conditions. Taking a video 1 Turn the Mode dial to Video . 2 Use the viewfinder or camera screen to take the picture. Place the camera on -even if you can also press the Shutter button and hold it turns green. Night-for more than 2 seconds to take...
... the picture is being saved; To stop recording, press the Shutter button again. See page 9.) 3 Press the Shutter button to begin recording. you are in Review, Share, or Setup. NOTE: ■ You can still take pictures. If the ready light is red, wait until it for night scenes or low-light... conditions. Taking a video 1 Turn the Mode dial to Video . 2 Use the viewfinder or camera screen to take the picture. Place the camera on -even if you can also press the Shutter button and hold it turns green. Night-for more than 2 seconds to take...
User Manual
Page 16
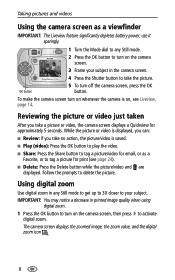
...in printed image quality when using digital zoom. 1 Press the OK button to turn on whenever the camera is on the camera screen. 3 Frame your subject in any Still mode. 2 Press the OK button to turn off the camera screen, press the OK button. Reviewing the picture or video just ... as a Favorite, or to tag a picture for print (see Liveview, page 14. Using digital zoom Use digital zoom in the camera screen. 4 Press the Shutter button to take a picture or video, the camera screen displays a Quickview for approximately 5 seconds. While the picture or video is saved. ■ Play (...
...in printed image quality when using digital zoom. 1 Press the OK button to turn on whenever the camera is on the camera screen. 3 Frame your subject in any Still mode. 2 Press the OK button to turn off the camera screen, press the OK button. Reviewing the picture or video just ... as a Favorite, or to tag a picture for print (see Liveview, page 14. Using digital zoom Use digital zoom in the camera screen. 4 Press the Shutter button to take a picture or video, the camera screen displays a Quickview for approximately 5 seconds. While the picture or video is saved. ■ Play (...

User Manual
Page 23
...9632; Press to scroll through pictures and videos. (For fast scrolling, press and hold ). 3 Press the Review button to take a picture anytime-even in a compatible Kodak EasyShare camera dock or Kodak EasyShare printer dock (sold separately) to locate a video (or highlight one at a time. ■ Press ...the OK button to display a single view of the selected picture. 3 Press the Review button to view and work with...
...9632; Press to scroll through pictures and videos. (For fast scrolling, press and hold ). 3 Press the Review button to take a picture anytime-even in a compatible Kodak EasyShare camera dock or Kodak EasyShare printer dock (sold separately) to locate a video (or highlight one at a time. ■ Press ...the OK button to display a single view of the selected picture. 3 Press the Review button to view and work with...

User Manual
Page 24
NOTE: The camera does not record audio; there is no sound during playback. To view and delete other pictures and videos, press . 4 To exit, highlight Exit then press the OK button; To replay the video, press the OK button. Deleting pictures and videos 1 Press the Review button. 2 Press... Storage (page 12) Setup Menu (page 14) 17 To rewind a video, press during playback. Remove protection before deleting (see page 19). Reviewing pictures and videos 3 To play or pause a video, press the OK button. ALL-deletes all pictures and videos from your current image storage location...
NOTE: The camera does not record audio; there is no sound during playback. To view and delete other pictures and videos, press . 4 To exit, highlight Exit then press the OK button; To replay the video, press the OK button. Deleting pictures and videos 1 Press the Review button. 2 Press... Storage (page 12) Setup Menu (page 14) 17 To rewind a video, press during playback. Remove protection before deleting (see page 19). Reviewing pictures and videos 3 To play or pause a video, press the OK button. ALL-deletes all pictures and videos from your current image storage location...
User Manual
Page 25
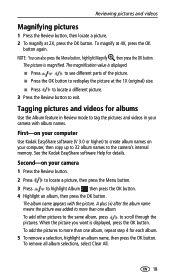
See the Kodak EasyShare software Help for albums Use the Album feature in your camera 1 Press the Review button. 2 Press to locate a picture, then press the Menu button. 3 Press to more than one album, repeat step 4 for each album. 5 To remove a selection,... pictures. Tagging pictures and videos for details. To magnify at 2X, press the OK button. First-on your computer Use Kodak EasyShare software (V 3.0 or higher) to create album names on your camera with the picture. A plus (+) after the album name means the picture was added to highlight Album , then press the...
See the Kodak EasyShare software Help for albums Use the Album feature in your camera 1 Press the Review button. 2 Press to locate a picture, then press the Menu button. 3 Press to more than one album, repeat step 4 for each album. 5 To remove a selection,... pictures. Tagging pictures and videos for details. To magnify at 2X, press the OK button. First-on your computer Use Kodak EasyShare software (V 3.0 or higher) to create album names on your camera with the picture. A plus (+) after the album name means the picture was added to highlight Album , then press the...

User Manual
Page 26
...slide show on a television or on the camera screen. Your selections are saved. 7 Press the Menu button to return to highlight Slide Show , then press the OK button. 19 To restore them, see page 20. See the Kodak EasyShare software Help for details. Starting the slide...the Slide Show to your computer, the Kodak EasyShare software opens and categorizes your pictures and videos on any external device, see Kodak EasyShare software Help. Running a slide show 1 Press the Review button, then press the Menu button. 2 Press to Review mode. The picture or video is protected...
...slide show on a television or on the camera screen. Your selections are saved. 7 Press the Menu button to return to highlight Slide Show , then press the OK button. 19 To restore them, see page 20. See the Kodak EasyShare software Help for details. Starting the slide...the Slide Show to your computer, the Kodak EasyShare software opens and categorizes your pictures and videos on any external device, see Kodak EasyShare software Help. Running a slide show 1 Press the Review button, then press the Menu button. 2 Press to Review mode. The picture or video is protected...

User Manual
Page 27
... press the OK button. This setting remains until you change it . to highlight Interval, then press the 2 Select a display interval. Reviewing pictures and videos 3 Highlight Begin Show, then press the OK button. You can display pictures and videos on a television You can increase... Show menu, press OK button. Displaying pictures and videos on a television or any device equipped with a video input using a compatible Kodak EasyShare printer dock and an optional video cable (see the printer dock user's guide). Changing the slide show is continuously repeated. 1 On the...
... press the OK button. This setting remains until you change it . to highlight Interval, then press the 2 Select a display interval. Reviewing pictures and videos 3 Highlight Begin Show, then press the OK button. You can display pictures and videos on a television You can increase... Show menu, press OK button. Displaying pictures and videos on a television or any device equipped with a video input using a compatible Kodak EasyShare printer dock and an optional video cable (see the printer dock user's guide). Changing the slide show is continuously repeated. 1 On the...

User Manual
Page 28
.... ALL-copies all pictures and videos from internal memory to a card. Protection settings are copied, not moved. See page 12. Reviewing pictures and videos Copying pictures and videos You can copy pictures and videos from a card to internal memory or from your selected image ...storage location to the other location. Before you copy, make sure that: ■ A card is inserted in the camera. ■ The camera's image storage location is set to the location from the original location after they are copied, delete them (see page 19. To remove pictures...
.... ALL-copies all pictures and videos from internal memory to a card. Protection settings are copied, not moved. See page 12. Reviewing pictures and videos Copying pictures and videos You can copy pictures and videos from a card to internal memory or from your selected image ...storage location to the other location. Before you copy, make sure that: ■ A card is inserted in the camera. ■ The camera's image storage location is set to the location from the original location after they are copied, delete them (see page 19. To remove pictures...
User Manual
Page 36
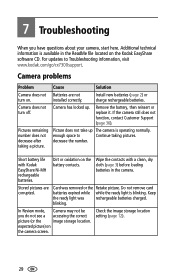
... Customer Support (page 36). enough space to Troubleshooting information, visit www.kodak.com/go/cx7300support. Dirt or oxidation on the camera screen. In Review mode, Camera may not be you have questions about your camera, start here. expected picture) on the Wipe the contacts with Kodak EasyShare Ni-MH rechargeable batteries. installed correctly. cloth (page 3) before loading...
... Customer Support (page 36). enough space to Troubleshooting information, visit www.kodak.com/go/cx7300support. Dirt or oxidation on the camera screen. In Review mode, Camera may not be you have questions about your camera, start here. expected picture) on the Wipe the contacts with Kodak EasyShare Ni-MH rechargeable batteries. installed correctly. cloth (page 3) before loading...
User Manual
Page 37
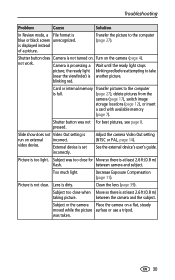
... picture surface or use a tripod. External device is blue or black screen unrecognized. Decrease Exposure Compensation (page 11). Troubleshooting Problem Cause Solution In Review mode, a File format is set incorrectly. Transfer the picture to take (near the viewfinder) is at least 2.6 ft (0.8 m) taking picture.... Picture is run on . Too much light. Picture is not turned on external incorrect. Shutter button does Camera is not clear. between camera and subject. Subject was too close when Move so there is full. (page 27), delete pictures from the...
... picture surface or use a tripod. External device is blue or black screen unrecognized. Decrease Exposure Compensation (page 11). Troubleshooting Problem Cause Solution In Review mode, a File format is set incorrectly. Transfer the picture to take (near the viewfinder) is at least 2.6 ft (0.8 m) taking picture.... Picture is run on . Too much light. Picture is not turned on external incorrect. Shutter button does Camera is not clear. between camera and subject. Subject was too close when Move so there is full. (page 27), delete pictures from the...
User Manual
Page 50
... handling, 3 types, 3 button controller, ii Delete, ii, 9 Flash/Status, ii, 6, 10 Menu, ii, 11 OK, ii, 4 Review, ii, 9, 16 Share, ii, 9, 24 shutter, i, 8 C cable USB, 1, 27 video, 20 43 1 camera screen error messages, 33 Liveview, 9 Quickview, 9 reviewing pictures/videos, 16 status area, 6 status icons, 6 turning Liveview default on/off, 14 using as viewfinder...
... handling, 3 types, 3 button controller, ii Delete, ii, 9 Flash/Status, ii, 6, 10 Menu, ii, 11 OK, ii, 4 Review, ii, 9, 16 Share, ii, 9, 24 shutter, i, 8 C cable USB, 1, 27 video, 20 43 1 camera screen error messages, 33 Liveview, 9 Quickview, 9 reviewing pictures/videos, 16 status area, 6 status icons, 6 turning Liveview default on/off, 14 using as viewfinder...
User Manual
Page 51
... SD/MMC Card, 17 protected pictures/videos, 19 digital zoom, 9 disposal and recycling of batteries, 3 of camera, 40 dock connector on camera, iii locator holes for, iii printer, 28 downloading pictures, 27 E EasyShare software See also Kodak EasyShare software, 22 emailing pictures/videos, 25 error messages,... 10 focus distance, 38 Format, 15 formatting internal memory/card, 15 G grip, i, ii H help camera, 29 EasyShare software, 36 support, 36 troubleshooting, 29 web links, 36 I icons camera screen, 6 Review menu, 17 Setup Menu, 14 Share menu, 24 Image Storage, 12 capacities, 40 on SD/MMC card...
... SD/MMC Card, 17 protected pictures/videos, 19 digital zoom, 9 disposal and recycling of batteries, 3 of camera, 40 dock connector on camera, iii locator holes for, iii printer, 28 downloading pictures, 27 E EasyShare software See also Kodak EasyShare software, 22 emailing pictures/videos, 25 error messages,... 10 focus distance, 38 Format, 15 formatting internal memory/card, 15 G grip, i, ii H help camera, 29 EasyShare software, 36 support, 36 troubleshooting, 29 web links, 36 I icons camera screen, 6 Review menu, 17 Setup Menu, 14 Share menu, 24 Image Storage, 12 capacities, 40 on SD/MMC card...
User Manual
Page 52
...22 M Macintosh OS installing software on, 22 system requirements, 22 Magnify, 18 maintenance, camera, 39 memory inserting card, 7 internal, 12 removable card, 12 setting image storage location, 12 storage capacities, 40 Menu button, ii, 11 review mode, 17 Setup Menu, 14 Share, 24 MMC card formatting, 15 inserting, 7 ...printing from computer, 27 printing tagged, 24 protecting, 19 reviewing, 16 storage capacity, 40 45 era screen lens, i cleaning, 40 light ready, ii, 35 Self Timer, i, 12 video, i lithium batteries, expected ...
...22 M Macintosh OS installing software on, 22 system requirements, 22 Magnify, 18 maintenance, camera, 39 memory inserting card, 7 internal, 12 removable card, 12 setting image storage location, 12 storage capacities, 40 Menu button, ii, 11 review mode, 17 Setup Menu, 14 Share, 24 MMC card formatting, 15 inserting, 7 ...printing from computer, 27 printing tagged, 24 protecting, 19 reviewing, 16 storage capacity, 40 45 era screen lens, i cleaning, 40 light ready, ii, 35 Self Timer, i, 12 video, i lithium batteries, expected ...
User Manual
Page 53
..., 9 R ReadMe file, 29 ready light, ii, 35 recycling and disposal of batteries, 3 of camera, 40 red-eye flash, 10 regulatory information, 41 requirements, system, 22 Return, 14 Review button, ii, 9, 16 reviewing pictures/videos as a slide show, 19 as you take them, 9 deleting, 17 in multiples (Multi...-up , 16 viewing on television, 20 Play Video, 16 power auto off, 41 camera, 4 switch, i printer dock, 28 printing from...
..., 9 R ReadMe file, 29 ready light, ii, 35 recycling and disposal of batteries, 3 of camera, 40 red-eye flash, 10 regulatory information, 41 requirements, system, 22 Return, 14 Review button, ii, 9, 16 reviewing pictures/videos as a slide show, 19 as you take them, 9 deleting, 17 in multiples (Multi...-up , 16 viewing on television, 20 Play Video, 16 power auto off, 41 camera, 4 switch, i printer dock, 28 printing from...
User Manual
Page 54
... tripod socket, iii troubleshooting camera, 29 camera/computer communications, 32 error messages, 33 ready light status, 35 turning camera on/off, 4 U upgrading software, firmware, 41 URLs, Kodak web sites, 36 USB cable camera port, ii connecting camera and computer, 27 transferring ...pictures, 27 V Video Date Display, 15 Video Length, 12 Video mode, 8 Video Out, 14 videos checking settings, 6 copying, 21 deleting, 17 display date on, 15 emailing tagged, 25 protecting, 19 record light, i reviewing...
... tripod socket, iii troubleshooting camera, 29 camera/computer communications, 32 error messages, 33 ready light status, 35 turning camera on/off, 4 U upgrading software, firmware, 41 URLs, Kodak web sites, 36 USB cable camera port, ii connecting camera and computer, 27 transferring ...pictures, 27 V Video Date Display, 15 Video Length, 12 Video mode, 8 Video Out, 14 videos checking settings, 6 copying, 21 deleting, 17 display date on, 15 emailing tagged, 25 protecting, 19 record light, i reviewing...


