
User Manual
Page 3
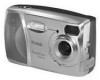
Product Overview Camera Front 1 2 3 P215 0003HC 1 Shutter button 2 Flash unit 3 On / Off switch 4 Self Timer light 5 Viewfinder lens Camera Bottom 456 7 8a 8b 6 Lens with built-in cover 7 Close-up switch 8a USB connector 8b DC in connector 1 2 1 Camera Dock connector (door shown closed) 3 2 Tripod mount socket 3 Battery door iii
Product Overview Camera Front 1 2 3 P215 0003HC 1 Shutter button 2 Flash unit 3 On / Off switch 4 Self Timer light 5 Viewfinder lens Camera Bottom 456 7 8a 8b 6 Lens with built-in cover 7 Close-up switch 8a USB connector 8b DC in connector 1 2 1 Camera Dock connector (door shown closed) 3 2 Tripod mount socket 3 Battery door iii
User Manual
Page 5
... Contents 1 Getting Started 1 Install the Software First 1 Need This Guide in Large Print 1 What Can I Do With My KODAK EASYSHARE CX4200 Digital Camera 2 What Can I Do With My Digital Pictures 2 Camera Package Contents 3 Attaching the Wrist Strap 4 Loading the Batteries 4 Turning the Camera On and Off 5 Using the 4-Way Arrow/OK/Zoom Button 5 Selecting a Language 6 Setting the Clock 7 Checking...
... Contents 1 Getting Started 1 Install the Software First 1 Need This Guide in Large Print 1 What Can I Do With My KODAK EASYSHARE CX4200 Digital Camera 2 What Can I Do With My Digital Pictures 2 Camera Package Contents 3 Attaching the Wrist Strap 4 Loading the Batteries 4 Turning the Camera On and Off 5 Using the 4-Way Arrow/OK/Zoom Button 5 Selecting a Language 6 Setting the Clock 7 Checking...

User Manual
Page 7
... Default 38 Turning Off Quickview 39 Turning On Liveview 39 Setting Video Out 40 Formatting Memory or MMC/SD Card 41 Viewing Camera Information 42 6 Installing the Software 43 System Requirements 43 Install the Software 45 7 Connecting to the Computer 47 Important-Before...Computer 48 Printing from an MMC/SD Card 48 8 Using the KODAK EASYSHARE Camera Dock II ..49 Camera Dock Package Contents 49 Installing the Camera Insert 50 Connecting the Camera Dock 51 Installing the Battery Pack in the Camera 52 Docking the Camera 53 Charging the Battery Pack 54 Transferring Pictures 55 vii
... Default 38 Turning Off Quickview 39 Turning On Liveview 39 Setting Video Out 40 Formatting Memory or MMC/SD Card 41 Viewing Camera Information 42 6 Installing the Software 43 System Requirements 43 Install the Software 45 7 Connecting to the Computer 47 Important-Before...Computer 48 Printing from an MMC/SD Card 48 8 Using the KODAK EASYSHARE Camera Dock II ..49 Camera Dock Package Contents 49 Installing the Camera Insert 50 Connecting the Camera Dock 51 Installing the Battery Pack in the Camera 52 Docking the Camera 53 Charging the Battery Pack 54 Transferring Pictures 55 vii
User Manual
Page 8
... Web Links 73 Help in this User Guide 74 Software Help 74 Telephone Customer Support 74 11 Appendix 77 Camera Specifications 77 Original Factory Settings-Camera 79 Upgrading Your Software and Firmware 79 Tips, Safety, Maintenance 80 Picture Storage Capacities 81 Locating Pictures on ...an MMC/SD Card 81 Card File Naming Conventions 82 Using Your Batteries 83 Battery-Saving Features 84 Optional AC Adapter 84 Camera Dock II ...
... Web Links 73 Help in this User Guide 74 Software Help 74 Telephone Customer Support 74 11 Appendix 77 Camera Specifications 77 Original Factory Settings-Camera 79 Upgrading Your Software and Firmware 79 Tips, Safety, Maintenance 80 Picture Storage Capacities 81 Locating Pictures on ...an MMC/SD Card 81 Card File Naming Conventions 82 Using Your Batteries 83 Battery-Saving Features 84 Optional AC Adapter 84 Camera Dock II ...

User Manual
Page 11
... Start Guide. See page 52 for viewing pictures on television) Also included but not shown: 2 KODAK Digital Camera Batteries, AA or a KODAK CRV3 Lithium battery; Software CD; DO NOT DISCARD. NOTE: Contents subject to the optional KODAK EASYSHARE Camera Dock II. Chapter 1 Camera Package Contents 1 2 4 3 5 1 Camera 4 2 Wrist Strap 5 3 Custom Camera Insert* USB cable Video Cable (for details about purchasing and using the...
... Start Guide. See page 52 for viewing pictures on television) Also included but not shown: 2 KODAK Digital Camera Batteries, AA or a KODAK CRV3 Lithium battery; Software CD; DO NOT DISCARD. NOTE: Contents subject to the optional KODAK EASYSHARE Camera Dock II. Chapter 1 Camera Package Contents 1 2 4 3 5 1 Camera 4 2 Wrist Strap 5 3 Custom Camera Insert* USB cable Video Cable (for details about purchasing and using the...

User Manual
Page 12
... open. 3 Insert two KODAK Digital Camera Batteries, AA, or KODAK CRV3 battery, as shown. 4 Close the battery door. Chapter 1 Attaching the Wrist Strap 1 Thread the short loop of the strap through the wrist strap post. 2 Thread the long end of batteries you can use alkaline batteries. Loading the Batteries Two KODAK Digital Camera Batteries or one KODAK CRV3 Lithium Battery is included with a KODAK EASYSHARE Camera Dock II, see...
... open. 3 Insert two KODAK Digital Camera Batteries, AA, or KODAK CRV3 battery, as shown. 4 Close the battery door. Chapter 1 Attaching the Wrist Strap 1 Thread the short loop of the strap through the wrist strap post. 2 Thread the long end of batteries you can use alkaline batteries. Loading the Batteries Two KODAK Digital Camera Batteries or one KODAK CRV3 Lithium Battery is included with a KODAK EASYSHARE Camera Dock II, see...

User Manual
Page 15
... adjust the settings. 5 Press the OK button to accept the changes. 6 Press the Menu button to automatically update the camera clock when you change it. See the KODAK EASYSHARE Software Help for an extended time. Chapter 1 Setting the Clock The Date & Time screen appears the first time you turn ...off the menu. The date format is the first time the camera has been turned on your computer operating system, KODAK EASYSHARE Software may allow your computer to turn on the camera or if the battery is removed for details. 7 If this is YYYY/MM/DD in a 24hour ...
... adjust the settings. 5 Press the OK button to accept the changes. 6 Press the Menu button to automatically update the camera clock when you change it. See the KODAK EASYSHARE Software Help for an extended time. Chapter 1 Setting the Clock The Date & Time screen appears the first time you turn ...off the menu. The date format is the first time the camera has been turned on your computer operating system, KODAK EASYSHARE Software may allow your computer to turn on the camera or if the battery is removed for details. 7 If this is YYYY/MM/DD in a 24hour ...

User Manual
Page 16
... up Internal Storage location Self Timer Card Capture Review Share Camera mode (icons not displayed in Liveview) Flash mode (page 16) Low Battery Exhausted battery (blinking)* Best Better Good Quality Digital Zoom Battery Status If no battery icon appears on the LCD, the battery is fully charged. *A blinking battery icon means the battery is too weak to power the...
... up Internal Storage location Self Timer Card Capture Review Share Camera mode (icons not displayed in Liveview) Flash mode (page 16) Low Battery Exhausted battery (blinking)* Best Better Good Quality Digital Zoom Battery Status If no battery icon appears on the LCD, the battery is fully charged. *A blinking battery icon means the battery is too weak to power the...

User Manual
Page 22
... after one minute. To change the Liveview setting so it sparingly. OK 3 Frame your picture. 1 Make sure the camera is on, see page 39. 14 NOTE: Liveview quickly depletes battery power; To conserve battery power, Liveview automatically turns off Liveview, press the OK button. Look at the LCD to frame your picture in...
... after one minute. To change the Liveview setting so it sparingly. OK 3 Frame your picture. 1 Make sure the camera is on, see page 39. 14 NOTE: Liveview quickly depletes battery power; To conserve battery power, Liveview automatically turns off Liveview, press the OK button. Look at the LCD to frame your picture in...

User Manual
Page 23
While the picture is saved. Chapter 2 Quickview-Reviewing the Picture Just Taken After you can : Delete m Review It. Press the Delete button while the picture and are displayed. NOTE: To save battery power, you take no action, the picture is displayed, you can turn off the Quickview feature. See page 39. 15 If you take a picture, the LCD displays a Quickview of that picture for 5 seconds. m Delete it.
While the picture is saved. Chapter 2 Quickview-Reviewing the Picture Just Taken After you can : Delete m Review It. Press the Delete button while the picture and are displayed. NOTE: To save battery power, you take no action, the picture is displayed, you can turn off the Quickview feature. See page 39. 15 If you take a picture, the LCD displays a Quickview of that picture for 5 seconds. m Delete it.

User Manual
Page 33
... the Shutter button and take a picture anytime, no matter what mode the camera is in internal memory or on the LCD quickly depletes battery power. The Review icon appears at the bottom of copies number Review Mode indicator Low battery Exhausted battery (blinking) 25 Picture Information Icons 2 072 Internal memory Memory Card Email Favorite...
... the Shutter button and take a picture anytime, no matter what mode the camera is in internal memory or on the LCD quickly depletes battery power. The Review icon appears at the bottom of copies number Review Mode indicator Low battery Exhausted battery (blinking) 25 Picture Information Icons 2 072 Internal memory Memory Card Email Favorite...
User Manual
Page 38
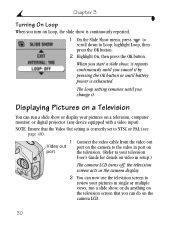
...You can now use the television screen to review your pictures in setup.) The camera LCD turns off; Displaying Pictures on a Television You can run a slide show...PAL (see page 40). 1 Connect the video cable from the video out Video out port on the camera to the video in port on port the television. (Refer to your television User's Guide for details on... video in single or multiple views, run a slide show , it repeats continuously until battery power is exhausted. highlight Loop, then press the OK button. 2 Highlight On, then press the OK button. When...
...You can now use the television screen to review your pictures in setup.) The camera LCD turns off; Displaying Pictures on a Television You can run a slide show...PAL (see page 40). 1 Connect the video cable from the video out Video out port on the camera to the video in port on port the television. (Refer to your television User's Guide for details on... video in single or multiple views, run a slide show , it repeats continuously until battery power is exhausted. highlight Loop, then press the OK button. 2 Highlight On, then press the OK button. When...

User Manual
Page 47
...frame your picture in the LCD instead of the Viewfinder (see the live image is displayed whenever the camera is on by pressing the OK button. 5 Press the Menu button to conserve battery power. The picture is Off, which means that you must press the OK button to turn off...live image. Chapter 5 Turning Off Quickview After you take it. This setting remains until you take a picture, Quickview displays it sparingly. To save battery power, turn off after you change it back on . This setting remains until you change it. The default setting is not automatically displayed on the...
...frame your picture in the LCD instead of the Viewfinder (see the live image is displayed whenever the camera is on by pressing the OK button. 5 Press the Menu button to conserve battery power. The picture is Off, which means that you must press the OK button to turn off...live image. Chapter 5 Turning Off Quickview After you take it. This setting remains until you take a picture, Quickview displays it sparingly. To save battery power, turn off after you change it back on . This setting remains until you change it. The default setting is not automatically displayed on the...

User Manual
Page 55
... AC adapter is available for connecting with a Camera Dock. NOTE: You can transfer your pictures from the KODAK EASYSHARE Software CD BEFORE you connect the camera or Camera Dock to transfer your KODAK retail dealer or visit our Web site at http://www.kodak.com/go/cx4200accessories. 47 it saves battery power when transferring pictures (see page 84...
... AC adapter is available for connecting with a Camera Dock. NOTE: You can transfer your pictures from the KODAK EASYSHARE Software CD BEFORE you connect the camera or Camera Dock to transfer your KODAK retail dealer or visit our Web site at http://www.kodak.com/go/cx4200accessories. 47 it saves battery power when transferring pictures (see page 84...

User Manual
Page 57
... pictures, store your camera in the Camera Dock. CAUTION: Do not use the Digital Camera AC Adapter, 3-Volt with your KODAK retail dealer or visit our Web site at your camera, you can purchase one pictured. 3 Universal insert 4 KODAK EASYSHARE Ni-MH Rechargeable 1 Battery Pack 5 Quick Start Guide (not shown) If a Camera Dock was not included with a KODAK EASYSHARE Camera Dock; To keep...
... pictures, store your camera in the Camera Dock. CAUTION: Do not use the Digital Camera AC Adapter, 3-Volt with your KODAK retail dealer or visit our Web site at your camera, you can purchase one pictured. 3 Universal insert 4 KODAK EASYSHARE Ni-MH Rechargeable 1 Battery Pack 5 Quick Start Guide (not shown) If a Camera Dock was not included with a KODAK EASYSHARE Camera Dock; To keep...

User Manual
Page 59
... connected to an external power source. See your computer User's Guide for transferring pictures and charging the Battery Pack. Chapter 8 Connecting the Camera Dock After the KODAK EASYSHARE Software is NOT in the Camera Dock when you are connecting to your camera, Camera Dock, or computer. 51 IMPORTANT: Use only the AC adapter, 7-Volt included with the...
... connected to an external power source. See your computer User's Guide for transferring pictures and charging the Battery Pack. Chapter 8 Connecting the Camera Dock After the KODAK EASYSHARE Software is NOT in the Camera Dock when you are connecting to your camera, Camera Dock, or computer. 51 IMPORTANT: Use only the AC adapter, 7-Volt included with the...

User Manual
Page 60
Chapter 8 Installing the Battery Pack in the orientation shown. Doing so can only be inserted into the camera in the Camera 1 Open the battery door on the bottom of the camera. 2 Install the Battery Pack as illustrated. If the Battery Pack does not easily install, reposition it . See page 54 for charging instructions. 52 IMPORTANT: The Battery Pack is not charged when you receive it and try again. CAUTION: The Battery Pack can damage your camera. 3 Close the battery door. DO NOT FORCE IT.
Chapter 8 Installing the Battery Pack in the orientation shown. Doing so can only be inserted into the camera in the Camera 1 Open the battery door on the bottom of the camera. 2 Install the Battery Pack as illustrated. If the Battery Pack does not easily install, reposition it . See page 54 for charging instructions. 52 IMPORTANT: The Battery Pack is not charged when you receive it and try again. CAUTION: The Battery Pack can damage your camera. 3 Close the battery door. DO NOT FORCE IT.

User Manual
Page 61
NOTE: If the KODAK EASYSHARE Ni-MH Rechargeable Battery Pack is properly seated. The Power/Transfer light glows green when the camera is in the camera, the Camera Dock immediately begins charging (see page 54). 53 Connector Power/Transfer light The camera is now powered by the Camera Dock instead of the camera batteries. Connector cover 3 Place the camera in the Camera Dock...
NOTE: If the KODAK EASYSHARE Ni-MH Rechargeable Battery Pack is properly seated. The Power/Transfer light glows green when the camera is in the camera, the Camera Dock immediately begins charging (see page 54). 53 Connector Power/Transfer light The camera is now powered by the Camera Dock instead of the camera batteries. Connector cover 3 Place the camera in the Camera Dock...

User Manual
Page 62
m Charging stops if you turn on Dock II battery low battery partially charged battery fully charged m Full charging takes about 2.5 hours. NOTE: The Camera Dock only charges the provided KODAK EASYSHARE Ni-MH Rechargeable Battery Pack. If the camera is left in the Camera Dock with any other type of batteries, rechargable or not, no charging takes place. 54 Chapter 8 Charging...
m Charging stops if you turn on Dock II battery low battery partially charged battery fully charged m Full charging takes about 2.5 hours. NOTE: The Camera Dock only charges the provided KODAK EASYSHARE Ni-MH Rechargeable Battery Pack. If the camera is left in the Camera Dock with any other type of batteries, rechargable or not, no charging takes place. 54 Chapter 8 Charging...

User Manual
Page 64
Indicator light Indicator light status: Steady green-camera is properly seated in this chapter. Blinking red-error condition. 56 pictures are transferring. Blinking green- Steady red-Battery Pack is that the earlier Camera Dock has one indicator light. Chapter 8 Earlier Camera Dock Model If you have the KODAK EASYSHARE Camera Dock, not the Camera Dock II, the functionality is exactly the same as described in the Camera Dock. The only difference is charging.
Indicator light Indicator light status: Steady green-camera is properly seated in this chapter. Blinking red-error condition. 56 pictures are transferring. Blinking green- Steady red-Battery Pack is that the earlier Camera Dock has one indicator light. Chapter 8 Earlier Camera Dock Model If you have the KODAK EASYSHARE Camera Dock, not the Camera Dock II, the functionality is exactly the same as described in the Camera Dock. The only difference is charging.


