
User Manual
Page 4
Product features Back view 1 2 345 6 78 9 10 11 12 19 18 1 LCD 2 Viewfinder 3 Ready light 4 Review button 5 LCD/Info button 6 Share button 7 Delete button 8 Wide angle button 9 Telephoto button 10 OK button ii 13 14 15 17 16 11 4-way arrows 12 Strap post 13 USB, A/V Out 14 Menu button 15 Battery compartment 16 Slot for optional SD or MMC card 17 SD or MMC card (sold separately) 18 Dock connector 19 Tripod socket www.kodak.com/go/support
Product features Back view 1 2 345 6 78 9 10 11 12 19 18 1 LCD 2 Viewfinder 3 Ready light 4 Review button 5 LCD/Info button 6 Share button 7 Delete button 8 Wide angle button 9 Telephoto button 10 OK button ii 13 14 15 17 16 11 4-way arrows 12 Strap post 13 USB, A/V Out 14 Menu button 15 Battery compartment 16 Slot for optional SD or MMC card 17 SD or MMC card (sold separately) 18 Dock connector 19 Tripod socket www.kodak.com/go/support
User Manual
Page 6
... 42 6 Troubleshooting 47 Camera problems 47 Camera ready light status 49 Camera/computer communications 50 LCD screen messages 51 7 Getting help 54 Helpful links 54 8 Appendix 56 Camera specifications 56 Storage capacities ...59 Important safety instructions 60 Battery life 61 Upgrading your software and firmware 62 Care and maintenance 62 Warranty...63 Regulatory compliance 65 iv www.kodak...
... 42 6 Troubleshooting 47 Camera problems 47 Camera ready light status 49 Camera/computer communications 50 LCD screen messages 51 7 Getting help 54 Helpful links 54 8 Appendix 56 Camera specifications 56 Storage capacities ...59 Important safety instructions 60 Battery life 61 Upgrading your software and firmware 62 Care and maintenance 62 Warranty...63 Regulatory compliance 65 iv www.kodak...

User Manual
Page 13
...the Shutter button halfway to use Focus Zone and set exposure. Taking a picture 1 2 Taking pictures/videos 3 LCD/Info Use the LCD or viewfinder. The camera attempts to take the picture. When the Ready light turns green, press the Shutter button completely down to take pictures... Framing marks indicate the camera focus area. www.kodak.com/go/support 7 Framing marks 1 Press the Shutter button ...
...the Shutter button halfway to use Focus Zone and set exposure. Taking a picture 1 2 Taking pictures/videos 3 LCD/Info Use the LCD or viewfinder. The camera attempts to take the picture. When the Ready light turns green, press the Shutter button completely down to take pictures... Framing marks indicate the camera focus area. www.kodak.com/go/support 7 Framing marks 1 Press the Shutter button ...

User Manual
Page 14
... buttons, the picture/ video is saved. Delete Play a video. ( to adjust volume.) To review pictures/videos anytime, see page 17. 8 www.kodak.com/go/support Tag a picture/video for email or as a favorite, or tag a picture for approximately 10 seconds. To stop recording, press and ...release the Shutter button again. If you take a picture or video, the LCD displays a quickview for print. Reviewing the picture/video just taken After you press no buttons, the picture or video is saved. Taking pictures/videos...
... buttons, the picture/ video is saved. Delete Play a video. ( to adjust volume.) To review pictures/videos anytime, see page 17. 8 www.kodak.com/go/support Tag a picture/video for email or as a favorite, or tag a picture for approximately 10 seconds. To stop recording, press and ...release the Shutter button again. If you take a picture or video, the LCD displays a quickview for print. Reviewing the picture/video just taken After you press no buttons, the picture or video is saved. Taking pictures/videos...

User Manual
Page 16
... . Press Wide Angle (W) to zoom in any Still mode or during ) video recording. 1 Use the viewfinder or LCD to get up mode. NOTE: In Video mode, the zoom indicator changes and only the digital zoom range appears. Optical zoom is effective when the lens is no closer than 24 in. (60 cm...) to the subject or 5.1 in. (12.9 cm) in . (10 x 15 cm) print. 10 www.kodak.com/go/support When you are video recording, only...
... . Press Wide Angle (W) to zoom in any Still mode or during ) video recording. 1 Use the viewfinder or LCD to get up mode. NOTE: In Video mode, the zoom indicator changes and only the digital zoom range appears. Optical zoom is effective when the lens is no closer than 24 in. (60 cm...) to the subject or 5.1 in. (12.9 cm) in . (10 x 15 cm) print. 10 www.kodak.com/go/support When you are video recording, only...

User Manual
Page 17
..., see Flash modes below). for evaluate lighting conditions; www.kodak.com/go/support 11 I The flash fires multiple times (for the and then again when the eyes to become accustomed to I The camera then automatically corrects red-eye in heavy shadows. Flash Fill Every...: eye I The flash fires twice (to the picture is turned on /off : If Red-eye Pre-flash is taken). flash; focusing in the LCD screen. Press the button repeatedly to -subject distance Zoom position Wide angle Telephoto Flash distance 2-11.5 ft (0.6-3.5 m) @ ISO 200 2-6.6 ft (0.6-2.0 ...
..., see Flash modes below). for evaluate lighting conditions; www.kodak.com/go/support 11 I The flash fires multiple times (for the and then again when the eyes to become accustomed to I The camera then automatically corrects red-eye in heavy shadows. Flash Fill Every...: eye I The flash fires twice (to the picture is turned on /off : If Red-eye Pre-flash is taken). flash; focusing in the LCD screen. Press the button repeatedly to -subject distance Zoom position Wide angle Telephoto Flash distance 2-11.5 ft (0.6-3.5 m) @ ISO 200 2-6.6 ft (0.6-2.0 ...

User Manual
Page 19
...timer/Burst button . To delete selectively, do so in Capture mode, press the LCD/Info appears. To turn on the framing grid in Review (see page 11). Taking pictures/videos Using burst Option Description Purpose Camera takes up to 3 pictures while the Shutter button is unavailable in Anti-Blur,...3 Press the Shutter button completely down and hold it to take pictures. event. The camera stops taking pictures when you can delete all pictures in the burst series. button until the grid www.kodak.com/go/support 13 This is no more storage space. Using the framing grid to ...
...timer/Burst button . To delete selectively, do so in Capture mode, press the LCD/Info appears. To turn on the framing grid in Review (see page 11). Taking pictures/videos Using burst Option Description Purpose Camera takes up to 3 pictures while the Shutter button is unavailable in Anti-Blur,...3 Press the Shutter button completely down and hold it to take pictures. event. The camera stops taking pictures when you can delete all pictures in the burst series. button until the grid www.kodak.com/go/support 13 This is no more storage space. Using the framing grid to ...

User Manual
Page 20
...exposure compensation before you take a picture to obtain information quickly. An exposure compensation level between -2.0 and +2.0 is shown on the LCD as the LCD image gets darker or lighter. 3 Take the picture when you are in the main menu or in Panorama mode is not readily...to make your pictures darker or lighter. Using camera Help Use the camera Help screen to better understand menu options when the User's Guide is adjusted. 1 Press to decrease exposure compensation. 2 Press to obtain screen Help. 14 www.kodak.com/go/support Press repeatedly to increase exposure ...
...exposure compensation before you take a picture to obtain information quickly. An exposure compensation level between -2.0 and +2.0 is shown on the LCD as the LCD image gets darker or lighter. 3 Take the picture when you are in the main menu or in Panorama mode is not readily...to make your pictures darker or lighter. Using camera Help Use the camera Help screen to better understand menu options when the User's Guide is adjusted. 1 Press to decrease exposure compensation. 2 Press to obtain screen Help. 14 www.kodak.com/go/support Press repeatedly to increase exposure ...
User Manual
Page 21
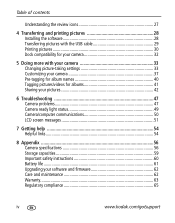
... 3 pictures, the pictures are taking only 2 pictures, press the OK button to 3 pictures into a panoramic scene. After a quickview, the LCD displays the liveview and an "overlay" from the first picture cover the same portion in the new picture. (You may press the Delete button to... delete each picture. NOTE: For printing options, visit the Kodak EasyShare Gallery at www.kodakgallery.com. www.kodak.com/go/support 15 After you are automatically stitched together. 1 2 3 Take 2 or 3 pictures. Make the overlay from ...
... 3 pictures, the pictures are taking only 2 pictures, press the OK button to 3 pictures into a panoramic scene. After a quickview, the LCD displays the liveview and an "overlay" from the first picture cover the same portion in the new picture. (You may press the Delete button to... delete each picture. NOTE: For printing options, visit the Kodak EasyShare Gallery at www.kodakgallery.com. www.kodak.com/go/support 15 After you are automatically stitched together. 1 2 3 Take 2 or 3 pictures. Make the overlay from ...

User Manual
Page 23
... bar at the top of the LCD. NOTE: If you press while at 1X, the view changes from single-picture to 1X. Review To save battery power, use an optional Kodak EasyShare dock or Kodak 3-volt AC adapter. (See www.kodak.com/go/c653accessories or www.kodak.com/go /support 17 to view... other parts of the 4 Press the OK button to return to multi-up thumbnails. (See page 18.) www.kodak.com/go /c623accessories. Press Review...
... bar at the top of the LCD. NOTE: If you press while at 1X, the view changes from single-picture to 1X. Review To save battery power, use an optional Kodak EasyShare dock or Kodak 3-volt AC adapter. (See www.kodak.com/go/c653accessories or www.kodak.com/go /support 17 to view... other parts of the 4 Press the OK button to return to multi-up thumbnails. (See page 18.) www.kodak.com/go /c623accessories. Press Review...

User Manual
Page 24
press again for 4X. 6 Press 4X. Viewing picture/video information 1 Press the Review button. 2 Repeatedly press the LCD/Info button to single-picture view. press again for Viewing thumbnails (multi-up) 1 Press the Review button. 2 Press to change from single-picture view to... multi-up thumbnails. 3 Press OK to return to turn on/off status icons and picture/video info. 18 www.kodak.com/go/support Working with pictures/videos Playing a video Playback speed 4X 2X 1X 2X 4X Reverse Forward 1 Press the Review button. 2 Press to ...
press again for 4X. 6 Press 4X. Viewing picture/video information 1 Press the Review button. 2 Repeatedly press the LCD/Info button to single-picture view. press again for Viewing thumbnails (multi-up) 1 Press the Review button. 2 Press to change from single-picture view to... multi-up thumbnails. 3 Press OK to return to turn on/off status icons and picture/video info. 18 www.kodak.com/go/support Working with pictures/videos Playing a video Playback speed 4X 2X 1X 2X 4X Reverse Forward 1 Press the Review button. 2 Press to ...

User Manual
Page 29
Manual options: You choose the first and last frames; to display your pictures/videos on the LCD. the camera chooses 2, 7, or 14 equally spaced frames. www.kodak.com/go/support 23 Running a slide show 1 Press the Review button, then the Menu button. 2 Press to highlight Slide Show, then press ...the slide show Use Slide Show to find a 2 Press the Menu button, choose Edit Video, then press the OK button. Auto options: The camera includes the first and last frames, then 2, 7, or 14 equally spaced frames. To interrupt the Slide Show, press the OK button. Each picture/...
Manual options: You choose the first and last frames; to display your pictures/videos on the LCD. the camera chooses 2, 7, or 14 equally spaced frames. www.kodak.com/go/support 23 Running a slide show 1 Press the Review button, then the Menu button. 2 Press to highlight Slide Show, then press ...the slide show Use Slide Show to find a 2 Press the Menu button, choose Edit Video, then press the OK button. Auto options: The camera includes the first and last frames, then 2, 7, or 14 equally spaced frames. To interrupt the Slide Show, press the OK button. Each picture/...

User Manual
Page 39
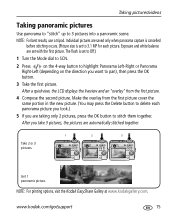
.... (51 x 76 cm); NOTE: Some settings remain until you change settings to get the best results from your camera Changing picture-taking settings You can change them; NOTE: Press the LCD/Info button for printing up to exit. Also for printing 4 x 6 in. (10 x 15 cm) prints without...20 x 30 in. (51 x 76 cm); pictures are unavailable in some modes. www.kodak.com/go/support 33 pictures are medium resolution with smaller file size. 3.1 MP-for conserving space. 5 Doing more with your camera: 1 Press the Menu button. 2 Press to highlight a setting, then press the OK ...
.... (51 x 76 cm); NOTE: Some settings remain until you change settings to get the best results from your camera Changing picture-taking settings You can change them; NOTE: Press the LCD/Info button for printing up to exit. Also for printing 4 x 6 in. (10 x 15 cm) prints without...20 x 30 in. (51 x 76 cm); pictures are unavailable in some modes. www.kodak.com/go/support 33 pictures are medium resolution with smaller file size. 3.1 MP-for conserving space. 5 Doing more with your camera: 1 Press the Menu button. 2 Press to highlight a setting, then press the OK ...
User Manual
Page 43
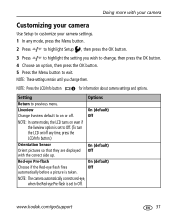
... 4 Choose an option, then press the OK button. 5 Press the Menu button to Off. (To turn the LCD on even if the liveview option is set to exit. NOTE: The camera automatically corrects red-eye, when the Red-eye Pre-flash is set to previous menu. Setting Options Return to... Off. www.kodak.com/go/support 37 Doing more with the correct side up. NOTE: These settings remain until you wish to change them. Off NOTE: In some modes, the LCD turns on /off . NOTE: Press the LCD/Info button for information about camera settings and options. On (default...
... 4 Choose an option, then press the OK button. 5 Press the Menu button to Off. (To turn the LCD on even if the liveview option is set to exit. NOTE: The camera automatically corrects red-eye, when the Red-eye Pre-flash is set to previous menu. Setting Options Return to... Off. www.kodak.com/go/support 37 Doing more with the correct side up. NOTE: These settings remain until you wish to change them. Off NOTE: In some modes, the LCD turns on /off . NOTE: Press the LCD/Info button for information about camera settings and options. On (default...

User Manual
Page 46
... computer Use the EasyShare software that was packaged with your camera Pre-tagging for albums. Selected albums are noted with those album names. First-on the screen. See EasyShare software Help for details. 40 www.kodak.com/go/support Repeat to your computer, EasyShare software opens and ...categorizes your pictures in the appropriate album. To remove all the pictures or videos you turn on the LCD, your computer When you ...
... computer Use the EasyShare software that was packaged with your camera Pre-tagging for albums. Selected albums are noted with those album names. First-on the screen. See EasyShare software Help for details. 40 www.kodak.com/go/support Repeat to your computer, EasyShare software opens and ...categorizes your pictures in the appropriate album. To remove all the pictures or videos you turn on the LCD, your computer When you ...
User Manual
Page 53
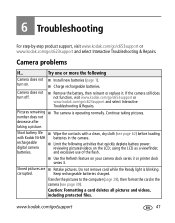
... picture. rechargeable digital camera I Limit the following Camera does not I Install new batteries (page 1). Transfer the pictures to the computer (page 29), then format the card in the camera (see page 62) before loading with Kodak Ni-MH batteries in the camera. www.kodak.com/go ... card while the Ready light is operating normally. Keep rechargeable batteries charged. Pictures remaining I Charge rechargeable batteries. using the LCD as a viewfinder; Stored pictures are I Remove the battery, then reinsert or replace it. and excessive use of the flash...
... picture. rechargeable digital camera I Limit the following Camera does not I Install new batteries (page 1). Transfer the pictures to the computer (page 29), then format the card in the camera (see page 62) before loading with Kodak Ni-MH batteries in the camera. www.kodak.com/go ... card while the Ready light is operating normally. Keep rechargeable batteries charged. Pictures remaining I Charge rechargeable batteries. using the LCD as a viewfinder; Stored pictures are I Remove the battery, then reinsert or replace it. and excessive use of the flash...

User Manual
Page 54
...use a tripod. 48 www.kodak.com/go/support I Wait until the Ready light stops blinking red before attempting to the computer (page 29), delete pictures from the camera (page 19), switch image storage locations (see page 38). I Place the camera on the LCD screen. Picture is at least ...2 ft (0.6 m) between the camera and the subject. I Decrease Exposure Compensation (page 14). I...
...use a tripod. 48 www.kodak.com/go/support I Wait until the Ready light stops blinking red before attempting to the computer (page 29), delete pictures from the camera (page 19), switch image storage locations (see page 38). I Place the camera on the LCD screen. Picture is at least ...2 ft (0.6 m) between the camera and the subject. I Decrease Exposure Compensation (page 14). I...
User Manual
Page 56
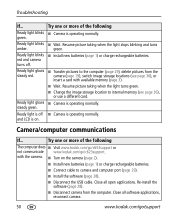
.... I Install new batteries (page 1) or charge rechargeable batteries. I Connect cable to the computer (page 29), delete pictures from the computer. Close all software applications, reconnect camera. 50 www.kodak.com/go /c623support. and LCD is operating normally. Ready light glows steady green.
.... I Install new batteries (page 1) or charge rechargeable batteries. I Connect cable to the computer (page 29), delete pictures from the computer. Close all software applications, reconnect camera. 50 www.kodak.com/go /c623support. and LCD is operating normally. Ready light glows steady green.

User Manual
Page 57
Close all open applications. I Unplug the USB cable from the camera. LCD screen messages If... www.kodak.com/go/support 51 Re-install the software (page 29). Only one or more of the following No images to display I Change ...image storage location setting (see page 39). Re-install the software (page 28). Disconnect cable or rem. (remove) camera from dock). Caution: Formatting ...
Close all open applications. I Unplug the USB cable from the camera. LCD screen messages If... www.kodak.com/go/support 51 Re-install the software (page 29). Only one or more of the following No images to display I Change ...image storage location setting (see page 39). Re-install the software (page 28). Disconnect cable or rem. (remove) camera from dock). Caution: Formatting ...
User Manual
Page 62
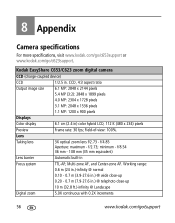
Kodak EasyShare C653/C623 zoom digital camera CCD (charge-coupled device) CCD 1/2.5 in Focus system TTL-AF; f/4.85 Aperture: maximum - f/2.73; f/8.54 36 mm - 108 mm (35 mm equivalent) Lens barrier Automatic built-in . Working range: 0.6 m (24 in.)-infinity @ normal 0.10 - 0.7 m (3.9-27.6 in.) @ wide close -up 0.20 - 0.7 m (7.9-27.6 in ) color hybrid LCD, 112 K (480 x 234) pixels Preview...
Kodak EasyShare C653/C623 zoom digital camera CCD (charge-coupled device) CCD 1/2.5 in Focus system TTL-AF; f/4.85 Aperture: maximum - f/2.73; f/8.54 36 mm - 108 mm (35 mm equivalent) Lens barrier Automatic built-in . Working range: 0.6 m (24 in.)-infinity @ normal 0.10 - 0.7 m (3.9-27.6 in.) @ wide close -up 0.20 - 0.7 m (7.9-27.6 in ) color hybrid LCD, 112 K (480 x 234) pixels Preview...

