
User Manual
Page 1
Kodak EasyShare C653/C623 zoom digital camera User's guide www.kodak.com For interactive tutorials, www.kodak.com/go/howto For help with your camera, www.kodak.com/go/c653support or www.kodak.com/go/c623support
Kodak EasyShare C653/C623 zoom digital camera User's guide www.kodak.com For interactive tutorials, www.kodak.com/go/howto For help with your camera, www.kodak.com/go/c653support or www.kodak.com/go/c623support

User Manual
Page 5
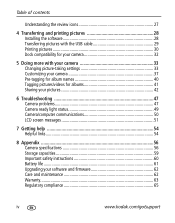
... Using optical zoom 10 Using the digital zoom 10 Using the flash 11 Using the self-timer 12 Using burst 13 Using the framing grid to compose a picture 13 Using exposure compensation to adjust picture brightness 14 Using camera Help 14 Taking panoramic pictures 15 ...Understanding the picture-taking icons 16 3 Working with pictures/videos 17 Reviewing pictures/videos 17 Deleting pictures/videos 19 Cropping pictures 21 Using Kodak Perfect Touch technology 21 Editing videos 22 ...
... Using optical zoom 10 Using the digital zoom 10 Using the flash 11 Using the self-timer 12 Using burst 13 Using the framing grid to compose a picture 13 Using exposure compensation to adjust picture brightness 14 Using camera Help 14 Taking panoramic pictures 15 ...Understanding the picture-taking icons 16 3 Working with pictures/videos 17 Reviewing pictures/videos 17 Deleting pictures/videos 19 Cropping pictures 21 Using Kodak Perfect Touch technology 21 Editing videos 22 ...
User Manual
Page 6
... the USB cable 29 Printing pictures 30 Dock compatibility for your camera 32 5 Doing more with your camera 33 Changing picture-taking settings 33 Customizing your camera 37 Pre-tagging for album names 40 Tagging pictures/videos for ...Camera ready light status 49 Camera/computer communications 50 LCD screen messages 51 7 Getting help 54 Helpful links 54 8 Appendix 56 Camera specifications 56 Storage capacities 59 Important safety instructions 60 Battery life 61 Upgrading your software and firmware 62 Care and maintenance 62 Warranty...63 Regulatory compliance 65 iv www.kodak...
... the USB cable 29 Printing pictures 30 Dock compatibility for your camera 32 5 Doing more with your camera 33 Changing picture-taking settings 33 Customizing your camera 37 Pre-tagging for album names 40 Tagging pictures/videos for ...Camera ready light status 49 Camera/computer communications 50 LCD screen messages 51 7 Getting help 54 Helpful links 54 8 Appendix 56 Camera specifications 56 Storage capacities 59 Important safety instructions 60 Battery life 61 Upgrading your software and firmware 62 Care and maintenance 62 Warranty...63 Regulatory compliance 65 iv www.kodak...

User Manual
Page 7
1 Setting up your camera Attaching the strap Loading the battery Ni-MH CRV3 lithium 2 AA (rechargeable or (rechargeable) (non-rechargeable) non-rechargeable) For battery types, see page 61. To extend battery life, see page 58. www.kodak.com/go/support 1
1 Setting up your camera Attaching the strap Loading the battery Ni-MH CRV3 lithium 2 AA (rechargeable or (rechargeable) (non-rechargeable) non-rechargeable) For battery types, see page 61. To extend battery life, see page 58. www.kodak.com/go/support 1

User Manual
Page 8
for previous/next field. to change. Setting up your camera Turning on the camera Setting the language, date/time OK (press) 1 2 OK to accept. 2 www.kodak.com/go/support
for previous/next field. to change. Setting up your camera Turning on the camera Setting the language, date/time OK (press) 1 2 OK to accept. 2 www.kodak.com/go/support
User Manual
Page 9
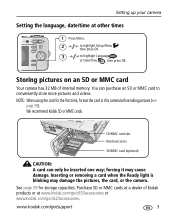
Storing pictures on an SD or MMC card Your camera has 32 MB of Kodak products or at www.kodak.com/go/c653accessories or www.kodak.com/go /support 3 SD/MMC card slot Notched corner SD/MMC card (optional) CAUTION: A card can purchase an SD or MMC card to highlight Language .... 3 to conveniently store more pictures and videos. You can only be inserted one way; forcing it may damage the pictures, the card, or the camera. We recommend Kodak SD or MMC cards. NOTE: When using the card for storage capacities. Inserting or removing a card when the Ready light is blinking may cause...
Storing pictures on an SD or MMC card Your camera has 32 MB of Kodak products or at www.kodak.com/go/c653accessories or www.kodak.com/go /support 3 SD/MMC card slot Notched corner SD/MMC card (optional) CAUTION: A card can purchase an SD or MMC card to highlight Language .... 3 to conveniently store more pictures and videos. You can only be inserted one way; forcing it may damage the pictures, the card, or the camera. We recommend Kodak SD or MMC cards. NOTE: When using the card for storage capacities. Inserting or removing a card when the Ready light is blinking may cause...

User Manual
Page 10
... Picture-taking pictures under special conditions. (See page 5.) Video Capturing video with sound. (See page 4.) 4 www.kodak.com/go/support Close-up Close range. Use available light instead of camera shake and subject movement. The camera automatically sets the focus distance depending on the zoom position. SCN Scene Point-and-shoot simplicity when...
... Picture-taking pictures under special conditions. (See page 5.) Video Capturing video with sound. (See page 4.) 4 www.kodak.com/go/support Close-up Close range. Use available light instead of camera shake and subject movement. The camera automatically sets the focus distance depending on the zoom position. SCN Scene Point-and-shoot simplicity when...

User Manual
Page 11
Landscape Sport Night Portrait Night Landscape Snow Beach Text Fireworks Flower Manner/ Museum Far-away scenes. The camera uses infinity auto-focus. Place the camera on a flat, steady surface or use a tripod. Flash does not fire. Close-ups of people. Stitching up to 3 captured ...focus framing marks are disabled. Subjects in night scenes or low-light conditions. Place the camera on a flat, steady surface or use a tripod. Place the camera on a flat, steady surface or use a tripod. www.kodak.com/go/support 5 Distant scenery at night. Documents. NOTE: If the Help text...
Landscape Sport Night Portrait Night Landscape Snow Beach Text Fireworks Flower Manner/ Museum Far-away scenes. The camera uses infinity auto-focus. Place the camera on a flat, steady surface or use a tripod. Flash does not fire. Close-ups of people. Stitching up to 3 captured ...focus framing marks are disabled. Subjects in night scenes or low-light conditions. Place the camera on a flat, steady surface or use a tripod. Place the camera on a flat, steady surface or use a tripod. www.kodak.com/go/support 5 Distant scenery at night. Documents. NOTE: If the Help text...

User Manual
Page 13
...1 2 Taking pictures/videos 3 LCD/Info Use the LCD or viewfinder. The camera attempts to focus on foreground subjects, even if the subjects are fixed at Center... halfway to use Focus Zone and set exposure. Press to turn green, focus is accomplished. 2 If the camera is not focusing on /off: • LCD (LCD off to focus and set Center Zone, the framing...3 Press the Shutter button completely down . Using the framing marks to take pictures Framing marks indicate the camera focus area. When the Ready light turns green, press the Shutter button completely down to take the picture...
...1 2 Taking pictures/videos 3 LCD/Info Use the LCD or viewfinder. The camera attempts to focus on foreground subjects, even if the subjects are fixed at Center... halfway to use Focus Zone and set exposure. Press to turn green, focus is accomplished. 2 If the camera is not focusing on /off: • LCD (LCD off to focus and set Center Zone, the framing...3 Press the Shutter button completely down . Using the framing marks to take pictures Framing marks indicate the camera focus area. When the Ready light turns green, press the Shutter button completely down to take the picture...

User Manual
Page 17
... Pre-flash feature on/off : If Red-eye Pre-flash is turned on: eye I The flash fires twice (to I The camera then automatically corrects red-eye in the picture. www.kodak.com/go/support 11 Taking pictures/videos Using the flash Use the flash when you take pictures at night, indoors, or... outdoors in low-light conditions; Flash Fill Every time you take a picture, regardless of the lighting conditions. In low light, hold the camera steady or use a ...
... Pre-flash feature on/off : If Red-eye Pre-flash is turned on: eye I The flash fires twice (to I The camera then automatically corrects red-eye in the picture. www.kodak.com/go/support 11 Taking pictures/videos Using the flash Use the flash when you take pictures at night, indoors, or... outdoors in low-light conditions; Flash Fill Every time you take a picture, regardless of the lighting conditions. In low light, hold the camera steady or use a ...

User Manual
Page 18
.../videos Using the self-timer Use the self-timer when you want to be included in a picture, or to ensure a steady Shutter button press. 1 Place camera on a tripod) • Again for 2-shot (one picture taken after 10 seconds and another picture taken 8 seconds later) 3 Compose the scene. 4 Press the ...Shutter button halfway, then completely down. Use the same procedure to use the self-timer in video mode. 12 www.kodak.com/go/support NOTE: The video stops when no storage space remains. To cancel the Self-timer before the picture is taken, press the Self...
.../videos Using the self-timer Use the self-timer when you want to be included in a picture, or to ensure a steady Shutter button press. 1 Place camera on a tripod) • Again for 2-shot (one picture taken after 10 seconds and another picture taken 8 seconds later) 3 Compose the scene. 4 Press the ...Shutter button halfway, then completely down. Use the same procedure to use the self-timer in video mode. 12 www.kodak.com/go/support NOTE: The video stops when no storage space remains. To cancel the Self-timer before the picture is taken, press the Self...

User Manual
Page 19
... set exposure. 3 Press the Shutter button completely down and hold it to take pictures. The camera stops taking pictures when you want to balance a picture between water, earth, and sky. button until the grid www.kodak.com/go/support 13 Using the framing grid to compose a picture The framing grid divides the...
... set exposure. 3 Press the Shutter button completely down and hold it to take pictures. The camera stops taking pictures when you want to balance a picture between water, earth, and sky. button until the grid www.kodak.com/go/support 13 Using the framing grid to compose a picture The framing grid divides the...

User Manual
Page 20
... brightness In Auto, Landscape, Close-up, or Panorama mode, you can adjust exposure compensation before you take a picture to obtain information quickly. Using camera Help Use the camera Help screen to better understand menu options when the User's Guide is shown on the LCD as the LCD image gets darker or lighter... when you are in the main menu or in Panorama mode is adjusted. 1 Press to decrease exposure compensation. 2 Press to obtain screen Help. 14 www.kodak.com/go/support
... brightness In Auto, Landscape, Close-up, or Panorama mode, you can adjust exposure compensation before you take a picture to obtain information quickly. Using camera Help Use the camera Help screen to better understand menu options when the User's Guide is shown on the LCD as the LCD image gets darker or lighter... when you are in the main menu or in Panorama mode is adjusted. 1 Press to decrease exposure compensation. 2 Press to obtain screen Help. 14 www.kodak.com/go/support
User Manual
Page 22
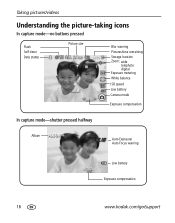
Taking pictures/videos Understanding the picture-taking icons In capture mode-no buttons pressed Flash Self-timer Date stamp Picture size Blur warning Pictures/time remaining Storage location Zoom: wide telephoto digital Exposure metering White balance ISO speed Low battery Camera mode Exposure compensation In capture mode-shutter pressed halfway Album Auto Exposure/ Auto Focus warning Low battery Exposure compensation 16 www.kodak.com/go/support
Taking pictures/videos Understanding the picture-taking icons In capture mode-no buttons pressed Flash Self-timer Date stamp Picture size Blur warning Pictures/time remaining Storage location Zoom: wide telephoto digital Exposure metering White balance ISO speed Low battery Camera mode Exposure compensation In capture mode-shutter pressed halfway Album Auto Exposure/ Auto Focus warning Low battery Exposure compensation 16 www.kodak.com/go/support

User Manual
Page 29
...once. Manual options: You choose the first and last frames; Starting the slide show Use Slide Show to exit the menu. www.kodak.com/go/support 23 Auto options: The camera includes the first and last frames, then 2, 7, or 14 equally spaced frames. To interrupt the Slide Show, press the OK ...button. the camera chooses 2, 7, or 14 equally spaced frames. to highlight Begin Show, then press the OK button. Working with pictures/videos Making a video action print From a video...
...once. Manual options: You choose the first and last frames; Starting the slide show Use Slide Show to exit the menu. www.kodak.com/go/support 23 Auto options: The camera includes the first and last frames, then 2, 7, or 14 equally spaced frames. To interrupt the Slide Show, press the OK ...button. the camera chooses 2, 7, or 14 equally spaced frames. to highlight Begin Show, then press the OK button. Working with pictures/videos Making a video action print From a video...

User Manual
Page 31
NOTE: Ensure that the Video Out setting (NTSC or PAL) is running. (Image quality on a television screen may be as good as on a television, computer monitor, or any device equipped with a video input. To connect the camera to a television, use the A/V (audio/video) cable (may not be sold separately). The slide show stops if you connect a cable while the slide show is correct (see page 38). Working with pictures/videos Displaying pictures and videos on a television You can display pictures/videos on a computer monitor or when printed.) A/V Cable www.kodak.com/go/support 25
NOTE: Ensure that the Video Out setting (NTSC or PAL) is running. (Image quality on a television screen may be as good as on a television, computer monitor, or any device equipped with a video input. To connect the camera to a television, use the A/V (audio/video) cable (may not be sold separately). The slide show stops if you connect a cable while the slide show is correct (see page 38). Working with pictures/videos Displaying pictures and videos on a television You can display pictures/videos on a computer monitor or when printed.) A/V Cable www.kodak.com/go/support 25

User Manual
Page 32
... the OK button. To remove pictures/videos from the original location after copying, delete them (see page 19). Tags that : I The camera's image storage location is inserted in the camera. NOTE: Pictures/videos are not copied. Protection settings are copied, not moved. Copy pictures/videos: 1 Press the Review button, then the ...Copying pictures/videos You can copy pictures/videos from a card to internal memory or from internal memory to a picture/video, see page 20. 26 www.kodak.com/go/support Before you copy, make sure that you are not copied. To apply protection to a card.
... the OK button. To remove pictures/videos from the original location after copying, delete them (see page 19). Tags that : I The camera's image storage location is inserted in the camera. NOTE: Pictures/videos are not copied. Protection settings are copied, not moved. Copy pictures/videos: 1 Press the Review button, then the ...Copying pictures/videos You can copy pictures/videos from a card to internal memory or from internal memory to a picture/video, see page 20. 26 www.kodak.com/go/support Before you copy, make sure that you are not copied. To apply protection to a card.

User Manual
Page 34
.... 4 Follow the on . 4 Transferring and printing pictures Installing the software CAUTION: Install EasyShare software before connecting the camera to electronically register your computer (including anti-virus software). 2 Place the EasyShare software CD into the CD-ROM drive. 3 Load the software: Windows OS-if the ...from the Start menu and type d:\setup.exe where d is the drive letter that are open on the EasyShare software CD, click the Help button in EasyShare software. 28 www.kodak.com/go /register. 5 If prompted, restart the computer. See the anti-virus software manual for details...
.... 4 Follow the on . 4 Transferring and printing pictures Installing the software CAUTION: Install EasyShare software before connecting the camera to electronically register your computer (including anti-virus software). 2 Place the EasyShare software CD into the CD-ROM drive. 3 Load the software: Windows OS-if the ...from the Start menu and type d:\setup.exe where d is the drive letter that are open on the EasyShare software CD, click the Help button in EasyShare software. 28 www.kodak.com/go /register. 5 If prompted, restart the computer. See the anti-virus software manual for details...

User Manual
Page 35
... You can also use these and other accessories at a dealer of Kodak products or www.kodak.com/go/c653accessories or www.kodak.com/go /support 29 I Kodak EasyShare camera dock, Kodak EasyShare printer dock (see page 30) I Kodak multi-card reader, Kodak SD multimedia card reader-writer Purchase these Kodak products to transfer your computer and prompts you through the transfer...
... You can also use these and other accessories at a dealer of Kodak products or www.kodak.com/go/c653accessories or www.kodak.com/go /support 29 I Kodak EasyShare camera dock, Kodak EasyShare printer dock (see page 30) I Kodak multi-card reader, Kodak SD multimedia card reader-writer Purchase these Kodak products to transfer your computer and prompts you through the transfer...

User Manual
Page 36
.... Direct printing with a PictBridge enabled printer Your camera is compatible with fully charged batteries I PictBridge enabled printer I Camera with PictBridge technology, so you can print directly to the Kodak EasyShare printer dock and print directly-with or without a computer. Transferring and printing pictures Printing pictures Printing with a Kodak EasyShare printer dock Dock your printer user guide...
.... Direct printing with a PictBridge enabled printer Your camera is compatible with fully charged batteries I PictBridge enabled printer I Camera with PictBridge technology, so you can print directly to the Kodak EasyShare printer dock and print directly-with or without a computer. Transferring and printing pictures Printing pictures Printing with a Kodak EasyShare printer dock Dock your printer user guide...


