

Operation Manual
Page 1
Operating Manual KODAK EKTAGRAPHIC III Slide Projectors PRESENTATION TECHNOLOGIES
Operating Manual KODAK EKTAGRAPHIC III Slide Projectors PRESENTATION TECHNOLOGIES

Operation Manual
Page 3
Operating Manual KODAK EKTAGRAPHIC III Slide Projectors
Operating Manual KODAK EKTAGRAPHIC III Slide Projectors

Operation Manual
Page 4
You have just purchased a KODAK EKTAGRAPHIC III Slide Projector with a KODAK Extra Bright Lamp Module. Congratulations! This new lamp module procides 30% greater light intensity so your images look brighter, richer and more saturated. This module features a "Lamp On" indicator on the lamp module door.
You have just purchased a KODAK EKTAGRAPHIC III Slide Projector with a KODAK Extra Bright Lamp Module. Congratulations! This new lamp module procides 30% greater light intensity so your images look brighter, richer and more saturated. This module features a "Lamp On" indicator on the lamp module door.
Operation Manual
Page 5
KODAK EKTAGRAPHIC III Slide Projector 1 Record this number, as well as the model identification, date, and place of the projector. Contents Important Safety Instructions 2 Overview 2 Introduction 3 Operation 3 Startup 3 Loading the Slide Tray 6 Projecting Your Slides 10 Editing Your Presentation 17 Clearing a Gate Jam 18 Using the Built-In Viewer ... 27 Warranty 29 How to Obtain Service 30 Appendix A 31 Serial Number The serial number of your projector is printed on the label affixed to the power cord retainer on the base of purchase, for future reference.
KODAK EKTAGRAPHIC III Slide Projector 1 Record this number, as well as the model identification, date, and place of the projector. Contents Important Safety Instructions 2 Overview 2 Introduction 3 Operation 3 Startup 3 Loading the Slide Tray 6 Projecting Your Slides 10 Editing Your Presentation 17 Clearing a Gate Jam 18 Using the Built-In Viewer ... 27 Warranty 29 How to Obtain Service 30 Appendix A 31 Serial Number The serial number of your projector is printed on the label affixed to the power cord retainer on the base of purchase, for future reference.

Operation Manual
Page 6
..., & ATS) 11 - Special-Application Receptacle 22 - Overview FRONT RIGHT 1 - Lock Ring 3 - Forward 15 - Reading Light Cover 20 - Lens 8 - Standby Light (Model E Plus) 21 - Leveling Foot 2 KODAK EKTAGRAPHIC III Slide Projector Viewer (Model ATS) 9 - Raised Index Mark 19 - Select Bar 12 - Storage Compartment/Remote 4 - Power Cord 24 - Elevating Adjustment Wheel 6 - Tray 2 - Timer (Models AMT & ATS) 13...
..., & ATS) 11 - Special-Application Receptacle 22 - Overview FRONT RIGHT 1 - Lock Ring 3 - Forward 15 - Reading Light Cover 20 - Lens 8 - Standby Light (Model E Plus) 21 - Leveling Foot 2 KODAK EKTAGRAPHIC III Slide Projector Viewer (Model ATS) 9 - Raised Index Mark 19 - Select Bar 12 - Storage Compartment/Remote 4 - Power Cord 24 - Elevating Adjustment Wheel 6 - Tray 2 - Timer (Models AMT & ATS) 13...
Operation Manual
Page 7
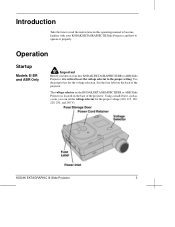
Use the proper fuse for the proper voltage (100, 115, 130, 220, 230, and 240 V). The voltage selector on the KODAK EKTAGRAPHIC III BR or ABR Slide Projector is located on your KODAK EKTAGRAPHIC III Slide Projector and how to operate it is critical to set the voltage selector for the voltage selection. Using a small object, such as a coin, you turn...
Use the proper fuse for the proper voltage (100, 115, 130, 220, 230, and 240 V). The voltage selector on the KODAK EKTAGRAPHIC III BR or ABR Slide Projector is located on your KODAK EKTAGRAPHIC III Slide Projector and how to operate it is critical to set the voltage selector for the voltage selection. Using a small object, such as a coin, you turn...

Operation Manual
Page 8
...from the receptacle. A spare fuse is located in all countries worldwide. 4 KODAK EKTAGRAPHIC III Slide Projector Remove the spent fuse with your local power company. Important The EKTAGRAPHIC III BR and ABR Slide Projectors are not intended to meet approval in the small, pull-out storage door below... receptacle and close the storage door. The fuse is provided. Operation EKTAGRAPHIC III BR and ABR Slide Projectors have a sensing capability to the standards of power for this projector. Although the Models III BR and ABR are approved to automatically set the proper power cycle ...
...from the receptacle. A spare fuse is located in all countries worldwide. 4 KODAK EKTAGRAPHIC III Slide Projector Remove the spent fuse with your local power company. Important The EKTAGRAPHIC III BR and ABR Slide Projectors are not intended to meet approval in the small, pull-out storage door below... receptacle and close the storage door. The fuse is provided. Operation EKTAGRAPHIC III BR and ABR Slide Projectors have a sensing capability to the standards of power for this projector. Although the Models III BR and ABR are approved to automatically set the proper power cycle ...

Operation Manual
Page 9
This receptacle also accepts plugs for accessories, such as Kodak dissolve controls. Plug the power cord into the remote-control receptacle, aligning the raised dot with 110- KODAK EKTAGRAPHIC III Slide Projector 5 Plug the 5-pin cable remote connector into a grounded outlet with the metallic rivet head. Models A, AMT and ATS Operation Open the storage compartment and remove the remote control. to 125-volt 60 Hz current only.
This receptacle also accepts plugs for accessories, such as Kodak dissolve controls. Plug the power cord into the remote-control receptacle, aligning the raised dot with 110- KODAK EKTAGRAPHIC III Slide Projector 5 Plug the 5-pin cable remote connector into a grounded outlet with the metallic rivet head. Models A, AMT and ATS Operation Open the storage compartment and remove the remote control. to 125-volt 60 Hz current only.
Operation Manual
Page 10
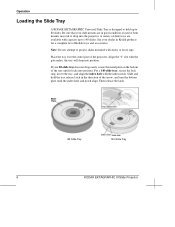
... accessories. the tray will drop into position. frayed or bent mounts may fail to project slides mounted with capacity up to 80 slides. Then release the latch. 80-Slide Tray 140-Slide Tray 6 KODAK EKTAGRAPHIC III Slide Projector Operation Loading the Slide Tray A KODAK EKTAGRAPHIC Universal Slide Tray is designed to hold the tray release latch in the direction of the arrow, and...
... accessories. the tray will drop into position. frayed or bent mounts may fail to project slides mounted with capacity up to 80 slides. Then release the latch. 80-Slide Tray 140-Slide Tray 6 KODAK EKTAGRAPHIC III Slide Projector Operation Loading the Slide Tray A KODAK EKTAGRAPHIC Universal Slide Tray is designed to hold the tray release latch in the direction of the arrow, and...
Operation Manual
Page 11
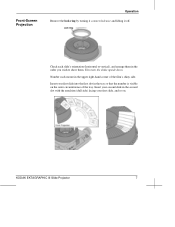
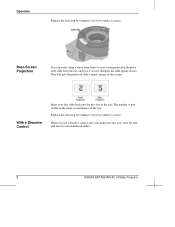
... order you wish to show them. Insert your first slide, and so on the outer circumference of the film's shiny side. KODAK EKTAGRAPHIC III Slide Projector 7 Front-Screen Projection Operation Remove the lock ring by turning it counterclockwise and lifting it off. Insert your second slide in the second slot with the emulsion (dull side) facing...
... order you wish to show them. Insert your first slide, and so on the outer circumference of the film's shiny side. KODAK EKTAGRAPHIC III Slide Projector 7 Front-Screen Projection Operation Remove the lock ring by turning it counterclockwise and lifting it off. Insert your second slide in the second slot with the emulsion (dull side) facing...
Operation Manual
Page 12
... the tray. When you use a dissolve control, put your first slide back into two trays (one for oddand one for even-numbered slides). 8 KODAK EKTAGRAPHIC III Slide Projector The number is now visible in the tray. Remove each slide from front- This will give the projected slide a mirror image on the screen. Replace the lock ring by turning...
... the tray. When you use a dissolve control, put your first slide back into two trays (one for oddand one for even-numbered slides). 8 KODAK EKTAGRAPHIC III Slide Projector The number is now visible in the tray. Remove each slide from front- This will give the projected slide a mirror image on the screen. Replace the lock ring by turning...
Operation Manual
Page 13
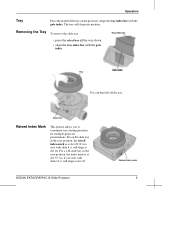
... in the zero position, the index mark is at slot 35. KODAK EKTAGRAPHIC III Slide Projector 9 Removing the Tray To remove the slide tray: • press the select bar all the way down • align the tray index bar with the gate index. The tray will align at ... index bar with the gate index. For a 140-slide tray in the zero position, the raised index mark is at slot 20. So, if you start with slide 12, it will align at slot 47. If you to coordinate tray starting positions for multiple-projector presentations. Raised Index Mark This feature allows you...
... in the zero position, the index mark is at slot 35. KODAK EKTAGRAPHIC III Slide Projector 9 Removing the Tray To remove the slide tray: • press the select bar all the way down • align the tray index bar with the gate index. The tray will align at ... index bar with the gate index. For a 140-slide tray in the zero position, the raised index mark is at slot 20. So, if you start with slide 12, it will align at slot 47. If you to coordinate tray starting positions for multiple-projector presentations. Raised Index Mark This feature allows you...

Operation Manual
Page 14
... power switch to order this module. 10 KODAK EKTAGRAPHIC III Slide Projector You may want to keep a spare KODAK EC Lamp Module (CAT 831 3587) handy in Kodak products to half lamp (for longer lamp life) or lamp (for instructions on the projector. Replacing the entire module makes the change quick ...and easy. (See "Maintenance" on page 21 for maximum brightness). Operation Projecting Your Slides Lens To insert a ...
... power switch to order this module. 10 KODAK EKTAGRAPHIC III Slide Projector You may want to keep a spare KODAK EC Lamp Module (CAT 831 3587) handy in Kodak products to half lamp (for longer lamp life) or lamp (for instructions on the projector. Replacing the entire module makes the change quick ...and easy. (See "Maintenance" on page 21 for maximum brightness). Operation Projecting Your Slides Lens To insert a ...
Operation Manual
Page 15
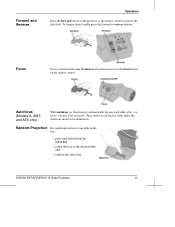
KODAK EKTAGRAPHIC III Slide Projector 11 Autofocus (Models A, AMT, and ATS only) With autofocus on the remote control. Random Projection For random projection of any slide in the tray: • press and hold down the select bar, • rotate the tray to project the first slide. To change slides, briefly press the forward or reverse buttons. Turn...
KODAK EKTAGRAPHIC III Slide Projector 11 Autofocus (Models A, AMT, and ATS only) With autofocus on the remote control. Random Projection For random projection of any slide in the tray: • press and hold down the select bar, • rotate the tray to project the first slide. To change slides, briefly press the forward or reverse buttons. Turn...
Operation Manual
Page 16
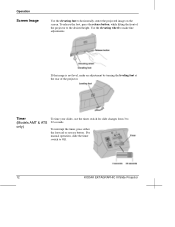
... make an adjustment by turning the leveling foot at the rear of the projector to the desired height. Use the elevating wheel to Off. 12 KODAK EKTAGRAPHIC III Slide Projector To release the foot, press the release button, while lifting the front of the projector. If the image is not level, make fine adjustments. Timer (Models...
... make an adjustment by turning the leveling foot at the rear of the projector to the desired height. Use the elevating wheel to Off. 12 KODAK EKTAGRAPHIC III Slide Projector To release the foot, press the release button, while lifting the front of the projector. If the image is not level, make fine adjustments. Timer (Models...
Operation Manual
Page 17
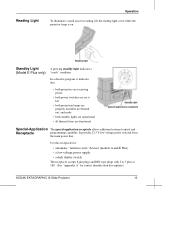
... power switches are set at 180˚. (See "Appendix A" for reading, lift the reading light cover while the projector lamp is on. In a dissolve program, it indicates that • both projectors are receiving power • both standby lights are operational • all thermal fuses are functional Special-Application The special-application.... Standby Light A glowing standby light indicates a (Model E Plus only) "ready" condition. Reading Light Operation To illuminate a small area for contact identification descriptions.) KODAK EKTAGRAPHIC III Slide Projector 13
... power switches are set at 180˚. (See "Appendix A" for reading, lift the reading light cover while the projector lamp is on. In a dissolve program, it indicates that • both projectors are receiving power • both standby lights are operational • all thermal fuses are functional Special-Application The special-application.... Standby Light A glowing standby light indicates a (Model E Plus only) "ready" condition. Reading Light Operation To illuminate a small area for contact identification descriptions.) KODAK EKTAGRAPHIC III Slide Projector 13

Operation Manual
Page 18
...brighter the projected image. Operation Single Slides Important All equipment, cables, and connectors used with the special-application receptacle must be assembled by qualified electronic personnel All circuits connected electrically to the projector through this receptacle must have a ..., Number 118-1959 (R1965), Picture Machines Appliances, CSA, 178 Rexdale Boulevard, Rexdale, Ontario M9W 1R3 Canada. 14 KODAK EKTAGRAPHIC III Slide Projector A flat ). After viewing the slide, press forward, reverse, or the select bar to a half- Also, a curved-field lens, in millimetres...
...brighter the projected image. Operation Single Slides Important All equipment, cables, and connectors used with the special-application receptacle must be assembled by qualified electronic personnel All circuits connected electrically to the projector through this receptacle must have a ..., Number 118-1959 (R1965), Picture Machines Appliances, CSA, 178 Rexdale Boulevard, Rexdale, Ontario M9W 1R3 Canada. 14 KODAK EKTAGRAPHIC III Slide Projector A flat ). After viewing the slide, press forward, reverse, or the select bar to a half- Also, a curved-field lens, in millimetres...
Operation Manual
Page 19
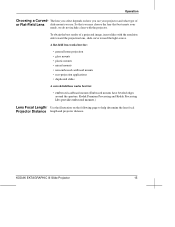
KODAK EKTAGRAPHIC III Slide Projector 15 Operation Choosing a Curved- To obtain the best results of or Flat-Field Lens slide mount you use your needs, we do not include a lens with the emulsion side toward the projection lens, slide curve toward the light source. Kodak Premium Processing and Kodak Processing labs provide embossed mounts.) Lens Focal Length/ Use the illustration...
KODAK EKTAGRAPHIC III Slide Projector 15 Operation Choosing a Curved- To obtain the best results of or Flat-Field Lens slide mount you use your needs, we do not include a lens with the emulsion side toward the projection lens, slide curve toward the light source. Kodak Premium Processing and Kodak Processing labs provide embossed mounts.) Lens Focal Length/ Use the illustration...
Operation Manual
Page 21
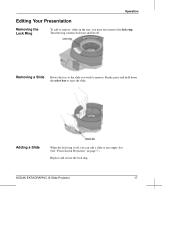
Adding a Slide When the lock ring is off . Firmly press and hold down the select bar to remove. KODAK EKTAGRAPHIC III Slide Projector 17 Operation Editing Your Presentation Removing the Lock Ring To add or remove slides in the tray, you can add a slide to any empty slot. (See "Front-Screen Projection" on page 7.) Replace and secure the lock ring. Turn the ring counterclockwise and lift off , you must first remove the lock ring. Removing a Slide Rotate the tray to the slide you wish to eject the slide.
Adding a Slide When the lock ring is off . Firmly press and hold down the select bar to remove. KODAK EKTAGRAPHIC III Slide Projector 17 Operation Editing Your Presentation Removing the Lock Ring To add or remove slides in the tray, you can add a slide to any empty slot. (See "Front-Screen Projection" on page 7.) Replace and secure the lock ring. Turn the ring counterclockwise and lift off , you must first remove the lock ring. Removing a Slide Rotate the tray to the slide you wish to eject the slide.

Operation Manual
Page 22
... of the tray. Remount damaged slides to remove the tray. • Slide the tray release latch in the direction of the arrow, and • with your projector and slides from the projector gate by pressing the forward button or removing the slide manually. Remove the slide or object from subsequent damage. 18 KODAK EKTAGRAPHIC III Slide Projector Rotate the metal plate on...
... of the tray. Remount damaged slides to remove the tray. • Slide the tray release latch in the direction of the arrow, and • with your projector and slides from the projector gate by pressing the forward button or removing the slide manually. Remove the slide or object from subsequent damage. 18 KODAK EKTAGRAPHIC III Slide Projector Rotate the metal plate on...