User Guide
Page 3
... Image Processing 30 Overview 30 Common terms 30 Making camera selections 31 Scan Validation Tool dialog box 32 Starting the Scan Validation Tool 33 Using the TWAIN Datasource 34 Kodak Scanner Properties dialog box 34 Buttons on the Kodak Scanner Properties dialog box 34 The Imaging tab 35 Scanning ...Processing settings 55 Page size and layout 57 More Scanner Settings dialog box 61 Image Control options 62 Color Dropout options 64 Scanner Control dialog box 65 Multi-Feed Detection options 65 Energy Saving features of the scanner 66 Transport Timeout 66 Defining the Scan area ...
... Image Processing 30 Overview 30 Common terms 30 Making camera selections 31 Scan Validation Tool dialog box 32 Starting the Scan Validation Tool 33 Using the TWAIN Datasource 34 Kodak Scanner Properties dialog box 34 Buttons on the Kodak Scanner Properties dialog box 34 The Imaging tab 35 Scanning ...Processing settings 55 Page size and layout 57 More Scanner Settings dialog box 61 Image Control options 62 Color Dropout options 64 Scanner Control dialog box 65 Multi-Feed Detection options 65 Energy Saving features of the scanner 66 Transport Timeout 66 Defining the Scan area ...

User Guide
Page 20
...4. Following is a brief outline of the clips on the automatic document feeder. See the section entitled, "Locking the scanner" in Chapter 3, Using the Scanner. Place the scanner in its front. 2. Shipping switch 3. Set up the scanner. • Lock the shipping switch before you started. 1. Place...snap the wire leg into the wall outlet. 3. Lift the input tray to a new location. The scanner has a shipping switch that locks the scanner's flatbed camera to avoid causing damage during transportation. • Unlock the shipping switch before moving the shipping switch (...
...4. Following is a brief outline of the clips on the automatic document feeder. See the section entitled, "Locking the scanner" in Chapter 3, Using the Scanner. Place the scanner in its front. 2. Shipping switch 3. Set up the scanner. • Lock the shipping switch before you started. 1. Place...snap the wire leg into the wall outlet. 3. Lift the input tray to a new location. The scanner has a shipping switch that locks the scanner's flatbed camera to avoid causing damage during transportation. • Unlock the shipping switch before moving the shipping switch (...

User Guide
Page 34
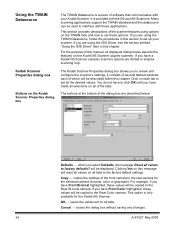
... remove any unneeded border or cleaning up extraneous "noise" on the image. Duplex - The cameras have the ability to scan your documents. Basic image processing concepts are using (i.e., Kodak Capture Software). The information that only one -sided documents; The Kodak i65 Scanner is derived from the color scan. black-and-white. Color - All fields on the user...
... remove any unneeded border or cleaning up extraneous "noise" on the image. Duplex - The cameras have the ability to scan your documents. Basic image processing concepts are using (i.e., Kodak Capture Software). The information that only one -sided documents; The Kodak i65 Scanner is derived from the color scan. black-and-white. Color - All fields on the user...

User Guide
Page 35
...Kodak Scan Validation Tool, you want to use the following examples as a guide when making selections on which camera (in black-andwhite, make your camera selections as follows: Camera selection Result - Both TWAIN and ISIS have camera selection boxes that refer to scan only the front side of a color document...in bi-tonal If you want to the cameras within the scanners. Example 1: scanning a two-sided color document both Front Color and Rear Color. Side 1 Result - The result is highlighted, will be making camera selections. Side 2 • Select both sides...
...Kodak Scan Validation Tool, you want to use the following examples as a guide when making selections on which camera (in black-andwhite, make your camera selections as follows: Camera selection Result - Both TWAIN and ISIS have camera selection boxes that refer to scan only the front side of a color document...in bi-tonal If you want to the cameras within the scanners. Example 1: scanning a two-sided color document both Front Color and Rear Color. Side 1 Result - The result is highlighted, will be making camera selections. Side 2 • Select both sides...
User Guide
Page 38
...reset all values on all tabs to set up your Kodak Scanner. The Kodak Scanner Properties dialog box allows you have to simplex scanning only. You do not have made all selections on all values to the rear camera for the Kodak i65 Scanner. If you have Front Bi-tonal highlighted, these options.... Click on each of the scanner features using the ISIS Driver, see the section entitled, "Using the ISIS Driver" later...
...reset all values on all tabs to set up your Kodak Scanner. The Kodak Scanner Properties dialog box allows you have to simplex scanning only. You do not have made all selections on all values to the rear camera for the Kodak i65 Scanner. If you have Front Bi-tonal highlighted, these options.... Click on each of the scanner features using the ISIS Driver, see the section entitled, "Using the ISIS Driver" later...

User Guide
Page 39
... Bi-tonal and/or Rear Bi-tonal) or any combination of this chapter, "Making camera selections". For detailed information about the cameras, refer to color images. A-61527 May 2006 On the Kodak i65 Scanner there is a separate camera for each side of a document depending on how the documents are making changes to see these settings reflected in the...
... Bi-tonal and/or Rear Bi-tonal) or any combination of this chapter, "Making camera selections". For detailed information about the cameras, refer to color images. A-61527 May 2006 On the Kodak i65 Scanner there is a separate camera for each side of a document depending on how the documents are making changes to see these settings reflected in the...

User Guide
Page 47
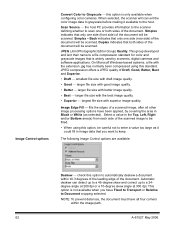
...Camera selection box lists the available sides of an image that a small amount of image data from the edge of the image. Cropping allows you can be lost. When using Aggressive cropping, there is a possibility that you to image output (i.e., cropping values, rotation, paper size and units of mixed-sized documents.... • Aggressive: selecting this option for different document sizes based upon the edges of the document may be set per document. • On an i65 Scanner two cropping options can define individual image ...
...Camera selection box lists the available sides of an image that a small amount of image data from the edge of the image. Cropping allows you can be lost. When using Aggressive cropping, there is a possibility that you to image output (i.e., cropping values, rotation, paper size and units of mixed-sized documents.... • Aggressive: selecting this option for different document sizes based upon the edges of the document may be set per document. • On an i65 Scanner two cropping options can define individual image ...
User Guide
Page 50
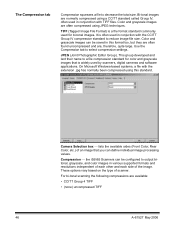
Color and grayscale images are normally compressed using a CCITT standard called Group IV, often used by scanners, digital cameras and software applications. TIFF (Tagged Image File Format) is widely used in conjuction with the extension .jpg has normally... conjunction with TIFF files. Color and grayscale images can be configured to a file compression standard for bi-tonal images. Camera Selection box lists the available sides (Front Color, Rear Color, etc.) of scanner. Compression the i55/i65 Scanners can define individual image processing values.
Color and grayscale images are normally compressed using a CCITT standard called Group IV, often used by scanners, digital cameras and software applications. TIFF (Tagged Image File Format) is widely used in conjuction with the extension .jpg has normally... conjunction with TIFF files. Color and grayscale images can be configured to a file compression standard for bi-tonal images. Camera Selection box lists the available sides (Front Color, Rear Color, etc.) of scanner. Compression the i55/i65 Scanners can define individual image processing values.

User Guide
Page 52
through OCR (Optical Character Recognition) and ICR (Intelligent Character Recognition) technology - The i55/i65 Scanners can dropout either red, green or blue. The Dropout tab allows you want to eliminate: (none) Remove Red, Remove Green, Remove Blue. This setting determines ... the dropped-out image. 48 A-61527 May 2006 For example, if you are scanning a white document with a Red/Green/Blue component more of the selected color out. This value is applied to the color area. Camera Selection box electronic color drop-out is available only for this value should choose an...
through OCR (Optical Character Recognition) and ICR (Intelligent Character Recognition) technology - The i55/i65 Scanners can dropout either red, green or blue. The Dropout tab allows you want to eliminate: (none) Remove Red, Remove Green, Remove Blue. This setting determines ... the dropped-out image. 48 A-61527 May 2006 For example, if you are scanning a white document with a Red/Green/Blue component more of the selected color out. This value is applied to the color area. Camera Selection box electronic color drop-out is available only for this value should choose an...
User Guide
Page 55
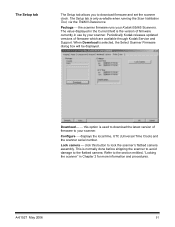
... to lock the scanner's flatbed camera assembly. Download... this button to your scanner. Periodically Kodak releases updated versions of firmware which are available through Kodak Service and Support. Lock camera - The Setup tab is selected, the Select Scanner Firmware dialog box will...the scanner serial number. A-61527 May 2006 51 Package the scanner firmware runs your scanner. This is used to the section entitled, "Locking the scanner" in use by your Kodak i55/i65 Scanners. click this option is normally done before shipping the scanner to ...
... to lock the scanner's flatbed camera assembly. Download... this button to your scanner. Periodically Kodak releases updated versions of firmware which are available through Kodak Service and Support. Lock camera - The Setup tab is selected, the Select Scanner Firmware dialog box will...the scanner serial number. A-61527 May 2006 51 Package the scanner firmware runs your scanner. This is used to the section entitled, "Locking the scanner" in use by your Kodak i55/i65 Scanners. click this option is normally done before shipping the scanner to ...

User Guide
Page 58
...box without saving any changes. Camera Settings area The selections in the Camera area list the available sides (front and back) of the document being scanned. When starting the configuration process, use the steps below as desired. Enable camera settings select the desired...PC first when using simultaneous output scanning. On the Kodak i65 Scanner there is transferred to capture only rear images.) Enable your selection by putting a checkmark in Chapter 4. This determines which image is a separate camera for each image by selecting the Color First or ...
...box without saving any changes. Camera Settings area The selections in the Camera area list the available sides (front and back) of the document being scanned. When starting the configuration process, use the steps below as desired. Enable camera settings select the desired...PC first when using simultaneous output scanning. On the Kodak i65 Scanner there is transferred to capture only rear images.) Enable your selection by putting a checkmark in Chapter 4. This determines which image is a separate camera for each image by selecting the Color First or ...

User Guide
Page 59
...cameras. Also select one or both sides of the scanned image. Dots per inch (dpi) or Resolution indicates the scanning resolution, which largely determines the quality of the document will be scanned. A-61527 May 2006 Scan Source the host PC provides information to the scanner...the selection you make. As you select the image, other options on the Scanner Settings dialog box. The availability of the document will be scanned when used the automatic document feeder, such as thick or bound documents (books). • ADF/Flatbed: if you select this dialog box allow...
...cameras. Also select one or both sides of the scanned image. Dots per inch (dpi) or Resolution indicates the scanning resolution, which largely determines the quality of the document will be scanned. A-61527 May 2006 Scan Source the host PC provides information to the scanner...the selection you make. As you select the image, other options on the Scanner Settings dialog box. The availability of the document will be scanned when used the automatic document feeder, such as thick or bound documents (books). • ADF/Flatbed: if you select this dialog box allow...

User Guide
Page 65
Enable camera settings select the desired checkbox to the i55/i65 Scanners are scanning front color and front binary and you select Binary First the scanner will become available on the Scanner Settings dialog box. For example, if you are available when you select the image, other options will return the front binary image, then...
Enable camera settings select the desired checkbox to the i55/i65 Scanners are scanning front color and front binary and you select Binary First the scanner will become available on the Scanner Settings dialog box. For example, if you are available when you select the image, other options will return the front binary image, then...
User Guide
Page 66
... processing options have Fixed to Transport or Relative to Document cropping selected. When selected, the scanner will be careful not to enter a value too large as selected). Simplex indicates that you have been applied, by scanners, digital cameras and software applications. Back indicates that both sides of... • Superior largest file size with the extension .jpg has normally been compressed using this option to automatically deskew a document within the image path. 62 A-61527 May 2006 Automatic deskew can detect up to a 45-degree skew and correct up to the ...
... processing options have Fixed to Transport or Relative to Document cropping selected. When selected, the scanner will be careful not to enter a value too large as selected). Simplex indicates that you have been applied, by scanners, digital cameras and software applications. Back indicates that both sides of... • Superior largest file size with the extension .jpg has normally been compressed using this option to automatically deskew a document within the image path. 62 A-61527 May 2006 Automatic deskew can detect up to a 45-degree skew and correct up to the ...

User Guide
Page 70
...Fixed to Transport or Relative to delete. Images with sizes less than the size number you select will wait after the last document enters the transport before the scanner goes into an idle state (sleep mode). To access the Scan Area dialog box, select Area on the cropping option .../Grayscale, Front Binary, Back Color/Grayscale, Back Binary or as appropriate based on the Scanner Settings dialog box. You can specify a time delay setting from 1 to set the amount of time the scanner will keep all camera selections are : 0 to 60 minutes. The scan areas defined for each image type ...
...Fixed to Transport or Relative to delete. Images with sizes less than the size number you select will wait after the last document enters the transport before the scanner goes into an idle state (sleep mode). To access the Scan Area dialog box, select Area on the cropping option .../Grayscale, Front Binary, Back Color/Grayscale, Back Binary or as appropriate based on the Scanner Settings dialog box. You can specify a time delay setting from 1 to set the amount of time the scanner will keep all camera selections are : 0 to 60 minutes. The scan areas defined for each image type ...

User Guide
Page 79
... and setting the flatbed cover into position before physically locking the scanner with the shipping switch. For TWAIN datasource users follow the procedure below. 1. Turn on starting the Scan Validation Tool, see the section entitled "Starting the...ISIS does not provide this option. Install the new flatbed cover by lifting the flatbed cover straight up. 2. Locking the scanner The TWAIN Datasource provides a Lock camera option which moves the camera into place. NOTE: For detailed instructions on the host PC and start the Scan Validation Tool. Replacing the flatbed cover If...
... and setting the flatbed cover into position before physically locking the scanner with the shipping switch. For TWAIN datasource users follow the procedure below. 1. Turn on starting the Scan Validation Tool, see the section entitled "Starting the...ISIS does not provide this option. Install the new flatbed cover by lifting the flatbed cover straight up. 2. Locking the scanner The TWAIN Datasource provides a Lock camera option which moves the camera into place. NOTE: For detailed instructions on the host PC and start the Scan Validation Tool. Replacing the flatbed cover If...

User Guide
Page 80
Click OK on both messages. 4. The following messages will be displayed: 3. 2. Access the Setup tab and click the Lock Camera button. Lock the scanner by moving the shipping switch (located at the bottom of the scanner) back to the locked position. 76 A-61527 May 2006
Click OK on both messages. 4. The following messages will be displayed: 3. 2. Access the Setup tab and click the Lock Camera button. Lock the scanner by moving the shipping switch (located at the bottom of the scanner) back to the locked position. 76 A-61527 May 2006
