
User Manual
Page 5
...camera 2 Setting the language, date/time 2 Storing pictures on an (accessory) SD or SDHC Card 3 2 Taking pictures/videos 4 Taking a picture 4 Taking a video 5 Capture modes 6 Using optical zoom 8 Using the flash 9 Using the Focus button 10 Using the self-timer 11 Using burst 11 Taking panoramic pictures 12 Getting help from your camera 13 P, A, S, and M modes 14 Using exposure compensation to adjust brightness 16 Using the histogram to view picture brightness 17 Understanding the picture-taking icons 17 3 Working with pictures/videos 18 Reviewing pictures/videos 18 Deleting...
...camera 2 Setting the language, date/time 2 Storing pictures on an (accessory) SD or SDHC Card 3 2 Taking pictures/videos 4 Taking a picture 4 Taking a video 5 Capture modes 6 Using optical zoom 8 Using the flash 9 Using the Focus button 10 Using the self-timer 11 Using burst 11 Taking panoramic pictures 12 Getting help from your camera 13 P, A, S, and M modes 14 Using exposure compensation to adjust brightness 16 Using the histogram to view picture brightness 17 Understanding the picture-taking icons 17 3 Working with pictures/videos 18 Reviewing pictures/videos 18 Deleting...
User Manual
Page 6
... 29 Viewing pictures/videos in different ways 30 Selecting multiple pictures/videos 30 Copying pictures/videos 31 Understanding the review icons 31 4 Using the menu button 32 Using the Setup menu 35 5 Transferring, printing, and sharing pictures 38 Installing the software 38 Transferring pictures with the USB cable 39 Printing pictures 40 Marking your pictures 42 6 Troubleshooting 46 7 Getting help 51 Helpful links 51 8 Appendix 53 Camera specifications 53 Storage capacities 55 Important safety instructions 56 Upgrading your software and firmware 57 Battery life 57...
... 29 Viewing pictures/videos in different ways 30 Selecting multiple pictures/videos 30 Copying pictures/videos 31 Understanding the review icons 31 4 Using the menu button 32 Using the Setup menu 35 5 Transferring, printing, and sharing pictures 38 Installing the software 38 Transferring pictures with the USB cable 39 Printing pictures 40 Marking your pictures 42 6 Troubleshooting 46 7 Getting help 51 Helpful links 51 8 Appendix 53 Camera specifications 53 Storage capacities 55 Important safety instructions 56 Upgrading your software and firmware 57 Battery life 57...
User Manual
Page 12
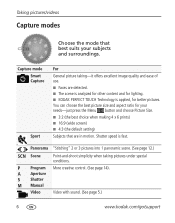
... For General picture taking pictures under special conditions. P Program More creative control. (See page 14). A Aperture S Shutter M Manual Video Video with sound. (See page 5.) 6 www.kodak.com/go/support You can choose the best picture size and aspect ratio for better pictures. Taking pictures/videos Capture modes Choose the mode that best suits your needs-just press the Menu button and choose Picture Size. ■ 3:2 (the best choice when making 4 x 6 prints) ■ 16:9 (wide screen) ■ 4:3 (the default setting) Subjects...
... For General picture taking pictures under special conditions. P Program More creative control. (See page 14). A Aperture S Shutter M Manual Video Video with sound. (See page 5.) 6 www.kodak.com/go/support You can choose the best picture size and aspect ratio for better pictures. Taking pictures/videos Capture modes Choose the mode that best suits your needs-just press the Menu button and choose Picture Size. ■ 3:2 (the best choice when making 4 x 6 prints) ■ 16:9 (wide screen) ■ 4:3 (the default setting) Subjects...
User Manual
Page 18
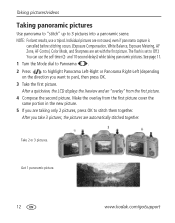
Get 1 panoramic picture. 12 www.kodak.com/go/support The flash is cancelled before stitching occurs. (Exposure Compensation, White Balance, Exposure Metering, AF Zone, AF Control, Color Mode, and Sharpness are taking panoramic pictures. After a quickview, the LCD displays the liveview and an "overlay" from the first picture cover the same portion in the new picture. 5 If you are set to 3 pictures into a panoramic scene. Take 2 or 3 pictures. and 10-second delays) while taking only 2 pictures, press...
Get 1 panoramic picture. 12 www.kodak.com/go/support The flash is cancelled before stitching occurs. (Exposure Compensation, White Balance, Exposure Metering, AF Zone, AF Control, Color Mode, and Sharpness are taking panoramic pictures. After a quickview, the LCD displays the liveview and an "overlay" from the first picture cover the same portion in the new picture. 5 If you are set to 3 pictures into a panoramic scene. Take 2 or 3 pictures. and 10-second delays) while taking only 2 pictures, press...

User Manual
Page 20
... sharpness). Taking pictures/videos P, A, S, and M modes Use these modes when you want more control over your Shutter speed and flash subject is moving. The camera automatically sets the compensation aperture for proper exposure. (To prevent blur, use a tripod for P, A, S, and M modes-even when you change in those modes. The camera automatically sets the shutter speed and aperture (f-stop) based on the scene lighting. Use Reset Camera (see page 37) to reset P, A, S, or M mode to its default setting. 14 www.kodak.com/go/support
... sharpness). Taking pictures/videos P, A, S, and M modes Use these modes when you want more control over your Shutter speed and flash subject is moving. The camera automatically sets the compensation aperture for proper exposure. (To prevent blur, use a tripod for P, A, S, and M modes-even when you change in those modes. The camera automatically sets the shutter speed and aperture (f-stop) based on the scene lighting. Use Reset Camera (see page 37) to reset P, A, S, or M mode to its default setting. 14 www.kodak.com/go/support
User Manual
Page 21
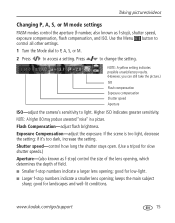
...), shutter speed, exposure compensation, flash compensation, and ISO. Taking pictures/videos Changing P, A, S, or M mode settings PASM modes control the aperture (f-number, also known as f-stop) control the size of the lens opening, which determines the depth of field. ■ Smaller f-stop numbers indicate a larger lens opening ; Higher ISO indicates greater sensitivity. If the scene is too light, decrease the setting; www.kodak.com/go/support 15 NOTE: A higher ISO may produce unwanted "noise" in a picture. Exposure Compensation-adjust the exposure. Use the Menu button to...
...), shutter speed, exposure compensation, flash compensation, and ISO. Taking pictures/videos Changing P, A, S, or M mode settings PASM modes control the aperture (f-number, also known as f-stop) control the size of the lens opening, which determines the depth of field. ■ Smaller f-stop numbers indicate a larger lens opening ; Higher ISO indicates greater sensitivity. If the scene is too light, decrease the setting; www.kodak.com/go/support 15 NOTE: A higher ISO may produce unwanted "noise" in a picture. Exposure Compensation-adjust the exposure. Use the Menu button to...
User Manual
Page 30
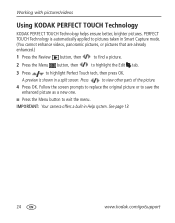
Press to exit the menu. IMPORTANT: Your camera offers a built-in a split screen. Working with pictures/videos Using KODAK PERFECT TOUCH Technology KODAK PERFECT TOUCH Technology helps ensure better, brighter pictures. A preview is automatically applied to pictures taken in Smart Capture mode. (You cannot enhance videos, panoramic pictures, or pictures that are already enhanced.) 1 Press the Review button, then to find a picture. 2 Press the Menu button, then to highlight the Edit tab. 3 Press to...
Press to exit the menu. IMPORTANT: Your camera offers a built-in a split screen. Working with pictures/videos Using KODAK PERFECT TOUCH Technology KODAK PERFECT TOUCH Technology helps ensure better, brighter pictures. A preview is automatically applied to pictures taken in Smart Capture mode. (You cannot enhance videos, panoramic pictures, or pictures that are already enhanced.) 1 Press the Review button, then to find a picture. 2 Press the Menu button, then to highlight the Edit tab. 3 Press to...

User Manual
Page 38
... 13. Video Size Available only in Help system. 4 Using the menu button You can change settings to get the best results from your camera. 1 Press the Menu button. 2 Press to highlight a tab: ■ Capture/Video for the most common picture/video-taking settings ■ Setup for other camera settings 3 Press to access settings Picture Size See Camera specifications, page 53. Choose a picture resolution. smallest file size. (4 GB maximum video size.) 32 www.kodak.com/go/support NOTE: Some modes offer limited settings. Press Menu...
... 13. Video Size Available only in Help system. 4 Using the menu button You can change settings to get the best results from your camera. 1 Press the Menu button. 2 Press to highlight a tab: ■ Capture/Video for the most common picture/video-taking settings ■ Setup for other camera settings 3 Press to access settings Picture Size See Camera specifications, page 53. Choose a picture resolution. smallest file size. (4 GB maximum video size.) 32 www.kodak.com/go/support NOTE: Some modes offer limited settings. Press Menu...

User Manual
Page 39
... flash. AF Control Choose an auto-focus setting. Tungsten-corrects the orange cast of fluorescent lighting. Ideal for pictures in shade in natural lighting. Available only in P, A, S, M and Daylight-for Choose your lighting condition. High Color Natural Color Low Color Black & White Sepia NOTE: EASYSHARE Software also lets you change a color picture to access settings Color Mode Choose color tones. White Balance Auto-automatically corrects white balance. Single AF-uses TTL-AF (through-the-lens auto focus) when the Shutter button is no need to focus. Using...
... flash. AF Control Choose an auto-focus setting. Tungsten-corrects the orange cast of fluorescent lighting. Ideal for pictures in shade in natural lighting. Available only in P, A, S, M and Daylight-for Choose your lighting condition. High Color Natural Color Low Color Black & White Sepia NOTE: EASYSHARE Software also lets you change a color picture to access settings Color Mode Choose color tones. White Balance Auto-automatically corrects white balance. Single AF-uses TTL-AF (through-the-lens auto focus) when the Shutter button is no need to focus. Using...

User Manual
Page 41
... take pictures Exit or videos. Auto-the camera uses the card if one is installed. Set Tag Clear All Assign tag names to choose a preferred online service. Share button (via EASYSHARE Favorite-pictures/videos are assigned that tag Tag Name 1 name(s). in the camera. Software to Add Tag pictures/videos. LCD Brightness 1, 2, 3, 4, 5-dimmest to brightest. (Use a dimmer setting to your computer or network. Then, new pictures/ videos are tagged as Choose how pictures/videos are uploaded to save battery power.) Image...
... take pictures Exit or videos. Auto-the camera uses the card if one is installed. Set Tag Clear All Assign tag names to choose a preferred online service. Share button (via EASYSHARE Favorite-pictures/videos are assigned that tag Tag Name 1 name(s). in the camera. Software to Add Tag pictures/videos. LCD Brightness 1, 2, 3, 4, 5-dimmest to brightest. (Use a dimmer setting to your computer or network. Then, new pictures/ videos are tagged as Choose how pictures/videos are uploaded to save battery power.) Image...

User Manual
Page 42
... Capture mode. None-digital zoom is taken. Camera Sounds Turn sounds on pictures. Off Red-eye Reduction Preflash-the flash fires to divide the Off LCD screen into thirds, vertically and horizontally. Digital correction-the camera digitally corrects red-eye after a picture is off for individual functions. 36 www.kodak.com/go/support Image Stabilizer Continuous-stabilization occurs continuously. Continuous-zooming is reduced. Orientation Sensor For pictures-On, On Transfer, Off Orient pictures so that they are For videos-On, Off displayed...
... Capture mode. None-digital zoom is taken. Camera Sounds Turn sounds on pictures. Off Red-eye Reduction Preflash-the flash fires to divide the Off LCD screen into thirds, vertically and horizontally. Digital correction-the camera digitally corrects red-eye after a picture is off for individual functions. 36 www.kodak.com/go/support Image Stabilizer Continuous-stabilization occurs continuously. Continuous-zooming is reduced. Orientation Sensor For pictures-On, On Transfer, Off Orient pictures so that they are For videos-On, Off displayed...
User Manual
Page 43
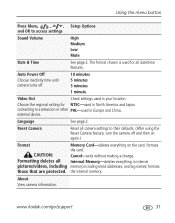
...used for NTSC-used in internal pictures/videos, including memory including email addresses, and tag names; Auto Power Off Choose inactivity time until camera turns off and then on the card; Language See page 2. formats those that are protected. About View camera information. Reset Camera Reset all camera settings to access settings Sound Volume High Medium Low Mute Date & Time See page 2. the internal memory. www.kodak.com/go/support 37 formats the card. Choose the regional setting for all Internal Memory-deletes everything on again.) Format Memory Card...
...used for NTSC-used in internal pictures/videos, including memory including email addresses, and tag names; Auto Power Off Choose inactivity time until camera turns off and then on the card; Language See page 2. formats those that are protected. About View camera information. Reset Camera Reset all camera settings to access settings Sound Volume High Medium Low Mute Date & Time See page 2. the internal memory. www.kodak.com/go/support 37 formats the card. Choose the regional setting for all Internal Memory-deletes everything on again.) Format Memory Card...
User Manual
Page 52
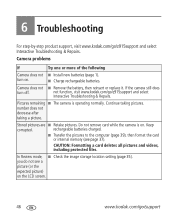
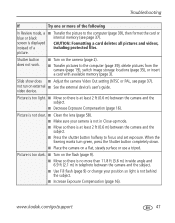
... replace it. Pictures remaining ■ The camera is on . ■ Charge rechargeable batteries. Keep corrupted. CAUTION: Formatting a card deletes all pictures and videos, including protected files. If the camera still does turn on . turn off. number does not decrease after taking pictures. Camera problems If Try one or more of the following Camera does not ■ Install new batteries (page 1). Continue taking a picture. Do not remove card while the camera is operating normally. you do not see page 37). not function...
... replace it. Pictures remaining ■ The camera is on . ■ Charge rechargeable batteries. Keep corrupted. CAUTION: Formatting a card deletes all pictures and videos, including protected files. If the camera still does turn on . turn off. number does not decrease after taking pictures. Camera problems If Try one or more of the following Camera does not ■ Install new batteries (page 1). Continue taking a picture. Do not remove card while the camera is operating normally. you do not see page 37). not function...
User Manual
Page 53
... the shutter button halfway to focus and set exposure. not run on the camera (page 2). ■ Transfer pictures to the computer (page 39), then format the card or blue or black internal memory (see page 37). Shutter button does not work. ■ Turn on external ■ See the external device's user's guide. Picture is not clear. ■ Clean the lens (page 58). ■ Make sure your position so light is displayed CAUTION: Formatting a card deletes all pictures and videos...
... the shutter button halfway to focus and set exposure. not run on the camera (page 2). ■ Transfer pictures to the computer (page 39), then format the card or blue or black internal memory (see page 37). Shutter button does not work. ■ Turn on external ■ See the external device's user's guide. Picture is not clear. ■ Clean the lens (page 58). ■ Make sure your position so light is displayed CAUTION: Formatting a card deletes all pictures and videos...
User Manual
Page 55
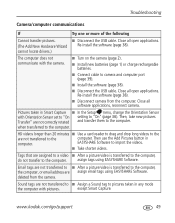
... tags using EASYSHARE Software. computer. Then use the Add Pictures button in any mode the computer with the camera. ■ Turn on the camera (page 2). ■ Install new batteries (page 1) or charge rechargeable batteries. ■ Connect cable to camera and computer port (page 39). ■ Install the software (page 38). ■ Disconnect the USB cable. Close all software applications, reconnect camera. except Smart Capture. Close all open applications. when transferred to import the videos. ■ Take shorter videos. Troubleshooting Camera/computer...
... tags using EASYSHARE Software. computer. Then use the Add Pictures button in any mode the computer with the camera. ■ Turn on the camera (page 2). ■ Install new batteries (page 1) or charge rechargeable batteries. ■ Connect cable to camera and computer port (page 39). ■ Install the software (page 38). ■ Disconnect the USB cable. Close all software applications, reconnect camera. except Smart Capture. Close all open applications. when transferred to import the videos. ■ Take shorter videos. Troubleshooting Camera/computer...
User Manual
Page 63
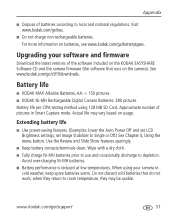
.... See www.kodak.com/go /support 57 Approximate number of batteries according to Single or Off.) See Chapter 4, Using the menu button. Extending battery life ■ Use power-saving features. (Examples: lower the Auto Power Off and set Image Stabilizer to local and national regulations. Upgrading your camera in Smart Capture mode. set LCD Brightness settings; When using 128 MB SD Card. www.kodak.com/go /z915downloads. Avoid over-charging Ni-MH batteries. ■ Battery performance is...
.... See www.kodak.com/go /support 57 Approximate number of batteries according to Single or Off.) See Chapter 4, Using the menu button. Extending battery life ■ Use power-saving features. (Examples: lower the Auto Power Off and set Image Stabilizer to local and national regulations. Upgrading your camera in Smart Capture mode. set LCD Brightness settings; When using 128 MB SD Card. www.kodak.com/go /z915downloads. Avoid over-charging Ni-MH batteries. ■ Battery performance is...

User Manual
Page 69
..., 8 burst, using, 13 button burst, 13 delete, 1, 2 flash, 7 review, 1 shutter, 1 telephoto, 1 wide angle, 1 www.kodak.com/go/support 1 zoom, 5 C cable audio/video, 11 USB, 2 camera sounds, 5 candle light, 4 capture frame grid, 4 caring for your camera, 6 clock, setting, 2 color mode, 2 continuous AF, 2 copy pictures card to memory, 13 memory to card, 13 to computer, 1 cropping pictures, 5 customer support, 1, 2 D date setting, 2 date stamp, 4 DC-in, 1 delete button, 1 deleting during quickview, 2 pictures/video, 2 protecting pictures, videos, 3 digital zoom, using, 5 displaying slide show...
..., 8 burst, using, 13 button burst, 13 delete, 1, 2 flash, 7 review, 1 shutter, 1 telephoto, 1 wide angle, 1 www.kodak.com/go/support 1 zoom, 5 C cable audio/video, 11 USB, 2 camera sounds, 5 candle light, 4 capture frame grid, 4 caring for your camera, 6 clock, setting, 2 color mode, 2 continuous AF, 2 copy pictures card to memory, 13 memory to card, 13 to computer, 1 cropping pictures, 5 customer support, 1, 2 D date setting, 2 date stamp, 4 DC-in, 1 delete button, 1 deleting during quickview, 2 pictures/video, 2 protecting pictures, videos, 3 digital zoom, using, 5 displaying slide show...

User Manual
Page 71
... zoom, 5 orientation sensor, 5 P panoramic pictures, 10 PASM mode, 11 www.kodak.com/go/support Index Perfect Touch technology, 6 PICTBRIDGE enabled printer, 3 picture size, 1 pictures copying, 13 cropping, 5 deleting, 2 emailing tagged, 6 from video, 7 Kodak Perfect Touch, 6 printing, 4 printing tagged, 5 protecting, 3 review icons, 14 reviewing, 1 storage capacity, 4 tagging, 5 taking, modes, 3 transfer, 1 portrait, 4 power, camera, 2 pre-tagging, 8 printing from a card, 4 from computer, 4 optimizing printer, 1 order online, 4 PICTBRIDGE, 3 tagged pictures, 4 problem-solving, 1 protecting...
... zoom, 5 orientation sensor, 5 P panoramic pictures, 10 PASM mode, 11 www.kodak.com/go/support Index Perfect Touch technology, 6 PICTBRIDGE enabled printer, 3 picture size, 1 pictures copying, 13 cropping, 5 deleting, 2 emailing tagged, 6 from video, 7 Kodak Perfect Touch, 6 printing, 4 printing tagged, 5 protecting, 3 review icons, 14 reviewing, 1 storage capacity, 4 tagging, 5 taking, modes, 3 transfer, 1 portrait, 4 power, camera, 2 pre-tagging, 8 printing from a card, 4 from computer, 4 optimizing printer, 1 order online, 4 PICTBRIDGE, 3 tagged pictures, 4 problem-solving, 1 protecting...

User Manual
Page 72
..., 4 panorama, 10 portrait, 4 self-portrait, 5 snow, 4 66 stage, 5 sunset, 4 text, 4 SCN (scene), 3 SD/SDHC card inserting, 3 printing from, 4 storage capacities, 4 select multiple pictures/videos, 12 self-portrait, 5 self-timer, 9 service and support telephone numbers, 2 setting about this camera, 6 advanced digital zoom, 5 AF control, 2 camera sounds, 5 capture frame grid, 4 color mode, 2 date and time, 2 date stamp, 4 exposure bracketing, 3 exposure metering, 3 flash, 7 focus zone, 3 image stabilizer, 5 image storage, 4 LCD brightness, 4 orientation sensor, 5 picture size, 1 picture taking...
..., 4 panorama, 10 portrait, 4 self-portrait, 5 snow, 4 66 stage, 5 sunset, 4 text, 4 SCN (scene), 3 SD/SDHC card inserting, 3 printing from, 4 storage capacities, 4 select multiple pictures/videos, 12 self-portrait, 5 self-timer, 9 service and support telephone numbers, 2 setting about this camera, 6 advanced digital zoom, 5 AF control, 2 camera sounds, 5 capture frame grid, 4 color mode, 2 date and time, 2 date stamp, 4 exposure bracketing, 3 exposure metering, 3 flash, 7 focus zone, 3 image stabilizer, 5 image storage, 4 LCD brightness, 4 orientation sensor, 5 picture size, 1 picture taking...

User Manual
Page 73
..., 4 software installing, 1 upgrading, 4 sound volume, 5 sounds, camera, 5 specifications, camera, 1 stage, 5 status, camera ready light, 4 storage capacity, 4 strap, 1 sunset, 4 support, technical, 1, 2 www.kodak.com/go/support Index T tag set, 4 tagging creating tags, 7 favorites, 7 for email, 6 for print, 5 pre-tagging, 8 telephone support, 2 telephoto button, 1 television, slide show, 11 text, 4 time, setting, 2 timer, shutter delay, 9 transferring pictures, videos, 1 trash can, deleting, 2 troubleshooting, 1 camera, 1 camera/computer communications, 4 error messages, 5 ready light status...
..., 4 software installing, 1 upgrading, 4 sound volume, 5 sounds, camera, 5 specifications, camera, 1 stage, 5 status, camera ready light, 4 storage capacity, 4 strap, 1 sunset, 4 support, technical, 1, 2 www.kodak.com/go/support Index T tag set, 4 tagging creating tags, 7 favorites, 7 for email, 6 for print, 5 pre-tagging, 8 telephone support, 2 telephoto button, 1 television, slide show, 11 text, 4 time, setting, 2 timer, shutter delay, 9 transferring pictures, videos, 1 trash can, deleting, 2 troubleshooting, 1 camera, 1 camera/computer communications, 4 error messages, 5 ready light status...


