
User Guide
Page 2
...29). 6. Cords rated for these precautions. Do not immerse this projector with hot surfaces. 7. Keep the air-flow vents unobstructed. For lamp replacement, allow the module to that it is not in use . 4. Allow the projector to Obtain Service" on heat-sensitive surfaces. 5. Read and understand...so that of damage. 14. Always unplug the projector from the electrical outlet before using your projector if the cord is damaged or if the projector has been dropped or damaged (see "How to cool before touching the lamp and the surrounding area. Save These Instructions Use ...
...29). 6. Cords rated for these precautions. Do not immerse this projector with hot surfaces. 7. Keep the air-flow vents unobstructed. For lamp replacement, allow the module to that it is not in use . 4. Allow the projector to Obtain Service" on heat-sensitive surfaces. 5. Read and understand...so that of damage. 14. Always unplug the projector from the electrical outlet before using your projector if the cord is damaged or if the projector has been dropped or damaged (see "How to cool before touching the lamp and the surrounding area. Save These Instructions Use ...
User Guide
Page 5
...Viewer (Model 5600 Only 18 Shutdown 19 Maintenance 20 Changing the Projection Lamp 21 Cleaning the Condenser, Heat-Absorbing Glass, and Mirror 22 Troubleshooting 26 Warranty 28 How to Obtain Service 29 Serial Number The serial number of your projector is printed ...on the label affixed to the power cord retainer on the base of purchase, for future reference. KODAK CAROUSEL® Slide Projector...
...Viewer (Model 5600 Only 18 Shutdown 19 Maintenance 20 Changing the Projection Lamp 21 Cleaning the Condenser, Heat-Absorbing Glass, and Mirror 22 Troubleshooting 26 Warranty 28 How to Obtain Service 29 Serial Number The serial number of your projector is printed ...on the label affixed to the power cord retainer on the base of purchase, for future reference. KODAK CAROUSEL® Slide Projector...
User Guide
Page 6
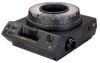
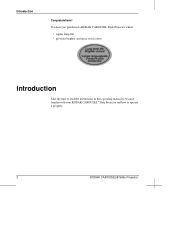
You have just purchased a KODAK CAROUSEL Slide Projector which: • triples lamp life • provides brighter and more vivid colors! Introduction Take the time to read the instructions in this operating manual to become familiar with your KODAK CAROUSEL® Slide Projector and how to operate it properly. 2 KODAK CAROUSEL® Slide Projector Introduction Congratulations!
You have just purchased a KODAK CAROUSEL Slide Projector which: • triples lamp life • provides brighter and more vivid colors! Introduction Take the time to read the instructions in this operating manual to become familiar with your KODAK CAROUSEL® Slide Projector and how to operate it properly. 2 KODAK CAROUSEL® Slide Projector Introduction Congratulations!
User Guide
Page 7
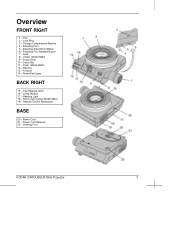
Elevating Foot 5 - Lens 8 - Tray Release Latch 16 - Lamp Module 17 - Room Light Outlet (Model 5600) 19 - Elevating Foot Release Button 7 - Reverse 13 - Power Cord 21 - Lock Ring 3 - Viewer (Model 5600) 9 - Reading Light 18 - Remote Control Receptacle BASE 20 - Overview FRONT RIGHT 1 - Elevating Adjustment Wheel 6 - Storage Compartment/Remote 4 - Timer (Model 5600) 12 - Power/Fan/Lamp BACK RIGHT 15 - Focus Knob 10 - Forward 14 - Leveling Foot KODAK CAROUSEL® Slide Projector 3 Select Bar 11 - Tray 2 - Power Cord Retainer 22 -
Elevating Foot 5 - Lens 8 - Tray Release Latch 16 - Lamp Module 17 - Room Light Outlet (Model 5600) 19 - Elevating Foot Release Button 7 - Reverse 13 - Power Cord 21 - Lock Ring 3 - Viewer (Model 5600) 9 - Reading Light 18 - Remote Control Receptacle BASE 20 - Overview FRONT RIGHT 1 - Elevating Adjustment Wheel 6 - Storage Compartment/Remote 4 - Timer (Model 5600) 12 - Power/Fan/Lamp BACK RIGHT 15 - Focus Knob 10 - Forward 14 - Leveling Foot KODAK CAROUSEL® Slide Projector 3 Select Bar 11 - Tray 2 - Power Cord Retainer 22 -
User Guide
Page 13
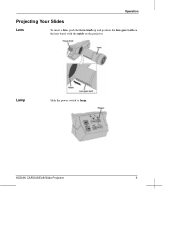
KODAK CAROUSEL® Slide Projector 9 Lamp Slide the power switch to lamp. Operation Projecting Your Slides Lens To insert a lens, push the focus knob up and position the lens gear teeth on the lens barrel with the notch on the projector.
KODAK CAROUSEL® Slide Projector 9 Lamp Slide the power switch to lamp. Operation Projecting Your Slides Lens To insert a lens, push the focus knob up and position the lens gear teeth on the lens barrel with the notch on the projector.
User Guide
Page 16
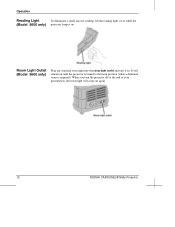
Room Light Outlet (Model 5600 only) Plug any standard room light into the room light outlet and turn the projector off at the end of your presentation, the room light will remain on until the projector is turned to the lamp position (when a darkened room is on. When you turn it on again. 12 KODAK CAROUSEL® Slide Projector It will come on . Operation Reading Light To illuminate a small area for reading, lift the reading light cover while the (Model 5600 only) projector lamp is required).
Room Light Outlet (Model 5600 only) Plug any standard room light into the room light outlet and turn the projector off at the end of your presentation, the room light will remain on until the projector is turned to the lamp position (when a darkened room is on. When you turn it on again. 12 KODAK CAROUSEL® Slide Projector It will come on . Operation Reading Light To illuminate a small area for reading, lift the reading light cover while the (Model 5600 only) projector lamp is required).
User Guide
Page 22
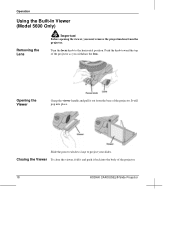
... the body of the projector. 18 KODAK CAROUSEL® Slide Projector Slide the power switch to lamp to the horizontal position. Turn the focus knob to project your slides. Closing the Viewer To close the viewer, fold it and push it out from the base of the projector as you must remove ...the projection lens from the projector. Opening the Viewer Grasp the viewer handle and pull it back into place. Push the knob toward the top of the projector. Operation Using the Built-In Viewer (Model 5600 Only) Removing the Lens ...
... the body of the projector. 18 KODAK CAROUSEL® Slide Projector Slide the power switch to lamp to the horizontal position. Turn the focus knob to project your slides. Closing the Viewer To close the viewer, fold it and push it out from the base of the projector as you must remove ...the projection lens from the projector. Opening the Viewer Grasp the viewer handle and pull it back into place. Push the knob toward the top of the projector. Operation Using the Built-In Viewer (Model 5600 Only) Removing the Lens ...
User Guide
Page 24
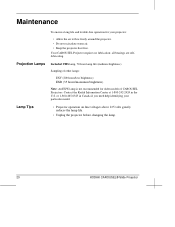
... brightness) EXR (35 hours/maximum brightness) Note: An EXW lamp is not recommended for your particular model. Lamp Tips • Projector operation on line voltages above 125 volts greatly reduces the lamp life. • Unplug the projector before changing the lamp. 20 KODAK CAROUSEL® Slide Projector Contact the Kodak Information Center at 1-800-242-2424 in Canada if you...
... brightness) EXR (35 hours/maximum brightness) Note: An EXW lamp is not recommended for your particular model. Lamp Tips • Projector operation on line voltages above 125 volts greatly reduces the lamp life. • Unplug the projector before changing the lamp. 20 KODAK CAROUSEL® Slide Projector Contact the Kodak Information Center at 1-800-242-2424 in Canada if you...

User Guide
Page 25
...Relatch the clip in the forward position and push the lamp module all the way back into the socket. Lift up the lamp release clip. Carefully remove the worn lamp from the socket and place it latches. KODAK CAROUSEL® Slide Projector 21 To release the latch, you may cause some ...resistance. Push down to Off and unplug the projector. Note: There is an additional safety...
...Relatch the clip in the forward position and push the lamp module all the way back into the socket. Lift up the lamp release clip. Carefully remove the worn lamp from the socket and place it latches. KODAK CAROUSEL® Slide Projector 21 To release the latch, you may cause some ...resistance. Push down to Off and unplug the projector. Note: There is an additional safety...
User Guide
Page 26
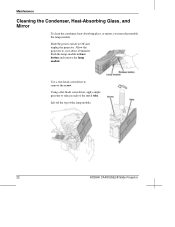
Using a flat-blade screwdriver, apply ample pressure to remove the screw. Push the lamp-module release button and remove the lamp module. Use a torx-head screwdriver to release each of the lamp module. 22 KODAK CAROUSEL® Slide Projector Allow the projector to Off and unplug the projector. Lift off the top of the metal tabs. Maintenance Cleaning the Condenser, Heat-Absorbing Glass, and Mirror To clean the condenser, heat-absorbing glass, or mirror, you must disassemble the lamp module. Slide the power switch to cool about 10 minutes.
Using a flat-blade screwdriver, apply ample pressure to remove the screw. Push the lamp-module release button and remove the lamp module. Use a torx-head screwdriver to release each of the lamp module. 22 KODAK CAROUSEL® Slide Projector Allow the projector to Off and unplug the projector. Lift off the top of the metal tabs. Maintenance Cleaning the Condenser, Heat-Absorbing Glass, and Mirror To clean the condenser, heat-absorbing glass, or mirror, you must disassemble the lamp module. Slide the power switch to cool about 10 minutes.
User Guide
Page 27
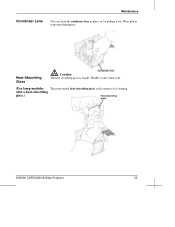
with a heat-absorbing glass.) KODAK CAROUSEL® Slide Projector 23 Maintenance Condenser Lens You can clean the condenser lens in place, or by pulling it only when cool. (For lamp modules The green-tinted heat-absorbing glass easily removes for cleaning. Heat-Absorbing Glass Caution The heat-absorbing glass is fragile. Handle it out. Wear gloves to prevent fingerprints.
with a heat-absorbing glass.) KODAK CAROUSEL® Slide Projector 23 Maintenance Condenser Lens You can clean the condenser lens in place, or by pulling it only when cool. (For lamp modules The green-tinted heat-absorbing glass easily removes for cleaning. Heat-Absorbing Glass Caution The heat-absorbing glass is fragile. Handle it out. Wear gloves to prevent fingerprints.

User Guide
Page 28
Insert the remainder of the lamp module. Insert the screw and tighten. Start with the tabs in the rear of the tabs into its appropriate slot. Then insert and seat the lamp. 24 KODAK CAROUSEL® Slide Projector Maintenance Reassembling the Lamp Module To reassemble the lamp module, you will need to align and insert each tab into slots until all 7 tabs on the top and 2 on the bottom are secured.
Insert the remainder of the lamp module. Insert the screw and tighten. Start with the tabs in the rear of the tabs into its appropriate slot. Then insert and seat the lamp. 24 KODAK CAROUSEL® Slide Projector Maintenance Reassembling the Lamp Module To reassemble the lamp module, you will need to align and insert each tab into slots until all 7 tabs on the top and 2 on the bottom are secured.
User Guide
Page 29
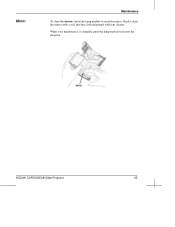
KODAK CAROUSEL® Slide Projector 25 Gently clean the mirror with a soft, lint-free cloth moistened with lens cleaner. Mirror Maintenance To clean the mirror, invert the lamp module to reach the mirror. When your maintenance is complete, push the lamp module back into the projector.
KODAK CAROUSEL® Slide Projector 25 Gently clean the mirror with a soft, lint-free cloth moistened with lens cleaner. Mirror Maintenance To clean the mirror, invert the lamp module to reach the mirror. When your maintenance is complete, push the lamp module back into the projector.
User Guide
Page 30
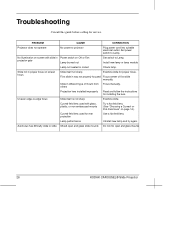
... open and glass mounts 26 KODAK CAROUSEL® Slide Projector Set power switch to projector Plug power cord into suitable electrical outlet. Slide in socket Check lamp. or Flat-Field Lens" on Off or Fan projector gate Lamp burned out Set switch to Lamp. PROBLEM CAUSE CORRECTION Projector does not operate No power to Lamp. Troubleshooting Consult this guide before...
... open and glass mounts 26 KODAK CAROUSEL® Slide Projector Set power switch to projector Plug power cord into suitable electrical outlet. Slide in socket Check lamp. or Flat-Field Lens" on Off or Fan projector gate Lamp burned out Set switch to Lamp. PROBLEM CAUSE CORRECTION Projector does not operate No power to Lamp. Troubleshooting Consult this guide before...

User Guide
Page 31
...KODAK CAROUSEL® Slide Projector Check condenser lens. See "Clearing a Gate Jam" on a stand equal with center of screen. Reposition tray. Troubleshooting PROBLEM Slide fails to drop into projection position Uneven illumination on screen Projector won't cycle to next slide CAUSE Tray base plate not properly indexed Tray not properly positioned on projector. Projector... not level or tilted too high Projection lamp not fully seated...
...KODAK CAROUSEL® Slide Projector Check condenser lens. See "Clearing a Gate Jam" on a stand equal with center of screen. Reposition tray. Troubleshooting PROBLEM Slide fails to drop into projection position Uneven illumination on screen Projector won't cycle to next slide CAUSE Tray base plate not properly indexed Tray not properly positioned on projector. Projector... not level or tilted too high Projection lamp not fully seated...
User Guide
Page 32
... such damages. Limitations This warranty does not cover circumstances beyond Kodak's control, projector lamps, or problems caused by failure to the original design of this projector nullifies this KODAK CAROUSEL Slide Projector does not function properly within the warranty period, upon submission of dated proof of purchase, Kodak will repair it without charge, except for any consequential or...
... such damages. Limitations This warranty does not cover circumstances beyond Kodak's control, projector lamps, or problems caused by failure to the original design of this projector nullifies this KODAK CAROUSEL Slide Projector does not function properly within the warranty period, upon submission of dated proof of purchase, Kodak will repair it without charge, except for any consequential or...