User Guide
Page 7
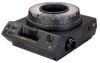
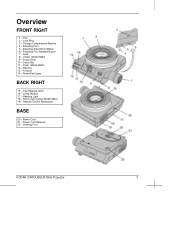
Elevating Foot 5 - Forward 14 - Lamp Module 17 - Power Cord 21 - Lock Ring 3 - Remote Control Receptacle BASE 20 - Elevating Foot Release Button 7 - Timer (Model 5600) 12 - Power Cord Retainer 22 - Storage Compartment/Remote 4 - Power/Fan/Lamp BACK RIGHT 15 - Tray 2 - Elevating Adjustment Wheel 6 - Viewer (Model 5600) 9 - Room Light Outlet (Model 5600) 19 - Lens 8 - Select Bar 11 - Leveling Foot KODAK CAROUSEL® Slide Projector 3 Reverse 13 - Reading Light 18 - Overview FRONT RIGHT 1 - Focus Knob 10 - Tray Release Latch 16 -
Elevating Foot 5 - Forward 14 - Lamp Module 17 - Power Cord 21 - Lock Ring 3 - Remote Control Receptacle BASE 20 - Elevating Foot Release Button 7 - Timer (Model 5600) 12 - Power Cord Retainer 22 - Storage Compartment/Remote 4 - Power/Fan/Lamp BACK RIGHT 15 - Tray 2 - Elevating Adjustment Wheel 6 - Viewer (Model 5600) 9 - Room Light Outlet (Model 5600) 19 - Lens 8 - Select Bar 11 - Leveling Foot KODAK CAROUSEL® Slide Projector 3 Reverse 13 - Reading Light 18 - Overview FRONT RIGHT 1 - Focus Knob 10 - Tray Release Latch 16 -
User Guide
Page 13
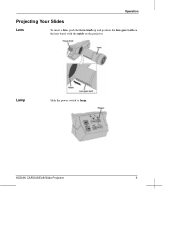
Lamp Slide the power switch to lamp. Operation Projecting Your Slides Lens To insert a lens, push the focus knob up and position the lens gear teeth on the lens barrel with the notch on the projector. KODAK CAROUSEL® Slide Projector 9
Lamp Slide the power switch to lamp. Operation Projecting Your Slides Lens To insert a lens, push the focus knob up and position the lens gear teeth on the lens barrel with the notch on the projector. KODAK CAROUSEL® Slide Projector 9
User Guide
Page 17
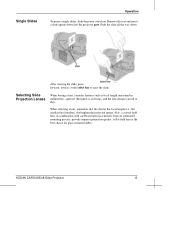
... combination with cardboard open face mounts from an automated mounting process, provide superior projection quality. When selecting a lens, remember that the shorter the focal length (i.e., the smaller the f/number), the brighter the projected image. KODAK CAROUSEL® Slide Projector 13 A flat ). After viewing the slide, press forward, reverse, or the select bar to eject the...
... combination with cardboard open face mounts from an automated mounting process, provide superior projection quality. When selecting a lens, remember that the shorter the focal length (i.e., the smaller the f/number), the brighter the projected image. KODAK CAROUSEL® Slide Projector 13 A flat ). After viewing the slide, press forward, reverse, or the select bar to eject the...
User Guide
Page 18
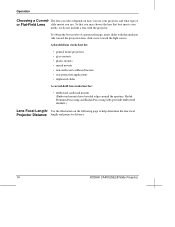
...; non-embossed cardboard mounts • rear-projection applications • duplicated slides A curved-field lens works best for: • embossed cardboard mounts (Embossed mounts have beveled edges around the aperture. Operation Choosing a Curved- The lens you select depends on the following page to help determine the lens focal Projector Distance length and projector distance. 14 KODAK CAROUSEL® Slide Projector
...; non-embossed cardboard mounts • rear-projection applications • duplicated slides A curved-field lens works best for: • embossed cardboard mounts (Embossed mounts have beveled edges around the aperture. Operation Choosing a Curved- The lens you select depends on the following page to help determine the lens focal Projector Distance length and projector distance. 14 KODAK CAROUSEL® Slide Projector
User Guide
Page 22
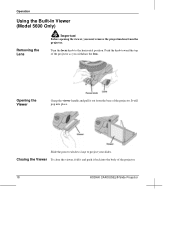
...the knob toward the top of the projector as you must remove the projection lens from the base of the projector. 18 KODAK CAROUSEL® Slide Projector It will pop into the body of the projector. Slide the power switch to lamp to the... horizontal position. Closing the Viewer To close the viewer, fold it and push it out from the projector. Turn the focus knob to project your slides. Operation Using the Built-In Viewer (Model 5600 Only) Removing the Lens...
...the knob toward the top of the projector as you must remove the projection lens from the base of the projector. 18 KODAK CAROUSEL® Slide Projector It will pop into the body of the projector. Slide the power switch to lamp to the... horizontal position. Closing the Viewer To close the viewer, fold it and push it out from the projector. Turn the focus knob to project your slides. Operation Using the Built-In Viewer (Model 5600 Only) Removing the Lens...

User Guide
Page 23
Reinserting the Lens Operation To reinsert the lens, push the focus knob up and position the lens gear teeth on the lens barrel with the notch on the projector. KODAK CAROUSEL® Slide Projector 19 Shutdown To shut down, • remove and store the tray • slide the power switch to off Your projector will remain warm for several minutes.
Reinserting the Lens Operation To reinsert the lens, push the focus knob up and position the lens gear teeth on the lens barrel with the notch on the projector. KODAK CAROUSEL® Slide Projector 19 Shutdown To shut down, • remove and store the tray • slide the power switch to off Your projector will remain warm for several minutes.
User Guide
Page 27
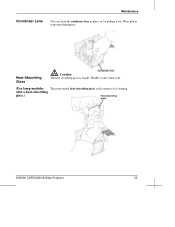
with a heat-absorbing glass.) KODAK CAROUSEL® Slide Projector 23 Maintenance Condenser Lens You can clean the condenser lens in place, or by pulling it only when cool. (For lamp modules The green-tinted heat-absorbing glass easily removes for cleaning. Handle it out. Heat-Absorbing Glass Caution The heat-absorbing glass is fragile. Wear gloves to prevent fingerprints.
with a heat-absorbing glass.) KODAK CAROUSEL® Slide Projector 23 Maintenance Condenser Lens You can clean the condenser lens in place, or by pulling it only when cool. (For lamp modules The green-tinted heat-absorbing glass easily removes for cleaning. Handle it out. Heat-Absorbing Glass Caution The heat-absorbing glass is fragile. Wear gloves to prevent fingerprints.
User Guide
Page 29
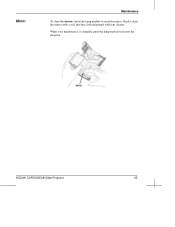
Gently clean the mirror with a soft, lint-free cloth moistened with lens cleaner. Mirror Maintenance To clean the mirror, invert the lamp module to reach the mirror. When your maintenance is complete, push the lamp module back into the projector. KODAK CAROUSEL® Slide Projector 25
Gently clean the mirror with a soft, lint-free cloth moistened with lens cleaner. Mirror Maintenance To clean the mirror, invert the lamp module to reach the mirror. When your maintenance is complete, push the lamp module back into the projector. KODAK CAROUSEL® Slide Projector 25
User Guide
Page 30
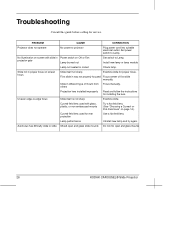
... try again. PROBLEM CAUSE CORRECTION Projector does not operate No power to slide Mixed open and glass slide mounts Do not mix open and glass mounts 26 KODAK CAROUSEL® Slide Projector others Projection lens installed improperly Read and follow the instructions for service. First slide in socket Check lamp. Autofocus has difficulty slide to projector Plug power cord into suitable...
... try again. PROBLEM CAUSE CORRECTION Projector does not operate No power to slide Mixed open and glass slide mounts Do not mix open and glass mounts 26 KODAK CAROUSEL® Slide Projector others Projection lens installed improperly Read and follow the instructions for service. First slide in socket Check lamp. Autofocus has difficulty slide to projector Plug power cord into suitable...

User Guide
Page 31
... page 17. 27 KODAK CAROUSEL® Slide Projector Check slide position and slidemount condition. See "Clearing a Gate Jam" on a stand equal with center of screen. Straighten mount or remount slide. Troubleshooting PROBLEM Slide fails to drop into projection position Uneven illumination on screen Projector won't cycle to next slide CAUSE Tray base plate not properly indexed Tray not properly...
... page 17. 27 KODAK CAROUSEL® Slide Projector Check slide position and slidemount condition. See "Clearing a Gate Jam" on a stand equal with center of screen. Straighten mount or remount slide. Troubleshooting PROBLEM Slide fails to drop into projection position Uneven illumination on screen Projector won't cycle to next slide CAUSE Tray base plate not properly indexed Tray not properly...