
User Manual
Page 2
... sleep mode. 2 www.kodak.com/go /ac cessories. Charge until the Battery Charging light turns off (up to the computer's USB port, not a Hub. USB AC adapter USB cable Battery Charging light Kodak EasyShare camera or printer docks (may be sold separately) Kodak 5V AC adapter, Kodak Li-Ion universal battery chargers (sold separately) Battery Charging light First, turn OFF the camera. Your computer Connect the USB cable to 3 Purchase hours). accessories: Charg3e.6 / 7.2Power Li-IBoAnTUTNEIRVYERCSHAALRGER www.kodak .com/go /easysharecenter ENGLISH ᕣ Charging the...
... sleep mode. 2 www.kodak.com/go /ac cessories. Charge until the Battery Charging light turns off (up to the computer's USB port, not a Hub. USB AC adapter USB cable Battery Charging light Kodak EasyShare camera or printer docks (may be sold separately) Kodak 5V AC adapter, Kodak Li-Ion universal battery chargers (sold separately) Battery Charging light First, turn OFF the camera. Your computer Connect the USB cable to 3 Purchase hours). accessories: Charg3e.6 / 7.2Power Li-IBoAnTUTNEIRVYERCSHAALRGER www.kodak .com/go /easysharecenter ENGLISH ᕣ Charging the...

User Manual
Page 4
Turn on /off: •Status icons •Framing grid Press the Shutter button completely down when the Ready light turns green. Press it completely down and release. To stop recording, press the Shutter button again. 4 www.kodak.com/go/easysharecenter ENGLISH ᕦ Taking a picture/video Pictures 1 2 Videos 1 2 3 3 Ready/Battery charging light T - Press to turn on Help button Press the Shutter button halfway to focus and set exposure.
Turn on /off: •Status icons •Framing grid Press the Shutter button completely down when the Ready light turns green. Press it completely down and release. To stop recording, press the Shutter button again. 4 www.kodak.com/go/easysharecenter ENGLISH ᕦ Taking a picture/video Pictures 1 2 Videos 1 2 3 3 Ready/Battery charging light T - Press to turn on Help button Press the Shutter button halfway to focus and set exposure.

User Manual
Page 5
play at 2X speed; press again for 4X. 1 Turn off the camera. 2 Connect the A/V cable. 3 Turn on the camera. 4 Review pictures/videos/slide shows on television. reverse at 2X speed; press again for 4X. Videos Play. Other display devices: •Your computer monitor •Devices equipped with a video input www.kodak.com/go/m1063support 5 adjust the volume. ENGLISH ᕧ Reviewing pictures/videos Camera Your television A/V cable (may be sold separately) 1 Press Review. 2 for previous/next picture/video. During playback: OK pause/unpause.
play at 2X speed; press again for 4X. 1 Turn off the camera. 2 Connect the A/V cable. 3 Turn on the camera. 4 Review pictures/videos/slide shows on television. reverse at 2X speed; press again for 4X. Videos Play. Other display devices: •Your computer monitor •Devices equipped with a video input www.kodak.com/go/m1063support 5 adjust the volume. ENGLISH ᕧ Reviewing pictures/videos Camera Your television A/V cable (may be sold separately) 1 Press Review. 2 for previous/next picture/video. During playback: OK pause/unpause.

User Manual
Page 6
ENGLISH ᕨ Transferring pictures/videos USB cable 1 Off Kodak EasyShare printer dock or camera dock (May be sold separately.) For dock compatibility, visit www.kodak.com/go /easysharecenter On 2 6 www.kodak.com/go /dockcompatibility. To purchase accessories, visit www.kodak.com/go/m1063accessories, To use an EasyShare dock, see its User guide.
ENGLISH ᕨ Transferring pictures/videos USB cable 1 Off Kodak EasyShare printer dock or camera dock (May be sold separately.) For dock compatibility, visit www.kodak.com/go /easysharecenter On 2 6 www.kodak.com/go /dockcompatibility. To purchase accessories, visit www.kodak.com/go/m1063accessories, To use an EasyShare dock, see its User guide.

User Manual
Page 7
... for: • the Extended user guide • interactive troubleshooting and repairs • interactive tutorials • FAQs • downloads • accessories • printing information • product registration www.kodak.com/go/m1063support 7 You have: • set up your camera • taken pictures • transferred pictures to your best pictures! Finish reading this book, so you can take and share your computer Keep learning! ENGLISH ᕩ Keep learning about...
... for: • the Extended user guide • interactive troubleshooting and repairs • interactive tutorials • FAQs • downloads • accessories • printing information • product registration www.kodak.com/go/m1063support 7 You have: • set up your camera • taken pictures • transferred pictures to your best pictures! Finish reading this book, so you can take and share your computer Keep learning! ENGLISH ᕩ Keep learning about...

User Manual
Page 11
....kodak.com/go/m1063support 11 Flash modes Auto Flash Flash fires When the lighting conditions require it. Off Never. Press the button repeatedly to the flash, then corrects red-eye in the fires again when the picture is in the LCD screen. Fill Every time you take a picture, regardless of the lighting conditions. Red- Use when the subject is taken. The current flash mode appears in shadow or is "backlit" (when the light...
....kodak.com/go/m1063support 11 Flash modes Auto Flash Flash fires When the lighting conditions require it. Off Never. Press the button repeatedly to the flash, then corrects red-eye in the fires again when the picture is in the LCD screen. Fill Every time you take a picture, regardless of the lighting conditions. Red- Use when the subject is taken. The current flash mode appears in shadow or is "backlit" (when the light...

User Manual
Page 12
... General picture taking-offers an excellent balance of image quality and ease of flash if possible. Close range. Distant scenery at night. Flash does not fire. Place the camera on a flat, steady surface or use . Use available light instead of use a tripod. Doing more with sound. (See page 4.) 12 www.kodak.com/go/easysharecenter SCN Scene High ISO ISO Video Point-and-shoot simplicity when taking modes Choose the mode...
... General picture taking-offers an excellent balance of image quality and ease of flash if possible. Close range. Distant scenery at night. Flash does not fire. Place the camera on a flat, steady surface or use . Use available light instead of use a tripod. Doing more with sound. (See page 4.) 12 www.kodak.com/go/easysharecenter SCN Scene High ISO ISO Video Point-and-shoot simplicity when taking modes Choose the mode...

User Manual
Page 13
If the mode description turns off Help www.kodak.com/go/m1063support 13 T Turn on Help Scroll up/down OK Turn off before you want to learn more with your camera Scene modes Choose a Scene mode-for great pictures in practically any situation! 1 Turn the Mode dial to Scene . 2 Press to choose a Scene mode. Using camera Help To better understand each menu option, use camera Help. Select an option you finish reading it, press OK. 3 Press OK to display Scene mode descriptions. Doing more about, then press the Zoom telephoto (T) button.
If the mode description turns off Help www.kodak.com/go/m1063support 13 T Turn on Help Scroll up/down OK Turn off before you want to learn more with your camera Scene modes Choose a Scene mode-for great pictures in practically any situation! 1 Turn the Mode dial to Scene . 2 Press to choose a Scene mode. Using camera Help To better understand each menu option, use camera Help. Select an option you finish reading it, press OK. 3 Press OK to display Scene mode descriptions. Doing more about, then press the Zoom telephoto (T) button.

User Manual
Page 14
... Delete button to re-take 3 pictures, the pictures are taking only 2 pictures, press the OK button to stitch them together. Take 2 or 3 pictures. Get 1 panoramic picture. 14 www.kodak.com/go/easysharecenter After you want to pan), then press the OK button. 3 Take the first picture. Doing more with your camera Taking panoramic pictures Use panorama to "stitch" up to 3 pictures into a panoramic scene. 1 Turn the Mode dial to SCN. 2 Press on the 4-way button to highlight Panorama...
... Delete button to re-take 3 pictures, the pictures are taking only 2 pictures, press the OK button to stitch them together. Take 2 or 3 pictures. Get 1 panoramic picture. 14 www.kodak.com/go/easysharecenter After you want to pan), then press the OK button. 3 Take the first picture. Doing more with your camera Taking panoramic pictures Use panorama to "stitch" up to 3 pictures into a panoramic scene. 1 Turn the Mode dial to SCN. 2 Press on the 4-way button to highlight Panorama...

User Manual
Page 15
Doing more with your camera Understanding picture-taking icons Self-timer/Burst Flash Camera mode Album name Framing marks Framing grid Picture size Date stamp Pictures/time remaining Storage location Zoom: Wide, Telephoto, Digital Focus zone Exposure metering White balance Long time exposure ISO speed Battery level Exposure compensation www.kodak.com/go/m1063support 15
Doing more with your camera Understanding picture-taking icons Self-timer/Burst Flash Camera mode Album name Framing marks Framing grid Picture size Date stamp Pictures/time remaining Storage location Zoom: Wide, Telephoto, Digital Focus zone Exposure metering White balance Long time exposure ISO speed Battery level Exposure compensation www.kodak.com/go/m1063support 15
User Manual
Page 17
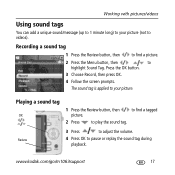
.... Working with pictures/videos Using sound tags You can add a unique sound/message (up to 1 minute long) to your picture (not to your picture. to find a picture. 2 Press the Menu button, then to pause or replay the sound tag during playback. The sound tag is applied to videos). Playing a sound tag OK 1 Press the Review button, then picture. Press the OK button. 3 Choose Record, then press OK. 4 Follow the screen prompts. Review 3 Press to adjust the volume...
.... Working with pictures/videos Using sound tags You can add a unique sound/message (up to 1 minute long) to your picture (not to your picture. to find a picture. 2 Press the Menu button, then to pause or replay the sound tag during playback. The sound tag is applied to videos). Playing a sound tag OK 1 Press the Review button, then picture. Press the OK button. 3 Choose Record, then press OK. 4 Follow the screen prompts. Review 3 Press to adjust the volume...

User Manual
Page 18
... to replace the original picture or to single-picture view. Working with pictures/videos Viewing thumbnails (multi-up) 1 Press the Review button. 2 Press the Zoom Wide Angle (W) button to change from single-picture view to multi-up thumbnails. 3 Press Telephoto (T) to return to save the enhanced picture as a new one. Using Kodak Perfect Touch technology Kodak Perfect Touch technology helps ensure better, brighter pictures. 1 Press the Review button, then for previous/next picture. 2 Press the Menu button.
... to replace the original picture or to single-picture view. Working with pictures/videos Viewing thumbnails (multi-up) 1 Press the Review button. 2 Press the Zoom Wide Angle (W) button to change from single-picture view to multi-up thumbnails. 3 Press Telephoto (T) to return to save the enhanced picture as a new one. Using Kodak Perfect Touch technology Kodak Perfect Touch technology helps ensure better, brighter pictures. 1 Press the Review button, then for previous/next picture. 2 Press the Menu button.
User Manual
Page 19
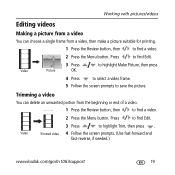
... find a video. 2 Press the Menu button. Trimming a video You can choose a single frame from the beginning or end of a video. 1 Press the Review button, then to save the picture. Video Trimmed video 4 Follow the screen prompts. (Use fast-forward and fast-reverse, if needed.) www.kodak.com/go/m1063support 19 Working with pictures/videos Editing videos Making a picture from a video You can delete an unwanted portion from a video, then make a picture suitable for printing. 1 Press the Review button, then...
... find a video. 2 Press the Menu button. Trimming a video You can choose a single frame from the beginning or end of a video. 1 Press the Review button, then to save the picture. Video Trimmed video 4 Follow the screen prompts. (Use fast-forward and fast-reverse, if needed.) www.kodak.com/go/m1063support 19 Working with pictures/videos Editing videos Making a picture from a video You can delete an unwanted portion from a video, then make a picture suitable for printing. 1 Press the Review button, then...

User Manual
Page 20
... find a video. 2 Press the Menu button. to highlight Video 4-, 9-, or 3 Press to highlight Video Action Print, then 16-up picture, suitable for a 4 x 6-inch (10 x 15 cm) print. 1 Press the Review button, then to highlight Begin Show, then press the OK button. Running a slide show Use Slide Show to display your pictures/videos on the camera, a television, or any device equipped with pictures/videos Making a video action print From a video, you can make a 4-, 9-, or...
... find a video. 2 Press the Menu button. to highlight Video 4-, 9-, or 3 Press to highlight Video Action Print, then 16-up picture, suitable for a 4 x 6-inch (10 x 15 cm) print. 1 Press the Review button, then to highlight Begin Show, then press the OK button. Running a slide show Use Slide Show to display your pictures/videos on the camera, a television, or any device equipped with pictures/videos Making a video action print From a video, you can make a 4-, 9-, or...
User Manual
Page 21
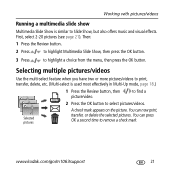
Working with pictures/videos Running a multimedia slide show Multimedia Slide Show is used most effectively in Multi-Up mode, page 18.) 1 Press the Review button, then picture/video. First, select 2-20 pictures (see page 21). Selected pictures A check mark appears on the picture. Selecting multiple pictures/videos Use the multi-select feature when you have two or more pictures/videos to print, transfer, delete, etc. (Multi-select is similar to remove a check mark...
Working with pictures/videos Running a multimedia slide show Multimedia Slide Show is used most effectively in Multi-Up mode, page 18.) 1 Press the Review button, then picture/video. First, select 2-20 pictures (see page 21). Selected pictures A check mark appears on the picture. Selecting multiple pictures/videos Use the multi-select feature when you have two or more pictures/videos to print, transfer, delete, etc. (Multi-select is similar to remove a check mark...
User Manual
Page 22
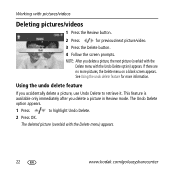
... you delete a picture, the next picture (overlaid with the Delete menu with the Undo Delete option) appears. NOTE: After you delete a picture in Review mode. Working with pictures/videos Deleting pictures/videos 1 Press the Review button. 2 Press for more pictures, the Delete menu on a blank screen appears. The Undo Delete option appears. 1 Press to retrieve it. The deleted picture (overlaid with the Delete menu) appears. 22 www.kodak.com/go/easysharecenter Using the undo delete feature If you accidentally delete a picture, use Undo Delete...
... you delete a picture, the next picture (overlaid with the Delete menu with the Undo Delete option) appears. NOTE: After you delete a picture in Review mode. Working with pictures/videos Deleting pictures/videos 1 Press the Review button. 2 Press for more pictures, the Delete menu on a blank screen appears. The Undo Delete option appears. 1 Press to retrieve it. The deleted picture (overlaid with the Delete menu) appears. 22 www.kodak.com/go/easysharecenter Using the undo delete feature If you accidentally delete a picture, use Undo Delete...

User Manual
Page 23
...: Formatting a card deletes all pictures and videos, including protected files. rechargeable digital camera battery KLIC-7001. I Insert a card into the slot, then push to seat. I Install new battery. Battery does not I Reformat the card. www.kodak.com/go /m1063support, and select Interactive Troubleshooting & Repairs. I See page 2 or visit www.kodak.com/go/usbcharging. excessive use of the following activities that quickly deplete battery power: with Kodak Li-Ion reviewing pictures/videos on /off. 3 Solving camera problems For support, visit www.kodak...
...: Formatting a card deletes all pictures and videos, including protected files. rechargeable digital camera battery KLIC-7001. I Insert a card into the slot, then push to seat. I Install new battery. Battery does not I Reformat the card. www.kodak.com/go /m1063support, and select Interactive Troubleshooting & Repairs. I See page 2 or visit www.kodak.com/go/usbcharging. excessive use of the following activities that quickly deplete battery power: with Kodak Li-Ion reviewing pictures/videos on /off. 3 Solving camera problems For support, visit www.kodak...

User Manual
Page 24
... indoor use of the airline. I Remove the battery when the product is not recommended by the battery manufacturer. I Keep batteries out of the reach of time. I Use only a USB-certified computer. Kodak AC adapters and battery chargers are no user-serviceable parts inside the product, contact Kodak customer support. For additional health-related information, contact your local health provider. I Dispose of batteries according to avoid risk of controls, adjustments, or...
... indoor use of the airline. I Remove the battery when the product is not recommended by the battery manufacturer. I Keep batteries out of the reach of time. I Use only a USB-certified computer. Kodak AC adapters and battery chargers are no user-serviceable parts inside the product, contact Kodak customer support. For additional health-related information, contact your local health provider. I Dispose of batteries according to avoid risk of controls, adjustments, or...

User Manual
Page 25
... any necessary adjustments and/or replacement parts. Wipe gently with a remanufactured Product. Retain the original dated sales receipt. In the US, visit the Electronics Industry Alliance Web site at your local authorities. Appendix Upgrading your software and firmware Download the latest versions of the software included on the Kodak EasyShare software CD and the camera firmware (the software that runs on the lens or LCD to remove dust...
... any necessary adjustments and/or replacement parts. Wipe gently with a remanufactured Product. Retain the original dated sales receipt. In the US, visit the Electronics Industry Alliance Web site at your local authorities. Appendix Upgrading your software and firmware Download the latest versions of the software included on the Kodak EasyShare software CD and the camera firmware (the software that runs on the lens or LCD to remove dust...

User Manual
Page 27
...in order to provide reasonable protection against harmful interference in accordance with the installation of the FCC Rules. Any changes or modifications not expressly approved by the party responsible for compliance could void the user's authority to Part 15 of the product, ... the interference by turning the equipment off and on, the user is connected; 4) consult the dealer or an experienced radio/TV technician for a Class B digital device, pursuant to operate the equipment. FCC compliance and advisory Appendix Kodak EasyShare M1063/MD1063/MX1063 digital camera This equipment has...
...in order to provide reasonable protection against harmful interference in accordance with the installation of the FCC Rules. Any changes or modifications not expressly approved by the party responsible for compliance could void the user's authority to Part 15 of the product, ... the interference by turning the equipment off and on, the user is connected; 4) consult the dealer or an experienced radio/TV technician for a Class B digital device, pursuant to operate the equipment. FCC compliance and advisory Appendix Kodak EasyShare M1063/MD1063/MX1063 digital camera This equipment has...


