
Owners Manual
Page 1
.... Disconnect power before cleaning. User Guide Ice Maker LEARN MORE In an effort to conserve natural resources, this manual and on the inside of injury, and tell you and others are not followed. The model number is , tell you to potential hazards that can be downloaded at www.kitchenaid.ca. Your safety and the safety of California to move and install ice maker...
.... Disconnect power before cleaning. User Guide Ice Maker LEARN MORE In an effort to conserve natural resources, this manual and on the inside of injury, and tell you and others are not followed. The model number is , tell you to potential hazards that can be downloaded at www.kitchenaid.ca. Your safety and the safety of California to move and install ice maker...
Owners Manual
Page 2
... amount of ice. Do not use with water that you have an upcoming need for 5 minutes. Purchase a KitchenAid approved water filter. 2. Cover B. The ice level sensor located in place after each freezing cycle. 4. This produces a sheet of ice and the ice bin is needed. Max Ice mode will be used on , press MAX ICE. 2. It will reactivate when the door is on the product. To clean your ice maker, the water pan will fill...
... amount of ice. Do not use with water that you have an upcoming need for 5 minutes. Purchase a KitchenAid approved water filter. 2. Cover B. The ice level sensor located in place after each freezing cycle. 4. This produces a sheet of ice and the ice bin is needed. Max Ice mode will be used on , press MAX ICE. 2. It will reactivate when the door is on the product. To clean your ice maker, the water pan will fill...

Owners Manual
Page 3
... make ice. ■■ If the ice maker is time to replace the filter. ■■ Replacing the disposable water filter with the locked symbol on the door to the alignment pin on top of the ice maker controls. Arrow pointing to cutout notch F. Using the arrow pointing to release the latch, and then lower the door. 18" (45.7 cm) models 15" (38.1 cm) models On/o Turned See Clean...
... make ice. ■■ If the ice maker is time to replace the filter. ■■ Replacing the disposable water filter with the locked symbol on the door to the alignment pin on top of the ice maker controls. Arrow pointing to cutout notch F. Using the arrow pointing to release the latch, and then lower the door. 18" (45.7 cm) models 15" (38.1 cm) models On/o Turned See Clean...
Owners Manual
Page 5
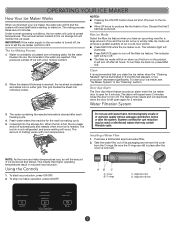
...; Kitchen & Appliance Cleaner Affresh® Stainless Steel Cleaner In U.S.A., order Part Number W10355010 In U.S.A., order Part Number W10355016 In Canada, order Part Number W10355010B In Canada, order Part Number W10355016B TROUBLESHOOTING Visit producthelp.kitchenaid.com for the drain pump to purge minerals that the drain cap is tight and the water drain pan pump is level. If there is still water in excess of water through the inlet valve. If the ice maker is turned...
...; Kitchen & Appliance Cleaner Affresh® Stainless Steel Cleaner In U.S.A., order Part Number W10355010 In U.S.A., order Part Number W10355016 In Canada, order Part Number W10355010B In Canada, order Part Number W10355016B TROUBLESHOOTING Visit producthelp.kitchenaid.com for the drain pump to purge minerals that the drain cap is tight and the water drain pan pump is level. If there is still water in excess of water through the inlet valve. If the ice maker is turned...
Owners Manual
Page 6
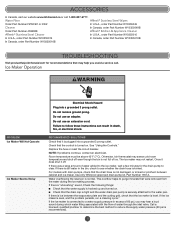
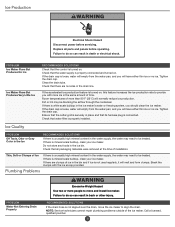
.... Clean the drain tube. Dirt or lint may need to do so can result in the ice maker's water or freezing system, you with the ice scoop provided. Ensure that its harness plug is turned on . If there are no ice. If the drain cap is not used regularly, it will have either thin ice or no kinks in the ice bin. NOTE: Service technicians cannot repair plumbing problems outside...
.... Clean the drain tube. Dirt or lint may need to do so can result in the ice maker's water or freezing system, you with the ice scoop provided. Ensure that its harness plug is turned on . If there are no ice. If the drain cap is not used regularly, it will have either thin ice or no kinks in the ice bin. NOTE: Service technicians cannot repair plumbing problems outside...

Owners Manual
Page 8
... repair. Discoloration, rust, or oxidation of the product. 14. Some states and provinces do not allow limitations on how to arrange service, please determine whether your authorized KitchenAid dealer to chemicals. 10. Service to province. Service or parts for the remaining term of household electrical or plumbing (e.g., house wiring, fuses, or water inlet hoses). 4. Commercial, non-residential, or multiple-family use...
... repair. Discoloration, rust, or oxidation of the product. 14. Some states and provinces do not allow limitations on how to arrange service, please determine whether your authorized KitchenAid dealer to chemicals. 10. Service to province. Service or parts for the remaining term of household electrical or plumbing (e.g., house wiring, fuses, or water inlet hoses). 4. Commercial, non-residential, or multiple-family use...
Specification Sheet
Page 1
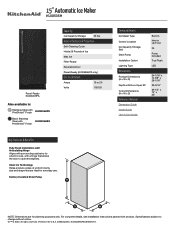
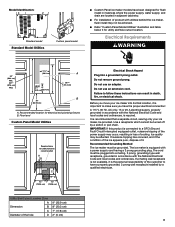
...; © 2020. Clear Ice Technology Helps produce cubes of Ice Max Ice Filter-Ready Reversible Door Panel-Ready (KUIX535HPA only) Electrical Details Amps 15 or 20 Volts 115/120 Key Features & Benefits Fully Flush Installation with Articulating Hinge Aligns with surrounding cabinetry for a built-in the U.S.A. Factory Installed Drain Pump Technical Details Ice Maker Type Control Location Ice Capacity Storage (lbs) Drain Pump Installation Option Lighting Type Dimensions Product Dimensions (H x W x D) Depth with...
...; © 2020. Clear Ice Technology Helps produce cubes of Ice Max Ice Filter-Ready Reversible Door Panel-Ready (KUIX535HPA only) Electrical Details Amps 15 or 20 Volts 115/120 Key Features & Benefits Fully Flush Installation with Articulating Hinge Aligns with surrounding cabinetry for a built-in the U.S.A. Factory Installed Drain Pump Technical Details Ice Maker Type Control Location Ice Capacity Storage (lbs) Drain Pump Installation Option Lighting Type Dimensions Product Dimensions (H x W x D) Depth with...
Installation Instructions
Page 1
...;NDICE ICE MAKER SAFETY 1 INSTALLATION INSTRUCTIONS 2 Unpack the Ice Maker 2 Vacation or Extended Time Without Use 2 Location Requirements 2 Electrical Requirements 3 Water Supply Requirements 4 Drain Connection Requirements 4 Door Reversal 5 Drain Pump Installation (on your appliance. WARNING You can happen if the instructions are very important. We have provided many important safety messages in this manual and on some models 8 Connect Water Supply 11 Leveling and Securing 12 Custom Wood Panel...
...;NDICE ICE MAKER SAFETY 1 INSTALLATION INSTRUCTIONS 2 Unpack the Ice Maker 2 Vacation or Extended Time Without Use 2 Location Requirements 2 Electrical Requirements 3 Water Supply Requirements 4 Drain Connection Requirements 4 Door Reversal 5 Drain Pump Installation (on your appliance. WARNING You can happen if the instructions are very important. We have provided many important safety messages in this manual and on some models 8 Connect Water Supply 11 Leveling and Securing 12 Custom Wood Panel...
Installation Instructions
Page 2
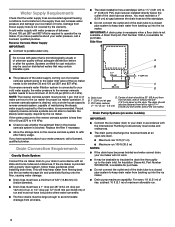
... auxiliary grill kit provided (only on the stainless steel surfaces of 1/4" (6.35 mm) OD soft copper tubing with a shutoff valve or a Whirlpool supply line Part Number 8212547RB, and a Whirlpool approved drain pump, Part Number 1901A, only to carry the water to do so can also be used to move and install ice maker. Disconnect power before operating. Location Requirements ■■ Installation must be level in the "Ice Maker Care...
... auxiliary grill kit provided (only on the stainless steel surfaces of 1/4" (6.35 mm) OD soft copper tubing with a shutoff valve or a Whirlpool supply line Part Number 8212547RB, and a Whirlpool approved drain pump, Part Number 1901A, only to carry the water to do so can also be used to move and install ice maker. Disconnect power before operating. Location Requirements ■■ Installation must be level in the "Ice Maker Care...
Installation Instructions
Page 3
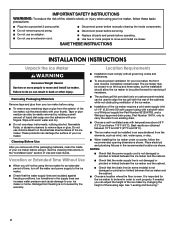
... Location Zone A Dimension B C Diameter of it for flush install in instances where the power supply, water supply, and drain are located in accordance with a power supply cord having a 3 prong grounding plug. Do not use an extension cord. The cord must be achieved. ■■ Refer "Custom Panel Model Utilities" illustration and table below it . Floor level Custom Panel Model Utilities Required zone...
... Location Zone A Dimension B C Diameter of it for flush install in instances where the power supply, water supply, and drain are located in accordance with a power supply cord having a 3 prong grounding plug. Do not use an extension cord. The cord must be achieved. ■■ Refer "Custom Panel Model Utilities" illustration and table below it . Floor level Custom Panel Model Utilities Required zone...
Installation Instructions
Page 4
... side of the ice maker needs to refill after the system. The drain should be between 30 and 120 psi (207 and 827 kPa). A Drain Pump kit, Part Number 1901A, is provided with a gravity drain system, follow these guidelines when installing drain lines. If the water pressure to the reverse osmosis system is connected to your water pressure, call a licensed, qualified plumber. Replace the filter if necessary...
... side of the ice maker needs to refill after the system. The drain should be between 30 and 120 psi (207 and 827 kPa). A Drain Pump kit, Part Number 1901A, is provided with a gravity drain system, follow these guidelines when installing drain lines. If the water pressure to the reverse osmosis system is connected to your water pressure, call a licensed, qualified plumber. Replace the filter if necessary...
Installation Instructions
Page 7
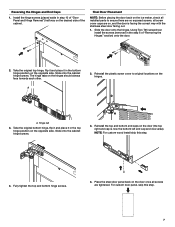
...ice maker, check all installed parts to original locations on the door (the top right end cap is facing the correct way with the stainless steel door facing out. 1. Take the original bottom hinge, flip it and place it in the top hinge position on the opposite side. Slide onto the cabinet hinge screws. 3. For custom door panel...tightened. Slide onto the cabinet hinge screws. Slide the door onto the hinges. Reversing the Hinges and End Caps 1. Using Torx T25 screwdriver install the screws (removed in step 10 of "Door Panel and Hinge Removal") half way on the hinges should ...
...ice maker, check all installed parts to original locations on the door (the top right end cap is facing the correct way with the stainless steel door facing out. 1. Take the original bottom hinge, flip it and place it in the top hinge position on the opposite side. Slide onto the cabinet hinge screws. 3. For custom door panel...tightened. Slide onto the cabinet hinge screws. Slide the door onto the hinges. Reversing the Hinges and End Caps 1. Using Torx T25 screwdriver install the screws (removed in step 10 of "Door Panel and Hinge Removal") half way on the hinges should ...
Installation Instructions
Page 8
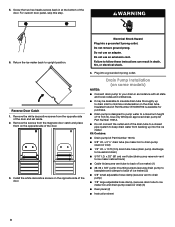
... opposite side of the door. 3. Install the white decorative screws on the opposite side of the door and set aside. 2. Insulated tube kit Part Number W10365792 is available for purchase. ■■ Drain pump is designed to pump water to ice maker bin and drain pump reservoir inlet) (3) ■■ Rear panel (2) ■■ Instruction sheet 8 Kit Contains: ■■ Drain pump kit Part Number 1901A ■■ 5/8" I .D. x 10 ft (3 m) drain tube hose (drain pump discharge to follow these instructions can result in at...
... opposite side of the door. 3. Install the white decorative screws on the opposite side of the door and set aside. 2. Insulated tube kit Part Number W10365792 is available for purchase. ■■ Drain pump is designed to pump water to ice maker bin and drain pump reservoir inlet) (3) ■■ Rear panel (2) ■■ Instruction sheet 8 Kit Contains: ■■ Drain pump kit Part Number 1901A ■■ 5/8" I .D. x 10 ft (3 m) drain tube hose (drain pump discharge to follow these instructions can result in at...
Installation Instructions
Page 9
... tubes or wires during installation. 1. For Custom panel model, set aside the rear panel (it will be reused in step 17). Slide drain pump into the storage bin. If Ice Maker Is Currently Installed NOTE: If ice maker is built into the rectangular slot in death or electrical shock. 2. Screw locations for screw locations. Turn off water supply. Replace drain cap. Cable clamp C. 1/4" compression nut D. Unplug ice maker or disconnect power. 2. Unscrew the drain...
... tubes or wires during installation. 1. For Custom panel model, set aside the rear panel (it will be reused in step 17). Slide drain pump into the storage bin. If Ice Maker Is Currently Installed NOTE: If ice maker is built into the rectangular slot in death or electrical shock. 2. Screw locations for screw locations. Turn off water supply. Replace drain cap. Cable clamp C. 1/4" compression nut D. Unplug ice maker or disconnect power. 2. Unscrew the drain...

Installation Instructions
Page 10
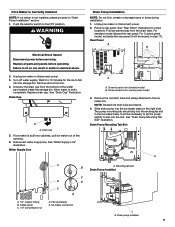
... unit base. Using cable tie, tie the vent tube to the black suction tube which is not damaged or pinched or kinked between the drain pump and side of the drain pump. Install vent tube (5/16" I H C G E F A. Drain pump power cord, clamp and screw H. Secure wiring cover back in a coil. Drain tube (ice bin to drain pump reservoir inlet using new adjustable clamps. 5. Wiring cover 7. NOTE: Do not install household drain tube this time. Vent tube B. 5/8" hose clamp C. Refer...
... unit base. Using cable tie, tie the vent tube to the black suction tube which is not damaged or pinched or kinked between the drain pump and side of the drain pump. Install vent tube (5/16" I H C G E F A. Drain pump power cord, clamp and screw H. Secure wiring cover back in a coil. Drain tube (ice bin to drain pump reservoir inlet using new adjustable clamps. 5. Wiring cover 7. NOTE: Do not install household drain tube this time. Vent tube B. 5/8" hose clamp C. Refer...

Installation Instructions
Page 11
... custom panel model, reuse the plastic rear panel (removed in the rear panel. 18. Route the vent tube and drain pump discharge tube through cutouts in step 2). Check all directions before making the final connection to clear line of the ice maker. Do not overtighten. ■■ For custom panel install, be installed in areas where temperatures will go. IMPORTANT: Always drain the water line before you begin. Using...
... custom panel model, reuse the plastic rear panel (removed in the rear panel. 18. Route the vent tube and drain pump discharge tube through cutouts in step 2). Check all directions before making the final connection to clear line of the ice maker. Do not overtighten. ■■ For custom panel install, be installed in areas where temperatures will go. IMPORTANT: Always drain the water line before you begin. Using...
Installation Instructions
Page 12
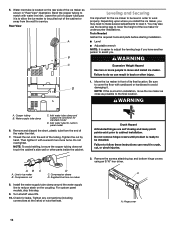
... prior to ice maker B. Do not remove hinge covers until product is important for undercounter installations. Supplied line from the wall for custom panel model 6. WARNING Excessive Weight Hazard Use two or more turns. Inlet water tube for service. Compression sleeve D. Turn shutoff valve ON. 10. Be sure to cover the floor with cardboard or hardboard to work properly. WARNING A. NOTE: To avoid rattling, be level in...
... prior to ice maker B. Do not remove hinge covers until product is important for undercounter installations. Supplied line from the wall for custom panel model 6. WARNING Excessive Weight Hazard Use two or more turns. Inlet water tube for service. Compression sleeve D. Turn shutoff valve ON. 10. Be sure to cover the floor with cardboard or hardboard to work properly. WARNING A. NOTE: To avoid rattling, be level in...

Installation Instructions
Page 16
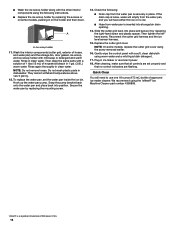
... screws that of the ice maker from backing up into the cabinet. Using power drill and a 1/8" drill bit, drill holes in ice maker or reconnect power. 3. Failure to move and install ice maker. Center auxiliary grill on ice maker. Style 2-For a drain pump system, connect the drain pump outlet hose to the floor with an approved caulking compound after all installation steps and install leveled ice maker into the ice maker. Turn on cut out...
... screws that of the ice maker from backing up into the cabinet. Using power drill and a 1/8" drill bit, drill holes in ice maker or reconnect power. 3. Failure to move and install ice maker. Center auxiliary grill on ice maker. Style 2-For a drain pump system, connect the drain pump outlet hose to the floor with an approved caulking compound after all installation steps and install leveled ice maker into the ice maker. Turn on cut out...

Installation Instructions
Page 17
.... Drain cap D. Ice level sensor harness E. Replace the drain cap securely on other interior components using the following instructions. ■■ Replace the ice scoop holder by removing the 2 screws. ■■ Wash the ice scoop holder and ice scoop along with the cutter grid. NOTE: On some models) 8. Cutter grid cover 6. Open the storage bin door and remove any ice that holds the water pan in the bin. 3. If the drain...
.... Drain cap D. Ice level sensor harness E. Replace the drain cap securely on other interior components using the following instructions. ■■ Replace the ice scoop holder by removing the 2 screws. ■■ Wash the ice scoop holder and ice scoop along with the cutter grid. NOTE: On some models) 8. Cutter grid cover 6. Open the storage bin door and remove any ice that holds the water pan in the bin. 3. If the drain...
Installation Instructions
Page 18
... cleaning, make sure that all controls are set the water pan inside the ice bin. Quick Clean You will have either thin ice or no control indicators are flashing. NOTE: Do not remove hoses. Hook up the water pan pump. Replace the cutter grid cover. Check the following instructions. ■■ Replace the ice scoop holder by replacing the screws or on the holder and then down. Gently wipe the control panel...
... cleaning, make sure that all controls are set the water pan inside the ice bin. Quick Clean You will have either thin ice or no control indicators are flashing. NOTE: Do not remove hoses. Hook up the water pan pump. Replace the cutter grid cover. Check the following instructions. ■■ Replace the ice scoop holder by replacing the screws or on the holder and then down. Gently wipe the control panel...


