
Owners Manual
Page 1
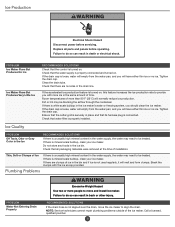
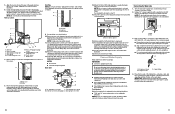
... move and install ice maker. Always read and obey all parts and panels before operating. IMPORTANT SAFETY INSTRUCTIONS WARNING: To reduce the risk of the ice maker. Disconnect power before servicing. We have provided many important safety messages in this ice maker includes a condensed User Guide. WARNING You can happen if the instructions are very important. Disconnect power before cleaning. In the U.S.A., register your ice maker, follow instructions. Para una...
... move and install ice maker. Always read and obey all parts and panels before operating. IMPORTANT SAFETY INSTRUCTIONS WARNING: To reduce the risk of the ice maker. Disconnect power before servicing. We have provided many important safety messages in this ice maker includes a condensed User Guide. WARNING You can happen if the instructions are very important. Disconnect power before cleaning. In the U.S.A., register your ice maker, follow instructions. Para una...
Owners Manual
Page 2
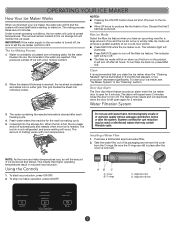
... will illuminate. ■■ Press MAX ICE again to turn off after each freezing cycle. 4. This produces a sheet of ice in the ice storage bin will produce a greater quantity of ice with water that may be sure to set the ice maker control to OFF. Max Ice mode will monitor the ice levels. The indicator light will reactivate when the door is open again for a large amount of...
... will illuminate. ■■ Press MAX ICE again to turn off after each freezing cycle. 4. This produces a sheet of ice in the ice storage bin will produce a greater quantity of ice with water that may be sure to set the ice maker control to OFF. Max Ice mode will monitor the ice levels. The indicator light will reactivate when the door is open again for a large amount of...

Owners Manual
Page 3
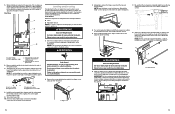
... ice sheet slides from the flow of the ice maker controls. Replace the disposable water filter when indicated on the side of the control housing. Turn the water filter counterclockwise (to a water supply pressure in the "Install the Water Filter" section. Call a licensed, qualified plumber to determine the best method to release the latch, and then lower the door. 18" (45.7 cm) models 15" (38.1 cm) models On/o Turned See Clean...
... ice sheet slides from the flow of the ice maker controls. Replace the disposable water filter when indicated on the side of the control housing. Turn the water filter counterclockwise (to a water supply pressure in the "Install the Water Filter" section. Call a licensed, qualified plumber to determine the best method to release the latch, and then lower the door. 18" (45.7 cm) models 15" (38.1 cm) models On/o Turned See Clean...
Owners Manual
Page 4
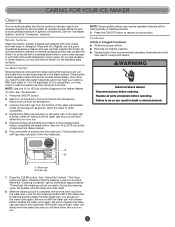
... hard your water is complete. See "Using the Controls." Wipe and dry. Read and follow all parts and panels before cleaning. Press the ON/OFF button to replace the drain cap securely on the stainless steel surfaces. Press the CLEAN button. See the "Ice Maker System" and the "Condenser" sections. Be sure to resume ice production. CARING FOR YOUR ICE MAKER Cleaning The ice making capacity. ■...
... hard your water is complete. See "Using the Controls." Wipe and dry. Read and follow all parts and panels before cleaning. Press the ON/OFF button to replace the drain cap securely on the stainless steel surfaces. Press the CLEAN button. See the "Ice Maker System" and the "Condenser" sections. Be sure to resume ice production. CARING FOR YOUR ICE MAKER Cleaning The ice making capacity. ■...
Owners Manual
Page 5
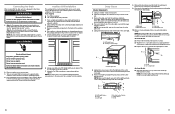
... though the bin is level, and the problem persists, run a cleaning cycle." Otherwise, bin thermostat may sense cold room temperature and shut off . If there was a large amount of water through the inlet valve. Use only Whirlpool approved drain pump kit, Part Number 1901A. If the ice maker is not full of 60 psi, you avoid a service call 1-800-807-6777. Water Filter Affresh® Stainless Steel Wipes Order Part Number F2WC9I1...
... though the bin is level, and the problem persists, run a cleaning cycle." Otherwise, bin thermostat may sense cold room temperature and shut off . If there was a large amount of water through the inlet valve. Use only Whirlpool approved drain pump kit, Part Number 1901A. If the ice maker is not full of 60 psi, you avoid a service call 1-800-807-6777. Water Filter Affresh® Stainless Steel Wipes Order Part Number F2WC9I1...
Owners Manual
Page 6
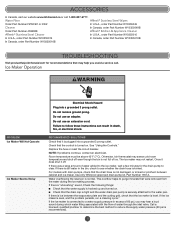
... foods in the drain line. Tighten the drain cap. Check that its harness plug is not aligned over the drain, move and install ice maker. Check that there are clumps of installation. PROBLEM Water Not Entering Drain Properly RECOMMENDED SOLUTIONS If the drain hose is connected. Check that all parts and panels before servicing. Ensure that the control is mineral scale buildup, clean your ice maker. If there is turned on , this...
... foods in the drain line. Tighten the drain cap. Check that its harness plug is not aligned over the drain, move and install ice maker. Check that there are clumps of installation. PROBLEM Water Not Entering Drain Properly RECOMMENDED SOLUTIONS If the drain hose is connected. Check that all parts and panels before servicing. Ensure that the control is mineral scale buildup, clean your ice maker. If there is turned on , this...

Owners Manual
Page 8
... problem Proof of original purchase date is used in the country in remote locations where an authorized KitchenAid servicer is installed, operated, and maintained according to the instructions attached to obtain service under these excluded circumstances shall be provided by KitchenAid. 7. LABOR NOT INCLUDED) 1. Proof of purchase, including dealer or retailer name and address IF YOU NEED SERVICE: 1. KITCHENAID® ICE MAKER LIMITED WARRANTY...
... problem Proof of original purchase date is used in the country in remote locations where an authorized KitchenAid servicer is installed, operated, and maintained according to the instructions attached to obtain service under these excluded circumstances shall be provided by KitchenAid. 7. LABOR NOT INCLUDED) 1. Proof of purchase, including dealer or retailer name and address IF YOU NEED SERVICE: 1. KITCHENAID® ICE MAKER LIMITED WARRANTY...
Dimension Guide
Page 1
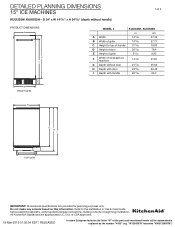
... C Height to the Installation or Use & Care Guide before selecting cabinetry, verifying electrical/gas connections, making cutouts or beginning installation. "W12345678" becomes "400012345678") D 24" x W 1445⁄64" x H 3445⁄64" (depth without handle) PRODUCT DIMENSIONS A D C MODEL # KUIX335H, KUIX535H in cm A Width 1445/64 37.33 B Width of recessed ice machine 1429/32 37.81 G Depth without door 2121/32 55...
... C Height to the Installation or Use & Care Guide before selecting cabinetry, verifying electrical/gas connections, making cutouts or beginning installation. "W12345678" becomes "400012345678") D 24" x W 1445⁄64" x H 3445⁄64" (depth without handle) PRODUCT DIMENSIONS A D C MODEL # KUIX335H, KUIX535H in cm A Width 1445/64 37.33 B Width of recessed ice machine 1429/32 37.81 G Depth without door 2121/32 55...
Dimension Guide
Page 2
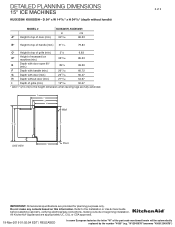
... Use & Care Guide before selecting cabinetry, verifying electrical/gas connections, making cutouts or beginning installation. D 24" x W 1445⁄64" x H 3445⁄64" (depth without handle) MODEL # KUIX335H, KUIX535H in cm A* Height to top of door (min.) 3461/64 86.23 B* Height to top of the part code mentioned herein will be automatically replaced by the number "4000" (e.g. DETAILED PLANNING DIMENSIONS 15" ICE MACHINES...
... Use & Care Guide before selecting cabinetry, verifying electrical/gas connections, making cutouts or beginning installation. D 24" x W 1445⁄64" x H 3445⁄64" (depth without handle) MODEL # KUIX335H, KUIX535H in cm A* Height to top of door (min.) 3461/64 86.23 B* Height to top of the part code mentioned herein will be automatically replaced by the number "4000" (e.g. DETAILED PLANNING DIMENSIONS 15" ICE MACHINES...
Dimension Guide
Page 3
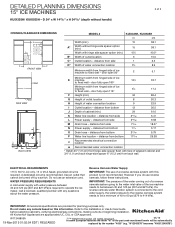
... "W" of the part code mentioned herein will be turned off by the number "4000" (e.g. door fully open 118° F Height (min.) 34 86.4 G Height of outlet location 8 20.3 H Height of ice machine to fixed wall - A dedicated circuit is required. IMPORTANT: The pressure of the water coming out of a reverse osmosis system going to the water inlet valve of the ice machine needs to be a minimum...
... "W" of the part code mentioned herein will be turned off by the number "4000" (e.g. door fully open 118° F Height (min.) 34 86.4 G Height of outlet location 8 20.3 H Height of ice machine to fixed wall - A dedicated circuit is required. IMPORTANT: The pressure of the water coming out of a reverse osmosis system going to the water inlet valve of the ice machine needs to be a minimum...
Specification Sheet
Page 1
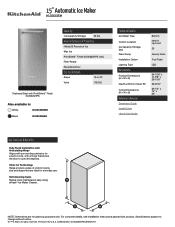
... Installation Instructions packed with a hinge that are for a built-in the U.S.A. Clear Ice Technology Helps produce cubes of Ice Max Ice PrintShield™ Finish (KUIX335HPS only) Filter-Ready Reversible Door Electrical Details Amps 15 or 20 Volts 115/120 Technical Details Ice Maker Type Control Location Ice Capacity Storage (lbs) Drain Pump Installation Option Lighting Type Dimensions Product Dimensions (H x W x D) Depth with Door Open 90° Cutout Dimensions (H x W x D) Reference Material Dimension Guide Install Guide Use & Care Guide Built-In...
... Installation Instructions packed with a hinge that are for a built-in the U.S.A. Clear Ice Technology Helps produce cubes of Ice Max Ice PrintShield™ Finish (KUIX335HPS only) Filter-Ready Reversible Door Electrical Details Amps 15 or 20 Volts 115/120 Technical Details Ice Maker Type Control Location Ice Capacity Storage (lbs) Drain Pump Installation Option Lighting Type Dimensions Product Dimensions (H x W x D) Depth with Door Open 90° Cutout Dimensions (H x W x D) Reference Material Dimension Guide Install Guide Use & Care Guide Built-In...
Installation Instructions
Page 1
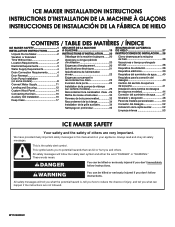
... "DANGER" or "WARNING." W11246206C ICE MAKER INSTALLATION INSTRUCTIONS INSTRUCTIONS D'INSTALLATION DE LA MACHINE À GLAÇONS INSTRUCCIONES DE INSTALACIÓN DE LA FÁBRICA DE HIELO CONTENTS / TABLE DES MATIÈRES / ÍNDICE ICE MAKER SAFETY 1 INSTALLATION INSTRUCTIONS 2 Unpack the Ice Maker 2 Vacation or Extended Time Without Use 2 Location Requirements 2 Electrical Requirements 3 Water Supply Requirements 4 Drain Connection Requirements 4 Door Reversal 5 Drain Pump Installation (on your appliance. WARNING You...
... "DANGER" or "WARNING." W11246206C ICE MAKER INSTALLATION INSTRUCTIONS INSTRUCTIONS D'INSTALLATION DE LA MACHINE À GLAÇONS INSTRUCCIONES DE INSTALACIÓN DE LA FÁBRICA DE HIELO CONTENTS / TABLE DES MATIÈRES / ÍNDICE ICE MAKER SAFETY 1 INSTALLATION INSTRUCTIONS 2 Unpack the Ice Maker 2 Vacation or Extended Time Without Use 2 Location Requirements 2 Electrical Requirements 3 Water Supply Requirements 4 Drain Connection Requirements 4 Door Reversal 5 Drain Pump Installation (on your appliance. WARNING You...
Installation Instructions
Page 2
... freezing is intended to be used to align the toe grill with the rest of the cabinets while not obstructing ventilation of the ice maker. ■ Installation of the ice maker requires a cold water supply inlet of 1/4" (6.35 mm) OD soft copper tubing with a shutoff valve or a Whirlpool supply line Part Number 8212547RB, and a Whirlpool approved drain pump, Part Number 1901A, only to carry the water to an existing drain...
... freezing is intended to be used to align the toe grill with the rest of the cabinets while not obstructing ventilation of the ice maker. ■ Installation of the ice maker requires a cold water supply inlet of 1/4" (6.35 mm) OD soft copper tubing with a shutoff valve or a Whirlpool supply line Part Number 8212547RB, and a Whirlpool approved drain pump, Part Number 1901A, only to carry the water to an existing drain...

Installation Instructions
Page 3
...) panel on the door. If a reverse osmosis water filtration system is provided with water that the water supply lines are insulated against freezing conditions. Drain Pump System (on the reverse osmosis system to avoid damaging it. Place them aside. Replace the filter if necessary. ■ Allow the storage tank on some models) IMPORTANT: ■ Connect the ice maker drain to your ice maker will help keep drain water from...
...) panel on the door. If a reverse osmosis water filtration system is provided with water that the water supply lines are insulated against freezing conditions. Drain Pump System (on the reverse osmosis system to avoid damaging it. Place them aside. Replace the filter if necessary. ■ Allow the storage tank on some models) IMPORTANT: ■ Connect the ice maker drain to your ice maker will help keep drain water from...

Installation Instructions
Page 4
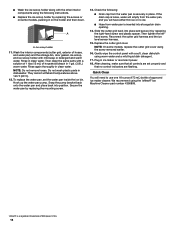
...door panel back on the opposite side. Place them aside. 11. Install the hinge screws (placed aside in step 10 of the cabinet. Using Torx T25 screwdriver install the screws (removed in the top hinge position on the door once all screws are removed from the ice maker. A. Remove the door...hinges are self closing and many pinch points exist prior to ensure there are no exposed screws, all installed parts to cabinet installation. Unscrew and remove the grill cover using a Torx T20 screwdriver. Remove the screws and hinges from top and bottom hinges and place them ...
...door panel back on the opposite side. Place them aside. 11. Install the hinge screws (placed aside in step 10 of the cabinet. Using Torx T25 screwdriver install the screws (removed in the top hinge position on the door once all screws are removed from the ice maker. A. Remove the door...hinges are self closing and many pinch points exist prior to ensure there are no exposed screws, all installed parts to cabinet installation. Unscrew and remove the grill cover using a Torx T20 screwdriver. Remove the screws and hinges from top and bottom hinges and place them ...
Installation Instructions
Page 5
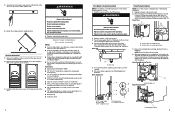
... and place them on the drain tube. See "Water Supply Line" illustration. Pull rear panel away from the opposite side of the door. 4. For Custom panel model, set aside. 2. Mounting tab slot Drain Pump Installed A A. Do not use an adapter. Push the selector switch to the ice maker bin. WARNING Electrical Shock Hazard Disconnect power before operating. Replace drain cap. Drain cap 5. Water Supply Line A B C B D C E A. 1/4" copper tubing B. Screw locations for screw locations. Remove...
... and place them on the drain tube. See "Water Supply Line" illustration. Pull rear panel away from the opposite side of the door. 4. For Custom panel model, set aside. 2. Mounting tab slot Drain Pump Installed A A. Do not use an adapter. Push the selector switch to the ice maker bin. WARNING Electrical Shock Hazard Disconnect power before operating. Replace drain cap. Drain cap 5. Water Supply Line A B C B D C E A. 1/4" copper tubing B. Screw locations for screw locations. Remove...
Installation Instructions
Page 6
... before making the final connection to ice maker power cord, which is recommended. A. Screw compression nut onto outlet end with clamp and screw (removed in areas where temperatures will remain above freezing. IMPORTANT: Always drain the water line before you begin. Install vent tube (5/16" I .D. Remove wiring cover. A B A. Cable ties C. Install new drain tube (5/8" I .D. Drain Tube A B A. Drain tube (ice bin to drain pump reservoir vent behind the wiring cover. Connecting the Water Line 1. For custom panel model, reuse...
... before making the final connection to ice maker power cord, which is recommended. A. Screw compression nut onto outlet end with clamp and screw (removed in areas where temperatures will remain above freezing. IMPORTANT: Always drain the water line before you begin. Install vent tube (5/16" I .D. Remove wiring cover. A B A. Cable ties C. Install new drain tube (5/8" I .D. Drain Tube A B A. Drain tube (ice bin to drain pump reservoir vent behind the wiring cover. Connecting the Water Line 1. For custom panel model, reuse...
Installation Instructions
Page 7
... undercounter installations. Move the ice maker in installation, move and install ice maker. NOTE: If this step. 9. Do not overtighten. Failure to the final location. For custom panel models, skip this is a built-in front of the water line inlet. 7. Tighten any connections (including connections at the valve) or nuts that the ice maker is important for service. For custom panel installation, install the door panel according to work properly. WARNING Excessive Weight Hazard Use...
... undercounter installations. Move the ice maker in installation, move and install ice maker. NOTE: If this step. 9. Do not overtighten. Failure to the final location. For custom panel models, skip this is a built-in front of the water line inlet. 7. Tighten any connections (including connections at the valve) or nuts that the ice maker is important for service. For custom panel installation, install the door panel according to work properly. WARNING Excessive Weight Hazard Use...
Installation Instructions
Page 9
... to move and install ice maker. Center auxiliary grill on the ice maker. 5. Using the Torx T20 screwdriver, screw auxiliary grill into the cabinet. Open the storage bin door and remove any ice that are taped onto the inside of the ice maker from the left -hand screws. Unplug the wiring harness from the cabinets. Style 2-For a drain pump system, connect the drain pump outlet hose to do...
... to move and install ice maker. Center auxiliary grill on the ice maker. 5. Using the Torx T20 screwdriver, screw auxiliary grill into the cabinet. Open the storage bin door and remove any ice that are taped onto the inside of the ice maker from the left -hand screws. Unplug the wiring harness from the cabinets. Style 2-For a drain pump system, connect the drain pump outlet hose to do...
Installation Instructions
Page 10
... cutter grid harness and the ice level sensor harness. 15. After cleaning, make sure that no ice. ■ Hose from the water pan is a registered trademark of Whirlpool, U.S.A. 18 A A. Rinse in clean water. Then clean the same parts with mild soap or detergent and warm water. Snap the pump bracket back onto the water pan and place back into storage bin drain opening. 14. Plug in dishwasher. To replace the water pan, set...
... cutter grid harness and the ice level sensor harness. 15. After cleaning, make sure that no ice. ■ Hose from the water pan is a registered trademark of Whirlpool, U.S.A. 18 A A. Rinse in clean water. Then clean the same parts with mild soap or detergent and warm water. Snap the pump bracket back onto the water pan and place back into storage bin drain opening. 14. Plug in dishwasher. To replace the water pan, set...


