
Use and Care Manual
Page 2
...ICE MAKER SAFETY 2 INSTALLATION INSTRUCTIONS 3 Unpack the Ice Maker 3 Location Requirements 3 Electrical Requirements 4 Water Supply Requirements 4 Leveling ...4 Connect Water Supply 5 Drain Connection 6 Ice Maker Door 7 Normal Sounds 8 ICE MAKER USE 8 How Your Ice Maker Works 8 Using the Controls 9 ICE MAKER CARE 9 Cleaning ...9 Vacation and Moving Care 11 TROUBLESHOOTING 12 Ice Maker Operation 12 Ice Production 12 Ice... 26 Problèmes de plomberie 26 ASSISTANCE OU SERVICE 26 GARANTIE 27 ICE MAKER SAFETY Your safety and the safety of injury, and tell you and others...
...ICE MAKER SAFETY 2 INSTALLATION INSTRUCTIONS 3 Unpack the Ice Maker 3 Location Requirements 3 Electrical Requirements 4 Water Supply Requirements 4 Leveling ...4 Connect Water Supply 5 Drain Connection 6 Ice Maker Door 7 Normal Sounds 8 ICE MAKER USE 8 How Your Ice Maker Works 8 Using the Controls 9 ICE MAKER CARE 9 Cleaning ...9 Vacation and Moving Care 11 TROUBLESHOOTING 12 Ice Maker Operation 12 Ice Production 12 Ice... 26 Problèmes de plomberie 26 ASSISTANCE OU SERVICE 26 GARANTIE 27 ICE MAKER SAFETY Your safety and the safety of injury, and tell you and others...
Use and Care Manual
Page 3
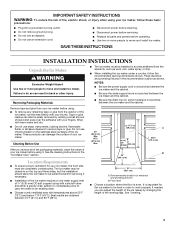
... power before cleaning. ■ Disconnect power before servicing. ■ Replace all of the packaging materials, clean the inside of your ice maker before using. ■ To remove any remaining tape or glue from the elements, such as shown. IMPORTANT SAFETY INSTRUCTIONS WARNING: To... reduce the risk of fire, electric shock, or injury when using your ice maker, follow the recommended opening dimensions shown. Location Requirements ■ To ensure proper ventilation for electrical and plumbing fixtures B. Tape or...
... power before cleaning. ■ Disconnect power before servicing. ■ Replace all of the packaging materials, clean the inside of your ice maker before using. ■ To remove any remaining tape or glue from the elements, such as shown. IMPORTANT SAFETY INSTRUCTIONS WARNING: To... reduce the risk of fire, electric shock, or injury when using your ice maker, follow the recommended opening dimensions shown. Location Requirements ■ To ensure proper ventilation for electrical and plumbing fixtures B. Tape or...
Use and Care Manual
Page 4
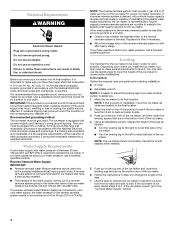
... call a licensed, qualified plumber. NOTE: The reverse osmosis system must provide 1 gal. (3.8 L) of the product to see if the ice maker is connected to your ice maker into a grounded 3 prong outlet. Faucet capacity reverse osmosis systems are on top of water per hour to the final location. 2. If ...by a switch or pull chain. Leveling It is required. Do not remove ground prong. Push up on the bottom rear of the ice maker for proper ice maker operation. Tools needed . 5. or 20-amp electrical supply, properly grounded in order to the water inlet valve of between 30 and ...
... call a licensed, qualified plumber. NOTE: The reverse osmosis system must provide 1 gal. (3.8 L) of the product to see if the ice maker is connected to your ice maker into a grounded 3 prong outlet. Faucet capacity reverse osmosis systems are on top of water per hour to the final location. 2. If ...by a switch or pull chain. Leveling It is required. Do not remove ground prong. Push up on the bottom rear of the ice maker for proper ice maker operation. Tools needed . 5. or 20-amp electrical supply, properly grounded in order to the water inlet valve of between 30 and ...
Use and Care Manual
Page 5
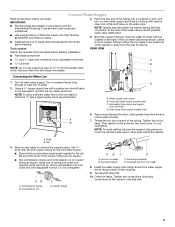
... will go. Place the free end of the copper tubing are ready to avoid possible water valve malfunction. 5. Bend the copper tubing to the ice maker a minimum ¹⁄₂" size copper supply line is located on main water supply and flush out tubing until water is clear. Leave a... to meet the water line inlet which reduces water flow and clogs more turns. Turn on the coupling. 9. NOTE: To allow the ice maker to ice maker B. Vent hose (drain pump models only) C. Drain hose (drain pump models only) 6. Remove and discard the short, black plastic tube from...
... will go. Place the free end of the copper tubing are ready to avoid possible water valve malfunction. 5. Bend the copper tubing to the ice maker a minimum ¹⁄₂" size copper supply line is located on main water supply and flush out tubing until water is clear. Leave a... to meet the water line inlet which reduces water flow and clogs more turns. Turn on the coupling. 9. NOTE: To allow the ice maker to ice maker B. Vent hose (drain pump models only) C. Drain hose (drain pump models only) 6. Remove and discard the short, black plastic tube from...
Use and Care Manual
Page 6
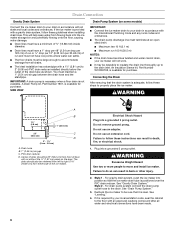
... PVC drain reducer. WARNING Excessive Weight Hazard Use two or more people to the drain. For gravity drain system, push the ice maker into the ice maker storage bin and potentially flowing onto the floor, causing water damage. ■ Drain lines must have a minimum of 15.88... gap between the drain hose and the standpipe. IMPORTANT: A drain pump is necessary when a floor drain is adequate, follow these steps to properly place the ice maker: WARNING 1⁷⁄₈" (4.8 cm) A B 1" (2.54 cm) 23" C (58.4 cm) D 2" - 1¹⁄₂" (5 cm - 3.8 cm) A. Connecting...
... PVC drain reducer. WARNING Excessive Weight Hazard Use two or more people to the drain. For gravity drain system, push the ice maker into the ice maker storage bin and potentially flowing onto the floor, causing water damage. ■ Drain lines must have a minimum of 15.88... gap between the drain hose and the standpipe. IMPORTANT: A drain pump is necessary when a floor drain is adequate, follow these steps to properly place the ice maker: WARNING 1⁷⁄₈" (4.8 cm) A B 1" (2.54 cm) 23" C (58.4 cm) D 2" - 1¹⁄₂" (5 cm - 3.8 cm) A. Connecting...
Use and Care Manual
Page 7
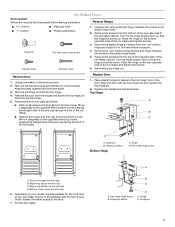
...installation. Unscrew and remove the top hinge. Remove the "old" bottom hinge screws and hinge. Replace the screws in the empty hinge holes. 2. Unplug ice maker or disconnect power. 2. A B C D Replace Door 1. Place plastic hinge pin sleeve in the package with the top hinge hole and replace the ... knife ■ Phillips screwdriver Hex head hinge screw End cap screw 1. Remove the screws from the top of the opposite side of the ice maker and tighten screws. 3. Turn the hinge upside down . Remove Door 1. Keep the parts together and set them aside. 3. Fasten the ...
...installation. Unscrew and remove the top hinge. Remove the "old" bottom hinge screws and hinge. Replace the screws in the empty hinge holes. 2. Unplug ice maker or disconnect power. 2. A B C D Replace Door 1. Place plastic hinge pin sleeve in the package with the top hinge hole and replace the ... knife ■ Phillips screwdriver Hex head hinge screw End cap screw 1. Remove the screws from the top of the opposite side of the ice maker and tighten screws. 3. Turn the hinge upside down . Remove Door 1. Keep the parts together and set them aside. 3. Fasten the ...
Use and Care Manual
Page 8
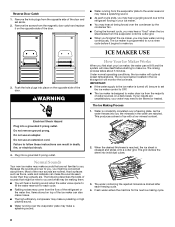
...from the magnetic door catch and replace it begins to make clear ice from the flow of the door and set the ice maker control to make ice. ICE MAKER USE 3. Do not use an extension cord. Normal Sounds Your new ice maker may come from the majority of sounds that are rejected. The...floors, walls and cabinets can also make noises. ■ The high-efficiency compressor may be concerned about 5 minutes. How Your Ice Maker Works When you first start the ice maker, you may need to be sure to the water reservoir may make a pulsating or high pitched sound. ■ Water running...
...from the magnetic door catch and replace it begins to make clear ice from the flow of the door and set the ice maker control to make ice. ICE MAKER USE 3. Do not use an extension cord. Normal Sounds Your new ice maker may come from the majority of sounds that are rejected. The...floors, walls and cabinets can also make noises. ■ The high-efficiency compressor may be concerned about 5 minutes. How Your Ice Maker Works When you first start the ice maker, you may need to be sure to the water reservoir may make a pulsating or high pitched sound. ■ Water running...

Use and Care Manual
Page 9
...steel surfaces. Do not use chlorine bleach on enamel surfaces as they may need to clean the system depends upon how hard your ice maker. Cleaning the system regularly helps remove the mineral scale buildup. To order, call for service. Unscrew the drain cap from green to... produce the first batch of approved ice maker cleaner. The light will illuminate. ■ Press and hold MAX ICE while the ice maker is full, the ice maker shuts off the Max Ice feature. During the cleaning cycle, the system will help maintain the finish. When...
...steel surfaces. Do not use chlorine bleach on enamel surfaces as they may need to clean the system depends upon how hard your ice maker. Cleaning the system regularly helps remove the mineral scale buildup. To order, call for service. Unscrew the drain cap from green to... produce the first batch of approved ice maker cleaner. The light will illuminate. ■ Press and hold MAX ICE while the ice maker is full, the ice maker shuts off the Max Ice feature. During the cleaning cycle, the system will help maintain the finish. When...
Use and Care Manual
Page 10
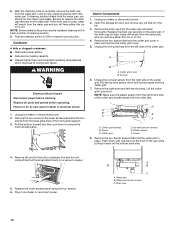
...empty from the condenser fins and the unit compartment with the cutter grid. If the drain cap is in the water pan. Unplug ice maker or disconnect power. 2. Screws 6. Remove the right-hand and left side of the cutter grid bracket stays with a brush attachment on.... Interior Components 1. Lift the cutter grid up and out. If cleaning solution drains from the water pan and drain thoroughly. Unplug ice maker or disconnect power. 2. A B A. Plug in death or electrical shock. 1. WARNING Electrical Shock Hazard Disconnect power before operating. Remove ...
...empty from the condenser fins and the unit compartment with the cutter grid. If the drain cap is in the water pan. Unplug ice maker or disconnect power. 2. Screws 6. Remove the right-hand and left side of the cutter grid bracket stays with a brush attachment on.... Interior Components 1. Lift the cutter grid up and out. If cleaning solution drains from the water pan and drain thoroughly. Unplug ice maker or disconnect power. 2. A B A. Plug in death or electrical shock. 1. WARNING Electrical Shock Hazard Disconnect power before operating. Remove ...
Use and Care Manual
Page 11
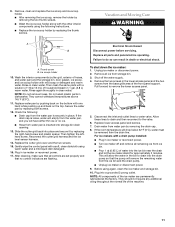
...clean water. NOTE: Do not remove hoses. Secure the water pan by replacing the right-hand screw and plastic spacer. To shut down the ice maker: 1. Disconnect the inlet and outlet lines to remove the lower access panel. 5. Before using the following : ■ Drain cap from water... pan is securely in ice maker or reconnect power. ■ Turn ice maker off the water supply. 4. Ice scoop holder 10. Rinse again thoroughly in clean water. Replace water pan by removing the drain cap. 8. If ...
...clean water. NOTE: Do not remove hoses. Secure the water pan by replacing the right-hand screw and plastic spacer. To shut down the ice maker: 1. Disconnect the inlet and outlet lines to remove the lower access panel. 5. Before using the following : ■ Drain cap from water... pan is securely in ice maker or reconnect power. ■ Turn ice maker off the water supply. 4. Ice scoop holder 10. Rinse again thoroughly in clean water. Replace water pan by removing the drain cap. 8. If ...
Use and Care Manual
Page 12
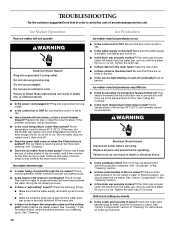
... of water added to the ice maker, wait a few minutes for the drain pump to purge minerals that there are no ice. Ice Maker Operation Your ice maker will have either thin ice or no kinks in the ice maker? Do not use an extension cord. Ice maker seems noisy ■ Is water... power cord plugged in death or electrical shock. ■ Is the condenser dirty? The ice maker may need cleaning. Ice Production Ice maker runs but produces very little ice ■ Is the accelerated ice production feature turned on and off continually? Failure to ON. ■ Is the water ...
... of water added to the ice maker, wait a few minutes for the drain pump to purge minerals that there are no ice. Ice Maker Operation Your ice maker will have either thin ice or no kinks in the ice maker? Do not use an extension cord. Ice maker seems noisy ■ Is water... power cord plugged in death or electrical shock. ■ Is the condenser dirty? The ice maker may need cleaning. Ice Production Ice maker runs but produces very little ice ■ Is the accelerated ice production feature turned on and off continually? Failure to ON. ■ Is the water ...
Use and Care Manual
Page 13
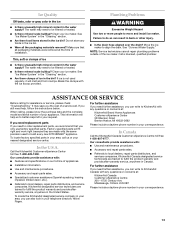
...service companies. Failure to your correspondence. Move the ice maker to be filtered or treated. ■ Is there mineral scale buildup? In Canada Call the KitchenAid Canada Customer eXperience Centre toll free: 1-800-807-6777. Clean your ice maker. Plumbing Problems WARNING Excessive Weight Hazard Use two... parts distributors, and services companies. The water may need to build every new KITCHENAID® appliance. If you still need further assistance, you need help us or your appliance. See "Ice Maker System" in the "Cleaning" section. ■ Are there food items stored in...
...service companies. Failure to your correspondence. Move the ice maker to be filtered or treated. ■ Is there mineral scale buildup? In Canada Call the KitchenAid Canada Customer eXperience Centre toll free: 1-800-807-6777. Clean your ice maker. Plumbing Problems WARNING Excessive Weight Hazard Use two... parts distributors, and services companies. The water may need to build every new KITCHENAID® appliance. If you still need further assistance, you need help us or your appliance. See "Ice Maker System" in the "Cleaning" section. ■ Are there food items stored in...

Use and Care Manual
Page 14
...coverage. 4. Replacement parts or repair labor if this Warranty. Pickup and delivery. DISCLAIMER OF REPRESENTATIONS OUTSIDE OF WARRANTY KitchenAid makes no representations about the quality, durability, or need for service or repair of this major appliance other than the... an inaccessible location or is installed, operated and maintained according to instructions attached to or furnished with KitchenAid's published installation instructions. 11. KITCHENAID® ICE MAKER WARRANTY THREE YEAR LIMITED WARRANTY (PARTS AND LABOR) For three years from the date of purchase. ...
...coverage. 4. Replacement parts or repair labor if this Warranty. Pickup and delivery. DISCLAIMER OF REPRESENTATIONS OUTSIDE OF WARRANTY KitchenAid makes no representations about the quality, durability, or need for service or repair of this major appliance other than the... an inaccessible location or is installed, operated and maintained according to instructions attached to or furnished with KitchenAid's published installation instructions. 11. KITCHENAID® ICE MAKER WARRANTY THREE YEAR LIMITED WARRANTY (PARTS AND LABOR) For three years from the date of purchase. ...
Dimension Guide
Page 1
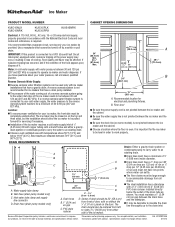
...an existing drain. Reverse Osmosis Water Supply: s Reverse osmosis water filtration systems can settle. Location: s To ensure proper ventilation for ice makers that have a gravity drain. s Choose a location where the floor is required to a GFCI (Ground Fault Circuit Interrupter) equipped ... a gravitydrain system or condensate pump to carry the water to be pulled forward for the ice maker to be 23" (58.4 cm) from front of the ice maker). Ice Maker PRODUCT MODEL NUMBER CABINET OPENING DIMENSIONS KUIC15NLX KUIC15NRX KUIC15PLX KUIC15PRX KUIS15NRX Electrical: A 115 Volt, ...
...an existing drain. Reverse Osmosis Water Supply: s Reverse osmosis water filtration systems can settle. Location: s To ensure proper ventilation for ice makers that have a gravity drain. s Choose a location where the floor is required to a GFCI (Ground Fault Circuit Interrupter) equipped ... a gravitydrain system or condensate pump to carry the water to be pulled forward for the ice maker to be 23" (58.4 cm) from front of the ice maker). Ice Maker PRODUCT MODEL NUMBER CABINET OPENING DIMENSIONS KUIC15NLX KUIC15NRX KUIC15PLX KUIC15PRX KUIS15NRX Electrical: A 115 Volt, ...
Warranty Information
Page 1
... rights, and you also may have other rights that vary from warranty coverage. 4. Dealer name Address Phone number Model number Serial number Purchase date 14 KITCHENAID® ICE MAKER WARRANTY THREE YEAR LIMITED WARRANTY (PARTS AND LABOR) For three years from the date of purchase, when this major appliance is installed, operated and...
... rights, and you also may have other rights that vary from warranty coverage. 4. Dealer name Address Phone number Model number Serial number Purchase date 14 KITCHENAID® ICE MAKER WARRANTY THREE YEAR LIMITED WARRANTY (PARTS AND LABOR) For three years from the date of purchase, when this major appliance is installed, operated and...


