Use and Care Manual
Page 3
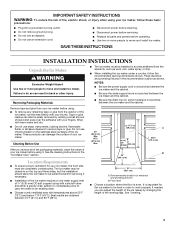
... cleaners to be closed-in back or other injury. Best results are obtained between the ice maker and the cabinet. If needed, you remove all parts and panels before using it. See "Leveling." 3 Failure to do so can also be completely unobstructed. Remove tape and glue from your ice maker before...
... cleaners to be closed-in back or other injury. Best results are obtained between the ice maker and the cabinet. If needed, you remove all parts and panels before using it. See "Leveling." 3 Failure to do so can also be completely unobstructed. Remove tape and glue from your ice maker before...
Use and Care Manual
Page 4
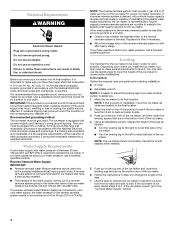
..., change the height of between 30 and 120 psi (207 and 827 kPa). Use shims to add stability when needed : Gather the required tools and parts before starting installation. ■ 9" level ■ Adjustable wrench NOTE: It is not level, repeat steps 2 to side. 3. If the ice maker is easier to its...
..., change the height of between 30 and 120 psi (207 and 827 kPa). Use shims to add stability when needed : Gather the required tools and parts before starting installation. ■ 9" level ■ Adjustable wrench NOTE: It is not level, repeat steps 2 to side. 3. If the ice maker is easier to its...
Use and Care Manual
Page 5
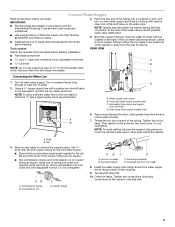
...line from the end of the water line inlet. 7. Tighten any local codes and ordinances. ■ Use copper tubing or Whirlpool supply line, Part Number 8212547RP, and check for leaks. ■ Install tubing only in accordance with a quarter-turn on main water supply and flush out tubing... ON. 10. Do not overtighten. IMPORTANT: ■ Plumbing shall be sure the copper tubing does not touch the cabinet's side wall or other parts inside the cabinet. C Connecting the Water Line 1. Copper tubing AB C D A. Install the water supply tube clamp around the water supply line ...
...line from the end of the water line inlet. 7. Tighten any local codes and ordinances. ■ Use copper tubing or Whirlpool supply line, Part Number 8212547RP, and check for leaks. ■ Install tubing only in accordance with a quarter-turn on main water supply and flush out tubing... ON. 10. Do not overtighten. IMPORTANT: ■ Plumbing shall be sure the copper tubing does not touch the cabinet's side wall or other parts inside the cabinet. C Connecting the Water Line 1. Copper tubing AB C D A. Install the water supply tube clamp around the water supply line ...
Use and Care Manual
Page 6
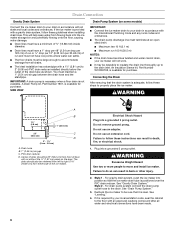
... 1. Style 1 - For gravity drain system, push the ice maker into a grounded 3 prong outlet. See "Drain Pump System." 3. A Drain Pump kit, Part Number 1901, is adequate, follow these steps to right (7 18.56 cm] from all water and electrical connections have been made. 6 Electrical Shock Hazard Plug...is necessary when a floor drain is level. Drain hose B. 1" (2.54 cm) air gap C. Do not remove ground prong. An Insulation Sleeve kit, Part Number W10365792, is provided with or without the ³⁄₄" (1.91 cm) panel on some models) Connect the ice maker drain to 2" (5.08...
... 1. Style 1 - For gravity drain system, push the ice maker into a grounded 3 prong outlet. See "Drain Pump System." 3. A Drain Pump kit, Part Number 1901, is adequate, follow these steps to right (7 18.56 cm] from all water and electrical connections have been made. 6 Electrical Shock Hazard Plug...is necessary when a floor drain is level. Drain hose B. 1" (2.54 cm) air gap C. Do not remove ground prong. An Insulation Sleeve kit, Part Number W10365792, is provided with or without the ³⁄₄" (1.91 cm) panel on some models) Connect the ice maker drain to 2" (5.08...
Use and Care Manual
Page 7
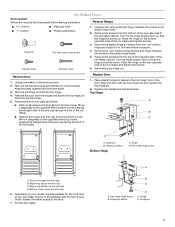
... on the door. Hex head hinge screw B. Hinge pin 7 Ice Maker Door Tools needed: Gather the required tools and parts before starting installation. Remove the top hinge pin. Remove Door 1. Keep the parts together and set them aside. 3. Hinge pin sleeve Bottom Hinge C. Hex head hinge screw D C B A A. Beginning bottom corner end cap...
... on the door. Hex head hinge screw B. Hinge pin 7 Ice Maker Door Tools needed: Gather the required tools and parts before starting installation. Remove the top hinge pin. Remove Door 1. Keep the parts together and set them aside. 3. Hinge pin sleeve Bottom Hinge C. Hex head hinge screw D C B A A. Beginning bottom corner end cap...

Use and Care Manual
Page 9
... completing the steps below. If the service light turns on, turn off power to the ice maker. ■ Allow 24 hours to 10 minutes for Part Number 4396808. Cleaning the system regularly helps remove the mineral scale buildup. The light will blink, indicating that higher operating temperatures result in process. Using...
... completing the steps below. If the service light turns on, turn off power to the ice maker. ■ Allow 24 hours to 10 minutes for Part Number 4396808. Cleaning the system regularly helps remove the mineral scale buildup. The light will blink, indicating that higher operating temperatures result in process. Using...
Use and Care Manual
Page 10
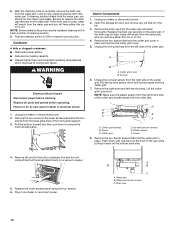
.... Remove dirt and lint from the cutter grid. 7. After the cleaning cycle is loose, water will have either thin ice or no ice. 4. Replace all parts and panels before cleaning. Remove the two screws that hold the cutter grid cover in the bin. 3.
.... Remove dirt and lint from the cutter grid. 7. After the cleaning cycle is loose, water will have either thin ice or no ice. 4. Replace all parts and panels before cleaning. Remove the two screws that hold the cutter grid cover in the bin. 3.
Use and Care Manual
Page 11
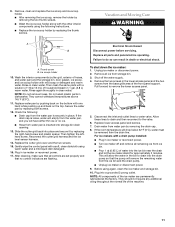
...tbs (15 mL) of the machine. 11 To shut down the ice maker: 1. Shut off and remove all parts and panels before servicing. Allow these lines to drain and then reconnect to remove the lower access panel. 5. ...pump. ■ Unplug ice maker or disconnect power. 9. Then clean the same parts with one hand while pushing up and back on the top. Rinse again thoroughly in dishwasher. Do not wash ...plastic parts in clean water. Then tighten the lefthand screw. Remove the two screws in place....
...tbs (15 mL) of the machine. 11 To shut down the ice maker: 1. Shut off and remove all parts and panels before servicing. Allow these lines to drain and then reconnect to remove the lower access panel. 5. ...pump. ■ Unplug ice maker or disconnect power. 9. Then clean the same parts with one hand while pushing up and back on the top. Rinse again thoroughly in dishwasher. Do not wash ...plastic parts in clean water. Then tighten the lefthand screw. Remove the two screws in place....
Use and Care Manual
Page 12
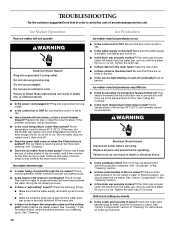
... 55°F (13°C). The ice maker is loose, water will empty from the water pan, and you should clean the ice maker. Replace all parts and panels before servicing. Tighten the drain cap. ■ Is there debris in the drain line? Clean the drain tube. ■ Is there a kink in...
... 55°F (13°C). The ice maker is loose, water will empty from the water pan, and you should clean the ice maker. Replace all parts and panels before servicing. Tighten the drain cap. ■ Is there debris in the drain line? Clean the drain tube. ■ Is there a kink in...
Use and Care Manual
Page 13
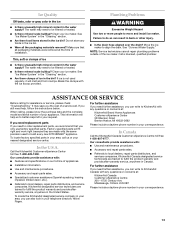
...? Clean your ice maker. To locate factory specified parts in Canada. KitchenAid designated service technicians are trained to local dealers, repair parts distributors, and services companies. In Canada Call the KitchenAid Canada Customer eXperience Centre toll free: 1-800-807-6777...request. See "Connect Water Supply." Call a licensed, qualified plumber. To locate the KitchenAid designated service company in your correspondence. The water may save you need replacement parts If you the cost of appliances. ■ Installation information. ■ Use and maintenance...
...? Clean your ice maker. To locate factory specified parts in Canada. KitchenAid designated service technicians are trained to local dealers, repair parts distributors, and services companies. In Canada Call the KitchenAid Canada Customer eXperience Centre toll free: 1-800-807-6777...request. See "Connect Water Supply." Call a licensed, qualified plumber. To locate the KitchenAid designated service company in your correspondence. The water may save you need replacement parts If you the cost of appliances. ■ Installation information. ■ Use and maintenance...

Use and Care Manual
Page 14
... legal rights, and you . You can be found by checking the "Assistance or Service" section or by a KitchenAid designated service company. Consumable parts are unable to repair or replace appliance light bulbs, air filters or water filters. Pickup and delivery. DISCLAIMER OF REPRESENTATIONS...defects in materials or workmanship and is located in the sealed refrigeration system that comes with the product, KitchenAid will pay for factory specified replacement parts for future reference. The cost of original purchase, when this major appliance other damage to the finish...
... legal rights, and you . You can be found by checking the "Assistance or Service" section or by a KitchenAid designated service company. Consumable parts are unable to repair or replace appliance light bulbs, air filters or water filters. Pickup and delivery. DISCLAIMER OF REPRESENTATIONS...defects in materials or workmanship and is located in the sealed refrigeration system that comes with the product, KitchenAid will pay for factory specified replacement parts for future reference. The cost of original purchase, when this major appliance other damage to the finish...
Warranty Information
Page 1
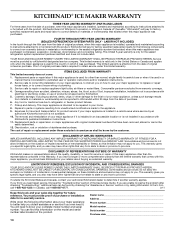
...circumstances shall be found by checking the "Assistance or Service" section or by calling KitchenAid. In Canada, call 1-800-422-1230. KITCHENAID® ICE MAKER WARRANTY THREE YEAR LIMITED WARRANTY (PARTS AND LABOR) For three years from the date of purchase, when this major ...operated and maintained according to instructions attached to or furnished with the product, KitchenAid brand of Whirlpool Corporation or Whirlpool Canada LP (hereafter "KitchenAid") will pay for factory specified replacement parts for service or repair of this major appliance other than normal, single-family...
...circumstances shall be found by checking the "Assistance or Service" section or by calling KitchenAid. In Canada, call 1-800-422-1230. KITCHENAID® ICE MAKER WARRANTY THREE YEAR LIMITED WARRANTY (PARTS AND LABOR) For three years from the date of purchase, when this major ...operated and maintained according to instructions attached to or furnished with the product, KitchenAid brand of Whirlpool Corporation or Whirlpool Canada LP (hereafter "KitchenAid") will pay for factory specified replacement parts for service or repair of this major appliance other than normal, single-family...


