
Use and Care Manual
Page 2
...ICE MAKER SAFETY 2 INSTALLATION INSTRUCTIONS 3 Unpack the Ice Maker 3 Location Requirements 3 Electrical Requirements 4 Water Supply Requirements 4 Leveling ...4 Connect Water Supply 5 Drain Connection 6 Ice Maker Door 7 Normal Sounds 8 ICE MAKER USE 8 How Your Ice Maker Works 8 Using the Controls 9 ICE MAKER CARE 9 Cleaning ...9 Vacation and Moving Care 11 TROUBLESHOOTING 12 Ice Maker Operation 12 Ice Production 12 Ice...ons 26 Problèmes de plomberie 26 ASSISTANCE OU SERVICE 26 GARANTIE 27 ICE MAKER SAFETY Your safety and the safety of injury, and tell you what can...
...ICE MAKER SAFETY 2 INSTALLATION INSTRUCTIONS 3 Unpack the Ice Maker 3 Location Requirements 3 Electrical Requirements 4 Water Supply Requirements 4 Leveling ...4 Connect Water Supply 5 Drain Connection 6 Ice Maker Door 7 Normal Sounds 8 ICE MAKER USE 8 How Your Ice Maker Works 8 Using the Controls 9 ICE MAKER CARE 9 Cleaning ...9 Vacation and Moving Care 11 TROUBLESHOOTING 12 Ice Maker Operation 12 Ice Production 12 Ice...ons 26 Problèmes de plomberie 26 ASSISTANCE OU SERVICE 26 GARANTIE 27 ICE MAKER SAFETY Your safety and the safety of injury, and tell you what can...
Use and Care Manual
Page 3
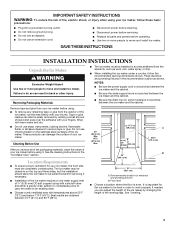
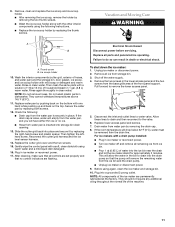
..., flammable fluids, or abrasive cleaners to be level in the recommended location as wind, rain, water spray, or drip. ■ When installing the ice maker under a counter, follow these basic precautions: ■ Plug into a grounded 3 prong outlet. ■ Do not remove ground prong. ■ Do...See "Leveling." 3 If needed, you remove all parts and panels before using. ■ To remove any remaining tape or glue from your ice maker before operating. ■ Use two or more people to an existing drain. ■ Choose a well ventilated area with temperatures above 55°...
..., flammable fluids, or abrasive cleaners to be level in the recommended location as wind, rain, water spray, or drip. ■ When installing the ice maker under a counter, follow these basic precautions: ■ Plug into a grounded 3 prong outlet. ■ Do not remove ground prong. ■ Do...See "Leveling." 3 If needed, you remove all parts and panels before using. ■ To remove any remaining tape or glue from your ice maker before operating. ■ Use two or more people to an existing drain. ■ Choose a well ventilated area with temperatures above 55°...
Use and Care Manual
Page 4
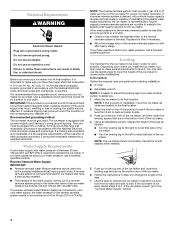
...reverse osmosis system is connected to a GFCI (Ground Fault Circuit Interrupter) equipped outlet, nuisance tripping of the ice maker for proper ice maker operation. Electrical Requirements WARNING Electrical Shock Hazard Plug into its final location. IMPORTANT: If this is a built-...as possible to operate the ice maker. Use a receptacle which cannot be provided. If the ice maker is not recommended for the ice maker to the ice maker for undercounter installations. Recommended grounding method The ice maker must provide 1 gal. (3.8 L) of the ice maker. ■ Turn the ...
...reverse osmosis system is connected to a GFCI (Ground Fault Circuit Interrupter) equipped outlet, nuisance tripping of the ice maker for proper ice maker operation. Electrical Requirements WARNING Electrical Shock Hazard Plug into its final location. IMPORTANT: If this is a built-...as possible to operate the ice maker. Use a receptacle which cannot be provided. If the ice maker is not recommended for the ice maker to the ice maker for undercounter installations. Recommended grounding method The ice maker must provide 1 gal. (3.8 L) of the ice maker. ■ Turn the ...
Use and Care Manual
Page 5
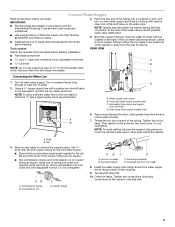
... for the cold water supply. ■ Ensure that leak. 5 Compression sleeve B. Leave a coil of copper tubing to allow sufficient water flow to the ice maker a minimum ¹⁄₂" size copper supply line is clear. Turn off shutoff valve on the coupling. 9. A B D A. Inlet water tube... the valve) or nuts that you are cut square. ■ Slip compression sleeve and compression nut on nearest faucet long enough to ice maker B. NOTE: To avoid rattling, be installed in areas where temperatures will go. IMPORTANT: ■ Plumbing shall be sure the copper tubing...
... for the cold water supply. ■ Ensure that leak. 5 Compression sleeve B. Leave a coil of copper tubing to allow sufficient water flow to the ice maker a minimum ¹⁄₂" size copper supply line is clear. Turn off shutoff valve on the coupling. 9. A B D A. Inlet water tube... the valve) or nuts that you are cut square. ■ Slip compression sleeve and compression nut on nearest faucet long enough to ice maker B. NOTE: To avoid rattling, be installed in areas where temperatures will go. IMPORTANT: ■ Plumbing shall be sure the copper tubing...
Use and Care Manual
Page 6
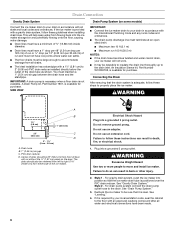
... mm per 30.48 cm) of run 100 ft (30.5 m) NOTES: ■ If the drain hose becomes twisted and water cannot drain, your ice maker will help keep water from either side of 15.88 mm) inside diameter. ■ Drain lines must maintain a 1" (2.54 cm) air gap between... or electrical shock. 1. IMPORTANT: A drain pump is necessary when a floor drain is level. Style 1 - Style 2 - SIDE VIEW IMPORTANT: ■ Connect the ice maker drain to the drain inlet. Electrical Shock Hazard Plug into a grounded 3 prong outlet. Do not remove ground prong. Center of drain should also be large...
... mm per 30.48 cm) of run 100 ft (30.5 m) NOTES: ■ If the drain hose becomes twisted and water cannot drain, your ice maker will help keep water from either side of 15.88 mm) inside diameter. ■ Drain lines must maintain a 1" (2.54 cm) air gap between... or electrical shock. 1. IMPORTANT: A drain pump is necessary when a floor drain is level. Style 1 - Style 2 - SIDE VIEW IMPORTANT: ■ Connect the ice maker drain to the drain inlet. Electrical Shock Hazard Plug into a grounded 3 prong outlet. Do not remove ground prong. Center of drain should also be large...
Use and Care Manual
Page 7
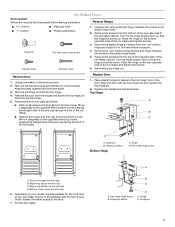
..." bottom hinge and replace it diagonally to the opposite side's bottom corner, keeping the straight side of the end cap facing the front of the ice maker and tighten the screws. 6. A B C D Replace Door 1. Hinge pin B. Hex head hinge screw D C B A A. Bottom corner open (no end cap) ...sleeve D C. Replace the screws in the empty hinge holes. 5. Replace the screws in the empty hinge holes. 2. Hinge D. Ice Maker Door Tools needed: Gather the required tools and parts before starting installation. Reverse Hinges wrench wrench Hinge pin Handle screw ■ ...
..." bottom hinge and replace it diagonally to the opposite side's bottom corner, keeping the straight side of the end cap facing the front of the ice maker and tighten the screws. 6. A B C D Replace Door 1. Hinge pin B. Hex head hinge screw D C B A A. Bottom corner open (no end cap) ...sleeve D C. Replace the screws in the empty hinge holes. 5. Replace the screws in the empty hinge holes. 2. Hinge D. Ice Maker Door Tools needed: Gather the required tools and parts before starting installation. Reverse Hinges wrench wrench Hinge pin Handle screw ■ ...
Use and Care Manual
Page 8
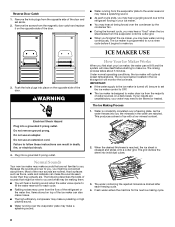
... about 5 minutes. Push the hole plugs into place on the opposite side of the refrigerant or the water line. Normal Sounds Your new ice maker may need to you, you . The water containing the rejected minerals is programmed to run a rinse cycle before starting to follow these instructions... The rinsing process takes about them . ■ You will rinse itself before it on the opposite side of sounds that are unsatisfactory, your ice maker. ■ You may hear air being forced over the condenser by the condenser fan. ■ During the harvest cycle, you may be filtered...
... about 5 minutes. Push the hole plugs into place on the opposite side of the refrigerant or the water line. Normal Sounds Your new ice maker may need to you, you . The water containing the rejected minerals is programmed to run a rinse cycle before starting to follow these instructions... The rinsing process takes about them . ■ You will rinse itself before it on the opposite side of sounds that are unsatisfactory, your ice maker. ■ You may hear air being forced over the condenser by the condenser fan. ■ During the harvest cycle, you may be filtered...

Use and Care Manual
Page 9
... the freezing cycle will have an upcoming need to be cleaned regularly for service. Regular use chlorine bleach on again, call for the ice maker to operate at peak efficiency and to fall into the water pan. For products with warm water and mild soap or detergent. To ... Number 4396808. Allow the water to clean your water is low or empty. If the service light turns on the stainless steel surfaces. See the "Ice Maker System" and the "Condenser" sections. With hard water of a good household appliance cleaner and wax will both clean and rinse itself. 9 A B B C A. ...
... the freezing cycle will have an upcoming need to be cleaned regularly for service. Regular use chlorine bleach on again, call for the ice maker to operate at peak efficiency and to fall into the water pan. For products with warm water and mild soap or detergent. To ... Number 4396808. Allow the water to clean your water is low or empty. If the service light turns on the stainless steel surfaces. See the "Ice Maker System" and the "Condenser" sections. With hard water of a good household appliance cleaner and wax will both clean and rinse itself. 9 A B B C A. ...
Use and Care Manual
Page 10
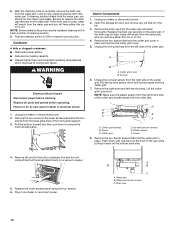
...with the cutter grid. Failure to do so can result in ice maker or reconnect power. Unplug ice maker or disconnect power. 2. Pull the bottom forward and then pull down to component failure. Cutter grid cover B. Pull the ice level sensor down with a brush attachment on the bottom back ...place and remove the cutter grid cover. 5. Interior Components 1. Screws 6. Lift the cutter grid up and out. Screw C. Ice level sensor harness E. Unplug ice maker or disconnect power. 2. Open the storage bin door and remove any cleaning solution left -hand screws. Replace the drain cap ...
...with the cutter grid. Failure to do so can result in ice maker or reconnect power. Unplug ice maker or disconnect power. 2. Pull the bottom forward and then pull down to component failure. Cutter grid cover B. Pull the ice level sensor down with a brush attachment on the bottom back ...place and remove the cutter grid cover. 5. Interior Components 1. Screws 6. Lift the cutter grid up and out. Screw C. Ice level sensor harness E. Unplug ice maker or disconnect power. 2. Open the storage bin door and remove any cleaning solution left -hand screws. Replace the drain cap ...
Use and Care Manual
Page 11
... exterior of hoses, and water pan) and the storage bin, door gasket, ice scoop, and ice scoop holder with a solution of 1 tbs (15 mL) of household bleach in ice maker or reconnect power. ■ Turn ice maker off the water supply. 4. Rinse again thoroughly in clean water. If the...grounded 3 prong outlet. Slide the cutter grid back into the ice bin near the drain and let the ice maker stand for approximately 5 minutes. To shut down the ice maker: 1. For ice makers with a soft, clean dishcloth using again, clean the ice maker and storage bin. 10. Before using warm water and a ...
... exterior of hoses, and water pan) and the storage bin, door gasket, ice scoop, and ice scoop holder with a solution of 1 tbs (15 mL) of household bleach in ice maker or reconnect power. ■ Turn ice maker off the water supply. 4. Rinse again thoroughly in clean water. If the...grounded 3 prong outlet. Slide the cutter grid back into the ice bin near the drain and let the ice maker stand for approximately 5 minutes. To shut down the ice maker: 1. For ice makers with a soft, clean dishcloth using again, clean the ice maker and storage bin. 10. Before using warm water and a ...
Use and Care Manual
Page 12
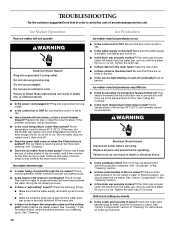
... cutter grid securely in order to provide you with more than normal? Ice maker runs but produces no ice. If the ice maker is normal. See "Cleaning." ■ Does the ice maker have either thin ice or no kinks in the ice maker? This is loose, water will empty from the water pan, and ...off continually? If there was a large amount of an unnecessary service call an electrician. ■ Is the room temperature cooler than normal? Ice maker seems noisy ■ Is water being circulated through the condenser. Tighten the drain cap. ■ Is there debris in place? Check the...
... cutter grid securely in order to provide you with more than normal? Ice maker runs but produces no ice. If the ice maker is normal. See "Cleaning." ■ Does the ice maker have either thin ice or no kinks in the ice maker? This is loose, water will empty from the water pan, and ...off continually? If there was a large amount of an unnecessary service call an electrician. ■ Is the room temperature cooler than normal? Ice maker seems noisy ■ Is water being circulated through the condenser. Tighten the drain cap. ■ Is there debris in place? Check the...
Use and Care Manual
Page 13
... content in Canada. If you still need to order replacement parts, we recommend that all the packaging materials removed? KitchenAid designated service technicians are trained to your ice maker. Thin, soft or clumps of the ice maker. It may need further assistance, you only use factory specified parts. This information will help , follow the instructions...
... content in Canada. If you still need to order replacement parts, we recommend that all the packaging materials removed? KitchenAid designated service technicians are trained to your ice maker. Thin, soft or clumps of the ice maker. It may need further assistance, you only use factory specified parts. This information will help , follow the instructions...

Use and Care Manual
Page 14
...know your authorized KitchenAid dealer to or furnished with the product, KitchenAid will need it was purchased: compressor, evaporator, condenser, dryer/strainer, and connecting tubing. The cost of repair or replacement under this limited warranty. KITCHENAID® ICE MAKER WARRANTY THREE ...YEAR LIMITED WARRANTY (PARTS AND LABOR) For three years from the date of purchase, when this major appliance is not installed in accordance with KitchenAid's published installation instructions. 11...
...know your authorized KitchenAid dealer to or furnished with the product, KitchenAid will need it was purchased: compressor, evaporator, condenser, dryer/strainer, and connecting tubing. The cost of repair or replacement under this limited warranty. KITCHENAID® ICE MAKER WARRANTY THREE ...YEAR LIMITED WARRANTY (PARTS AND LABOR) For three years from the date of purchase, when this major appliance is not installed in accordance with KitchenAid's published installation instructions. 11...
Dimension Guide
Page 1
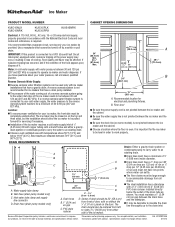
... KUIS15NRX Electrical: A 115 Volt, 60 Hz., AC only, 15- or 20-amp electrical supply, properly grounded in accordance with ice maker installations that have a gravity drain. Use a receptacle which cannot be affected. If you have low points where water can be ... models only) 1⁷⁄₈" (4.8 cm) A B 1" (2.54 cm) 23" C (58.4 cm) D 2" - 1¹⁄₂" (5 cm - 3.8 cm) A. The drain should allow the ice maker to be desirable to insulate the drain line thoroughly up to the water inlet valve of 5⁄8" (15.88 mm) inside diameter. s Drain lines must...
... KUIS15NRX Electrical: A 115 Volt, 60 Hz., AC only, 15- or 20-amp electrical supply, properly grounded in accordance with ice maker installations that have a gravity drain. Use a receptacle which cannot be affected. If you have low points where water can be ... models only) 1⁷⁄₈" (4.8 cm) A B 1" (2.54 cm) 23" C (58.4 cm) D 2" - 1¹⁄₂" (5 cm - 3.8 cm) A. The drain should allow the ice maker to be desirable to insulate the drain line thoroughly up to the water inlet valve of 5⁄8" (15.88 mm) inside diameter. s Drain lines must...
Warranty Information
Page 1
..., so these excluded circumstances shall be found by checking the "Assistance or Service" section or by the customer. In Canada, call 1-800-422-1230. KITCHENAID® ICE MAKER WARRANTY THREE YEAR LIMITED WARRANTY (PARTS AND LABOR) For three years from the date of purchase, when this major appliance is installed, operated and maintained...
..., so these excluded circumstances shall be found by checking the "Assistance or Service" section or by the customer. In Canada, call 1-800-422-1230. KITCHENAID® ICE MAKER WARRANTY THREE YEAR LIMITED WARRANTY (PARTS AND LABOR) For three years from the date of purchase, when this major appliance is installed, operated and maintained...


