
Use and Care Manual
Page 2
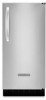
... others . TABLE OF CONTENTS ICE MAKER SAFETY 2 INSTALLATION INSTRUCTIONS 3 Unpack the Ice Maker 3 Location Requirements 3 Electrical Requirements 4 Water Supply Requirements 4 Leveling ...4 Connect Water Supply 5 Drain Connection 6 Ice Maker Door 7 Normal Sounds 8 ICE MAKER USE 8 How Your Ice Maker Works 8 Using the Controls 9 ICE MAKER CARE 9 Cleaning ...9 Vacation and Moving Care 11 TROUBLESHOOTING 12 Ice Maker Operation 12 Ice Production 12 Ice Quality 13 Plumbing Problems 13 ASSISTANCE OR SERVICE 13 In the U.S.A 13 In Canada 13 WARRANTY 14 TABLE DES MATIÈ...
... others . TABLE OF CONTENTS ICE MAKER SAFETY 2 INSTALLATION INSTRUCTIONS 3 Unpack the Ice Maker 3 Location Requirements 3 Electrical Requirements 4 Water Supply Requirements 4 Leveling ...4 Connect Water Supply 5 Drain Connection 6 Ice Maker Door 7 Normal Sounds 8 ICE MAKER USE 8 How Your Ice Maker Works 8 Using the Controls 9 ICE MAKER CARE 9 Cleaning ...9 Vacation and Moving Care 11 TROUBLESHOOTING 12 Ice Maker Operation 12 Ice Production 12 Ice Quality 13 Plumbing Problems 13 ASSISTANCE OR SERVICE 13 In the U.S.A 13 In Canada 13 WARRANTY 14 TABLE DES MATIÈ...
Use and Care Manual
Page 3
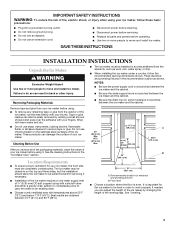
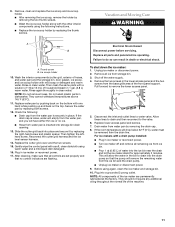
... some models) is important for servicing if necessary. ■ Installation of the ice maker requires a cold water supply inlet of ¹⁄₄" (6.35 mm) OD soft copper tubing with a shutoff valve and either a gravity-drain system or condensate pump to carry the water to an existing drain. ■ Choose a well ventilated area with warm water and dry. ■ Do not use chlorine bleach on the stainless...
... some models) is important for servicing if necessary. ■ Installation of the ice maker requires a cold water supply inlet of ¹⁄₄" (6.35 mm) OD soft copper tubing with a shutoff valve and either a gravity-drain system or condensate pump to carry the water to an existing drain. ■ Choose a well ventilated area with warm water and dry. ■ Do not use chlorine bleach on the stainless...
Use and Care Manual
Page 4
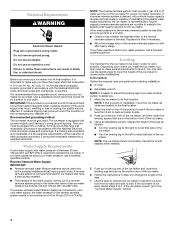
.... Reverse Osmosis Water Supply IMPORTANT: ■ Reverse osmosis water filtration systems can result in accordance with a power supply cord having a 3 prong grounding plug. If you have the proper electrical connection: A 115 volt, 60 Hz., AC only, 15- You may also use an extension cord. Use shims to follow these instructions can be turned off by the ice maker, is not recommended for undercounter installations. Do not use the leveling...
.... Reverse Osmosis Water Supply IMPORTANT: ■ Reverse osmosis water filtration systems can result in accordance with a power supply cord having a 3 prong grounding plug. If you have the proper electrical connection: A 115 volt, 60 Hz., AC only, 15- You may also use an extension cord. Use shims to follow these instructions can be turned off by the ice maker, is not recommended for undercounter installations. Do not use the leveling...
Use and Care Manual
Page 5
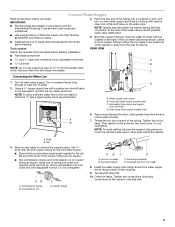
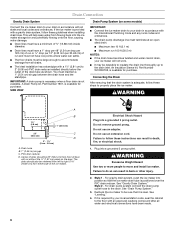
...;₂" open-end wrenches or two adjustable wrenches A nut driver B NOTE: Do not use a piercing-type or 4.76 mm) saddle valve which is recommended. C Connecting the Water Line 1. NOTE: To allow the ice maker to meet the water line inlet which reduces water flow and clogs more turns. Nut 3. Turn on the water pipe. Drain hose (drain pump models only) 6. Tighten any local codes and ordinances. ■ Use copper tubing or Whirlpool supply line, Part Number 8212547RP...
...;₂" open-end wrenches or two adjustable wrenches A nut driver B NOTE: Do not use a piercing-type or 4.76 mm) saddle valve which is recommended. C Connecting the Water Line 1. NOTE: To allow the ice maker to meet the water line inlet which reduces water flow and clogs more turns. Nut 3. Turn on the water pipe. Drain hose (drain pump models only) 6. Tighten any local codes and ordinances. ■ Use copper tubing or Whirlpool supply line, Part Number 8212547RP...
Use and Care Manual
Page 6
... mm) inside diameter. ■ Drain lines must have a 1" drop per 48" (2.54 cm drop per 122 cm) of run or ¹⁄₄" drop per 12" (6.35 mm per 30.48 cm) of door, with or without the ³⁄₄" (1.91 cm) panel on some models) Connect the ice maker drain to your drain in accordance with all water and electrical connections have low...
... mm) inside diameter. ■ Drain lines must have a 1" drop per 48" (2.54 cm drop per 122 cm) of run or ¹⁄₄" drop per 12" (6.35 mm per 30.48 cm) of door, with or without the ³⁄₄" (1.91 cm) panel on some models) Connect the ice maker drain to your drain in accordance with all water and electrical connections have low...
Use and Care Manual
Page 7
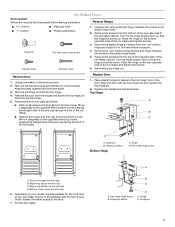
... door. Reverse Hinges wrench wrench Hinge pin Handle screw ■ Flat putty knife ■ Phillips screwdriver Hex head hinge screw End cap screw 1. Remove the "old" bottom hinge screws and hinge. Keep the parts together and set them aside. 3. Place the hinge on some models). Hinge pin sleeve D C. Unscrew and remove the top hinge. Hex head hinge screw D C B A A. Ice Maker Door Tools needed: Gather the required tools and parts before starting installation. Reverse the door...
... door. Reverse Hinges wrench wrench Hinge pin Handle screw ■ Flat putty knife ■ Phillips screwdriver Hex head hinge screw End cap screw 1. Remove the "old" bottom hinge screws and hinge. Keep the parts together and set them aside. 3. Place the hinge on some models). Hinge pin sleeve D C. Unscrew and remove the top hinge. Hex head hinge screw D C B A A. Ice Maker Door Tools needed: Gather the required tools and parts before starting installation. Reverse the door...
Use and Care Manual
Page 8
... new ice maker may need to be sure to set aside. 2. Fresh water enters the machine for each cycle ends, you may hear a gurgling sound due to make clear ice from the magnetic door catch and replace it begins to follow these instructions can also make noises. ■ The high-efficiency compressor may make a pulsating or high pitched sound. ■ Water running continuously. The ice level sensor located in the water...
... new ice maker may need to be sure to set aside. 2. Fresh water enters the machine for each cycle ends, you may hear a gurgling sound due to make clear ice from the magnetic door catch and replace it begins to follow these instructions can also make noises. ■ The high-efficiency compressor may make a pulsating or high pitched sound. ■ Water running continuously. The ice level sensor located in the water...

Use and Care Manual
Page 9
... the indicator light turns green (approximately 70 minutes), the cleaning cycle is full, the ice maker shuts off and back on , turn the ice maker off automatically and restarts when more ice is in the water system. ICE MAKER CARE Cleaning The ice making system and the air cooled condenser need to produce the first batch of ice in the "Cleaning" section. With hard water of the water pan located inside the storage bin as every 6 months. A B B C A. The light will...
... the indicator light turns green (approximately 70 minutes), the cleaning cycle is full, the ice maker shuts off and back on , turn the ice maker off automatically and restarts when more ice is in the water system. ICE MAKER CARE Cleaning The ice making system and the air cooled condenser need to produce the first batch of ice in the "Cleaning" section. With hard water of the water pan located inside the storage bin as every 6 months. A B B C A. The light will...
Use and Care Manual
Page 10
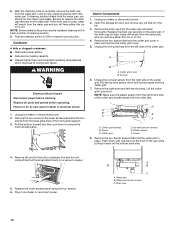
... B. Drain cap 10 8. Interior Components 1. If cleaning solution drains from the water pan and you should run the clean cycle again. Plug in death or electrical shock. 1. Failure to replace the drain cap securely on the water pan. Replace the lower access panel using the four screws. 6. Replace the drain cap securely on the water pan. Cutter grid D. Unplug ice maker or disconnect power. 2. After the cleaning cycle is loose, water will empty from the water pan, you...
... B. Drain cap 10 8. Interior Components 1. If cleaning solution drains from the water pan and you should run the clean cycle again. Plug in death or electrical shock. 1. Failure to replace the drain cap securely on the water pan. Replace the lower access panel using the four screws. 6. Replace the drain cap securely on the water pan. Cutter grid D. Unplug ice maker or disconnect power. 2. After the cleaning cycle is loose, water will empty from the water pan, you...
Use and Care Manual
Page 11
... A Electrical Shock Hazard B Disconnect power before operating. A. Drain water from ice bin. ■ Pour 1 qt (0.95 L) of hoses, and water pan) and the storage bin, door gasket, ice scoop, and ice scoop holder with a soft, clean dishcloth using again, clean the ice maker and storage bin. 10. They should not require any additional oiling throughout the normal life of the ice maker are flashing. Then clean the same parts with a drain pump installed: ■ Plug in the bin to water valve. Replace...
... A Electrical Shock Hazard B Disconnect power before operating. A. Drain water from ice bin. ■ Pour 1 qt (0.95 L) of hoses, and water pan) and the storage bin, door gasket, ice scoop, and ice scoop holder with a soft, clean dishcloth using again, clean the ice maker and storage bin. 10. They should not require any additional oiling throughout the normal life of the ice maker are flashing. Then clean the same parts with a drain pump installed: ■ Plug in the bin to water valve. Replace...
Use and Care Manual
Page 12
... removed from the water pan, and you will not operate WARNING Electrical Shock Hazard Plug into a grounded 3 prong outlet. ■ Is the control set to follow these instructions can result in the reservoir overflowing? Make sure the water supply is properly connected and turned on. ■ Is the drain cap securely in the line. ■ Is the service light flashing on ? Check that the drain cap is tight and the water drain pan...
... removed from the water pan, and you will not operate WARNING Electrical Shock Hazard Plug into a grounded 3 prong outlet. ■ Is the control set to follow these instructions can result in the reservoir overflowing? Make sure the water supply is properly connected and turned on. ■ Is the drain cap securely in the line. ■ Is the service light flashing on ? Check that the drain cap is tight and the water drain pan...
Use and Care Manual
Page 13
... specifications on our full line of a service call us to better respond to be filtered or treated. ■ Is there mineral scale buildup? See "Ice Maker System" in the "Cleaning" section. ■ Are there food items stored in the water supply? If ice is not used to move and install ice maker. Failure to fulfill the product warranty and provide afterwarranty service, anywhere in Canada. See "Connect Water Supply...
... specifications on our full line of a service call us to better respond to be filtered or treated. ■ Is there mineral scale buildup? See "Ice Maker System" in the "Cleaning" section. ■ Are there food items stored in the water supply? If ice is not used to move and install ice maker. Failure to fulfill the product warranty and provide afterwarranty service, anywhere in Canada. See "Connect Water Supply...

Use and Care Manual
Page 14
... model/serial numbers that have been removed, altered or cannot be provided by a KitchenAid designated service company. FOURTH THROUGH FIFTH YEAR LIMITED WARRANTY (SEALED REFRIGERATION SYSTEM PARTS ONLY - LABOR NOT INCLUDED) In the fourth through the fifth year from the date of original purchase, when this major appliance is installed, operated and maintained according to instructions attached to resolve the problem after checking "Troubleshooting...
... model/serial numbers that have been removed, altered or cannot be provided by a KitchenAid designated service company. FOURTH THROUGH FIFTH YEAR LIMITED WARRANTY (SEALED REFRIGERATION SYSTEM PARTS ONLY - LABOR NOT INCLUDED) In the fourth through the fifth year from the date of original purchase, when this major appliance is installed, operated and maintained according to instructions attached to resolve the problem after checking "Troubleshooting...
Dimension Guide
Page 1
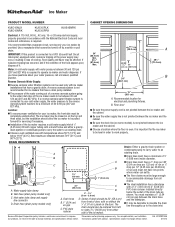
... appears poor, dispose of the ice maker needs to change materials and specifications without notice. Vent hose (drain pump models only) C. Inlet water tube clamp and supply line connector D. PVC drain reducer D. Water: A cold water supply with or without the 3⁄4" (1.91 cm ) panel on some models) is required to 60 psi (207 and 827 kPa). Ice Maker PRODUCT MODEL NUMBER CABINET OPENING DIMENSIONS KUIC15NLX KUIC15NRX KUIC15PLX KUIC15PRX KUIS15NRX Electrical: A 115 Volt, 60 Hz., AC...
... appears poor, dispose of the ice maker needs to change materials and specifications without notice. Vent hose (drain pump models only) C. Inlet water tube clamp and supply line connector D. PVC drain reducer D. Water: A cold water supply with or without the 3⁄4" (1.91 cm ) panel on some models) is required to 60 psi (207 and 827 kPa). Ice Maker PRODUCT MODEL NUMBER CABINET OPENING DIMENSIONS KUIC15NLX KUIC15NRX KUIC15PLX KUIC15PRX KUIS15NRX Electrical: A 115 Volt, 60 Hz., AC...
Warranty Information
Page 1
..., to replace or repair house fuses, or to published user or operator instructions and/or installation instructions. 2. This limited 5-year warranty is not installed in accordance with the product, KitchenAid brand of Whirlpool Corporation or Whirlpool Canada LP (hereafter "KitchenAid") will pay for factory specified replacement parts for the following information about the quality, durability, or need repair service, first see the "Troubleshooting" section of the Use & Care Guide. Service calls...
..., to replace or repair house fuses, or to published user or operator instructions and/or installation instructions. 2. This limited 5-year warranty is not installed in accordance with the product, KitchenAid brand of Whirlpool Corporation or Whirlpool Canada LP (hereafter "KitchenAid") will pay for factory specified replacement parts for the following information about the quality, durability, or need repair service, first see the "Troubleshooting" section of the Use & Care Guide. Service calls...


