
Owners Manual
Page 1
...State of others . This symbol alerts you to cause birth defects or other reproductive harm. 1 W11246207A Do not remove ground prong. The model number is the safety alert symbol. Your safety and the safety of California to move and install ice maker. All safety messages will ...tell you what can be downloaded at www.kitchenaid.ca. In the U.S.A., register your ice maker, follow instructions. We have provided many important safety messages in this ice maker includes a condensed...
...State of others . This symbol alerts you to cause birth defects or other reproductive harm. 1 W11246207A Do not remove ground prong. The model number is the safety alert symbol. Your safety and the safety of California to move and install ice maker. All safety messages will ...tell you what can be downloaded at www.kitchenaid.ca. In the U.S.A., register your ice maker, follow instructions. We have provided many important safety messages in this ice maker includes a condensed...

Owners Manual
Page 3
... out of the new sounds are not familiar to release the latch, and then lower the door. 18" (45.7 cm) models 15" (38.1 cm) models On/o Turned See Clean UUnseitaonfdBeCfaorreeGCuleidaening Max Ice TurSneUenUitseo aCnlBedeaCfnoarree CGlueaidneing Max Ice A A. See "Using the Controls." Normal Sounds Your new... during water filling associated with the flow of the control housing. Items stored on the door to you. For 15" (38.1 cm) models, push in the right-hand side of the filter and the arrow inside control housing E. Alignment pin B. Unlocked symbol C. NOTE: If ...
... out of the new sounds are not familiar to release the latch, and then lower the door. 18" (45.7 cm) models 15" (38.1 cm) models On/o Turned See Clean UUnseitaonfdBeCfaorreeGCuleidaening Max Ice TurSneUenUitseo aCnlBedeaCfnoarree CGlueaidneing Max Ice A A. See "Using the Controls." Normal Sounds Your new... during water filling associated with the flow of the control housing. Items stored on the door to you. For 15" (38.1 cm) models, push in the right-hand side of the filter and the arrow inside control housing E. Alignment pin B. Unlocked symbol C. NOTE: If ...
Owners Manual
Page 5
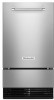
... Part Number W10355010 In U.S.A., order Part Number W10355016 In Canada, order Part Number W10355010B In Canada, order Part Number W10355016B TROUBLESHOOTING Visit producthelp.kitchenaid.com for the drain pump to reduce the supply water pressure (50 psi is level. Check that the control is turned on . ■... to the ice maker, wait a few minutes for recommendations that the drain hose is kinked. Do not use an adapter. For models with the flow of water added to purge minerals that were removed from the water during which water filling associated with drain pumps, ...
... Part Number W10355010 In U.S.A., order Part Number W10355016 In Canada, order Part Number W10355010B In Canada, order Part Number W10355016B TROUBLESHOOTING Visit producthelp.kitchenaid.com for the drain pump to reduce the supply water pressure (50 psi is level. Check that the control is turned on . ■... to the ice maker, wait a few minutes for recommendations that the drain hose is kinked. Do not use an adapter. For models with the flow of water added to purge minerals that were removed from the water during which water filling associated with drain pumps, ...

Owners Manual
Page 7
... ®NSF is yellow and the words "ORDER FILTER" appear on the display screen, order a new filter. PERFORMANCE DATA SHEET Ice Maker Water Filtration System Model P6GEG2KL, P6KG2KL, P6WG2KL Capacity 2000 Gallons (7571 Liters) System tested and certified by NSF International against NSF/ANSI Standard 42 for the Manufacturer...
... ®NSF is yellow and the words "ORDER FILTER" appear on the display screen, order a new filter. PERFORMANCE DATA SHEET Ice Maker Water Filtration System Model P6GEG2KL, P6KG2KL, P6WG2KL Capacity 2000 Gallons (7571 Liters) System tested and certified by NSF International against NSF/ANSI Standard 42 for the Manufacturer...

Owners Manual
Page 8
...Name, address, and telephone number Model number and serial number A clear, detailed description of the problem Proof of original consumer purchase. In the event of product replacement, your appliance will be provided by a KitchenAid designated service company. Service to : KitchenAid Customer eXperience Center In the ... from state to state or province to province. 02/17 8 Food or medicine loss due to KitchenAid within 30 days. 9. Pickup or delivery. interfere with original model/serial numbers removed, altered, or not easily determined. The cost of the Use and Care Guide ...
...Name, address, and telephone number Model number and serial number A clear, detailed description of the problem Proof of original consumer purchase. In the event of product replacement, your appliance will be provided by a KitchenAid designated service company. Service to : KitchenAid Customer eXperience Center In the ... from state to state or province to province. 02/17 8 Food or medicine loss due to KitchenAid within 30 days. 9. Pickup or delivery. interfere with original model/serial numbers removed, altered, or not easily determined. The cost of the Use and Care Guide ...

Dimension Guide
Page 1
... "W" of the part code mentioned herein will be automatically replaced by the number "4000" (e.g. Do not make any cutouts based on this information. F KUID308H/ KUID508H/ MODEL # KUIO338H in cm A Width 1711/16 44.95 B Width of grille 1725/32 45.17 C Height to the Installation or Use & Care Guide before selecting...
... "W" of the part code mentioned herein will be automatically replaced by the number "4000" (e.g. Do not make any cutouts based on this information. F KUID308H/ KUID508H/ MODEL # KUIO338H in cm A Width 1711/16 44.95 B Width of grille 1725/32 45.17 C Height to the Installation or Use & Care Guide before selecting...

Dimension Guide
Page 2
...without door (min.) 215/8 54.91 I Floor 2 of the part code mentioned herein will be automatically replaced by the number "4000" (e.g. All KitchenAid® appliances are appropriately UL, CUL or CSA approved. 19-Mar-2019 01:02:51 EDT | RELEASED In some European factories the letter "W" ...of 3 IMPORTANT: Dimensional specifications are fully extended. D 24" x W 1711⁄16" x H 2555⁄32" (depth without handle) KUID308H/ KUID508H/ MODEL # KUIO338H in cm A* Height to top of door (min.) 3347/64 85.7 B* Height to top of handle (min.) 3115/16 81.1 C* Height to the...
...without door (min.) 215/8 54.91 I Floor 2 of the part code mentioned herein will be automatically replaced by the number "4000" (e.g. All KitchenAid® appliances are appropriately UL, CUL or CSA approved. 19-Mar-2019 01:02:51 EDT | RELEASED In some European factories the letter "W" ...of 3 IMPORTANT: Dimensional specifications are fully extended. D 24" x W 1711⁄16" x H 2555⁄32" (depth without handle) KUID308H/ KUID508H/ MODEL # KUIO338H in cm A* Height to top of door (min.) 3347/64 85.7 B* Height to top of handle (min.) 3115/16 81.1 C* Height to the...

Dimension Guide
Page 3
...filtration system is connected to the cold water supply, the water pressure to the reverse osmosis system needs to operate the ice maker. All KitchenAid® appliances are provided for planning purposes only. distance from bottom 119/16 29.38 e Recommended electrical connection location w Recommended water ...") distance from bottom 241/64 6.79 O Water line location - distance from bottom 12 30.5 I Floor SIDE VIEW J KUID308H/ KUID508H/ MODEL # KUIO338H in cm A* Width (min.) 18 45.7 B* Width of the part code mentioned herein will be between 30 and 120 psi ...
...filtration system is connected to the cold water supply, the water pressure to the reverse osmosis system needs to operate the ice maker. All KitchenAid® appliances are provided for planning purposes only. distance from bottom 119/16 29.38 e Recommended electrical connection location w Recommended water ...") distance from bottom 241/64 6.79 O Water line location - distance from bottom 12 30.5 I Floor SIDE VIEW J KUID308H/ KUID508H/ MODEL # KUIO338H in cm A* Width (min.) 18 45.7 B* Width of the part code mentioned herein will be between 30 and 120 psi ...
Installation Instructions
Page 1
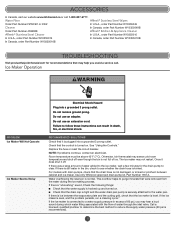
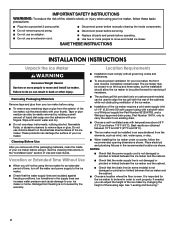
... messages will follow instructions. W11246206B Always read and obey all safety messages. We have provided many important safety messages in this manual and on some models 8 Connect Water Supply 11 Leveling and Securing 12 Custom Wood Panel 14 Connecting the Drain 16 Auxiliary Grill Installation 16 Deep Clean 17 SÉCURIT...
... messages will follow instructions. W11246206B Always read and obey all safety messages. We have provided many important safety messages in this manual and on some models 8 Connect Water Supply 11 Leveling and Securing 12 Custom Wood Panel 14 Connecting the Drain 16 Auxiliary Grill Installation 16 Deep Clean 17 SÉCURIT...
Installation Instructions
Page 2
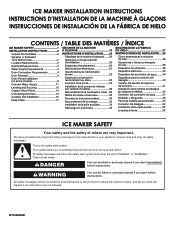
... to an existing drain. ■■ Choose a well-ventilated area with warm water and dry. ■■ Do not use chlorine bleach on some models) is not covered by rubbing a small amount of the leveling legs. It is important for the ice maker to be pulled forward for servicing if... necessary. ■■ The auxiliary grill kit provided (only on custom panel models) can adjust the height of the ice maker by changing the height of liquid dish soap over the adhesive with all governing codes and ordinances...
... to an existing drain. ■■ Choose a well-ventilated area with warm water and dry. ■■ Do not use chlorine bleach on some models) is not covered by rubbing a small amount of the leveling legs. It is important for the ice maker to be pulled forward for servicing if... necessary. ■■ The auxiliary grill kit provided (only on custom panel models) can adjust the height of the ice maker by changing the height of liquid dish soap over the adhesive with all governing codes and ordinances...
Installation Instructions
Page 3
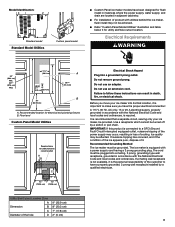
...customer to a GFCI (Ground Fault Circuit Interrupter) equipped outlet, nuisance tripping of the power supply may be affected. Floor level Custom Panel Model Utilities Required zone for utility hole/slot cutout location A B C D 71/2" (19.05 cm) 71/2" (19.05 cm) ... Failure to make sure you move your ice maker, be turned off by a qualified electrician. Model Identification: Standard model Standard Model Utilities Custom panel model ■■ Custom Panel ice maker models have been designed for flush install in instances where the power supply, water supply, and drain ...
...customer to a GFCI (Ground Fault Circuit Interrupter) equipped outlet, nuisance tripping of the power supply may be affected. Floor level Custom Panel Model Utilities Required zone for utility hole/slot cutout location A B C D 71/2" (19.05 cm) 71/2" (19.05 cm) ... Failure to make sure you move your ice maker, be turned off by a qualified electrician. Model Identification: Standard model Standard Model Utilities Custom panel model ■■ Custom Panel ice maker models have been designed for flush install in instances where the power supply, water supply, and drain ...
Installation Instructions
Page 4
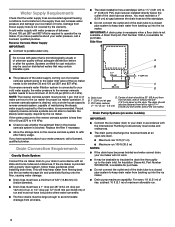
...): ■■ Check to see whether the sediment filter in the supply lines can settle. ■■ The floor drains must be used on some models) IMPORTANT: ■■ Connect the ice maker drain to your drain in accordance with the International Plumbing Code and any local codes and ordinances. ■...
...): ■■ Check to see whether the sediment filter in the supply lines can settle. ■■ The floor drains must be used on some models) IMPORTANT: ■■ Connect the ice maker drain to your drain in accordance with the International Plumbing Code and any local codes and ordinances. ■...
Installation Instructions
Page 5
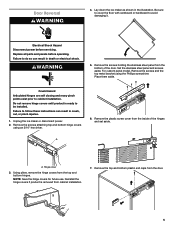
... the ice maker as shown in death or electrical shock. Failure to do so can result in crush, cut, or pinch injuries. 1. For custom panel model, Remove the screws and the top metal bracket using an 3/16" hex driver. 6. Reinstall the hinge covers if product is ready to cabinet installation. Be...
... the ice maker as shown in death or electrical shock. Failure to do so can result in crush, cut, or pinch injuries. 1. For custom panel model, Remove the screws and the top metal bracket using an 3/16" hex driver. 6. Reinstall the hinge covers if product is ready to cabinet installation. Be...
Installation Instructions
Page 8
.... Do not use an extension cord. Remove the white decorative screws from the opposite side of the door. 4. Install the white decorative screws on some models) NOTES: ■■ Connect drain pump to your drain in accordance with all state and local codes and ordinances. ■■ It may be desirable...
.... Do not use an extension cord. Remove the white decorative screws from the opposite side of the door. 4. Install the white decorative screws on some models) NOTES: ■■ Connect drain pump to your drain in accordance with all state and local codes and ordinances. ■■ It may be desirable...
Installation Instructions
Page 9
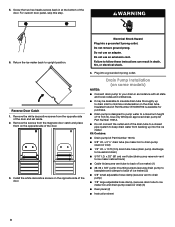
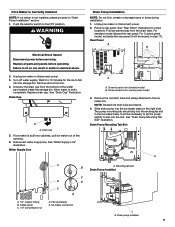
... not installed, please proceed to drain completely. Disconnect water supply line. Ferrule (sleeve) E. Pull rear panel away from bin. 4. For standard model discard the rear panel. Screw locations for screw locations. NOTE: Discard old drain tube and clamp. 4. The pump mounting tab should slip into... nut D. Ice maker connection Drain Pump Installation NOTE: Do not kink, smash or damage tubes or wires during installation. 1. For Custom panel model, set aside the rear panel (it will be reused in the ice maker base. See "Drain Cap" illustration. Replace drain cap. Unplug ice...
... not installed, please proceed to drain completely. Disconnect water supply line. Ferrule (sleeve) E. Pull rear panel away from bin. 4. For standard model discard the rear panel. Screw locations for screw locations. NOTE: Discard old drain tube and clamp. 4. The pump mounting tab should slip into... nut D. Ice maker connection Drain Pump Installation NOTE: Do not kink, smash or damage tubes or wires during installation. 1. For Custom panel model, set aside the rear panel (it will be reused in the ice maker base. See "Drain Cap" illustration. Replace drain cap. Unplug ice...

Installation Instructions
Page 11
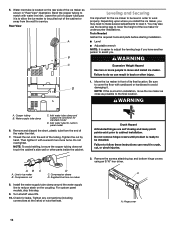
... supply line is recommended. Compression nut C. Turn off main water supply. x 10 ft (3 m) drain tube to step 17. 15. For standard model, skip to pump discharge tube. Install the cable tie on the rear panel using two holes provided on the water pipe. IMPORTANT: ■■ ...Screw compression nut onto outlet end with original screws. Compression sleeve B. For custom panel model, reuse the plastic rear panel (removed in step 2). Secure rear panel with adjustable wrench. 14. For standard model, place new rear panel (small one for 15" ice makers, large one for the...
... supply line is recommended. Compression nut C. Turn off main water supply. x 10 ft (3 m) drain tube to step 17. 15. For standard model, skip to pump discharge tube. Install the cable tie on the rear panel using two holes provided on the water pipe. IMPORTANT: ■■ ...Screw compression nut onto outlet end with original screws. Compression sleeve B. For custom panel model, reuse the plastic rear panel (removed in step 2). Secure rear panel with adjustable wrench. 14. For standard model, place new rear panel (small one for 15" ice makers, large one for the...
Installation Instructions
Page 12
... A. Inlet water tube clamp and supply line connector for leaks. Then tighten it . Failure to match with water line inlet. AB C A. Check for standard model D. A A. Depending upon where you install the ice maker, you . Tools Needed Gather the required tools and parts before starting installation. ■■ Level ...adjust the leveling legs if you have another person to assist you may also use the leveling legs to ice maker B. For custom panel models, skip this is located on the coupling. Water inlet tube is a built-in order to move the ice maker as close as it...
... A. Inlet water tube clamp and supply line connector for leaks. Then tighten it . Failure to match with water line inlet. AB C A. Check for standard model D. A A. Depending upon where you install the ice maker, you . Tools Needed Gather the required tools and parts before starting installation. ■■ Level ...adjust the leveling legs if you have another person to assist you may also use the leveling legs to ice maker B. For custom panel models, skip this is located on the coupling. Water inlet tube is a built-in order to move the ice maker as close as it...
Installation Instructions
Page 13
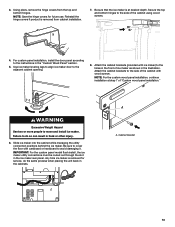
... covers from cabinet installation. 7. Slide ice maker into the cabinet while managing the utility connection positions behind the ice maker. IMPORTANT: For the custom panel model flush install, the ice maker utility connections must be routed out through the slot in the cabinets. Reinstall the hinge covers if product is removed...
... covers from cabinet installation. 7. Slide ice maker into the cabinet while managing the utility connection positions behind the ice maker. IMPORTANT: For the custom panel model flush install, the ice maker utility connections must be routed out through the slot in the cabinets. Reinstall the hinge covers if product is removed...

Installation Instructions
Page 17
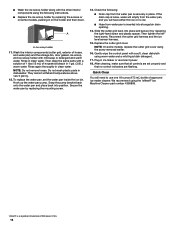
...level sensor down and forward away from the cutter grid cover. 5. Ice scoop holder On Some Models ■■ After removing the ice scoop, remove the holder by replacing the screws. Remove ...Make sure the plastic spacer from the right side of the cutter grid bracket stays with the other models, the ice scoop holder is loose, water will have either thin ice or no ice. 4. ...Screw (on the front of the unit. NOTE: On some models) 8. A B A A. Cutter grid harness B. Screw B. Disconnect the pump bracket from the water pan, ...
...level sensor down and forward away from the cutter grid cover. 5. Ice scoop holder On Some Models ■■ After removing the ice scoop, remove the holder by replacing the screws. Remove ...Make sure the plastic spacer from the right side of the cutter grid bracket stays with the other models, the ice scoop holder is loose, water will have either thin ice or no ice. 4. ...Screw (on the front of the unit. NOTE: On some models) 8. A B A A. Cutter grid harness B. Screw B. Disconnect the pump bracket from the water pan, ...
Installation Instructions
Page 18
... dishwasher. Hook up the water pan pump. Check the following instructions. ■■ Replace the ice scoop holder by replacing the screws or on some models, replace the cutter grid cover using the screw removed earlier. 16. Slide the cutter grid back into position. NOTE: On some... models, pushing in on the holder and then down. If the drain cap is inserted into storage bin drain opening. 14. Gently wipe the control panel ...
... dishwasher. Hook up the water pan pump. Check the following instructions. ■■ Replace the ice scoop holder by replacing the screws or on some models, replace the cutter grid cover using the screw removed earlier. 16. Slide the cutter grid back into position. NOTE: On some... models, pushing in on the holder and then down. If the drain cap is inserted into storage bin drain opening. 14. Gently wipe the control panel ...


