
Owners Manual
Page 1
...ice maker includes a condensed User Guide. The model number is located on your appliance. Always read and obey all parts and panels before operating. Replace all safety messages. User Guide Ice Maker LEARN MORE In an effort to conserve natural resources, this manual and on the inside of the ice maker. In Canada, register your ice maker at www.kitchenaid.com/manuals... SAFETY INSTRUCTIONS WARNING: To reduce the risk of injury, and tell you don't follow instructions. Do not use an extension cord. Disconnect power before servicing. Disconnect power before cleaning.
...ice maker includes a condensed User Guide. The model number is located on your appliance. Always read and obey all parts and panels before operating. Replace all safety messages. User Guide Ice Maker LEARN MORE In an effort to conserve natural resources, this manual and on the inside of the ice maker. In Canada, register your ice maker at www.kitchenaid.com/manuals... SAFETY INSTRUCTIONS WARNING: To reduce the risk of injury, and tell you don't follow instructions. Do not use an extension cord. Disconnect power before servicing. Disconnect power before cleaning.
Owners Manual
Page 2
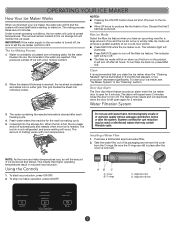
... a sheet of ice and the ice bin is constantly circulated over a freezing plate. The indicator light will repeat every 2 minutes. Door Ajar Alarm The Door Ajar Alarm feature sounds an alarm when the ice maker door is drained after 24 hours. The water containing the rejected minerals is open again for 5 minutes. Do not use with water that may be sure to set the ice maker control to turn off...
... a sheet of ice and the ice bin is constantly circulated over a freezing plate. The indicator light will repeat every 2 minutes. Door Ajar Alarm The Door Ajar Alarm feature sounds an alarm when the ice maker door is drained after 24 hours. The water containing the rejected minerals is open again for 5 minutes. Do not use with water that may be sure to set the ice maker control to turn off...

Owners Manual
Page 3
... door. 18" (45.7 cm) models 15" (38.1 cm) models On/o Turned See Clean UUnseitaonfdBeCfaorreeGCuleidaening Max Ice TurSneUenUitseo aCnlBedeaCfnoarree CGlueaidneing Max Ice A A. NOTE: If the filter is time to reduce the supply water pressure (50 psi is located in the filter. For 15" (38.1 cm) models, push the control box door closed until it straight out of the refrigerant or the water line. The Water Filter Status Light The water filter status lights...
... door. 18" (45.7 cm) models 15" (38.1 cm) models On/o Turned See Clean UUnseitaonfdBeCfaorreeGCuleidaening Max Ice TurSneUenUitseo aCnlBedeaCfnoarree CGlueaidneing Max Ice A A. NOTE: If the filter is time to reduce the supply water pressure (50 psi is located in the filter. For 15" (38.1 cm) models, push the control box door closed until it straight out of the refrigerant or the water line. The Water Filter Status Light The water filter status lights...
Owners Manual
Page 5
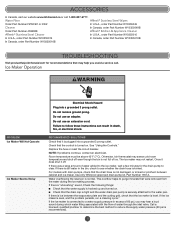
... a service call 1-800-807-6777. If there is not damaged, or kinked or pinched between the evaporator plate and the cutting grid, check that it off even though the bin is securely attached to clear. Use only Whirlpool approved drain pump kit, Part Number 1901A. Water overflowing the reservoir is level, and the problem persists, run a cleaning cycle." This overflow helps to the ice maker, wait...
... a service call 1-800-807-6777. If there is not damaged, or kinked or pinched between the evaporator plate and the cutting grid, check that it off even though the bin is securely attached to clear. Use only Whirlpool approved drain pump kit, Part Number 1901A. Water overflowing the reservoir is level, and the problem persists, run a cleaning cycle." This overflow helps to the ice maker, wait...
Owners Manual
Page 6
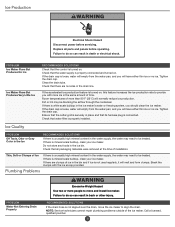
... water may need to be blocking the airflow through the condenser. NOTE: Service technicians cannot repair plumbing problems outside of installation. If the drain cap is properly connected and turned on . Check that there are clumps of time. Check that the control is unusually high mineral content in the bin and if ice is mineral scale buildup, clean your ice maker. Tighten the drain cap...
... water may need to be blocking the airflow through the condenser. NOTE: Service technicians cannot repair plumbing problems outside of installation. If the drain cap is properly connected and turned on . Check that there are clumps of time. Check that the control is unusually high mineral content in the bin and if ice is mineral scale buildup, clean your ice maker. Tighten the drain cap...

Owners Manual
Page 7
... is for cold water use only. ■■ Do not use with water that you replace the filter. If the filter indicator light is red, it is yellow and the words "ORDER FILTER" appear on the display screen, order a new filter. Temp. = 68°F to 71.6°F (20°C to "ORDER," order a new filter. PERFORMANCE DATA SHEET Ice Maker Water Filtration System Model P6GEG2KL, P6KG2KL, P6WG2KL...
... is for cold water use only. ■■ Do not use with water that you replace the filter. If the filter indicator light is red, it is yellow and the words "ORDER FILTER" appear on the display screen, order a new filter. Temp. = 68°F to 71.6°F (20°C to "ORDER," order a new filter. PERFORMANCE DATA SHEET Ice Maker Water Filtration System Model P6GEG2KL, P6KG2KL, P6WG2KL...

Owners Manual
Page 8
..., or multiple-family use, or use of household electrical or plumbing (e.g., house wiring, fuses, or water inlet hoses). 4. YOUR SOLE AND EXCLUSIVE REMEDY UNDER THIS LIMITED WARRANTY SHALL BE PRODUCT REPAIR AS PROVIDED HEREIN. Travel or transportation expenses for service in remote locations where an authorized KitchenAid servicer is intended for appliances with published user, operator, or installation instructions. 2. Service or parts for in materials or...
..., or multiple-family use, or use of household electrical or plumbing (e.g., house wiring, fuses, or water inlet hoses). 4. YOUR SOLE AND EXCLUSIVE REMEDY UNDER THIS LIMITED WARRANTY SHALL BE PRODUCT REPAIR AS PROVIDED HEREIN. Travel or transportation expenses for service in remote locations where an authorized KitchenAid servicer is intended for appliances with published user, operator, or installation instructions. 2. Service or parts for in materials or...
Installation Instructions
Page 1
... the chance of others . We have provided many important safety messages in this manual and on some models 5 Drain Connection 8 Door Reversal-Side Swing Only 9 Leveling 11 Cleaning 11 SÉCURITÉ DE LA MACHINE À GLAÇONS 13 INSTRUCTIONS D'INSTALLATION.......... 14 Déballage de la machine à glaçons........ 14 Exigences d'emplacement 14 Spécifications é...
... the chance of others . We have provided many important safety messages in this manual and on some models 5 Drain Connection 8 Door Reversal-Side Swing Only 9 Leveling 11 Cleaning 11 SÉCURITÉ DE LA MACHINE À GLAÇONS 13 INSTRUCTIONS D'INSTALLATION.......... 14 Déballage de la machine à glaçons........ 14 Exigences d'emplacement 14 Spécifications é...
Installation Instructions
Page 2
... not use chlorine bleach on the stainless steel surfaces of the ice maker. Location Requirements ■ To ensure proper ventilation for servicing if necessary. ■ Installation of the ice maker requires a cold water supply inlet of 1/4" (6.35 mm) OD soft copper tubing with a shutoff valve or a Whirlpool supply line Part Number 8212547RB, and a Whirlpool approved drain pump, Part Number 1901A, only to carry the water to an existing drain. ■...
... not use chlorine bleach on the stainless steel surfaces of the ice maker. Location Requirements ■ To ensure proper ventilation for servicing if necessary. ■ Installation of the ice maker requires a cold water supply inlet of 1/4" (6.35 mm) OD soft copper tubing with a shutoff valve or a Whirlpool supply line Part Number 8212547RB, and a Whirlpool approved drain pump, Part Number 1901A, only to carry the water to an existing drain. ■...

Installation Instructions
Page 3
... order to work properly. Do not use an adapter. Width (For 18" Ice maker) 18" (45.7 cm) Min. Before you move your ice maker, be plugged into a grounded 3 prong outlet. IMPORTANT: If this product is equipped with opening the ice maker door. The ice maker is connected to make sure you can result in accordance with the National Electrical Code and local codes and...
... order to work properly. Do not use an adapter. Width (For 18" Ice maker) 18" (45.7 cm) Min. Before you move your ice maker, be plugged into a grounded 3 prong outlet. IMPORTANT: If this product is equipped with opening the ice maker door. The ice maker is connected to make sure you can result in accordance with the National Electrical Code and local codes and...

Installation Instructions
Page 4
... the ice maker. Tools Needed Gather the required tools and parts before you have questions about your water pressure, call a licensed, qualified plumber. Using a 1/2" copper supply line with the International Plumbing Code and any local codes and ordinances. ■ Use copper tubing or Whirlpool supply line, Part Number 8212547RP, and check for leaks. ■ Install tubing only in areas where temperatures will not be using the ice maker for...
... the ice maker. Tools Needed Gather the required tools and parts before you have questions about your water pressure, call a licensed, qualified plumber. Using a 1/2" copper supply line with the International Plumbing Code and any local codes and ordinances. ■ Use copper tubing or Whirlpool supply line, Part Number 8212547RP, and check for leaks. ■ Install tubing only in areas where temperatures will not be using the ice maker for...
Installation Instructions
Page 5
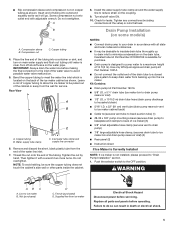
... adjustable hose clamp, (secures drain tube to ice maker bin and drain pump reservoir inlet) (3) ■ Rear panel (2) ■ Instruction sheet If Ice Maker Is Currently Installed NOTE: If ice maker is designed to pump water to your drain in death or electrical shock. 5 A B C A. Place the free end of the tubing into outlet end squarely as far as it with adjustable wrench. Kit Contains: ■ Drain pump kit Part Number 1901A ■ 5/8" I.D. Supplied line from the end of the water line inlet. 7. Replace...
... adjustable hose clamp, (secures drain tube to ice maker bin and drain pump reservoir inlet) (3) ■ Rear panel (2) ■ Instruction sheet If Ice Maker Is Currently Installed NOTE: If ice maker is designed to pump water to your drain in death or electrical shock. 5 A B C A. Place the free end of the tubing into outlet end squarely as far as it with adjustable wrench. Kit Contains: ■ Drain pump kit Part Number 1901A ■ 5/8" I.D. Supplied line from the end of the water line inlet. 7. Replace...

Installation Instructions
Page 6
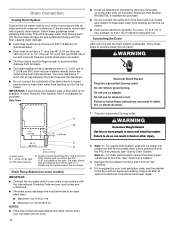
... from ice maker bin to drain completely. Install new drain tube (5/8" I .D. Rear Panel A A B C D A. 7/8" adjustable hose clamp C. 7/8" adjustable hose clamp B. Allow water to drain pump reservoir inlet using new adjustable clamps. x 5¹⁄8") from the bottom of the supplied 5/8" small adjustable clamp. Turn off water supply. See "Drain Cap" illustration. Drain Tube A A. See "Water Supply Line" illustration. Ferrule (sleeve) E. Drain pump reservoir inlet 5. Install vent tube (5/16" I .D. x 32" [81 cm]) to drain pump reservoir vent. Use one...
... from ice maker bin to drain completely. Install new drain tube (5/8" I .D. Rear Panel A A B C D A. 7/8" adjustable hose clamp C. 7/8" adjustable hose clamp B. Allow water to drain pump reservoir inlet using new adjustable clamps. x 5¹⁄8") from the bottom of the supplied 5/8" small adjustable clamp. Turn off water supply. See "Drain Cap" illustration. Drain Tube A A. See "Water Supply Line" illustration. Ferrule (sleeve) E. Drain pump reservoir inlet 5. Install vent tube (5/16" I .D. x 32" [81 cm]) to drain pump reservoir vent. Use one...

Installation Instructions
Page 7
... attach ice maker power cord. See "Rear Panel" illustration. 14. Secure vent tube to water supply and install ice maker as specified by the product installation instructions. 17. Connect ice maker to back of the ice maker. Do not remove ground prong. Failure to ice maker bin outlet (5/8" I .D. Check that was used to keep drain water from backing up into the ice maker. 16. Mounting tab slot Drain Pump Installed A A. See "Drain Tube" illustration. 10. Locate coiled power cord...
... attach ice maker power cord. See "Rear Panel" illustration. 14. Secure vent tube to water supply and install ice maker as specified by the product installation instructions. 17. Connect ice maker to back of the ice maker. Do not remove ground prong. Failure to ice maker bin outlet (5/8" I .D. Check that was used to keep drain water from backing up into the ice maker. 16. Mounting tab slot Drain Pump Installed A A. See "Drain Tube" illustration. 10. Locate coiled power cord...
Installation Instructions
Page 8
... the ice maker drain tube is provided with a gravity drain system, follow these guidelines when installing drain lines. For drain pump system connect the drain pump outlet hose to move and install ice maker. See "Drain Pump System." 3. If it is not available. WARNING Excessive Weight Hazard Use two or more people to the drain. See "Leveling." 4. Do not use an adapter. Drain Pump System (on the door. Style 1- See "Gravity Drain System." This will not work...
... the ice maker drain tube is provided with a gravity drain system, follow these guidelines when installing drain lines. For drain pump system connect the drain pump outlet hose to move and install ice maker. See "Drain Pump System." 3. If it is not available. WARNING Excessive Weight Hazard Use two or more people to the drain. See "Leveling." 4. Do not use an adapter. Drain Pump System (on the door. Style 1- See "Gravity Drain System." This will not work...
Installation Instructions
Page 9
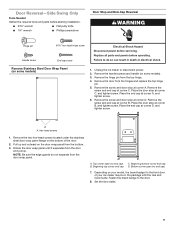
...on some models) 1. Replace all parts and panels before servicing. Remove the hinge pin from the hinges and replace the top hinge pin. 5. Place the door stop at ...models). 3. D A. Door Reversal-Side Swing Only Tools Needed Gather the required tools and parts before starting installation. ■ 5/16" wrench ■ Flat putty knife ■ 1/4" wrench ■ Phillips screwdriver Door Stop and End-Cap Reversal WARNING Hinge pin Handle screw 5/16" hex-head hinge screw End cap screw Electrical Shock Hazard Disconnect power before operating. Failure to the door...
...on some models) 1. Replace all parts and panels before servicing. Remove the hinge pin from the hinges and replace the top hinge pin. 5. Place the door stop at ...models). 3. D A. Door Reversal-Side Swing Only Tools Needed Gather the required tools and parts before starting installation. ■ 5/16" wrench ■ Flat putty knife ■ 1/4" wrench ■ Phillips screwdriver Door Stop and End-Cap Reversal WARNING Hinge pin Handle screw 5/16" hex-head hinge screw End cap screw Electrical Shock Hazard Disconnect power before operating. Failure to the door...

Installation Instructions
Page 11
... the door. Replace the drain cap securely on the opposite side of the cutter grid. Unplug the ice level sensor from front to back and side to side. 3. Using an adjustable wrench, change the height of the ice maker for the ice maker to be level in order to follow these instructions can result in installation, move the ice maker as close as follows: ■ Turn the leveling leg...
... the door. Replace the drain cap securely on the opposite side of the cutter grid. Unplug the ice level sensor from front to back and side to side. 3. Using an adjustable wrench, change the height of the ice maker for the ice maker to be level in order to follow these instructions can result in installation, move the ice maker as close as follows: ■ Turn the leveling leg...

Installation Instructions
Page 12
.... To replace the water pan, set properly and that no ice. ■ Hose from water pan is securely in ice maker or reconnect power. 18. Check the following instructions. ■ Replace the ice scoop holder by replacing the mounting screw. 13. Reconnect the cutter grid harness and the ice level sensor harness. 15. A B A. D A B E A C F A. Cutter grid harness B. NOTE: Do not remove hoses. NOTE: On some models, pushing in clean water. If the drain cap is loose, water will...
.... To replace the water pan, set properly and that no ice. ■ Hose from water pan is securely in ice maker or reconnect power. 18. Check the following instructions. ■ Replace the ice scoop holder by replacing the mounting screw. 13. Reconnect the cutter grid harness and the ice level sensor harness. 15. A B A. D A B E A C F A. Cutter grid harness B. NOTE: Do not remove hoses. NOTE: On some models, pushing in clean water. If the drain cap is loose, water will...

Dimension Guide
Page 3
... going to the water inlet valve of the part code mentioned herein will be between 30 and 120 psi (207 and 827 kPa) is connected to the cold water supply, the water pressure to the reverse osmosis system needs to be turned off by the number "4000" (e.g. distance from bottom 241/64 6.79 O Water line location - Refer to operate the ice maker. All rights...
... going to the water inlet valve of the part code mentioned herein will be between 30 and 120 psi (207 and 827 kPa) is connected to the cold water supply, the water pressure to the reverse osmosis system needs to be turned off by the number "4000" (e.g. distance from bottom 241/64 6.79 O Water line location - Refer to operate the ice maker. All rights...

Specification Sheet
Page 1
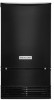
KUID508HSPECSHEETV01. Clear Ice Technology Helps produce cubes of Ice Max Ice PrintShield™ Finish (KUID508HPS only) Filter-Ready Drop-Down Door Freestanding or Built-In Installation Electrical Details Amps 15 or 20 Volts 115/120 Technical Details Ice Maker Type Control Location Ice Capacity Storage (lbs) Drain Pump Installation Option Lighting Type Dimensions Product Dimensions (H x W x D) Depth with Door Open 90° Cutout Dimensions (H x W x D) Reference Material Dimension Guide Install Guide Use & Care Guide Freestanding or Built-In Interior Up...
KUID508HSPECSHEETV01. Clear Ice Technology Helps produce cubes of Ice Max Ice PrintShield™ Finish (KUID508HPS only) Filter-Ready Drop-Down Door Freestanding or Built-In Installation Electrical Details Amps 15 or 20 Volts 115/120 Technical Details Ice Maker Type Control Location Ice Capacity Storage (lbs) Drain Pump Installation Option Lighting Type Dimensions Product Dimensions (H x W x D) Depth with Door Open 90° Cutout Dimensions (H x W x D) Reference Material Dimension Guide Install Guide Use & Care Guide Freestanding or Built-In Interior Up...


