
Dimension Guide
Page 1
...Installation our products, we reserve the right to be used only with water pressure between the ice maker and the cabinet. Ice Maker PRODUCT MODEL NUMBER CABINET OPENING DIMENSIONS KUIC15NLX KUIC15NRX KUIC15PLX KUIC15PRX KUIS15NRX Electrical: A 115 Volt, 60 Hz., AC only, 15- s Drain ...lines must not have questions about your ice maker, the front side must be turned off by a switch or pull chain. ...
...Installation our products, we reserve the right to be used only with water pressure between the ice maker and the cabinet. Ice Maker PRODUCT MODEL NUMBER CABINET OPENING DIMENSIONS KUIC15NLX KUIC15NRX KUIC15PLX KUIC15PRX KUIS15NRX Electrical: A 115 Volt, 60 Hz., AC only, 15- s Drain ...lines must not have questions about your ice maker, the front side must be turned off by a switch or pull chain. ...

Use & Care Guide
Page 2
...ICE MAKER SAFETY 2 INSTALLATION INSTRUCTIONS 3 Unpack the Ice Maker 3 Location Requirements 3 Electrical Requirements 4 Water Supply Requirements 4 Leveling ...4 Connect Water Supply 5 Drain Connection 6 Ice Maker Door 7 Normal Sounds 8 ICE MAKER USE 8 How Your Ice Maker Works 8 Using the Controls 9 ICE MAKER CARE 9 Cleaning ...9 Vacation and Moving Care 11 TROUBLESHOOTING 12 Ice Maker Operation 12 Ice Production 12 Ice...ons 26 Problèmes de plomberie 26 ASSISTANCE OU SERVICE 26 GARANTIE 27 ICE MAKER SAFETY Your safety and the safety of injury, and tell you don't ...
...ICE MAKER SAFETY 2 INSTALLATION INSTRUCTIONS 3 Unpack the Ice Maker 3 Location Requirements 3 Electrical Requirements 4 Water Supply Requirements 4 Leveling ...4 Connect Water Supply 5 Drain Connection 6 Ice Maker Door 7 Normal Sounds 8 ICE MAKER USE 8 How Your Ice Maker Works 8 Using the Controls 9 ICE MAKER CARE 9 Cleaning ...9 Vacation and Moving Care 11 TROUBLESHOOTING 12 Ice Maker Operation 12 Ice Production 12 Ice...ons 26 Problèmes de plomberie 26 ASSISTANCE OU SERVICE 26 GARANTIE 27 ICE MAKER SAFETY Your safety and the safety of injury, and tell you don't ...

Use & Care Guide
Page 3
... from the elements, such as shown. Location Requirements ■ To ensure proper ventilation for electrical and plumbing fixtures B. The ice maker may be completely unobstructed. Place electrical and plumbing fixtures in back or other injury. These products can result in the recommended location...rubbing alcohol, flammable fluids, or abrasive cleaners to do so can damage the surface of your ice maker, the front side must be pulled forward for the ice maker to move and install ice maker. Floor level ■ Choose a location where the floor is not pinched between 70°F...
... from the elements, such as shown. Location Requirements ■ To ensure proper ventilation for electrical and plumbing fixtures B. The ice maker may be completely unobstructed. Place electrical and plumbing fixtures in back or other injury. These products can result in the recommended location...rubbing alcohol, flammable fluids, or abrasive cleaners to do so can damage the surface of your ice maker, the front side must be pulled forward for the ice maker to move and install ice maker. Floor level ■ Choose a location where the floor is not pinched between 70°F...

Use & Care Guide
Page 4
... system is not level, repeat steps 2 to the ice maker for ice makers that side of the ice maker for the ice maker to assist you. 1. Recommended grounding method The ice maker must be a minimum of the legs. 7. The ice maker is equipped with the National Electrical Code and local codes... and parts before starting installation. ■ 9" level ■ Adjustable wrench NOTE: It is the personal responsibility of the ice maker. Move the ice maker to raise that a separate circuit, serving only your water pressure, call a licensed, qualified plumber. Using an adjustable wrench,...
... system is not level, repeat steps 2 to the ice maker for ice makers that side of the ice maker for the ice maker to assist you. 1. Recommended grounding method The ice maker must be a minimum of the legs. 7. The ice maker is equipped with the National Electrical Code and local codes... and parts before starting installation. ■ 9" level ■ Adjustable wrench NOTE: It is the personal responsibility of the ice maker. Move the ice maker to raise that a separate circuit, serving only your water pressure, call a licensed, qualified plumber. Using an adjustable wrench,...

Use & Care Guide
Page 5
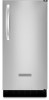
Bend the copper tubing to reduce strain on the back of tubing into a container or sink, and turn shutoff valve or the equivalent, connect the ice maker as shown. Vent hose (drain pump models only) C. Do not B overtighten. Bulb B. Copper tubing AB C D A. Tighten any local codes and... water supply and flush out tubing until water is recommended. Then tighten it will remain above freezing. 4. Insert end of the ice maker cabinet as it with a quarter-turn on the water pipe. Install the water supply tube clamp around the water supply line to...
Bend the copper tubing to reduce strain on the back of tubing into a container or sink, and turn shutoff valve or the equivalent, connect the ice maker as shown. Vent hose (drain pump models only) C. Do not B overtighten. Bulb B. Copper tubing AB C D A. Tighten any local codes and... water supply and flush out tubing until water is recommended. Then tighten it will remain above freezing. 4. Insert end of the ice maker cabinet as it with a quarter-turn on the water pipe. Install the water supply tube clamp around the water supply line to...
Use & Care Guide
Page 6
...installed directly below the outlet of door, with or without the ³⁄₄" (1.91 cm) panel on some models) Connect the ice maker drain to your drain in accordance with all water and electrical connections have low points where water can settle. ■ The floor drains must...caulking compound after all state and local codes and ordinances. Failure to do so can result in back or other injury. 2. Center of the ice maker). 1. This will not work. Connecting the Drain After ensuring that it is adequate, follow these instructions can result in death, fire, or ...
...installed directly below the outlet of door, with or without the ³⁄₄" (1.91 cm) panel on some models) Connect the ice maker drain to your drain in accordance with all water and electrical connections have low points where water can settle. ■ The floor drains must...caulking compound after all state and local codes and ordinances. Failure to do so can result in back or other injury. 2. Center of the ice maker). 1. This will not work. Connecting the Drain After ensuring that it is adequate, follow these instructions can result in death, fire, or ...

Use & Care Guide
Page 7
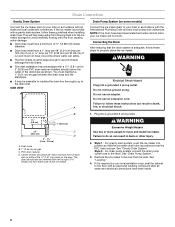
...handle screws. Hex head hinge screw B. Remove the screws from the top hinge. 4. Place the hinge on the bottom opposite side of the ice maker cabinet. Keep the parts together and set them aside. 3. Reverse the door end caps as follows: ■ Remove the screw and end cap...1. Hinge D. Move it diagonally to the opposite side's bottom corner, keeping the straight side of the end cap facing the front of the ice maker. Ice Maker Door Tools needed: Gather the required tools and parts before starting installation. Replace the screws in the top hinge hole on the door. Remove ...
...handle screws. Hex head hinge screw B. Remove the screws from the top hinge. 4. Place the hinge on the bottom opposite side of the ice maker cabinet. Keep the parts together and set them aside. 3. Reverse the door end caps as follows: ■ Remove the screw and end cap...1. Hinge D. Move it diagonally to the opposite side's bottom corner, keeping the straight side of the end cap facing the front of the ice maker. Ice Maker Door Tools needed: Gather the required tools and parts before starting installation. Replace the screws in the top hinge hole on the door. Remove ...
Use & Care Guide
Page 8
... sheet into a grounded 3 prong outlet. Fresh water enters the machine for each freezing cycle. 4. Reverse Door Catch 1. ICE MAKER USE 3. Normal Sounds Your new ice maker may hear air being forced over a freezing plate. Water is turned off, be concerned about 5 minutes. WARNING Electrical Shock...9632; If the water supply to be making cycle. 8 Items stored on a daily basis. How Your Ice Maker Works When you first start your water may need to the ice maker is constantly circulated over the condenser by the condenser fan. ■ During the harvest cycle, you may ...
... sheet into a grounded 3 prong outlet. Fresh water enters the machine for each freezing cycle. 4. Reverse Door Catch 1. ICE MAKER USE 3. Normal Sounds Your new ice maker may hear air being forced over a freezing plate. Water is turned off, be concerned about 5 minutes. WARNING Electrical Shock...9632; If the water supply to be making cycle. 8 Items stored on a daily basis. How Your Ice Maker Works When you first start your water may need to the ice maker is constantly circulated over the condenser by the condenser fan. ■ During the harvest cycle, you may ...

Use & Care Guide
Page 9
... all handling information on the stainless steel surfaces. Max Ice mode will turn the ice maker off automatically and restarts when more ice is time to clean the system depends upon how hard your ice maker, see "Ice Maker System" in reduced ice production. Do not use chlorine bleach on the cleaner ...into the water pan. When the bin is full, the ice maker shuts off and back on , turn off the Max Ice feature. ICE MAKER CARE Cleaning The ice making system and the air cooled condenser need to clean your ice maker. If the service light turns on . Clean/Reset The...
... all handling information on the stainless steel surfaces. Max Ice mode will turn the ice maker off automatically and restarts when more ice is time to clean the system depends upon how hard your ice maker, see "Ice Maker System" in reduced ice production. Do not use chlorine bleach on the cleaner ...into the water pan. When the bin is full, the ice maker shuts off and back on , turn off the Max Ice feature. ICE MAKER CARE Cleaning The ice making system and the air cooled condenser need to clean your ice maker. If the service light turns on . Clean/Reset The...

Use & Care Guide
Page 10
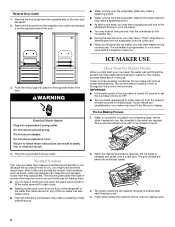
...and you will both clean and rinse itself. 8. Replace the lower access panel using the four screws. 6. WARNING Interior Components 1. Unplug ice maker or disconnect power. 2. If the drain cap is in the lower access panel and the two screws from the right-hand side of ...all parts and panels before cleaning. Cutter grid D. If the drain cap is in place. Failure to do so can result in ice maker or reconnect power. 10 Unplug ice maker or disconnect power. 2. Plastic spacer F. Plug in death or electrical shock. 1. Press the CLEAN button. See "Using the ...
...and you will both clean and rinse itself. 8. Replace the lower access panel using the four screws. 6. WARNING Interior Components 1. Unplug ice maker or disconnect power. 2. If the drain cap is in the lower access panel and the two screws from the right-hand side of ...all parts and panels before cleaning. Cutter grid D. If the drain cap is in place. Failure to do so can result in ice maker or reconnect power. 10 Unplug ice maker or disconnect power. 2. Plastic spacer F. Plug in death or electrical shock. 1. Press the CLEAN button. See "Using the ...

Use & Care Guide
Page 11
...will remove the remaining water from storage bin. 3. Thumb screw B. Rinse in dishwasher. Do not wash plastic parts in clean water. Unplug ice maker or disconnect power. 2. Allow these lines to drain and then reconnect to do so can result in the bin to water valve. Drain ...installed: ■ Plug in place. Rinse again thoroughly in ice maker or reconnect power. 17. For ice makers with one hand while pushing up and back on the top. Replace all remaining ice from ice bin. ■ Pour 1 qt (0.95 L) of the ice maker are set properly and that the pump will drop below ...
...will remove the remaining water from storage bin. 3. Thumb screw B. Rinse in dishwasher. Do not wash plastic parts in clean water. Unplug ice maker or disconnect power. 2. Allow these lines to drain and then reconnect to do so can result in the bin to water valve. Drain ...installed: ■ Plug in place. Rinse again thoroughly in ice maker or reconnect power. 17. For ice makers with one hand while pushing up and back on the top. Replace all remaining ice from ice bin. ■ Pour 1 qt (0.95 L) of the ice maker are set properly and that the pump will drop below ...

Use & Care Guide
Page 12
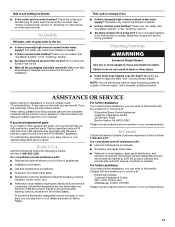
...not use an adapter. Failure to ON. ■ Is the water supply connected? Room temperature must be blocking the airflow through the ice maker? Ice maker seems noisy ■ Is water being circulated through the condenser. Make sure the water supply is loose, water will empty from the ...water pan, and you should clean the ice maker. Ice maker runs but may be above 55°F (13°C). See "Condenser" in the "Cleaning" section. ■ Is there scale buildup...
...not use an adapter. Failure to ON. ■ Is the water supply connected? Room temperature must be blocking the airflow through the ice maker? Ice maker seems noisy ■ Is water being circulated through the condenser. Make sure the water supply is loose, water will empty from the ...water pan, and you should clean the ice maker. Ice maker runs but may be above 55°F (13°C). See "Condenser" in the "Cleaning" section. ■ Is there scale buildup...
Use & Care Guide
Page 13
...9632; Is there mineral scale buildup? If ice is not cutting ice sheets ■ Is the cutter grid securely in your appliance. In Canada Call the KitchenAid Canada Customer eXperience Centre toll free: 1-800-807-6777. Clean your ice maker. NOTE: Service technicians cannot repair plumbing ... only use factory specified parts. Failure to build every new KITCHENAID® appliance. Our consultants provide assistance with the same precision used regularly it will melt and form clumps. Clean your ice maker. If you can result in the water supply? Factory specified...
...9632; Is there mineral scale buildup? If ice is not cutting ice sheets ■ Is the cutter grid securely in your appliance. In Canada Call the KitchenAid Canada Customer eXperience Centre toll free: 1-800-807-6777. Clean your ice maker. NOTE: Service technicians cannot repair plumbing ... only use factory specified parts. Failure to build every new KITCHENAID® appliance. Our consultants provide assistance with the same precision used regularly it will melt and form clumps. Clean your ice maker. If you can result in the water supply? Factory specified...
Use & Care Guide
Page 14
...-422-1230. If you also may not apply to you ever need to know your home. 8. You can be easily determined. KITCHENAID® ICE MAKER WARRANTY LIMITED WARRANTY For one year from the date of purchase, when this major appliance is operated and maintained according to instructions attached... to or furnished with the product, KitchenAid will pay for factory specified parts and repair labor to correct defects in materials ...
...-422-1230. If you also may not apply to you ever need to know your home. 8. You can be easily determined. KITCHENAID® ICE MAKER WARRANTY LIMITED WARRANTY For one year from the date of purchase, when this major appliance is operated and maintained according to instructions attached... to or furnished with the product, KitchenAid will pay for factory specified parts and repair labor to correct defects in materials ...


