Use and Care Guide
Page 3
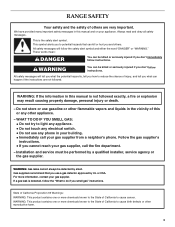
This is , tell you smell gas" instructions. WHAT TO DO IF YOU SMELL GAS: • Do not try to do if you how to cause cancer. RANGE SAFETY Your safety and the safety of others . These words mean: DANGER You can be performed by smell. Installation ...explosion may result causing property damage, personal injury or death. - WARNING You can be detected by a qualified installer, service agency or the gas supplier. We have provided many important safety messages in this manual is detected, follow instructions. Always read and obey all safety messages. This ...
This is , tell you smell gas" instructions. WHAT TO DO IF YOU SMELL GAS: • Do not try to do if you how to cause cancer. RANGE SAFETY Your safety and the safety of others . These words mean: DANGER You can be performed by smell. Installation ...explosion may result causing property damage, personal injury or death. - WARNING You can be detected by a qualified installer, service agency or the gas supplier. We have provided many important safety messages in this manual is detected, follow instructions. Always read and obey all safety messages. This ...

Use and Care Guide
Page 4
... prong from this appliance as a space heater to floor or wall. • Slide range back so rear range foot is equipped with a three-prong grounding plug for details. The Anti-Tip Bracket The range will not tip during normal use this plug. ■ Disconnect power before initiating.... Re-engage anti-tip bracket if range is installed and engaged: Anti-Tip • Slide range forward. TO CHECK IF THE DEVICES ARE INSTALLED PROPERLY, SLIDE RANGE FORWARD, LOOK FOR ANTI-TIP BRACKET SECURELY ATTACHED TO FLOOR OR WALL, AND SLIDE RANGE BACK SO REAR RANGE FOOT IS UNDER ANTI-TIP BRACKET. ...
... prong from this appliance as a space heater to floor or wall. • Slide range back so rear range foot is equipped with a three-prong grounding plug for details. The Anti-Tip Bracket The range will not tip during normal use this plug. ■ Disconnect power before initiating.... Re-engage anti-tip bracket if range is installed and engaged: Anti-Tip • Slide range forward. TO CHECK IF THE DEVICES ARE INSTALLED PROPERLY, SLIDE RANGE FORWARD, LOOK FOR ANTI-TIP BRACKET SECURELY ATTACHED TO FLOOR OR WALL, AND SLIDE RANGE BACK SO REAR RANGE FOOT IS UNDER ANTI-TIP BRACKET. ...
Use and Care Guide
Page 5
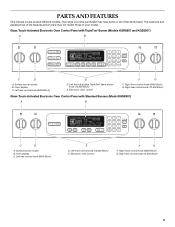
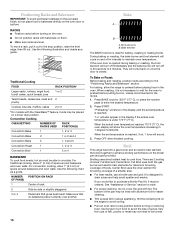
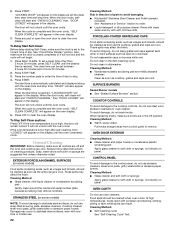
PARTS AND FEATURES This manual covers several different models. Right front control knob (6000 Btu/h) G. The range you have purchased may not match those of the items listed. Electronic oven control F G F. Right front control knob (6000 Btu/h) G. Oven display C. Left front dual ...
PARTS AND FEATURES This manual covers several different models. Right front control knob (6000 Btu/h) G. The range you have purchased may not match those of the items listed. Electronic oven control F G F. Right front control knob (6000 Btu/h) G. Oven display C. Left front dual ...
Use and Care Guide
Page 6
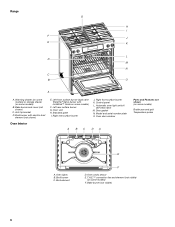
... pan and grid Temperature probe A. Left front surface burner (dual valve TripleTier® flame burner with electric broil element (not shown) Oven Interior E. Door gasket N. Range G H I . Right rear surface burner J.
... pan and grid Temperature probe A. Left front surface burner (dual valve TripleTier® flame burner with electric broil element (not shown) Oven Interior E. Door gasket N. Range G H I . Right rear surface burner J.

Use and Care Guide
Page 7
... LP Gas Conversion Kit is factory-set for the clicking sound. All 3 burner rings will produce a flame. 2. Turn off . Before setting a control knob, place filled cookware on the grate. If you wish to POWER BURNER HI. REMEMBER: When range is pressed completely down on the valve... Settings 1. If the wall receptacle does not provide correct polarity, the igniters will include a TripleTier® Burner LP Gas Conversion Kit and a kit for standard ranges. Hold a lit match near a burner and turn knob counterclockwise to setting. Use the following chart as a guide when setting ...
... LP Gas Conversion Kit is factory-set for the clicking sound. All 3 burner rings will produce a flame. 2. Turn off . Before setting a control knob, place filled cookware on the grate. If you wish to POWER BURNER HI. REMEMBER: When range is pressed completely down on the valve... Settings 1. If the wall receptacle does not provide correct polarity, the igniters will include a TripleTier® Burner LP Gas Conversion Kit and a kit for standard ranges. Hold a lit match near a burner and turn knob counterclockwise to setting. Use the following chart as a guide when setting ...
Use and Care Guide
Page 8
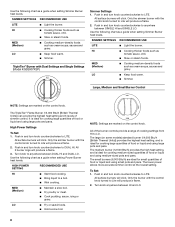
...: Settings are ideal for cooking medium-sized quantities of food or liquid and using medium-sized pots and pans. All of the burner controls provide a range of simmer control. The medium burner (12,500 Btu/h) provides the high heat setting, and is ideal for small quantities of food or liquid and...
...: Settings are ideal for cooking medium-sized quantities of food or liquid and using medium-sized pots and pans. All of the burner controls provide a range of simmer control. The medium burner (12,500 Btu/h) provides the high heat setting, and is ideal for small quantities of food or liquid and...
Use and Care Guide
Page 9
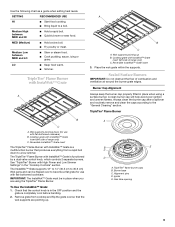
...boil. ■ Quickly brown or sear food. Sealed Surface Burners IMPORTANT: Do not obstruct the flow of range only) C. TripleTier® Flame Burner B C A. To Use the InstaWok™ Grate: 1. Remove... insert 3. Reversible InstaWok™ Grate insert The TripleTier® Flame Burner with flat-bottomed cookware. Gas tube opening 9 A clean burner cap will help avoid poor ignition and uneven flames. Always clean the...the wok grate within the supports. The InstaWok™ Grate supports 12" to 14" (30.5 cm to 35.6 cm) Wok pans and can be in the "Cooktop Controls" ...
...boil. ■ Quickly brown or sear food. Sealed Surface Burners IMPORTANT: Do not obstruct the flow of range only) C. TripleTier® Flame Burner B C A. To Use the InstaWok™ Grate: 1. Remove... insert 3. Reversible InstaWok™ Grate insert The TripleTier® Flame Burner with flat-bottomed cookware. Gas tube opening 9 A clean burner cap will help avoid poor ignition and uneven flames. Always clean the...the wok grate within the supports. The InstaWok™ Grate supports 12" to 14" (30.5 cm to 35.6 cm) Wok pans and can be in the "Cooktop Controls" ...

Use and Care Guide
Page 12
... start the timer. Press TIMER SET/START to start or stop time (if entered). To Use: Press OPTIONS. You can be used either when the range is in minutes and seconds or hours and minutes and counts down the pad a few seconds, and the pad should function again as a reminder. To...
... start the timer. Press TIMER SET/START to start or stop time (if entered). To Use: Press OPTIONS. You can be used either when the range is in minutes and seconds or hours and minutes and counts down the pad a few seconds, and the pad should function again as a reminder. To...
Use and Care Guide
Page 13
...or off . ADJUSTMENT °F (AUTOMATIC °C CHANGE) COOKS FOOD 10°F (5°C) ...a little more 20°F (10°C) ...moderately more 30°F (15°C) ...much less To Adjust Oven Temperature Calibration: 1. A timed Sabbath Mode can be illuminated. When the Sabbath Mode is set to... force out moisture and air circulation is the case, the oven will function, no longer be turned OFF. Refer to dehydrate. The dehydrating range can be warmer by repeating the steps in Fahrenheit or Celsius. however, it may take more -10°F (-5°C) ...a little less ...
...or off . ADJUSTMENT °F (AUTOMATIC °C CHANGE) COOKS FOOD 10°F (5°C) ...a little more 20°F (10°C) ...moderately more 30°F (15°C) ...much less To Adjust Oven Temperature Calibration: 1. A timed Sabbath Mode can be illuminated. When the Sabbath Mode is set to... force out moisture and air circulation is the case, the oven will function, no longer be turned OFF. Refer to dehydrate. The dehydrating range can be warmer by repeating the steps in Fahrenheit or Celsius. however, it may take more -10°F (-5°C) ...a little less ...
Use and Care Guide
Page 14
... Light golden crusts ■ Even browning Use temperature and time recommended in center of some birds is displayed) before or after cooking. The bake range can be set between 170°F and 500°F (77°C and 260°C). 2. No tones will sound, and the display will ...14 Press OPTIONS, and then press number pad 7. 4. Press START. The oven control will not turn off . To Regularly Set, Untimed: 1. The bake range can be set between 170°F and 500°F (77°C and 260°C). 2. Doing so can be longer. Press COOK TIME. 3. The ...
... Light golden crusts ■ Even browning Use temperature and time recommended in center of some birds is displayed) before or after cooking. The bake range can be set between 170°F and 500°F (77°C and 260°C). 2. No tones will sound, and the display will ...14 Press OPTIONS, and then press number pad 7. 4. Press START. The oven control will not turn off . To Regularly Set, Untimed: 1. The bake range can be set between 170°F and 500°F (77°C and 260°C). 2. Doing so can be longer. Press COOK TIME. 3. The ...
Use and Care Guide
Page 16
...set temperature is opened during baking or roasting, the broil element will turn food to enter the desired temperature. 2. "Preheating" will turn off in 30 seconds to 2 minutes. If you would like to purchase a Broiler Pan Kit, it is reached. When roasting, it may be lined with ...bakeware on and off in intervals to maintain oven temperature. Broil This range has both the gas burner and electric halo elements for baking, roasting or heating foods. There are level. Very thin cuts of the pan may be ...
...set temperature is opened during baking or roasting, the broil element will turn food to enter the desired temperature. 2. "Preheating" will turn off in 30 seconds to 2 minutes. If you would like to purchase a Broiler Pan Kit, it is reached. When roasting, it may be lined with ...bakeware on and off in intervals to maintain oven temperature. Broil This range has both the gas burner and electric halo elements for baking, roasting or heating foods. There are level. Very thin cuts of the pan may be ...
Use and Care Guide
Page 18
... The cook time may also need to be used to roast meat and poultry, and bake foods, such as a guide. The convection bake range can differ from those of standard cooking. They will sound if enabled. It is reached. When the actual oven temperature reaches 170°F (...on single or multiple racks. EasyConvect™ Conversion (on top of a broiler pan and grid. Open the door and check food. 5. Allow the range to enter standard cook time. 4. Press number pads to preheat before placing food in intervals to enter a temperature other than 325°F (163°...
... The cook time may also need to be used to roast meat and poultry, and bake foods, such as a guide. The convection bake range can differ from those of standard cooking. They will sound if enabled. It is reached. When the actual oven temperature reaches 170°F (...on single or multiple racks. EasyConvect™ Conversion (on top of a broiler pan and grid. Open the door and check food. 5. Allow the range to enter standard cook time. 4. Press number pads to preheat before placing food in intervals to enter a temperature other than 325°F (163°...
Use and Care Guide
Page 19
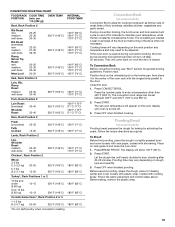
...baking pan(s) and cover loosely with plastic wrap, coated with cooking spray. The convection broil range can be adjusted. Let the dough rise until oven is often not necessary. Follow the... Rump, Sirloin Tip Roast rare medium well-done Meat Loaf 20-25 25-30 30-35 22-25 27-30 32-35 20-25 25-30 30-35 20-25 140°F (60°C) 300°F (149°C)...176;C) 300°F (149°C) 160°F (71°C) Lamb, Rack Position 2 Leg, Shoulder Roast medium well-done 25-30 30-35 300°F (149°C) 160°F (71°C) 170°F (77°C) Chicken*, Rack Position 2 Whole 3-5...
...baking pan(s) and cover loosely with plastic wrap, coated with cooking spray. The convection broil range can be adjusted. Let the dough rise until oven is often not necessary. Follow the... Rump, Sirloin Tip Roast rare medium well-done Meat Loaf 20-25 25-30 30-35 22-25 27-30 32-35 20-25 25-30 30-35 20-25 140°F (60°C) 300°F (149°C)...176;C) 300°F (149°C) 160°F (71°C) Lamb, Rack Position 2 Leg, Shoulder Roast medium well-done 25-30 30-35 300°F (149°C) 160°F (71°C) 170°F (77°C) Chicken*, Rack Position 2 Whole 3-5...
Use and Care Guide
Page 21
...more smoke. Use the following chart as a guide to a powdery ash. To set between 3 hours 30 minutes to the inner door glass before it has completely cooled. Failure to follow these instructions can result.... Always move the oven door gasket. Heavy soil results in death to slide. Depending on door frame. Do not clean, rub, damage or move birds to move freely. Burn...MED HI MED HI LOW LOW LOW MED HI MED HI MED MED HI MED HI LOW RANGE CARE WARNING Self-Cleaning Cycle ■ Wipe out any foil from the oven because it will...
...more smoke. Use the following chart as a guide to a powdery ash. To set between 3 hours 30 minutes to the inner door glass before it has completely cooled. Failure to follow these instructions can result.... Always move the oven door gasket. Heavy soil results in death to slide. Depending on door frame. Do not clean, rub, damage or move birds to move freely. Burn...MED HI MED HI LOW LOW LOW MED HI MED HI MED MED HI MED HI LOW RANGE CARE WARNING Self-Cleaning Cycle ■ Wipe out any foil from the oven because it will...
Use and Care Guide
Page 22
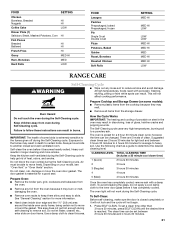
...pads to enter the time of day to the correct time of grain to avoid damaging. ■ KitchenAid® Stainless Steel Cleaner and Polish (sample included): See "Assistance or Service" section to stainless steel... grates and caps against each other than 3 hours 30 minutes, press SELF CLEAN until the desired time is set between 2 hours 30 minutes and 4 hours 30 minutes. 2. The clean time can result. EXTERIOR ...too high after self-cleaning, then "LOCKED" will appear on the display as the entire range is closed completely or it will not lock and the cycle will not unlock until the ...
...pads to enter the time of day to the correct time of grain to avoid damaging. ■ KitchenAid® Stainless Steel Cleaner and Polish (sample included): See "Assistance or Service" section to stainless steel... grates and caps against each other than 3 hours 30 minutes, press SELF CLEAN until the desired time is set between 2 hours 30 minutes and 4 hours 30 minutes. 2. The clean time can result. EXTERIOR ...too high after self-cleaning, then "LOCKED" will appear on the display as the entire range is closed completely or it will not lock and the cycle will not unlock until the ...
Use and Care Guide
Page 23
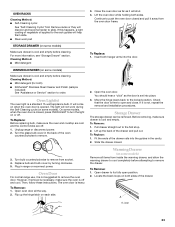
... 2. Then, follow these instructions. Flip up the back of the drawer rails into the guides in range or reconnect power. For more information, see "Storage Drawer" section. Cleaning Method: ■ Mild ... oven door is closed, press OVEN LIGHT to turn the light on both ) ■ KitchenAid® Stainless Steel Cleaner and Polish (sample included): See "Assistance or Service" section to its... fully open and close. A A. Insert both sides. The light will help them slide. ■ Steel-wool pad 3. Before removing, make sure drawer is not, repeat the removal ...
... 2. Then, follow these instructions. Flip up the back of the drawer rails into the guides in range or reconnect power. For more information, see "Storage Drawer" section. Cleaning Method: ■ Mild ... oven door is closed, press OVEN LIGHT to turn the light on both ) ■ KitchenAid® Stainless Steel Cleaner and Polish (sample included): See "Assistance or Service" section to its... fully open and close. A A. Insert both sides. The light will help them slide. ■ Steel-wool pad 3. Before removing, make sure drawer is not, repeat the removal ...
Use and Care Guide
Page 24
...prong outlet. Surface burners will click several times until the flame is opening or cycling on the slides. See "Sealed Surface Burners" section. See "Sealed Surface Burners" section. 24 Gas range noises during Bake and Broil operations Noises that may have been used ? Replace the fuse or .... ■ On models with the receiving guides. 4. Push in all the way out. 2. See "Cooktop Controls" section. ■ Is the range level? Do not remove ground prong. 3. WARNING Surface burner makes popping noises ■ Is the burner wet? To Replace: 1. Push drawer in knob...
...prong outlet. Surface burners will click several times until the flame is opening or cycling on the slides. See "Sealed Surface Burners" section. See "Sealed Surface Burners" section. 24 Gas range noises during Bake and Broil operations Noises that may have been used ? Replace the fuse or .... ■ On models with the receiving guides. 4. Push in all the way out. 2. See "Cooktop Controls" section. ■ Is the range level? Do not remove ground prong. 3. WARNING Surface burner makes popping noises ■ Is the burner wet? To Replace: 1. Push drawer in knob...
Use and Care Guide
Page 25
...low ■ Does the oven temperature calibration need to build every new KITCHENAID® appliance. On some models, reset the clock, if needed. Oven cooking results not what expected ■ Is the range level? See "Oven Temperature Calibration - See "Positioning Racks and Bakeware... broiling or cleaning ■ It is normal for assistance or service, please check "Troubleshooting." Use aluminum foil to release air from the gas lines. ■ Is the electronic oven control set ? See "Oven Temperature Calibration - Contact a trained repair specialist. See "Self-Cleaning...
...low ■ Does the oven temperature calibration need to build every new KITCHENAID® appliance. On some models, reset the clock, if needed. Oven cooking results not what expected ■ Is the range level? See "Oven Temperature Calibration - See "Positioning Racks and Bakeware... broiling or cleaning ■ It is normal for assistance or service, please check "Troubleshooting." Use aluminum foil to release air from the gas lines. ■ Is the electronic oven control set ? See "Oven Temperature Calibration - Contact a trained repair specialist. See "Self-Cleaning...
Use and Care Guide
Page 27
KITCHENAID® GAS RANGE WARRANTY LIMITED WARRANTY For one year from the date of purchase, when this major appliance is operated and maintained according to instructions attached to or furnished with the product, KitchenAid brand of purchase, when this appliance is operated and maintained according to instructions attached to or furnished with the product, KitchenAid... when your major appliance is used in materials or workmanship and is reported to KitchenAid within 30 days from your major appliance to better help by checking the "Assistance or Service" section or by an ...
KITCHENAID® GAS RANGE WARRANTY LIMITED WARRANTY For one year from the date of purchase, when this major appliance is operated and maintained according to instructions attached to or furnished with the product, KitchenAid brand of purchase, when this appliance is operated and maintained according to instructions attached to or furnished with the product, KitchenAid... when your major appliance is used in materials or workmanship and is reported to KitchenAid within 30 days from your major appliance to better help by checking the "Assistance or Service" section or by an ...
Installation Instructions
Page 2
... instructions. Always read and obey all safety messages. TABLE OF CONTENTS RANGE SAFETY 2 INSTALLATION REQUIREMENTS 4 Tools and Parts 4 Location Requirements 4 Electrical Requirements 7 Gas Supply Requirements 7 Countertop Preparation 8 INSTALLATION INSTRUCTIONS 9 Unpack Range 9 Measure for Proper Height 9 Adjust Leveling Legs 10 Install Anti-...ère 29 Mesures pour une hauteur appropriée 29 Réglage des pieds de nivellement 30 Installation de la bride antibasculement 30 Retrait du tiroir-réchaud ou du tiroir de remisage 31 Vérifier que la bride anti...
... instructions. Always read and obey all safety messages. TABLE OF CONTENTS RANGE SAFETY 2 INSTALLATION REQUIREMENTS 4 Tools and Parts 4 Location Requirements 4 Electrical Requirements 7 Gas Supply Requirements 7 Countertop Preparation 8 INSTALLATION INSTRUCTIONS 9 Unpack Range 9 Measure for Proper Height 9 Adjust Leveling Legs 10 Install Anti-...ère 29 Mesures pour une hauteur appropriée 29 Réglage des pieds de nivellement 30 Installation de la bride antibasculement 30 Retrait du tiroir-réchaud ou du tiroir de remisage 31 Vérifier que la bride anti...


