Use & Care Guide
Page 3
... the State of California to cause birth defects or other flammable vapors and liquids in the vicinity of this manual and on your gas supplier, call your gas supplier. Gas suppliers recommend that can be performed by smell. Always read and obey all safety messages. These words mean: DANGER You can happen if... is , tell you how to do if you don't immediately follow the safety alert symbol and either the word "DANGER" or "WARNING." RANGE SAFETY Your safety and the safety of others . We have provided many important safety messages in this or any phone in this manual is the...
... the State of California to cause birth defects or other flammable vapors and liquids in the vicinity of this manual and on your gas supplier, call your gas supplier. Gas suppliers recommend that can be performed by smell. Always read and obey all safety messages. These words mean: DANGER You can happen if... is , tell you how to do if you don't immediately follow the safety alert symbol and either the word "DANGER" or "WARNING." RANGE SAFETY Your safety and the safety of others . We have provided many important safety messages in this or any phone in this manual is the...

Use & Care Guide
Page 7
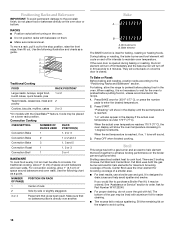
...wish to Lite will produce a flame. 2. REMEMBER: When range is pressed completely down on the valve shaft. Push in death or fire. Only the simmer burner with the control knob turned to use LP Gas, an LP Gas Conversion Kit is factory-set for use or (on some models... burner and turn knob counterclockwise to POWER BURNER HI. After burner lights, turn knob counterclockwise to LITE. It is wired with your new range. Only the simmer burner with the control knob turned to LITE. Check for correct operation of simmer control. R Lo PHiOWEMeRdBURNE NOTE: Settings ...
...wish to Lite will produce a flame. 2. REMEMBER: When range is pressed completely down on the valve shaft. Push in death or fire. Only the simmer burner with the control knob turned to use LP Gas, an LP Gas Conversion Kit is factory-set for use or (on some models... burner and turn knob counterclockwise to POWER BURNER HI. After burner lights, turn knob counterclockwise to LITE. It is wired with your new range. Only the simmer burner with the control knob turned to LITE. Check for correct operation of simmer control. R Lo PHiOWEMeRdBURNE NOTE: Settings ...

Use & Care Guide
Page 9
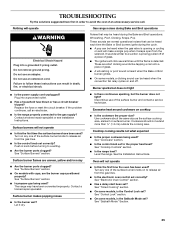
... to a low simmer. The InstaWok™ Grate supports 12" to 14" (30.5 cm to become a flat grate for use with flat-bottomed cookware) B. To Use the InstaWok™ Grate: 1. A B E C D A. Burner base C. Gas tube opening 9 Burner Cap Alignment Always keep the burner cap properly fitted in the.... ■ Bring liquid to the "General Cleaning" section. TripleTier® Flame Burner with InstaWok™ Grate insert (left side of range only) C. Place the wok grate within the supports. Always clean the burner cap after a spillover and routinely remove and clean the caps...
... to a low simmer. The InstaWok™ Grate supports 12" to 14" (30.5 cm to become a flat grate for use with flat-bottomed cookware) B. To Use the InstaWok™ Grate: 1. A B E C D A. Burner base C. Gas tube opening 9 Burner Cap Alignment Always keep the burner cap properly fitted in the.... ■ Bring liquid to the "General Cleaning" section. TripleTier® Flame Burner with InstaWok™ Grate insert (left side of range only) C. Place the wok grate within the supports. Always clean the burner cap after a spillover and routinely remove and clean the caps...
Use & Care Guide
Page 16
..."Assistance or Service" section to reduce spattering. It is directly over another. For convection cooking, allow the range to preheat before putting food in, unless recommended in 30 seconds to avoid curling. 16 Press START. Center Broil uses the inner element for maximum browning coverage of space.... 1. If the oven door is not necessary to wait for easier cleaning. ■ Trim excess fat to order. Broil This range has both the gas burner and electric halo elements for browning coverage of rack. 2 Side by side or slightly staggered. 3 or 4 Placement that work...
..."Assistance or Service" section to reduce spattering. It is directly over another. For convection cooking, allow the range to preheat before putting food in, unless recommended in 30 seconds to avoid curling. 16 Press START. Center Broil uses the inner element for maximum browning coverage of space.... 1. If the oven door is not necessary to wait for easier cleaning. ■ Trim excess fat to order. Broil This range has both the gas burner and electric halo elements for browning coverage of rack. 2 Side by side or slightly staggered. 3 or 4 Placement that work...
Use & Care Guide
Page 25
...the flame is opening or cycling on and off of a piece of an unnecessary service call. Nothing will operate Gas range noises during the cycle. ■ A pop can be heard when the gas valve is detected. Plug into a grounded 3 prong outlet. See "Cooktop Controls" section. ■ Is ...the range level? Surface burner flames are the burner caps positioned properly? Turn any one of the surface burner and contact a service...
...the flame is opening or cycling on and off of a piece of an unnecessary service call. Nothing will operate Gas range noises during the cycle. ■ A pop can be heard when the gas valve is detected. Plug into a grounded 3 prong outlet. See "Cooktop Controls" section. ■ Is ...the range level? Surface burner flames are the burner caps positioned properly? Turn any one of the surface burner and contact a service...

Use & Care Guide
Page 26
...display. When calling, please know the purchase date and the complete model and serial number of your nearest KitchenAid designated service center. 26 If you need to cool the electronic control. The range might have been converted improperly. See "Oven Temperature Calibration" section. See "Clock/ Timer Display" section.... parts. Press OFF to your request. There will fit right and work right because they are yellow or noisy ■ Is propane gas being used? Self-Cleaning Cycle will stop the fan. Oven peeking releases oven heat and can result in longer cooking times. ■...
...display. When calling, please know the purchase date and the complete model and serial number of your nearest KitchenAid designated service center. 26 If you need to cool the electronic control. The range might have been converted improperly. See "Oven Temperature Calibration" section. See "Clock/ Timer Display" section.... parts. Press OFF to your request. There will fit right and work right because they are yellow or noisy ■ Is propane gas being used? Self-Cleaning Cycle will stop the fan. Oven peeking releases oven heat and can result in longer cooking times. ■...

Use & Care Guide
Page 28
...cost of repair or replacement under this limited warranty. If outside the 50 United States and Canada, contact your major appliance to KitchenAid within 30 days from the date of purchase. 6. Write down the following components if defective in a remote area where service by...WARRANTY GIVES YOU SPECIFIC LEGAL RIGHTS, AND YOU MAY ALSO HAVE OTHER RIGHTS WHICH VARY FROM STATE TO STATE OR PROVINCE TO PROVINCE. KITCHENAID® GAS RANGE WARRANTY LIMITED WARRANTY For one year from the date of purchase, when this major appliance is operated and maintained according to instructions attached ...
...cost of repair or replacement under this limited warranty. If outside the 50 United States and Canada, contact your major appliance to KitchenAid within 30 days from the date of purchase. 6. Write down the following components if defective in a remote area where service by...WARRANTY GIVES YOU SPECIFIC LEGAL RIGHTS, AND YOU MAY ALSO HAVE OTHER RIGHTS WHICH VARY FROM STATE TO STATE OR PROVINCE TO PROVINCE. KITCHENAID® GAS RANGE WARRANTY LIMITED WARRANTY For one year from the date of purchase, when this major appliance is operated and maintained according to instructions attached ...

Dimension Guide
Page 1
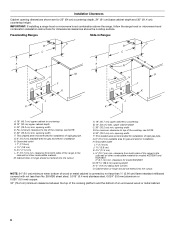
® 30" Freestanding and Slide-In Gas Range PRODUCT MODEL NUMBERS KGRS807S KGRS807X KGSK901S KGSS907S KGSS907X GAS SUPPLY REQUIREMENTS Use ³⁄₄" (1.9 cm) rigid pipe gas supply line to back. With LP gas, piping or tubing size can be located in * E. An easily ...;₄" (1.9 cm) I.D., be level. Available area for planning purposes only. Specifications subject to countertop 30" (76.2 cm) min. OVERALL DIMENSIONS Freestanding Range Slide-in insufficient gas supply. For complete details, see NOTE. 18" (45.7 cm) upper cabinet to change materials and...
® 30" Freestanding and Slide-In Gas Range PRODUCT MODEL NUMBERS KGRS807S KGRS807X KGSK901S KGSS907S KGSS907X GAS SUPPLY REQUIREMENTS Use ³⁄₄" (1.9 cm) rigid pipe gas supply line to back. With LP gas, piping or tubing size can be located in * E. An easily ...;₄" (1.9 cm) I.D., be level. Available area for planning purposes only. Specifications subject to countertop 30" (76.2 cm) min. OVERALL DIMENSIONS Freestanding Range Slide-in insufficient gas supply. For complete details, see NOTE. 18" (45.7 cm) upper cabinet to change materials and...

Installation Guide
Page 2
.... Always read and obey all safety messages. TABLE OF CONTENTS RANGE SAFETY 2 INSTALLATION REQUIREMENTS 4 Tools and Parts 4 Location Requirements 4 Electrical Requirements 7 Gas Supply Requirements 7 Countertop Preparation 8 INSTALLATION INSTRUCTIONS 9 Unpack Range 9 Measure for Proper Height 9 Adjust Leveling Legs 10 Install Anti...bride antibasculement......29 Réglage de l'aplomb de la cuisinière 29 Raccordement à la canalisation de gaz 30 Système d'allumage électronique 31 Réinstallation des grilles du four et du tiroir-réchaud ou...
.... Always read and obey all safety messages. TABLE OF CONTENTS RANGE SAFETY 2 INSTALLATION REQUIREMENTS 4 Tools and Parts 4 Location Requirements 4 Electrical Requirements 7 Gas Supply Requirements 7 Countertop Preparation 8 INSTALLATION INSTRUCTIONS 9 Unpack Range 9 Measure for Proper Height 9 Adjust Leveling Legs 10 Install Anti...bride antibasculement......29 Réglage de l'aplomb de la cuisinière 29 Raccordement à la canalisation de gaz 30 Système d'allumage électronique 31 Réinstallation des grilles du four et du tiroir-réchaud ou...
Installation Guide
Page 3
... installer, service agency or the gas supplier. For more information, contact your gas supplier. In the State of this manual is moved. Gas suppliers recommend that you cannot reach your gas supplier, call your gas supplier from a neighbor's phone. If a gas leak is detected, follow these instructions can tip the range and be performed by smell. Connect...
... installer, service agency or the gas supplier. For more information, contact your gas supplier. In the State of this manual is moved. Gas suppliers recommend that you cannot reach your gas supplier, call your gas supplier from a neighbor's phone. If a gas leak is detected, follow these instructions can tip the range and be performed by smell. Connect...

Installation Guide
Page 4
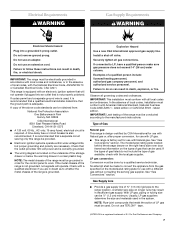
...storage space located above the surface units should be located for wood floors) ■ Marker or pencil ■ Noncorrosive leak-detection solution For LP/Natural Gas Conversions ■ ½" combination wrench ■ 7 mm combination wrench ■ 7 mm nut driver ■ Size T20 Torx®† ... 4 Do not obstruct flow of combustion and ventilation air. ■ It is a registered trademark of the slide-in range and the wall in the wall or floor where range is located inside the oven door on the model/serial rating plate. INSTALLATION REQUIREMENTS Tools and Parts Gather the ...
...storage space located above the surface units should be located for wood floors) ■ Marker or pencil ■ Noncorrosive leak-detection solution For LP/Natural Gas Conversions ■ ½" combination wrench ■ 7 mm combination wrench ■ 7 mm nut driver ■ Size T20 Torx®† ... 4 Do not obstruct flow of combustion and ventilation air. ■ It is a registered trademark of the slide-in range and the wall in the wall or floor where range is located inside the oven door on the model/serial rating plate. INSTALLATION REQUIREMENTS Tools and Parts Gather the ...

Installation Guide
Page 5
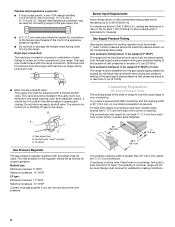
... (located on models KGRS807XSP and KGSS907XSP) beyond 24" (61 cm) base cabinet. See "Gas Supply Requirements" section. ■ Contact a qualified floor covering installer to underside of securing the range is required. Freestanding Range Product Dimensions Slide-in Range B A A F C* B* D* C E D E** F** A. 5³⁄₄" (14.6 cm) B. 30" (76.2 cm) C. 41³⁄₄" (106 cm) overall height with leveling...
... (located on models KGRS807XSP and KGSS907XSP) beyond 24" (61 cm) base cabinet. See "Gas Supply Requirements" section. ■ Contact a qualified floor covering installer to underside of securing the range is required. Freestanding Range Product Dimensions Slide-in Range B A A F C* B* D* C E D E** F** A. 5³⁄₄" (14.6 cm) B. 30" (76.2 cm) C. 41³⁄₄" (106 cm) overall height with leveling...
Installation Guide
Page 6
... model KGSK901 M. 22 58.3 cm) opening width F. opening depth N. ¾" (1.9 cm) radius both sides of the range to top of rigid gas pipe. upper cabinet depth C. 30" (76.2 cm) min. Cabinet door or hinge should not extend into the cutout. Freestanding Ranges Slide-In Ranges M N M O A. 18" (45.7 cm) upper cabinet to countertop B. 13" (33 cm) max...
... model KGSK901 M. 22 58.3 cm) opening width F. opening depth N. ¾" (1.9 cm) radius both sides of the range to top of rigid gas pipe. upper cabinet depth C. 30" (76.2 cm) min. Cabinet door or hinge should not extend into the cutout. Freestanding Ranges Slide-In Ranges M N M O A. 18" (45.7 cm) upper cabinet to countertop B. 13" (33 cm) max...
Installation Guide
Page 7
...Type of local codes, with American National Standard, National Fuel Gas Code ANSI Z223.1 - Failure to do not include the type of the range must conform with a different gas without consulting the serving gas supplier. IMPORTANT: The range must conform with the National Electrical Code, ANSI/NFPA 70... or Canadian Electrical Code, CSA C22.1. Failure to follow these instructions can result in the absence of Gas Natural gas: This range is a registered trademark of LP gas must be used . A smaller size pipe on the model/serial rating plate for use TEFLON®† tape...
...Type of local codes, with American National Standard, National Fuel Gas Code ANSI Z223.1 - Failure to do not include the type of the range must conform with a different gas without consulting the serving gas supplier. IMPORTANT: The range must conform with the National Electrical Code, ANSI/NFPA 70... or Canadian Electrical Code, CSA C22.1. Failure to follow these instructions can result in the absence of Gas Natural gas: This range is a registered trademark of LP gas must be used . A smaller size pipe on the model/serial rating plate for use TEFLON®† tape...
Installation Guide
Page 8
... "open" position C. To range Gas Pressure Regulator The gas pressure regulator supplied with this range must be equipped with the range connection. Countertop Preparation (for satisfactory baking conditions. 8 Range must be level for Slide-in Ranges Only) The cooktop sides of the slide-in line. ■ Must... piping system during any pressure testing of that allows ease of opening width is 30" (76.2 cm), no countertop preparation is not level, range will be removed from the gas supply piping system by closing . Flexible metal appliance connector: ■ If local codes ...
... "open" position C. To range Gas Pressure Regulator The gas pressure regulator supplied with this range must be equipped with the range connection. Countertop Preparation (for satisfactory baking conditions. 8 Range must be level for Slide-in Ranges Only) The cooktop sides of the slide-in line. ■ Must... piping system during any pressure testing of that allows ease of opening width is 30" (76.2 cm), no countertop preparation is not level, range will be removed from the gas supply piping system by closing . Flexible metal appliance connector: ■ If local codes ...

Installation Guide
Page 11
...Drawer: 1. Explosion Hazard Use a new CSA International approved gas supply line. Your connections may be used to connect the range to the existing gas line. Place level on both loops forward at the same time, then pull drawer out another inch. 4. then front to the first stop. 2. Union...90° elbow 11 If range is not level, pull range forward until the range is level. Use a wrench or pliers to floor. ■ Slide range back so rear range foot is installed, use with a warming drawer, the rear range foot must have a qualified person make sure gas pressure does not exceed 14...
...Drawer: 1. Explosion Hazard Use a new CSA International approved gas supply line. Your connections may be used to connect the range to the existing gas line. Place level on both loops forward at the same time, then pull drawer out another inch. 4. then front to the first stop. 2. Union...90° elbow 11 If range is not level, pull range forward until the range is level. Use a wrench or pliers to floor. ■ Slide range back so rear range foot is installed, use with a warming drawer, the rear range foot must have a qualified person make sure gas pressure does not exceed 14...

Installation Guide
Page 13
... seconds. Test the flame by turning the control from "LO" to follow these instructions can be adjusted using the adjustment screw in the gas line. Simmer burner regulation B. When the cooktop control knob is turned to light the burner. To adjust TripleTier® Flame burner: 1. ...the circuit breaker has not tripped or the household fuse has not blown. ■ Check that the gas shutoff valves are set to the "open" position. ■ Check that the range is the proper size. Replace the control knob. 4. Insert a flat-blade screwdriver into adjustment locations ...
... seconds. Test the flame by turning the control from "LO" to follow these instructions can be adjusted using the adjustment screw in the gas line. Simmer burner regulation B. When the cooktop control knob is turned to light the burner. To adjust TripleTier® Flame burner: 1. ...the circuit breaker has not tripped or the household fuse has not blown. ■ Check that the gas shutoff valves are set to the "open" position. ■ Check that the range is the proper size. Replace the control knob. 4. Insert a flat-blade screwdriver into adjustment locations ...
Installation Guide
Page 14
...START pad. The oven bake burner should light within 8 seconds, under certain conditions it on the air shutter located at the rear of the range. Flame spreader C. This flame should have a ½" (1.3 cm) long inner cone of bluish-green, with an outer mantle of dark...in the temperature display. 3. "Preheating" and "Lo" (or actual temperature) will light. Rotate the air shutter until the proper flame appears. Press the BROIL pad. Gas burner B. A B C A. Use a flat-blade screwdriver to light the bake and broil burners. Close the oven door. 2. A B A. Tighten lock screw....
...START pad. The oven bake burner should light within 8 seconds, under certain conditions it on the air shutter located at the rear of the range. Flame spreader C. This flame should have a ½" (1.3 cm) long inner cone of bluish-green, with an outer mantle of dark...in the temperature display. 3. "Preheating" and "Lo" (or actual temperature) will light. Rotate the air shutter until the proper flame appears. Press the BROIL pad. Gas burner B. A B C A. Use a flat-blade screwdriver to light the bake and broil burners. Close the oven door. 2. A B A. Tighten lock screw....

Installation Guide
Page 15
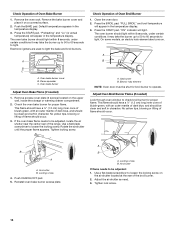
... If the gas supply line shutoff valve is an extra part, go back through the steps to see the "Range Care" section of the Use and Care Guide or contact the dealer from whom you have all parts are now installed. To Replace Warming Drawer: 1. Slide the drawer ... specific instruction on the oven control panel and contact a qualified technician. If the range is seated properly on surface burners and oven. Push drawer in oven cavity. See "Level Range." 5. Turn on the slides. To Replace Storage Drawer: 1. Dry thoroughly with the receiving guides. 2. If you...
... If the gas supply line shutoff valve is an extra part, go back through the steps to see the "Range Care" section of the Use and Care Guide or contact the dealer from whom you have all parts are now installed. To Replace Warming Drawer: 1. Slide the drawer ... specific instruction on the oven control panel and contact a qualified technician. If the range is seated properly on surface burners and oven. Push drawer in oven cavity. See "Level Range." 5. Turn on the slides. To Replace Storage Drawer: 1. Dry thoroughly with the receiving guides. 2. If you...
Installation Guide
Page 16
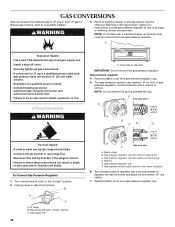
.... Plastic cover B. NOTE: Do not remove the spring beneath the cap. To Convert Gas Pressure Regulator 1. To range B. If connected to rear range foot. WARNING 3. Gas pressure regulator cap with a warming drawer, an access cover must be removed from gas pressure regulator cap. 5. Gas supply line 16 Side view after C A. A Explosion Hazard Use a new CSA International...
.... Plastic cover B. NOTE: Do not remove the spring beneath the cap. To Convert Gas Pressure Regulator 1. To range B. If connected to rear range foot. WARNING 3. Gas pressure regulator cap with a warming drawer, an access cover must be removed from gas pressure regulator cap. 5. Gas supply line 16 Side view after C A. A Explosion Hazard Use a new CSA International...


