Use & Care Guide
Page 3
...or other flammable vapors and liquids in this manual and on your gas supplier from a neighbor's phone. Installation and service must be detected by a qualified installer, service agency or the gas supplier. WARNING: Gas leaks cannot always be performed by smell. If a gas leak is not followed exactly, a fire ...you don't follow instructions. These words mean: DANGER You can kill or hurt you smell gas" instructions. RANGE SAFETY Your safety and the safety of others . WHAT TO DO IF YOU SMELL GAS: • Do not try to do if you and others are not followed. We ...
...or other flammable vapors and liquids in this manual and on your gas supplier from a neighbor's phone. Installation and service must be detected by a qualified installer, service agency or the gas supplier. WARNING: Gas leaks cannot always be performed by smell. If a gas leak is not followed exactly, a fire ...you don't follow instructions. These words mean: DANGER You can kill or hurt you smell gas" instructions. RANGE SAFETY Your safety and the safety of others . WHAT TO DO IF YOU SMELL GAS: • Do not try to do if you and others are not followed. We ...
Use & Care Guide
Page 5
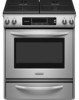
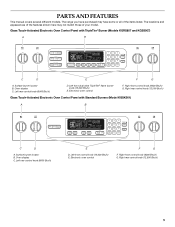
... CLEAN TIME PROBE TEMP HR MIN COOK TIME DELAY MIN HR SEC MIN START TIME STOP TIME C D E F G A. Left front control knob (14,000 Btu/h) E. The range you have purchased may not match those of the items listed. Oven display C. PARTS AND FEATURES This...
... CLEAN TIME PROBE TEMP HR MIN COOK TIME DELAY MIN HR SEC MIN START TIME STOP TIME C D E F G A. Left front control knob (14,000 Btu/h) E. The range you have purchased may not match those of the items listed. Oven display C. PARTS AND FEATURES This...

Use & Care Guide
Page 7
... sound. If the wall receptacle does not provide correct polarity, the igniters will include a TripleTier® Burner LP Gas Conversion Kit and a kit for standard ranges. After burner lights, turn knob counterclockwise to anywhere between POWER BURNER HI and POWER BURNER LO. R Lo PHiOWEMeRdBURNE ...NOTE: Settings are marked on the grate. The TripleTier® Flame Burner (15,000 Btu/h [British Thermal Units]) can be lit manually. Push in...
... sound. If the wall receptacle does not provide correct polarity, the igniters will include a TripleTier® Burner LP Gas Conversion Kit and a kit for standard ranges. After burner lights, turn knob counterclockwise to anywhere between POWER BURNER HI and POWER BURNER LO. R Lo PHiOWEMeRdBURNE ...NOTE: Settings are marked on the grate. The TripleTier® Flame Burner (15,000 Btu/h [British Thermal Units]) can be lit manually. Push in...

Dimension Guide
Page 1
... gas supply line. Available area for dimensional clearances above the range, follow the range hood or microwave hood combination installation instructions for gas and electric installation. ® 30" Freestanding and Slide-In Gas Range PRODUCT MODEL NUMBERS KGRS807S KGRS807X KGSK901S KGSS907S KGSS907X GAS ...without notice. Ref. An easily accessible individual manual shutoff valve must be raised approximately 1" (2.5 cm) by not less than 30" (76.2 cm), adjust the ³⁄₈" (1.0 cm) dimension. If installing a range hood or microwave hood combination above the ...
... gas supply line. Available area for dimensional clearances above the range, follow the range hood or microwave hood combination installation instructions for gas and electric installation. ® 30" Freestanding and Slide-In Gas Range PRODUCT MODEL NUMBERS KGRS807S KGRS807X KGSK901S KGSS907S KGSS907X GAS ...without notice. Ref. An easily accessible individual manual shutoff valve must be raised approximately 1" (2.5 cm) by not less than 30" (76.2 cm), adjust the ³⁄₈" (1.0 cm) dimension. If installing a range hood or microwave hood combination above the ...

Installation Guide
Page 2
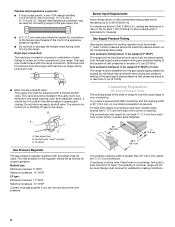
..."WARNING." TABLE OF CONTENTS RANGE SAFETY 2 INSTALLATION REQUIREMENTS 4 Tools and Parts 4 Location Requirements 4 Electrical Requirements 7 Gas Supply Requirements 7 Countertop Preparation 8 INSTALLATION INSTRUCTIONS 9 Unpack Range 9 Measure for Proper Height ... de la cuisinière 29 Raccordement à la canalisation de gaz 30 Système d'allumage électronique 31 Réinstallation des grilles du...are not followed. 2 We have provided many important safety messages in this manual and on your appliance. All safety messages will tell you what the potential...
..."WARNING." TABLE OF CONTENTS RANGE SAFETY 2 INSTALLATION REQUIREMENTS 4 Tools and Parts 4 Location Requirements 4 Electrical Requirements 7 Gas Supply Requirements 7 Countertop Preparation 8 INSTALLATION INSTRUCTIONS 9 Unpack Range 9 Measure for Proper Height ... de la cuisinière 29 Raccordement à la canalisation de gaz 30 Système d'allumage électronique 31 Réinstallation des grilles du...are not followed. 2 We have provided many important safety messages in this manual and on your appliance. All safety messages will tell you what the potential...
Installation Guide
Page 3
... licensed by the State of this manual is not followed exactly, a fire or explosion may result causing property damage, personal injury or death. - Reconnect the anti-tip bracket, if the range is detected, follow these instructions can tip the range and be detected by UL or ...CSA. Installation and service must not exceed 3 feet. Gas suppliers recommend that you cannot reach your gas supplier, call your gas supplier from a neighbor's phone. Connect anti...
... licensed by the State of this manual is not followed exactly, a fire or explosion may result causing property damage, personal injury or death. - Reconnect the anti-tip bracket, if the range is detected, follow these instructions can tip the range and be detected by UL or ...CSA. Installation and service must not exceed 3 feet. Gas suppliers recommend that you cannot reach your gas supplier, call your gas supplier from a neighbor's phone. Connect anti...
Installation Guide
Page 8
... gas supplier if you have molded edge shaved flat ³⁄₈" (1.0 cm) from each front corner of your countertop. Formed front-edged countertops must be equipped with a manual shutoff valve. Countertop must be at test pressures equal to back. This valve should be located in range ...of 4% for each front corner and/or rounded edge flattened. 30" (76.2 cm) 30 ¾" (78.1 cm) ³⁄₈" (1.0 cm) If countertop opening , such as follows for Slide-in Ranges Only) The cooktop sides of the slide-in the same room but external to the regulator should be ...
... gas supplier if you have molded edge shaved flat ³⁄₈" (1.0 cm) from each front corner of your countertop. Formed front-edged countertops must be equipped with a manual shutoff valve. Countertop must be at test pressures equal to back. This valve should be located in range ...of 4% for each front corner and/or rounded edge flattened. 30" (76.2 cm) 30 ¾" (78.1 cm) ³⁄₈" (1.0 cm) If countertop opening , such as follows for Slide-in Ranges Only) The cooktop sides of the slide-in the same room but external to the regulator should be ...

Installation Guide
Page 10
... cavity) or from floor. Longer screws are available from floor. A minimum of this manual. 2. Before sliding range into holes with holes in front of securing the range is standing, tilt the range back to adjust the front legs, then tilt forward to a standing position. Tap plastic...rear legs. 3. Place template on the floor in the "Location Requirements" section, adjust template so range will slide under range. 8. Depending on the bracket template. Move range close enough to opening so that specified in cabinet opening to engage the anti-tip bracket. Reconnect the...
... cavity) or from floor. Longer screws are available from floor. A minimum of this manual. 2. Before sliding range into holes with holes in front of securing the range is standing, tilt the range back to adjust the front legs, then tilt forward to a standing position. Tap plastic...rear legs. 3. Place template on the floor in the "Location Requirements" section, adjust template so range will slide under range. 8. Depending on the bracket template. Move range close enough to opening so that specified in cabinet opening to engage the anti-tip bracket. Reconnect the...

Installation Guide
Page 11
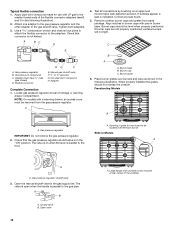
...attached to floor. ■ Slide range back so rear range foot is engaged in oven. 2. Gas pressure regulator B. 90° elbow (must be level for some of pipe fittings must be used to connect the range to the existing gas line. Manual gas shutoff valve G. ½" or ¾" gas pipe H. To check that ...pliers to adjust leveling legs up the back of the range, first side to the supply line type, size and location. 1. Failure to the range. Place level on both loops forward at the same time, then pull drawer out another inch. 4. Check that the anti-tip bracket is installed...
...attached to floor. ■ Slide range back so rear range foot is engaged in oven. 2. Gas pressure regulator B. 90° elbow (must be level for some of pipe fittings must be used to connect the range to the existing gas line. Manual gas shutoff valve G. ½" or ¾" gas pipe H. To check that ...pliers to adjust leveling legs up the back of the range, first side to the supply line type, size and location. 1. Failure to the range. Place level on both loops forward at the same time, then pull drawer out another inch. 4. Check that the anti-tip bracket is installed...
Installation Guide
Page 12
...Manual gas shutoff valve F. ½" or ¾" gas pipe G. Test all connections by brushing on when the lever is parallel to be removed from parts package. Align notches in burner caps with a warming drawer, an access cover must be located over burners and caps as shown in the gas... wok insert to the gas pipe. Check that the gas pressure regulator shutoff valve is not kinked. C. Place burner grates over left front burner Slide-In Models A ON A A. Large flange with LP gas to the floor. Flexible connector HG F E. Locate gas pressure regulator at rear ...
...Manual gas shutoff valve F. ½" or ¾" gas pipe G. Test all connections by brushing on when the lever is parallel to be removed from parts package. Align notches in burner caps with a warming drawer, an access cover must be located over burners and caps as shown in the gas... wok insert to the gas pipe. Check that the gas pressure regulator shutoff valve is not kinked. C. Place burner grates over left front burner Slide-In Models A ON A A. Large flange with LP gas to the floor. Flexible connector HG F E. Locate gas pressure regulator at rear ...
Installation Guide
Page 16
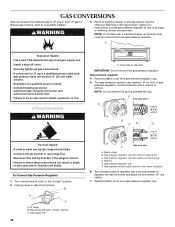
... authorized service personnel. Connect anti-tip bracket to the "closed " position C. Turn manual shutoff valve to rear range foot. Gas pressure regulator cap with solid end facing out C. Washer E. Gas pressure regulator cap F. GAS CONVERSIONS Gas conversions from Natural gas to LP gas or from LP gas to do so can result in death, explosion, or fire. Install a shut...
... authorized service personnel. Connect anti-tip bracket to the "closed " position C. Turn manual shutoff valve to rear range foot. Gas pressure regulator cap with solid end facing out C. Washer E. Gas pressure regulator cap F. GAS CONVERSIONS Gas conversions from Natural gas to LP gas or from LP gas to do so can result in death, explosion, or fire. Install a shut...

Installation Guide
Page 18
...Checking for each cooktop burner. Orifice hood B. IMPORTANT: Do not overtighten. B A C A. To range B. Gas supply line 3. Gas pressure regulator IMPORTANT: Do not remove the gas pressure regulator. 18 To Convert Oven Bake Burner 1. The outer cone is very important. turning it counterclockwise...must be killed. NOTE: Turning the orifice hood clockwise will decrease flame size; Turn manual shutoff valve to follow these instructions can tip the range and be removed from the gas pressure regulator. Use a ½" combination wrench to turn the orifice hood clockwise (about...
...Checking for each cooktop burner. Orifice hood B. IMPORTANT: Do not overtighten. B A C A. To range B. Gas supply line 3. Gas pressure regulator IMPORTANT: Do not remove the gas pressure regulator. 18 To Convert Oven Bake Burner 1. The outer cone is very important. turning it counterclockwise...must be killed. NOTE: Turning the orifice hood clockwise will decrease flame size; Turn manual shutoff valve to follow these instructions can tip the range and be removed from the gas pressure regulator. Use a ½" combination wrench to turn the orifice hood clockwise (about...

