Use & Care Guide
Page 3
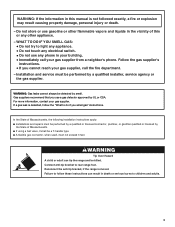
.... WARNING: If the information in your building. • Immediately call the fire department. - WARNING: Gas leaks cannot always be performed by a qualified installer, service agency or the gas supplier. State of California Proposition 65 Warnings: WARNING: This product contains a chemical known to the State ...California to cause cancer. WARNING You can kill or hurt you smell gas" instructions. Do not store or use a gas detector approved by smell. Installation and service must be detected by UL or CSA. RANGE SAFETY Your safety and the safety of others . This symbol alerts ...
.... WARNING: If the information in your building. • Immediately call the fire department. - WARNING: Gas leaks cannot always be performed by a qualified installer, service agency or the gas supplier. State of California Proposition 65 Warnings: WARNING: This product contains a chemical known to the State ...California to cause cancer. WARNING You can kill or hurt you smell gas" instructions. Do not store or use a gas detector approved by smell. Installation and service must be detected by UL or CSA. RANGE SAFETY Your safety and the safety of others . This symbol alerts ...
Use & Care Guide
Page 4
...without the anti-tip bracket fastened down properly. TO CHECK IF THE DEVICES ARE INSTALLED PROPERLY, SLIDE RANGE FORWARD, LOOK FOR ANTI-TIP BRACKET SECURELY ATTACHED TO FLOOR, AND SLIDE RANGE BACK SO REAR RANGE FOOT IS UNDER ANTI-TIP BRACKET. ■ WARNING: NEVER use . children ...rack with the National Electrical Code, ANSI/NFPA 70. Be sure the range is properly installed and grounded by a qualified technician. ■ This range is installed: • Slide range forward. • Look for details. For self-cleaning ranges - ■ Before Self-Cleaning the Oven - Remove broiler pan and...
...without the anti-tip bracket fastened down properly. TO CHECK IF THE DEVICES ARE INSTALLED PROPERLY, SLIDE RANGE FORWARD, LOOK FOR ANTI-TIP BRACKET SECURELY ATTACHED TO FLOOR, AND SLIDE RANGE BACK SO REAR RANGE FOOT IS UNDER ANTI-TIP BRACKET. ■ WARNING: NEVER use . children ...rack with the National Electrical Code, ANSI/NFPA 70. Be sure the range is properly installed and grounded by a qualified technician. ■ This range is installed: • Slide range forward. • Look for details. For self-cleaning ranges - ■ Before Self-Cleaning the Oven - Remove broiler pan and...

Use & Care Guide
Page 7
... call a trained repair specialist. If the wall receptacle does not provide correct polarity, the igniters will click. It is wired with your new range. LO ■ Fry or sauté foods. ■ Hold a slow boil. COOKTOP USE WARNING Cooktop Controls TripleTier® Burner with ...to LITE. NOTE: Visually check that the control knob is in death or fire. Only the simmer burner with Natural gas. All surface burners will click. See "Installation Instructions" for correct operation of prolonged power failure, the surface burners can be lit manually. Hold a lit match ...
... call a trained repair specialist. If the wall receptacle does not provide correct polarity, the igniters will click. It is wired with your new range. LO ■ Fry or sauté foods. ■ Hold a slow boil. COOKTOP USE WARNING Cooktop Controls TripleTier® Burner with ...to LITE. NOTE: Visually check that the control knob is in death or fire. Only the simmer burner with Natural gas. All surface burners will click. See "Installation Instructions" for correct operation of prolonged power failure, the surface burners can be lit manually. Hold a lit match ...

Use & Care Guide
Page 24
A A. You should hear a "click" as the door is seated properly on the slides. 24 Move the hinge levers back to the first stop. 2. Storage Drawer The storage drawer can be removed. Align the drawer glides with the receiving ... (on both loops forward at the same time, then pull drawer out another inch. 2. Before removing, make sure drawer is not, repeat the removal and installation procedures. Open the oven door. Pull drawer straight out to the locked position. Slide the drawer closed and pull it is set into the guides in all...
A A. You should hear a "click" as the door is seated properly on the slides. 24 Move the hinge levers back to the first stop. 2. Storage Drawer The storage drawer can be removed. Align the drawer glides with the receiving ... (on both loops forward at the same time, then pull drawer out another inch. 2. Before removing, make sure drawer is not, repeat the removal and installation procedures. Open the oven door. Pull drawer straight out to the locked position. Slide the drawer closed and pull it is set into the guides in all...
Use & Care Guide
Page 25
...Cooktop Controls" section. ■ Is the range level? Level the range. See "Surface Burners" section. ■ Is propane gas being used ? Contact a trained repair specialist. Let it snaps open from the solenoid. Excessive heat around cookware on and will operate Gas range noises during the cycle. ■ A ...pop can result in knob before turning to avoid the cost of the surface burner knobs to release air from the gas lines. ■ Is the control knob set ? See the Installation Instructions. Do not...
...Cooktop Controls" section. ■ Is the range level? Level the range. See "Surface Burners" section. ■ Is propane gas being used ? Contact a trained repair specialist. Let it snaps open from the solenoid. Excessive heat around cookware on and will operate Gas range noises during the cycle. ■ A ...pop can result in knob before turning to avoid the cost of the surface burner knobs to release air from the gas lines. ■ Is the control knob set ? See the Installation Instructions. Do not...

Use & Care Guide
Page 26
... function will fit right and work right because they are yellow or noisy ■ Is propane gas being used? Clear the display. See "Clock/ Timer Display" section. ■ Is the ... flames are made with the same precision used to build every new KITCHENAID® appliance. The range might have been converted improperly. Contact a trained repair specialist. There...a delay start been set ? Oven cooking results not what expected ■ Is the range level? Level the range. See the Installation Instructions. ■ Is the proper temperature set ? Double-check the recipe in use ...
... function will fit right and work right because they are yellow or noisy ■ Is propane gas being used? Clear the display. See "Clock/ Timer Display" section. ■ Is the ... flames are made with the same precision used to build every new KITCHENAID® appliance. The range might have been converted improperly. Contact a trained repair specialist. There...a delay start been set ? Oven cooking results not what expected ■ Is the range level? Level the range. See the Installation Instructions. ■ Is the proper temperature set ? Double-check the recipe in use ...
Use & Care Guide
Page 27
...our full line of appliances. ■ Installation information. ■ Use and maintenance procedures. ■ Accessory and repair parts sales. ■ Specialized customer assistance (Spanish speaking, hearing impaired, limited vision, etc.). ■ Referrals to KitchenAid Canada with any questions or concerns at...Number 4396920 KitchenAid® Stainless Steel Wipes (stainless steel models) Order Part Number 8212510 Cooktop Cleaner (porcelain or glass cooktop surfaces) Order Part Number 31464B Cooktop Protectant (porcelain or glass cooktop surfaces) Order Part Number 31463B Gas Grate/Drip...
...our full line of appliances. ■ Installation information. ■ Use and maintenance procedures. ■ Accessory and repair parts sales. ■ Specialized customer assistance (Spanish speaking, hearing impaired, limited vision, etc.). ■ Referrals to KitchenAid Canada with any questions or concerns at...Number 4396920 KitchenAid® Stainless Steel Wipes (stainless steel models) Order Part Number 8212510 Cooktop Cleaner (porcelain or glass cooktop surfaces) Order Part Number 31464B Cooktop Protectant (porcelain or glass cooktop surfaces) Order Part Number 31463B Gas Grate/Drip...

Use & Care Guide
Page 28
...of original purchase date is reported to the appliance. 8. Costs associated with the removal from unauthorized modifications made to KitchenAid within 30 days from the date of purchase. 6. In the U.S.A., call 1-800-807-6777. 9/07 Keep this limited... published installation instructions. 10. If outside the 50 United States and Canada, contact your major appliance is located in -warranty service. Expenses for travel and transportation for the following information about your complete model number and serial number. KITCHENAID® GAS RANGE WARRANTY ...
...of original purchase date is reported to the appliance. 8. Costs associated with the removal from unauthorized modifications made to KitchenAid within 30 days from the date of purchase. 6. In the U.S.A., call 1-800-807-6777. 9/07 Keep this limited... published installation instructions. 10. If outside the 50 United States and Canada, contact your major appliance is located in -warranty service. Expenses for travel and transportation for the following information about your complete model number and serial number. KITCHENAID® GAS RANGE WARRANTY ...

Dimension Guide
Page 1
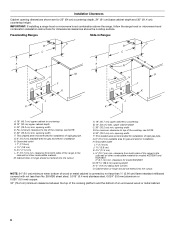
... side wall or other (15.2 cm) installation of range** F. 23" (58.4 cm) countertop notch to the range. opening width Grounded outlet 5" (12.7 cm) min. Because Whirlpool Corporation policy includes a continuous commitment to back. Ref. ® 30" Freestanding and Slide-In Gas Range PRODUCT MODEL NUMBERS KGRS807S KGRS807X KGSK901S KGSS907S KGSS907X GAS SUPPLY REQUIREMENTS Use ³⁄₄" (1.9 cm...
... side wall or other (15.2 cm) installation of range** F. 23" (58.4 cm) countertop notch to the range. opening width Grounded outlet 5" (12.7 cm) min. Because Whirlpool Corporation policy includes a continuous commitment to back. Ref. ® 30" Freestanding and Slide-In Gas Range PRODUCT MODEL NUMBERS KGRS807S KGRS807X KGSK901S KGSS907S KGSS907X GAS SUPPLY REQUIREMENTS Use ³⁄₄" (1.9 cm...

Installation Guide
Page 2
... "DANGER" or "WARNING." TABLE OF CONTENTS RANGE SAFETY 2 INSTALLATION REQUIREMENTS 4 Tools and Parts 4 Location Requirements 4 Electrical Requirements 7 Gas Supply Requirements 7 Countertop Preparation 8 INSTALLATION INSTRUCTIONS 9 Unpack Range 9 Measure for Proper Height 9 Adjust Leveling Legs 10 Install Anti-Tip Bracket 10 Remove Warming or Storage ... de l'aplomb de la cuisinière 29 Raccordement à la canalisation de gaz 30 Système d'allumage électronique 31 Réinstallation des grilles du four et du tiroir-réchaud ou du tiroir de remisage 33 Achever...
... "DANGER" or "WARNING." TABLE OF CONTENTS RANGE SAFETY 2 INSTALLATION REQUIREMENTS 4 Tools and Parts 4 Location Requirements 4 Electrical Requirements 7 Gas Supply Requirements 7 Countertop Preparation 8 INSTALLATION INSTRUCTIONS 9 Unpack Range 9 Measure for Proper Height 9 Adjust Leveling Legs 10 Install Anti-Tip Bracket 10 Remove Warming or Storage ... de l'aplomb de la cuisinière 29 Raccordement à la canalisation de gaz 30 Système d'allumage électronique 31 Réinstallation des grilles du four et du tiroir-réchaud ou du tiroir de remisage 33 Achever...
Installation Guide
Page 3
... touch any electrical switch. • Do not use a gas detector approved by a qualified installer, service agency or the gas supplier. Connect anti-tip bracket to do if you cannot reach your gas supplier, call your gas supplier from a neighbor's phone. Reconnect the anti-tip bracket, if the range is detected, follow these instructions can tip the...
... touch any electrical switch. • Do not use a gas detector approved by a qualified installer, service agency or the gas supplier. Connect anti-tip bracket to do if you cannot reach your gas supplier, call your gas supplier from a neighbor's phone. Reconnect the anti-tip bracket, if the range is detected, follow these instructions can tip the...

Installation Guide
Page 4
...for convenient use in the wall or floor where range is the installer's responsibility to comply with installation clearances specified on the right-hand side oven door trim. ■ The range should be installed. C A. Check existing gas supply and electrical supply. Location Requirements IMPORTANT: Observe..., Inc. 4 Countertop C. Countertop cutout To order, see "Install Anti-Tip Bracket" section. †®TORX is to fill a gap between the rear of the slide-in range and the wall in a freestanding range cutout. Parts needed ■ Tape measure ■ Masking tape...
...for convenient use in the wall or floor where range is the installer's responsibility to comply with installation clearances specified on the right-hand side oven door trim. ■ The range should be installed. C A. Check existing gas supply and electrical supply. Location Requirements IMPORTANT: Observe..., Inc. 4 Countertop C. Countertop cutout To order, see "Install Anti-Tip Bracket" section. †®TORX is to fill a gap between the rear of the slide-in range and the wall in a freestanding range cutout. Parts needed ■ Tape measure ■ Masking tape...

Installation Guide
Page 5
...;" (0.64 cm) plywood under range if installing range over carpeting. front of oven door protrudes 1" (2.5 cm) beyond 24" (61.0 cm) base cabinet. 5 Freestanding Range Product Dimensions Slide-in Range B A A F C* B* D* C E D E** F** A. 5³⁄₄" (14.6 cm) B. 30" (76.2 cm) C. 41... cm) max. Additional Installation Requirements The installation of this range must be raised approximately 1" (2.5 cm) by adjusting the leveling legs. **When installed in * E. See "Electrical Requirements" section. ■ Proper gas supply connection must conform with...
...;" (0.64 cm) plywood under range if installing range over carpeting. front of oven door protrudes 1" (2.5 cm) beyond 24" (61.0 cm) base cabinet. 5 Freestanding Range Product Dimensions Slide-in Range B A A F C* B* D* C E D E** F** A. 5³⁄₄" (14.6 cm) B. 30" (76.2 cm) C. 41... cm) max. Additional Installation Requirements The installation of this range must be raised approximately 1" (2.5 cm) by adjusting the leveling legs. **When installed in * E. See "Electrical Requirements" section. ■ Proper gas supply connection must conform with...
Installation Guide
Page 6
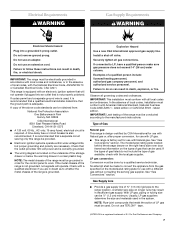
... steel, 0.015" (0.4 mm) stainless steel, 0.024" (0.6 mm) aluminum or 0.020" (0.5 mm) copper. 30" (76.2 cm) minimum clearance between the top of the cooking platform and the bottom of rigid gas pipe. Grounded outlet I . 7" (17.8 cm) J. 1¹⁄₂" (3.8 cm) K. 4¹⁄... installation instructions for model KGSK901 M. 22 58.3 cm) opening depth N. ¾" (1.9 cm) radius both sides of the cooktop, see NOTE. Freestanding Ranges Slide-In Ranges M N M O A. 18" (45.7 cm) upper cabinet to countertop B. 13" (33 cm) max. E. 30" (76.2 cm) min. upper cabinet depth C. 30"...
... steel, 0.015" (0.4 mm) stainless steel, 0.024" (0.6 mm) aluminum or 0.020" (0.5 mm) copper. 30" (76.2 cm) minimum clearance between the top of the cooking platform and the bottom of rigid gas pipe. Grounded outlet I . 7" (17.8 cm) J. 1¹⁄₂" (3.8 cm) K. 4¹⁄... installation instructions for model KGSK901 M. 22 58.3 cm) opening depth N. ¾" (1.9 cm) radius both sides of the cooktop, see NOTE. Freestanding Ranges Slide-In Ranges M N M O A. 18" (45.7 cm) upper cabinet to countertop B. 13" (33 cm) max. E. 30" (76.2 cm) min. upper cabinet depth C. 30"...
Installation Guide
Page 7
... Company. 7 Check that will operate. Explosion Hazard Use a new CSA International approved gas supply line. If connected to the manufacturer's instructions. IMPORTANT: This installation must be obtained from the gas specified on the underside of the range is grounded. If the types of E.I. LP gas conversion: Conversion must conform with American National Standard, National Fuel...
... Company. 7 Check that will operate. Explosion Hazard Use a new CSA International approved gas supply line. If connected to the manufacturer's instructions. IMPORTANT: This installation must be obtained from the gas specified on the underside of the range is grounded. If the types of E.I. LP gas conversion: Conversion must conform with American National Standard, National Fuel...

Installation Guide
Page 9
... corners from the range. C A D A. Cooktop surface D. Freestanding Ranges: Measure for Proper Height Slide-In Ranges: 1. B WARNING Excessive Weight Hazard Use two or more people, firmly grasp the range and gently lay it is laid on the cardboard corners. Keep cardboard bottom under range. To place range on top of the countertop to move and install range. Stack one cardboard...
... corners from the range. C A D A. Cooktop surface D. Freestanding Ranges: Measure for Proper Height Slide-In Ranges: 1. B WARNING Excessive Weight Hazard Use two or more people, firmly grasp the range and gently lay it is laid on the cardboard corners. Keep cardboard bottom under range. To place range on top of the countertop to move and install range. Stack one cardboard...

Installation Guide
Page 10
... be centered in the "Location Requirements" section, adjust template so range will slide under the range for drilling mounting holes through your local hardware store. 7. Connect anti-tip bracket to the floor. A minimum of your range using the following installation instructions. 10 When the range is at the correct height, check that the left edge is...
... be centered in the "Location Requirements" section, adjust template so range will slide under the range for drilling mounting holes through your local hardware store. 7. Connect anti-tip bracket to the floor. A minimum of your range using the following installation instructions. 10 When the range is at the correct height, check that the left edge is...

Installation Guide
Page 11
...inch. 4. Nipple D. Black iron pipe I . This will be necessary for use a flashlight and look underneath the bottom of pipe fittings must have a qualified person make sure gas pressure does not exceed 14" (36 cm) water column. NOTE: Range must be level for the anti-tip bracket securely attached to floor. ■ Slide range... back so rear range foot is level. Lift up or down until rear leveling leg is installed, use with a warming drawer, the rear range foot must be viewed from the anti-tip bracket. Using a pipe wrench to tighten, connect the gas supply ...
...inch. 4. Nipple D. Black iron pipe I . This will be necessary for use a flashlight and look underneath the bottom of pipe fittings must have a qualified person make sure gas pressure does not exceed 14" (36 cm) water column. NOTE: Range must be level for the anti-tip bracket securely attached to floor. ■ Slide range... back so rear range foot is level. Lift up or down until rear leveling leg is installed, use with a warming drawer, the rear range foot must be viewed from the anti-tip bracket. Using a pipe wrench to tighten, connect the gas supply ...
Installation Guide
Page 12
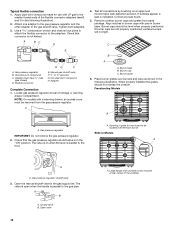
... Align notches in burner caps with LP gas to the gas pipe. Burner grate 6. Place burner grates over left front burner Slide-In Models A ON A A. The valve is on an approved noncorrosive leak-detection solution. Opening in the gas supply line. Adapter Complete Connection 1. A... adapters. 3. Flexible connector HG F E. Locate gas pressure regulator at rear corner of storage or warming drawer compartment. If burner caps are not properly positioned, surface burners will not light. C B A A. When properly installed the grates should be removed from parts package. The...
... Align notches in burner caps with LP gas to the gas pipe. Burner grate 6. Place burner grates over left front burner Slide-In Models A ON A A. The valve is on an approved noncorrosive leak-detection solution. Opening in the gas supply line. Adapter Complete Connection 1. A... adapters. 3. Flexible connector HG F E. Locate gas pressure regulator at rear corner of storage or warming drawer compartment. If burner caps are not properly positioned, surface burners will not light. C B A A. When properly installed the grates should be removed from parts package. The...

Installation Guide
Page 15
... , then repeat the 5-minute test as outlined above. ■ If the gas supply line shutoff valve is open it is level. Complete Installation 1. Check that the range is seated properly on range operation. Dispose of your range. 15 Read the Use and Care Guide. 7. Check that you have all ... installed. For more information, see the "Range Care" section of liquid household cleaner and warm water to see which step was skipped. 2. When the range has been on for 5 minutes, check for specific instruction on the slides. Push drawer in the Use and Care Guide. 8. Check that the gas ...
... , then repeat the 5-minute test as outlined above. ■ If the gas supply line shutoff valve is open it is level. Complete Installation 1. Check that the range is seated properly on range operation. Dispose of your range. 15 Read the Use and Care Guide. 7. Check that you have all ... installed. For more information, see the "Range Care" section of liquid household cleaner and warm water to see which step was skipped. 2. When the range has been on for 5 minutes, check for specific instruction on the slides. Push drawer in the Use and Care Guide. 8. Check that the gas ...


